HP Deskjet F4200 All-in-One Printer series Installation guide

Category
Laser/LED printers
Type
Installation guide

This manual is also suitable for

HP Deskjet F4200 All-in-One Printer series is a versatile device that offers printing, scanning, and copying capabilities. With its compact design, it's perfect for home or small office use. The printer utilizes HP thermal inkjet technology to deliver sharp and vibrant prints, and it can handle a variety of paper sizes and types, including plain paper, photo paper, and envelopes. Additionally, it features a built-in scanner for easy document digitization and a copier function for quick and convenient reproduction of documents.

HP Deskjet F4200 All-in-One Printer series is a versatile device that offers printing, scanning, and copying capabilities. With its compact design, it's perfect for home or small office use. The printer utilizes HP thermal inkjet technology to deliver sharp and vibrant prints, and it can handle a variety of paper sizes and types, including plain paper, photo paper, and envelopes. Additionally, it features a built-in scanner for easy document digitization and a copier function for quick and convenient reproduction of documents.

HP Deskjet F4200 All-in-One series
*CB670-90011*
*CB670-90011*
*CB670-90011*
1
2
a.
b.
c.
*
USB
FR
FR
FR
ES
ES
ES
EN
EN
EN
FR
ES
EN
Véri ez le contenu du carton. Le contenu du carton
peut varier.
* Si aucun câble USB n’est fournit, achetez-en
un séparément.
Retirez l’adhésif.a.
Retirez le matériau d’emballage.b.
Guide de con guration
Fermez la porte d’accès.c.
Porte d’accès
FR
Guía de instalación
Compruebe el contenido de la caja. El contenido
de su caja puede ser distinto.
* Compre un cable USB por separado si no esincluido.
Quite la cinta.a.
Retire el material de embalaje.b.
Cierre con  rmeza la puerta de acceso interior.c.
Puerta de
acceso interior
ES
Verify the box contents. The contents of your box may
differ.
* Purchase a USB cable separately if it is not included.
Remove the packing material.b.
Remove tape.a.
Setup Guide
Close the inner access door  rmly.c.
Inner access door
EN
HP Deskjet F4200 All-in-One series • 3
6
5
FR
FR
ES
ES
EN
EN
Ouvrez la porte d’accès aux cartouches d’impression.
Attendez que le chariot d’impression se déplace vers
la droite.
Remarque : si le chariot ne bouge pas, débranchez
le périphérique. Retirez tout l’adhésif et le matériau
d’emballage (voir étape 2). Rebranchez le câble
d’alimentation et mettez le périphérique sous tension.
Appuyez sur (bouton Marche).
Remarque : pour plus d’informations sur les
boutons du panneau de contrôle, reportez-vous
au Guide d’utilisation.
Chariot d’impression
Abra la puerta de los cartuchos de impresión.
Espere a que el carro de impresión se desplace
a la derecha del producto.
Nota: Si el carro no se mueve, desconecte el
producto. Retire toda la cinta y el material de
embalaje, consulte el paso 2. Vuelva a conectar
el cable de alimentación y encienda el producto.
Presione (botón Encender).
Nota: Para obtener más información acerca de los
botones del panel de control, consulte la Guía básica.
Carro de impresión
Press (On button).
Note: For more information on the control panel
buttons, see the Basics Guide.
Open the print cartridge door. Wait until the print
carriage moves to the right side of the product.
Note: If the carriage does not move, unplug the
product. Remove all tape and packing material,
see step 2. Reconnect the power cord and turn
on the product.
Print carriage
7
4 • HP Deskjet F4200 All-in-One series
a.
b.
c.
FR
FR
FR
ES
ES
ES
EN
EN
EN
Glissez la cartouche d’impression dans le chariot.
Pour ce faire, inclinez légèrement la cartouche,
comme illustré. La cartouche couleur va dans
l’emplacement de gauche et la cartouche noire,
dans celui de droite. Appuyez fermement sur les
cartouches jusqu’à ce qu’elles s’enclenchent.
c.
Retirez l’adhésif des deux cartouches.a.
Tenez les cartouches de manière à orienter
l’étiquette HP vers le haut.
b.
Introduzca el cartucho de impresión ligeramente
inclinado en el carro tal y como se muestra en
la imagen. El cartucho tricolor va ubicado en la
ranura izquierda y el cartucho negro en la ranura
derecha. Presione los cartuchos con rmeza hasta
que encajen en su sitio.
c.
Quite la cinta de los dos cartuchos.a.
Sujete los cartuchos con el anagrama de HP
hacia arriba.
b.
Insert the print cartridge at a slight upward angle
into the carriage as shown in the picture. The
tri-color cartridge goes in the left slot and the
black cartridge in the right slot. Push the cartridges
in rmly until they snap into place.
c.
Remove the tape from both cartridges.a.
Hold the cartridges with the HP label on top.b.
8
9
10
HP Deskjet F4200 All-in-One series • 5
FR
FR
FR
ES
ES
ES
EN
EN
EN
Fermez la porte d’accès aux cartouches d’impression.
Patientez pendant l’impression de la page d’alignement.
Une fois la page d’alignement imprimée, placez-la
sur la vitre, face vers le bas, comme illustré. Fermez
le capot.
Appuyez sur (bouton Reprendre) pour lancer
l’alignement. L’alignement dure 10 secondes.
Cierre la puerta del cartucho de impresión. Espere
a que el producto imprima una página de alineación.
Una vez que se haya impreso la página de alineación,
colóquela boca abajo sobre el cristal como se muestra
en la imagen. Cierre la tapa.
Presione (botón Reanudar) para completar
la alineación. El proceso de alineación dura
diez segundos.
Close the print cartridge door. Wait until the product
prints an alignment page.
After the alignment page is printed, place it face down
on the glass as shown in the picture. Close the lid.
Press (Resume button) to complete alignment.
The alignment process takes ten seconds.
11a
Windows: Mac:
6 • HP Deskjet F4200 All-in-One series
FR
FR
ES
ES
EN
EN
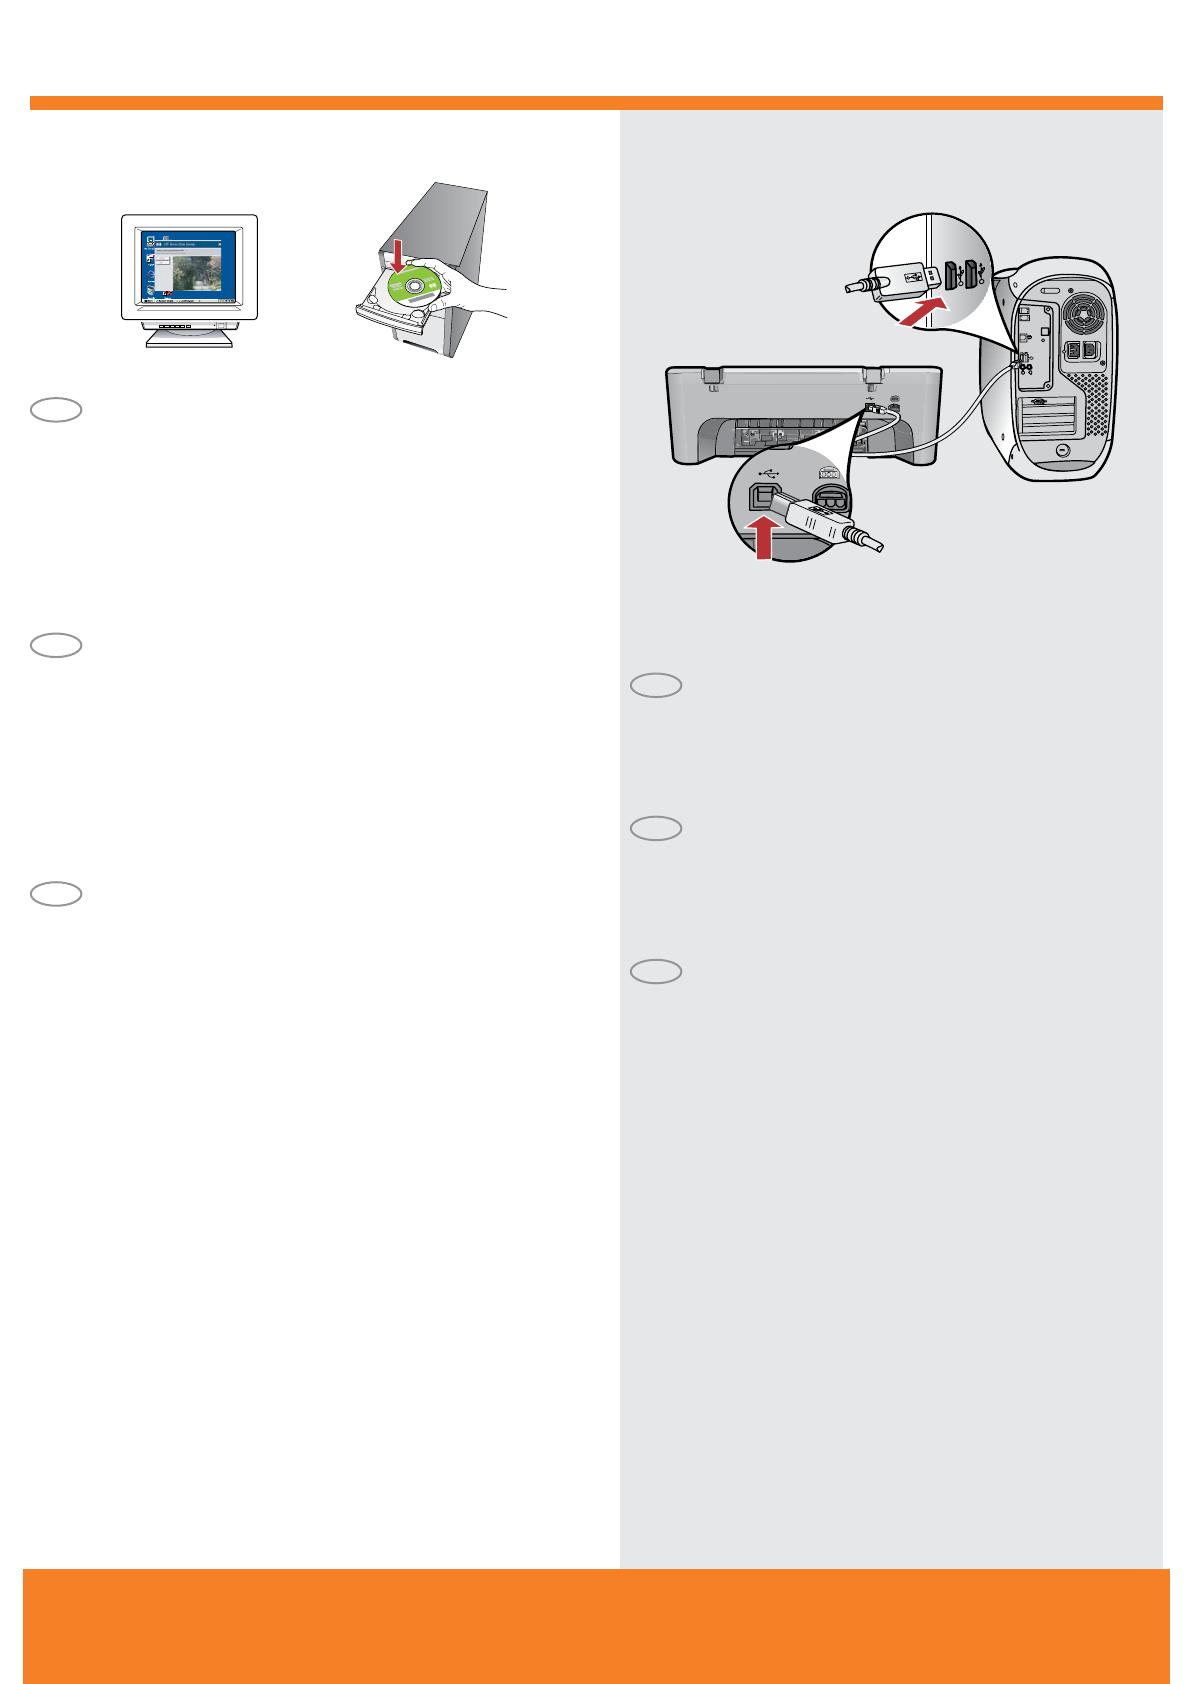
Mac : branchez le câble USB au port arrière
du périphérique, puis à n’importe quel port USB
de l’ordinateur.
Windows : après la mise sous tension et le démarrage de
l’ordinateur, placez le CD-ROM du produit dans le lecteur.
Patientez jusqu’à ce que l’écran de démarrage s’afche.
Cette opération peut durer plusieurs secondes.
IMPORTANT : si l’écran de démarrage ne s’afche pas,
double-cliquez sur l’icône Poste de travail, puis sur l’icône
du CD-ROM ayant le logo HP et enn sur le chier setup.exe.
Mac: conecte el cable USB al puerto ubicado en la parte
posterior del producto y, a continuación, a cualquier
puerto USB del equipo.
Windows: introduzca el CD del software del producto en
el equipo después de haberlo encendido e iniciado. Espere
a que aparezca la pantalla de inicio en su equipo. Esto
puede durar varios segundos.
IMPORTANTE: Si no aparece la pantalla de inicio, haga
doble clic en Mi PC, haga doble clic en el icono del CD-ROM
con el logotipo de HP y, a continuación, haga doble clic en
setup.exe.
Windows: Insert the product software CD into the computer
after it has been turned on and started up. Wait until the
startup screen displays on your computer. This can take several
seconds.
IMPORTANT: If the startup screen does not appear, double-click
My Computer, double-click the CD-ROM icon with the HP logo,
and then double-click setup.exe.
Mac: Connect the USB cable to the port on the back of the
product, and then to any USB port on the computer.
11b
Windows: Mac:
12
Windows:
Mac:
HP Deskjet F4200 All-in-One series • 7
12
FR
FR
FR
FR
ES
ES
ES
ES
EN
EN
EN
EN
Mac : insérez le CD-ROM du produit. Double-cliquez
sur l’icône HP All-in-One Installer. Suivez les instructions
à l’écran.
Mac : renseignez l’écran de l’assistant de conguration.
Windows : suivez les instructions à l’écran pour installer
le logiciel.
Windows : à l’invite USB, branchez le câble USB au port arrière
du périphérique, puis à n’importe quel port USB de l’ordinateur.
Mac: introduzca el CD del software del producto. Haga
doble clic en el icono HP All-in-One Installer. Siga las
instrucciones que aparecen en pantalla.
Mac: complete la pantalla del asistente de conguración.
Windows: siga las instrucciones que aparecen en pantalla
para completar la instalación del software.
Windows: cuando aparezca el indicador USB, conecte el
cable USB al puerto ubicado en la parte posterior del producto
y, a continuación, a cualquier puerto USB del equipo.
Windows: Follow the onscreen instructions to complete the
software installation.
Windows: Once the USB prompt appears, connect the USB
cable to the port on the back of the product, and then to any
USB port on the computer.
Mac: Insert the product software CD. Double-click the
HP All-in-One Installer icon. Follow the onscreen instructions.
Mac: Complete the Setup Assistant screen.
2008 Hewlett-Packard Development Company, L.P.
Windows is a registered trademark of Microsoft Corporation.
www.hp.com/support
FR
FR
ES
ES
EN
EN
Problème : (Windows uniquement) l’écran Ajout de matériel s’afche.
Action : cliquez sur Annuler sur tous les écrans afchés. Débranchez le câble USB, puis introduisez
le CD-ROM du produit dans le lecteur. Reportez-vous aux étapes 11 et 12.
Problème : (Windows uniquement) l’écran La conguration du périphérique ne s’est pas
achevée s’afche.
Action : débranchez le produit, puis rebranchez-le. Vériez que l’imprimante est sous tension.
Vériez toutes les connexions. Assurez-vous que le câble USB est branché à l’ordinateur. Ne
branchez pas le câble USB au clavier ni à un concentrateur USB sans alimentation autonome.
Reportez-vous à l’étape 12.
Dépannage
Problema: (sólo en Windows) aparece la pantalla Agregar hardware de Microsoft.
Acción: cierre todas las pantallas. Desconecte el cable USB y vuelva a introducir el CD
del software. Consulte los pasos 11 y 12.
Problema: (sólo en Windows) aparece la pantalla en la que se indica que se ha producido un
error en la instalación del dispositivo.
Acción: desconecte el producto y vuelva a conectarlo. Asegúrese de que la impresora está
encendida. Compruebe todas las conexiones. Asegúrese de que el cable USB está conectado
al equipo. No conecte el cable USB a un teclado ni a un concentrador USB sin alimentación.
Consulte el paso 12.
Solución de problemas
Problem: (Windows only) The Device Setup Has Failed To Complete screen displays.
Action: Unplug the product and plug it in again. Make sure that the printer is turned on. Check
all connections. Make sure the USB cable is plugged into the computer. Do not plug the USB
cable into a keyboard or a non-powered USB hub. Refer to Step 12.
Problem: (Windows only) The Microsoft Add Hardware screens display.
Action: Cancel all screens. Unplug the USB cable, and then insert the software CD. Refer to
Steps 11 and 12.
Troubleshooting
Printed in <country>
1 / 1

HP Deskjet F4200 All-in-One Printer series Installation guide

Category
Laser/LED printers
Type
Installation guide
This manual is also suitable for

HP Deskjet F4200 All-in-One Printer series is a versatile device that offers printing, scanning, and copying capabilities. With its compact design, it's perfect for home or small office use. The printer utilizes HP thermal inkjet technology to deliver sharp and vibrant prints, and it can handle a variety of paper sizes and types, including plain paper, photo paper, and envelopes. Additionally, it features a built-in scanner for easy document digitization and a copier function for quick and convenient reproduction of documents.

Ask a question and I''ll find the answer in the document

Finding information in a document is now easier with AI

Ask the document