Tripp Lite NetController B040-008-19 Owner's manual

Category
KVM switches
Type
Owner's manual
1
Owner’s Manual
Warranty
Registration:
register online today for a
chance to win a FREE Tripp Lite
product—www.tripplite.com/warranty
NetController
Console KVM and
Rackmount KVM Switches
Models: B040-008-19, B040-016-19, B042-004, B042-008 and B042-016
1111 W. 35th Street, Chicago, IL 60609 USA
www.tripplite.com/support
Note: Follow these instructions and operating procedures to ensure correct performance and to prevent damage to this unit or to its connected devices.
Copyright © 2011 Tripp Lite. All rights reserved. All trademarks are the property of their respective owners.
1. Features 2
1.1
General Features
2
1.2
Package Contents
2
1.3
Hardware/Software Support
2
1.4
Cable Requirements
2
1.5
External Views
3
2. Installation 5
2.1
Rackmounting Guidelines
5
2.2
Rackmounting Instructions
5
2.3
Connecting PCs and Peripherals to a Single Switch
5
2.4
Daisy-Chaining
6
3. Operation 7
3.1
Control Interfaces
7
3.1.1
Push Buttons
7
3.1.2
Keyboard Hotkeys
7
3.1.3
On-Screen Display
7
3.2
OSD Main Menu
8
3.2.1
Switching Ports Via OSD Main Menu
8
3.2.2
Editing Port Names
8
3.2.3
Setting Ports as Easy View Ports
8
3.2.4
Exiting the OSD
8
3.2.5
Logging Out of the KVM Switch
8
3.2.6
Initiate an Auto Scan
8
3.2.7
Navigate to the OSD Setup Page
8
3.3
OSD Setup Page
9
3.3.1
Auto Logout
9
3.3.2
OSD Timeout
9
3.3.3
Auto Scan Period
9
3.3.4
Title Bar
9
3.3.5
Hotkey
9
3.3.6
Password
9
3.3.7
Load Default
10
3.3.8
OSD Appearance
10
3.3.9
Auto Scan Mode
10
3.3.10
Status Page
10
3.4
Upgrade Firmware
10
4. Technical Specifications 12
5. Warranty & Warranty Registration 12
Español 13
Français 25
2
1. Features
1.1 General Features
1.2 Package Contents
1.3 Hardware/Software Support
1.4 Cable Requirements
• B040-SeriesConsoleKVMSwitchescomewithabuilt-in19in.LCD,keyboardandtouchpad
• Connectupto256*computersbydaisy-chainingupto16levels**ofNetControllerKVMSwitches
• Compatiblewithstandard19”racks
• AccessconnectedcomputersviaPush-button,OSDorHotkeyCommands
• Passwordprotection
• Firmwareupgradeable
• B042-SeriesRackmountKVMSwitchessupportUSBandPS/2keyboard/miceonboththeconsoleandconnectedcomputers
• B040-SeriesConsoleKVMSwitchescomewithanexternalUSBkeyboard/mouseportandVGAmonitorport
• P780-SeriesUSB/PS2ComboKVMCableKitseliminatetheneedtobuyseparateUSBandPS/2KVMcablekits
• RemotelyaccessconnectedcomputersbyconnectingaB051-000IPRemoteAccessUnit
• B040-SeriesConsoleKVMSwitchessupportresolutionsupto1280x1024;B042-SeriesRackmountKVMSwitchessupportresolutionsupto2048x1536
*Whendaisy-chaining(16)16-PortKVMswitchestogether.**PreviousversionsofNetControllerKVMSwitcheshavean8-leveldaisy-chainlimitation.Ifyouexperienceproblemsdaisy-chaining
over8levels,youmayneedtoupgradethermwareofyourunit(s).
• B040-SeriesConsoleKVMSwitchorB042-SeriesRackmountKVMSwitch
• 4ftHD15toDB9FirmwareUpgradeCable
• 8in.Daisy-ChainCable(B042-SeriesKVMSwitchesonly)
• 6ftC13to5-15PPowerCord(B040-SeriesConsoleKVMSwitchesonly)
• ExternalPowerSupply–Input:100-240V,50/60Hz,0.3AOutput:9V,1A(B042-SeriesRackmountKVMSwitchesonly)
• Daisy-ChainTerminator(B042-SeriesRackmountKVMSwitchesonly)
• ExternalVGAPortTerminator(B040-SeriesConsoleKVMSwitchesonly)
• RackmountHardware
• Owner’sManualCD
• QuickStartGuide
• Supportsstandard5-buttonMicrosoft
®
, Logitech
®
orcomparableMice
• SupportsstandardMicrosoft,Logitechandcomparablekeyboards
• CompatiblewithWindows®95andabove,Mac®OS10.4andabove,LinuxandSunSolaris
• B040-Seriesbuilt-inmonitorsupportsresolutionsupto1280x1024
• B042-SeriesKVMSwitchessupportresolutionsupto2048x1536
• C13PowerCord(B040-SeriesConsoleKVMSwitchesonly)
• ExternalPowerSupply*(B042-SeriesKVMSwitchesonly)
• TrippLiteP780-SeriesUSB/PS2ComboKVMCableKit
• TrippLiteP781-SeriesDaisy-ChainCable
• HD15FemaletoDB9MaleFirmwareUpgradeCable
• Daisy-ChainTerminator(B042-SeriesKVMSwitchesonly)
• ExternalVGAPortTerminator(B040-SeriesConsoleKVMSwitchesonly)
*UseonlytheexternalpowersupplythatisincludedwiththeB042-SeriesKVMSwitch.
2
1
3
4
5
6
7
9
10
8
2
1
34
3
1. Features (continued)
1.5 External Views
Console KVM Switch Front View
1
Upper Handle:PulltoslidetheKVMSwitchout;pushtoslidetheKVMSwitchin.
2
19” LCD Display:Built-inon-screendisplay(OSD)forconvenientKVMSwitchcontrol,includingportselection.
3
OSD Push Buttons:UsedtoaccesstheOSDMenutoadjusttheLCDdisplay.
4
LED Indicators:TheredLEDswillilluminateaboveeachportwithaconnectedcomputerthatisrunningpowerthroughtheconsoleinterface.Iftheconnected
computerispoweredoff,theredLEDwillnotbeilluminated.ThegreenLEDswillilluminateabovethecomputerportthatiscurrentlyselectedasactive.
5
Port Selection Buttons:Pushtodirectlyselecttheactivecomputerchannelthatcanbecontrolledbythesharedkeyboard,touchpadandLCDdisplay
6
Keyboard
7
2-Button Touch Pad:Leftbuttonisleftclick,rightisrightclick.Runyourngerupordownthefarrightsideofthetouchpadtoscrollupanddownascreen.
8
Slide Release:Mechanismtolockthedrawerclosedwhentheconsoleisnotinuse.Preventsitfromaccidentallyslidingopen.Toslidetheconsoleout,you
mustrstreleaseitbymovingthetabsideways.
9
Rackmounting Brackets:Therearerackmountbracketstosecurethechassistoasystemracklocatedateachcorneroftheunit.
10
Railway Release Tabs:Whenthedraweriscompletelypulledouttotheend,therailwaysystemwilllock.Pushthereleasetabsonbothsidestoreleasethe
drawersothatitcanbepushedbackin.
1
Port Selection Buttons: Pushtodirectlyselecttheactivecomputerchannelthatcanbecontrolledbythesharedkeyboard,monitorandmouse.
2
Bank LED Display: ShowsthepositionoftheB042-SeriesKVMSwitchinadaisy-chaininstallation.
3
Live LED Indicators: ARedLEDwillilluminatewhenthecorrespondingporthasacomputerthatisbothconnectedandpowered-on.
4
Selected LED Indicators: AGreenLEDwillilluminatewhenthecomputerconnectedtothecorrespondingporthastheKVMsfocus.
Rackmount KVM Switch Front View
3 5 6
41 2
1 53
2 4 6 7
4
Console KVM Switch Rear View
Rackmount KVM Switch Rear View
1
External USB Keyboard/Mouse Port: ThisUSBportisavailableifyouwanttouseanexternalkeyboardormouse.Itcanalsobeusedifconnectinga
B051-000IPRemoteAccessUnit.
2
Firmware Upgrade Port: Duringarmwareupgrade,theincludedHD15toDB9FirmwareUpgradeCableconnectstotheKVMswitchhere.
3
Daisy-Out Port: Whendaisy-chainingadditionalB042-SeriesKVMSwitches,thedaisy-chaincableconnectsfromthisporttothelower-levelKVMs
Daisy-ChainInport.
4
Power Dongle: TheincludedC13to5-15PpowercordconnectstotheKVMswitchhere.
5
External VGA Monitor Port: ThisHD15portisavailableifyouwanttouseanexternalmonitor.ItcanalsobeusedifconnectingaB051-000IPRe-
mote Access Unit.
Note: If this port is not being used, the included External VGA Port Terminator must be connected to it for the unit to function properly.
6
Computer Ports: ComputersconnecttotheKVMswitchhereviaP780-SeriesUSB/PS2ComboKVMCableKits.
1
USB Keyboard/Mouse Console Ports: TwoUSBportsareavailabletoconnectaUSBkeyboardand/ormouse.
2
Power Receptacle: TheincludedExternalPowerSupplyconnectstotheKVMswitchhere.
3
Daisy-Chain In/Firmware Upgrade Port:ThisHD15Maleconnectorisusedwhendaisy-chainingtoahigher-levelB040/42-SeriesKVMSwitch.
WhentheB042-SeriesKVMSwitchistherstKVMinadaisy-chain,orinsingle-stageinstallations,theincludedHD15toDB9FirmwareUpgrade
CableconnectstotheKVMswitchheretoperformarmwareupgrade.
Note: When performing a firmware upgrade on a daisy-chain installation, upgrading the Master KVM switch will also upgrade all lower-level KVM
switches. (See Firmware Upgrade on page 10 for details.)
4
Daisy-Chain Out Port: ThisHD15Femaleconnectorisusedwhendaisy-chainingtoalower-levelB042-SeriesKVMSwitch.
5
PS/2 Keyboard/Mouse Console Ports: TwoPS/2portsareavailabletoconnectaPS/2keyboardand/ormouse.
6
VGA Monitor Console Port: TheconsolemonitorconnectstotheKVMswitchhere.
7
Computer Ports: ComputersconnecttotheKVMswitchhereviaP780-SeriesUSB/PS2ComboKVMCableKits.
1. Features (continued)
1
2-3
5
2. Installation
2.1 Rackmounting Guidelines
2.2 Rackmounting Instructions
• Theambientoperatingtemperatureinarackcanbeanissue,andisdependentupontherackloadandventilation.Wheninstallinginaclosedor
multi-unitrackassembly,makesurethatthetemperaturedoesnotexceedthemaximumratedambienttemperature.
• Ensurethatairowwithintherackisnotcompromised.
• Toprotectagainstcircuitoverloading,youshouldplugtheKVMswitchandconnectedcomputersintoaTrippLiteSmartPro
®
orSmartOnline™
UPSSystem.
• Reliablegroundingofrackmountedequipmentshouldbemaintained.
Standard Rackmount KVM Switch Instructions
1
DependingonwhetheryouwanttomounttheKVMswitchtothefrontorbackoftherack,attachtheincludedrackmountbracketstothefrontorrear
sidesoftheKVMswitch.
2
Usinguser-suppliedscrews,mounttherackmountbracketsoftheKVMswitchtotherack.
Standard Console KVM Switch Instructions
TheB040-SeriesConsoleKVMSwitchescomewithremovablerackmountbrackets,allowingtheunittobeinstalledbyasingleperson.
1
Removetherackmountbracketsfromtheunitandmountthemtothebackoftherackusinguser-suppliedscrews.
2
TaketheConsoleKVMswitchandgentlyslideitintotheracksothatitslidesintotherackmountbracketsyoujustmounted.
3
Mounttherackmountbracketsonthefrontoftheunittotherackusinguser-suppliedscrews.
2.3 Single-Stage Installation
Inasingle-stageinstallation,thereisonlyoneB040/42-SeriesKVMSwitchbeingusedtoconnecttomultiplecomputers.
1
Beforestartingtheinstallation,shutdownallcomputersthataretobeconnectedtotheKVMswitch.
2
Connecttheexternalpowersupply(B042-SeriesKVMs)orpowercord(B040-SeriesKVMs)totheunit,andthenplugitintoaTrippLiteSurge
Suppressor,PDUorUninterruptiblePowerSupply(UPS).
3
B042-Series KVM Switches Only:ConnectaUSBorPS/2keyboard,mouseandamonitortotheconsoleportsonthebackoftheKVMswitch.
Note: Any combination of mouse and keyboard will work; PS/2 keyboard and mouse, USB keyboard and mouse, PS/2 keyboard and USB mouse, USB key
board and PS/2 mouse.
4
B040-Series Console KVM Switches Only:ConnectanexternalUSBmouseorkeyboard,andanexternalmonitortothecorrespondingexternal
consoleportsonthebackoftheunit.YoucanalsoaddremoteaccesstotheKVMswitchbyconnectingaB051-000IPRemoteAccessunittothe
externalconsoleportsonthebackoftheunit.(SeetheB051-000manualfordetailsoninstallation.)
Note: If you are not using the External VGA Monitor port, you must connect the External VGA Port Terminator to it for the unit to function properly.
5
UsingTrippLiteP780-SeriesUSB/PS2ComboKVMCableKits,connectacomputertoanavailablecomputerportonthebackoftheunit.Repeatthis
step for each additional computer you are connecting.
6
Powerontheconnectedcomputers.
2-Post Rack Console KVM Switch Instructions
TheB040-SeriesConsoleKVMSwitchescanbemountedtoa2-PostRackusingTrippLite’sB019-0002-PostRackmountKit(soldseparately).Seethe
B019-000owner’smanualforinstallationinstructions.
P780 series
cables
Daisy-chain up to 16 levels
P780 series
cable kit
Host computer not needed at any other time.
.
P781-series daisy-chain cables
BANK 16
6
2. Installation (continued)
2.4 Daisy-Chaining
Warning! The total length of daisy-chain cabling from the master KVM switch to the last KVM switch in a daisy-chain installation (regardless of
the number of levels) must not exceed 98 ft. (30 m). If the total length of daisy-chain cabling exceeds 98 ft. (30 m), the installation will not function
properly. Note: Previous versions of NetController KVM Switches may not support this distance. If you experience problems daisy-chaining at this
distance, you may need to upgrade the firmware of your unit(s).
Toincreasethenumberofconnectedcomputersupto256*,upto16levelsofNetControllerKVMSwitchescanbedaisy-chainedtogether.Thediagramand
stepsbelowdescribehowtosetupadaisy-chaininstallation.
*When(16)16-PortKVMswitchesaredaisy-chainedtogether.
Step 1: Connecttheexternalpowersupply(B042-SeriesKVMs)orpowercord(B040-SeriesKVMs)totheMasterKVMswitch,andthenplugitintoa
TrippLiteSurgeSuppressor,PDUorUninterruptiblePowerSupply(UPS).
Note: B040-Series Console KVM Switches can only occupy the first position in a daisy-chain.
Step 2: B042-Series KVM Switches Only:ConnectaUSBorPS/2keyboard,mouse,andamonitortotheconsoleportsonthebackoftheMaster KVM
switch.
Note: Any combination of mouse and keyboard will work; PS/2 keyboard and mouse, USB keyboard and mouse, PS/2 keyboard and USB mouse,
USB keyboard and PS/2 mouse.
Step 3: B040-Series Console KVM Switches Only:ConnectanexternalUSBmouseorkeyboard,andanexternalmonitortothecorrespondingexternal
consoleportsonthebackoftheMasterConsoleKVMswitch.YoucanalsoaddremoteaccesstotheKVMswitchbyconnectingaB051-000IP
RemoteAccessunittotheexternalconsoleportsonthebackoftheunit.(SeetheB051-000manualfordetailsoninstallation.)
Note: If you are not using the External VGA Monitor port, you must connect the External VGA Port Terminator to it for the unit to function
properly.
Step 4: Usingtheincluded8in.Daisy-ChainCable,oraP781-SeriesDaisy-ChainCable(soldseparately),connecttheDaisy-Chain Out port of the Master
KVMswitchtotheDaisy-Chain Inportofthesecond-levelB042-SeriesKVMSwitch.
Note: The maximum distance between any two daisy-chained KVM switches is 98 ft (30 m)*.
Step 5: Connecttheexternalpowersupplytothesecond-levelB042-SeriesKVMSwitchandthenplugitintoaTrippLiteSurgeSuppressor,PDUor
UninterruptiblePowerSupply(UPS).Repeatsteps4and5foranyadditionalKVMswitchesyouareadding,withnomorethan16KVMswitches
in the entire installation.
Step 6: Afteryouhavedaisy-chainedalloftheKVMswitches,connecttheDaisy-Chain TerminatorthatcamewithyourB042-SeriesKVMSwitchtothe
Daisy-Chain Out portofthelastKVMintheinstallation.
Step 7: UsingTrippLiteP780-SeriesUSB/PS2ComboKVMCableKits,connectacomputertoanavailablecomputerportontheinstallation.Repeatthis
step for each additional computer you are connecting.
Step 8: Powerontheconnectedcomputers.
*PreviousversionsofNetControllerKVMSwitchesmaynotsupportthesedistances.Ifyouexperienceproblemswhendaisy-chainingwithinthemaxdistancerequirements,youmayneedto
upgradethermwareofyourunit.(Seepage10fordetailsonperformingarmwareupgrade.)
Warning! Total daisy-chain cabling distance
from the master KVM switch to the last KVM
switch must not exceed 98 ft. (30 m).
7
3. Operation
3.1 Control Interfaces
TherearethreewaystooperateyourNetControllerKVMSwitch—Pushbuttons,KeyboardHotkeysortheOSDMenu.Theoperationofthesethreecontrol
methodsisdetailedbelow.
3.1.1 Push Buttons
Thepushbuttonsareusedtodirectlyselecttheactivecomputerchannelthatcanbecontrolledbythesharedkeyboard,mouseandmonitor.Pressingafront-
panelbuttonduringnormaloperationwillcausethecorrespondingchanneltobeselected.
3.1.2 Keyboard Hotkeys
HotkeycommandsareaconvenientwaytoswitchportsorperformbasicoperationsontheKVMswitchusingonlyyourkeyboard.Bydefault,allhotkey
commandsarestartedbypressingthe [Scroll Lock]keytwice,andthencompletedwithaseriesofkeystrokes.Theprecedinghotkeycanbechangedfrom
[Scroll Lock] to [Caps Lock], [Num Lock] or [F12].(Seepage9fordetailsonchangingthehotkey)
HotkeyCommand*= [Scroll Lock], [Scroll Lock],CommandKey/Sequence
*Hotkeysinahotkeycommandmustbepressedwithin2secondsofeachotherforthecommandtobesuccessful.
ThefollowingtablelistsallofthehotkeycommandsthatcanbeperformedontheKVMswitch,andgivesadescriptionofwhattheydo.
ThischapterprovidesgeneralguidelinesforKVMSwitchoperation.Itisstronglyrecommendedthatyoureadthischapterinadvanceofoperatingyour
NetControllerKVMSwitch.
Hotkey Command Hotkey Sequence
1
Description
Select Port (Single-Stage
Installation)
[Scroll Lock], [Scroll Lock],ab
ab=2-DigitPortNumber(01–16)
Switches console focus to the selected port.
Select Port (Daisy-Chain
Installation)
[Scroll Lock], [Scroll Lock],ab,yz
ab=2-DigitStationNumber(01–16)
yz=2-DigitPortNumber(01–16)
SwitchesconsolefocustotheselectedKVMswitchandport.
Next Lower Port [Scroll Lock], [Scroll Lock], [] Switchesconsolefocusfromthecurrentporttothenextaccessibleportpriortoit.
Next Higher Port [Scroll Lock], [Scroll Lock], [] Switchesconsolefocusfromthecurrentporttothenextaccessibleportafterit.
Next Lower Station [Scroll Lock], [Scroll Lock], [Page Up] Switchesconsolefocusfromthecurrentporttotherstaccessibleportonthenext
lower-levelKVMswitch.
Next Higher Station [Scroll Lock], [Scroll Lock], [Page Down] Switchesconsolefocusfromthecurrentporttothelastaccessibleportonthenext
higher-levelKVMswitch.
Beep On/Off [Scroll Lock], [Scroll Lock], [B] TogglestheBeeperOn/Off.TheBeepersoundswhenperformingaHotkeyCommand
or during an Auto Scan.
Initiate an Auto Scan [Scroll Lock], [Scroll Lock], [S] InitiatesanAutoScan.PressanykeytostopanAutoScan.
Title Bar On/Off [Scroll Lock], [Scroll Lock], [T] TurnstheTitleBarOn/Off.Note:ThisdoesnotaffecttheTitleBarsettingintheOSD.
Reset Console Mouse [Scroll Lock], [Scroll Lock], [End] Resetstheconsolemouseintheeventofalockup.
Open the OSD Menu [Scroll Lock], [Scroll Lock], [Spacebar] OpenstheOSDMenu.
Change the Hotkey
Preceding Sequence
[Scroll Lock], [Scroll Lock], [H], y
y=[Scroll Lock], [Caps Lock], [Num Lock] or [F12]
Changesthehotkeyprecedingsequenceto[Scroll Lock], [Caps Lock], [Num Lock] or
[F12].
Last Known Active Port
Restore
[Scroll Lock], [Scroll Lock], [L] Enables/DisablesthefeaturethatrestorestheKVMswitchtothelastporttohavethe
KVMsfocuspriortoapowerfailure.
1
Hotkeysinahotkeycommandmustbepressedwithin2secondsofeachotherforthecommandtobesuccessful.
3.1.3 On-Screen Display (OSD)
TheOn-ScreenDisplay(OSD)isatextbasedinterfacedusedtonavigatebetweenportsandperformoperationsontheKVMswitch.TheOSDcanbedis-
playedbypressingthehotkeycommand[Scroll Lock], [Scroll Lock], [Spacebar].ThefollowingsectiondescribesthefeaturesoftheOSDandhowtouse
them.
8
3. Operation (continued)
3.2 OSD Main Menu
UponopeningtheOSD,theOSDMainMenuistherstscreentoappear.TheOSDMainMenudisplaystheportsontheKVMinstallationandallowsyou
toswitchbetweenthem.Inaddition,theOSDMainMenuallowsyoutoeditportnames,markportsasEasy ViewportsandnavigatetootherOSDpages.
ThefollowingsectiondescribesthevariousfeaturesoftheOSDMainMenu.
• TheBank NumberoftheKVMswitchbeingdisplayedbytheOSDMainMenuisshownintheupper-leftcorner.TheBankNumbertellsyoutheposition
oftheKVMswitchwhoseportyouarecurrentlyviewing.
• TherstcolumnoftheOSDMainPagedisplaystheportnumberoftheselectedKVMswitch,andthesecondcolumndisplaystheportname.Eachport
namecanbegivenauniquenamebyusingtheOSDMainMenu’sEdit feature.Bydefault,portsarenamedasPC01,PC02,PC03,etc.
• Portrowsthatcontainthe
iconhavecomputersconnectedtothemusingthePS/2keyboardandmouseconnectorsoftheP780-SeriesKVMCableKit.
Portrowsthatcontainthe
iconhavecomputersconnectedtothemusingtheUSBkeyboard/mouseconnectoroftheP780-SeriesKVMCableKit.Port
rows that contain the
iconcurrentlyhavetheconsolesfocus.IfyouexittheOSD,thisistheportthatwillbedisplayed.
• Portrowsthatdonotcontainanyiconseitherdonothaveacomputerconnectedtothem,ortheyhaveacomputerconnectedtothemthatispoweredoff.
3.2.1 Switching Ports via the OSD Main Menu
ToswitchportsusingtheOSDMainMenu,highlightaportbyusingtheupanddownarrowkeys.AstheOSDMainMenuonlydisplays8portsata
time, use the [Page Up] and [Page Down]keystonavigatebetweenportsonKVMswitchesandDaisy-ChainedKVMSwitches.Oncethedesiredportis
highlighted, press the [Enter]keytoaccesstheportandclosetheOSD.
3.2.2 Editing Port Names
To edit a ports name, highlight it and press the [Insert] key.Thiswillallowyoutoenterinaportnamewithamaximumof16characters(A–Z,0–9).
3.2.3 Setting Ports as Easy View Ports
Easy ViewportsgiveusersamoreconvenientwaytochoosewhichportsareaccessedduringanAutoScan.TheuserhastheabilitytosetanAutoScanto
only access those ports that are marked as Easy View,limitingthescantoonlythecomputersthattheuserwishestomonitor.Bydefault,allportsonthe
installation are set as Easy View ports. To toggle Easy ViewOn/Off,highlightaportandpressthe [F6]key.A“v”nexttotheportnumberindicatesitisan
Easy View port.
3.2.4 Exiting the OSD
ToexittheOSD,simplypressthe[Esc]key.RegardlessofwhichOSDscreenyouarein,pressingthe[Esc] keywillalwaysexittheOSD.
3.2.5 Logging Out of the KVM Switch
TologoutoftheKVMSwitch,pressthe[F10]key.ThiswillclosetheOSDanddisplaythecurrentlyselectedportandapasswordprompt.Youwillnotbe
abletoaccesstheconnectedcomputeruntilyouenterthecorrectpassword.Oncethecorrectpasswordisentered,theportwillbereleasedforuse.
Note: Pressing the [F10] key when the Password feature is disabled will still close the OSD and display the currently selected port and password prompt;
however, you can simply press the [Esc] or [Enter] key to release the port for use.
3.2.6 Initiate an Auto Scan
To start an Auto Scan, press the [F2] keywhileintheOSD,regardlessofwhichOSDscreenyouarein.PressanykeytostopanAutoScan.
3.2.7 Navigate to the OSD Setup Page
TonavigatetotheOSDSetupPagefromtheOSDMainMenu,pressthe [F1]key.ThefeaturesoftheOSDSetupPagearedescribedinthefollowing
section.
9
3. Operation (continued)
The OSD Setup Page allows you to configure the settings of the KVM switch, and to enable/disable password security. The settings in the OSD
Setup Page are described in the following sections.
3.3 OSD Setup Page
3.3.1 Auto Logout
The Auto LogoutsettingallowsyoutodeterminetheamountofinactivitytimerequiredbeforetheuserisloggedoutoftheKVMswitchandrequiredto
enter a password to regain access. An Auto LogoutisonlyperformedwhenoutoftheOSDandaccessingaconnectedcomputer.Itdoesnotapplywhen
theuserisinsidetheOSD.ToedittheAuto Logout setting, highlight it and use the [] and []keystosetavaluebetween00and99minutes,inwhicha
settingof00disablesthefeature.Onceentered,pressthe [Enter] key to save the setting. The Auto Logoutsettingisdisabled(00)bydefault.Note: The Auto
Logout function will not work unless the Password feature is enabled.
3.3.2 OSD Timeout
The OSD TimeoutsettingallowsyoutodeterminetheamountofinactivitytimethatmustpassuntiltheOSDisclosed.ThisfeaturesimplyclosestheOSD,
and does not log you out. To edit the OSD Timeout setting, highlight it and use the [] and []keystosetavaluebetween00and95seconds(atintervals
of5),inwhichasettingof00disablesthefeature.Onceentered,pressthe [Enter] key to save the setting. The OSD Timeoutsettingissetat30secondsby
default.
3.3.3 Auto Scan Period
The Auto Scan PeriodsettingdeterminestheamountoftimeanAutoScanspendsonaportbeforeitcontinuestothenextport.ToedittheAuto Scan Period
setting, highlight it and use the [] and []keystosetavaluebetween5and95seconds(atintervalsof5).Onceentered,pressthe [Enter] key to save the
setting. The Auto Scan Periodsettingissetat10secondsbydefault.
3.3.4 Title Bar
TheTitleBaristheindicatorthatappearsonthescreentoletyouknowwhichportyouareaccessing.Thissettingallowstheusertochoosebetweenthe5
options listed: Disable –TheTitleBardoesnotshowupatall.Left–TheTitleBarisdisplayedinthetop-leftofthescreen,anddoesnotdisappear.Right
–TheTitleBarisdisplayedinthetop-rightofthescreen,anddoesnotdisappear.Left
-TheTitleBarisdisplayedinthetop-leftofthescreen,andit
disappears after 5 seconds. Right
-TheTitleBarisdisplayedinthetop-rightofthescreen,anditdisappearsafter5seconds.Toswitchbetweenoptions,
highlight the Title Bar setting and use the [] and []keystotogglebetweenthem.Whenyouhaveselectedthedesiredoption,pressthe [Enter] key.
3.3.5 Hotkey
The Hotkeysettingallowsyoutosettheprecedinghotkeysequenceto[Scroll Lock], [Caps Lock], [Num Lock] or [F12]. To switch the preceding hotkey,
highlight this setting and use the [] and []keystotogglebetweentheoptions.Pressthe[Enter] key to save the preceding hotkey choice. This setting
defaults at [Scroll Lock].
3.3.6 Password
The Passwordsettingallowsyoutoenable/disablepasswordsecurity.Whenenabled,apasswordisrequiredtoaccesstheKVMswitchoncetheuseris
logged out. To change this setting, highlight it and press the [Enter]key.Apromptwillappearaskingifyouwanttoenablethepassword.Yesenables
the password and Nodisablesit.Whenenablingthepassword,youwillbeaskedtoenteranewpassword,andthenenteritagaintoconrmit.Once
enabled,thepasswordenteredhereisrequiredtogainaccesstotheKVMswitchwhenauserhasbeenloggedout.Todisablepasswordsecurity,youwill
bepromptedtoenterthepreviouspassword.Oncethepreviouspasswordisenteredcorrectly,thepasswordfeatureisdisabled.Thisfeatureisdisabledby
default.
10
3. Operation (continued)
3.3.7 Load Default
The Load DefaultsettingallowsyoutorestoretheOSD’sfactorydefaultsettings(PortNames,AutoScanPeriod,TitleBar,etc.).RestoringtheOSD’sfac-
torydefaultsettingswillnotaffecttheKVMspasswordsecurity.Torestorethedefaultsettings,highlighttheLoad Default settings and press the [Enter]
key.YouwillbepromptedtoverifythatyouwanttorestoretheOSD’sfactorydefaultsettings.Ifyes,highlighttheyesoptionandpressthe [Enter] key.
3.3.8 OSD Appearance
The OSD AppearancesettingallowsyoutokeeptheOSDopenafterswitchingportsviatheOSDMainMenu.Toturnthissettingon,highlightitandpress
the [] and []keystotoggleitOn/Off,andthenpressthe [Enter]key.Thissettingisturnedoffbydefault.
3.3.9 Auto Scan Mode
The Auto Scan ModesettingallowsyoutospecifywhichportsareaccessedduringanAutoScan.Youcanchoosefromthefollowingoptions:All –Allports
willbescanned,regardlessofwhethertheyhaveacomputerconnectedtothemornot.Live–Onlyportsthathaveaconnectedcomputerthatispoweredon
willbeaccessedEzV –AllportsthataremarkedasEasy Viewportswillbescanned,regardlessofwhethertheyhaveacomputerconnectedtothemornot.
EzV + Live–OnlyportsthataremarkedasEasy Viewportsandhaveaconnected,poweredoncomputerwillbeaccessed.Toswitchbetweentheseoptions,
highlight the Auto Scan Mode setting and use the [] and []keystotogglebetweenthem.Whenyouhaveselectedthedesiredoption,pressthe[Enter]
key.
3.3.10 Status Page
WhenintheOSDSetupPage,pressthe[F1] key to switch to the OSD Status Page. The OSD Status PagedisplaysalloftheKVMswitchesintheinstalla-
tionandtheirrmwareversionnumbers.WhenintheOSD Status Page, press the [F1]keytoswitchtotheOSDMainMenu.
AllrmwareupgradesfortheB040/42-SeriesKVMSwitcheswillbeavailableintheSupportSectionofwww.tripplite.com.(Iftherearenoupdatesposted,
therearenonecurrentlyavailable.)Beforedownloadingthermwareles,verifythatthermwareversiononthewebsiteismorecurrentthatthatofyour
KVMswitch.YoucanndyourKVMswitchesrmwareversionbynavigatingtotheStatusPageintheOSD.YoucanalsousetheFirmwareUpgradeUtility
tocheckyourrmwareversion.(Seebelow)Toperformarmwareupgrade,followtheseinstructions:
Step 1: UsingtheprovidedFirmwareUpgradeCable,connectastandalonecomputer(onenotalreadyconnectedtotheKVMSwitchesServerPort)tothe
KVMSwitch.IfyouhavemultipleKVMSwitchesdaisy-chainedtogether,connecttheFirmwareUpgradeCabletotheMasterKVMSwitch(the
rstKVMinthedaisy-chain).AllKVMswitchesdaisy-chainedfromtheMasterKVMswitchwillbeupgradedsimultaneously.
Step 2: GototheSupportsectionofwww.tripplite.comanddownloadthermwareupgradeutilityandupgradele.
Step 3: BeforeupgradingthermwareonyourNetControllerKVMSwitch,disableallrunningprograms(anti-virus,systemmonitoring,etc.)onthe
standalonecomputeryouareusingtoperformtheupgrade.Theseprogramsmaypreventthermwareupgradefromcompletingsuccessfully.
Step 4: Locatethe.exeleyoujustdownloadedanddouble-clickonit.TheKVMUpgradeUtilityscreenwillopen.
3.4 Upgrade Firmware
11
3. Operation (continued)
Step 5: ClicktheSelectFilebuttonandndthermwareupgradelethatyoujustdownloaded.
Step 6: IfyouhavenotyetveriedyourKVMSwitchesrmwareversionnumberviatheOSDStatuspage,clicktheCheckVersionbutton.Thiswill
compareyourKVMSwitchesrmwaretothermwareupgradeleyoujustdownloaded.IfyourKVMhasmorerecentrmware,theFirmware
Upgrade Utility will ask you if you wish to continue.
Ifso,clicktheUpgradebuttontostarttheupgrade.Ifnot,closeoutoftheFirmwareUpgradeUtility.IfyourKVMSwitchhasolderrmware
thanthedownloadedle,clickontheUpgradebuttontostarttheupgrade.(UponclickingtheUpgradebutton,youwillbenotiedthatthevideo,
keyboardandmousewillbelockedupduringtheupgradeprocess.Clickyestocontinueornotoexit.)
Step 7: Duringthermwareupgradeprocess,yourKVMswitchconsolewillgoblankandyouwillnotbeabletousethekeyboardormouse.
Functionalitywillreturnuponrmwarecompletion.TheFirmwareUpgradeUtilitywillnotifyyouiftheupdatewassuccessfulornot.Ifthe
upgradefails,seetheTroubleshootingsectionbelow.
Firmware Upgrade Troubleshooting
Ifthermwareupgradefailsduetotimeout,stallsatanypointforalongperiodoftimeorfailsduetopoweroutage,checktomakesureallrunning
programs(anti-virus,systemmonitoring,etc.)areturnedoff.Whenyouhavedeterminedallprogramsaredisabled,unplugandre-plugthermware
upgradecableandtrytheupgradeprocedureagain.
Ifyoundthatyourkeyboardandmousearenolongerworkingduringarmwareupgradefailure,temporarilyconnectthemtothehostPCuntilyoucan
nishtheupgrade.Oncecompleted,yourKVMconsoleshouldagainbeworkingproperly.
12
4. Technical Specifications
5. Warranty & Warranty Registration
1-Year Limited Warranty
TRIPPLITEwarrantsitsproductstobefreefromdefectsinmaterialsandworkmanshipforaperiodofone(1)yearfromthedateofinitialpurchase.TRIPPLITE’sobligation
underthiswarrantyislimitedtorepairingorreplacing(atitssoleoption)anysuchdefectiveproducts.Toobtainserviceunderthiswarranty,youmustobtainaReturned
MaterialAuthorization(RMA)numberfromTRIPPLITEoranauthorizedTRIPPLITEservicecenter.ProductsmustbereturnedtoTRIPPLITEoranauthorizedTRIPPLITE
servicecenterwithtransportationchargesprepaidandmustbeaccompaniedbyabriefdescriptionoftheproblemencounteredandproofofdateandplaceofpurchase.This
warrantydoesnotapplytoequipment,whichhasbeendamagedbyaccident,negligenceormisapplicationorhasbeenalteredormodiedinanyway.
EXCEPTASPROVIDEDHEREIN,TRIPPLITEMAKESNOWARRANTIES,EXPRESSORIMPLIED,INCLUDINGWARRANTIESOFMERCHANTABILITYAND
FITNESSFORAPARTICULARPURPOSE.Somestatesdonotpermitlimitationorexclusionofimpliedwarranties;therefore,theaforesaidlimitation(s)orexclusion(s)may
not apply to the purchaser.
EXCEPTASPROVIDEDABOVE,INNOEVENTWILLTRIPPLITEBELIABLEFORDIRECT,INDIRECT,SPECIAL,INCIDENTALORCONSEQUENTIAL
DAMAGESARISINGOUTOFTHEUSEOFTHISPRODUCT,EVENIFADVISEDOFTHEPOSSIBILITYOFSUCHDAMAGE.Specically,TRIPPLITEisnotliable
foranycosts,suchaslostprotsorrevenue,lossofequipment,lossofuseofequipment,lossofsoftware,lossofdata,costsofsubstitutes,claimsbythirdparties,orotherwise.
Warranty Registration
Visitwww.tripplite.com/warrantytodaytoregisterthewarrantyforyournewTrippLiteproduct.You’llbeautomaticallyenteredintoadrawingforachancetowinaFREE
TrippLiteproduct!*
*Nopurchasenecessary.Voidwhereprohibited.Somerestrictionsapply.Seewebsitefordetails.
Useofthisequipmentinlifesupportapplicationswherefailureofthisequipmentcanreasonablybeexpectedtocausethefailureofthelifesupportequipmentortosignicantly
affectitssafetyoreffectivenessisnotrecommended.Donotusethisequipmentinthepresenceofaammableanestheticmixturewithair,oxygenornitrousoxide.
WEEE Compliance Information for Tripp Lite Customers and Recyclers (European Union)
UndertheWasteElectricalandElectronicEquipment(WEEE)Directiveandimplementingregulations,whencustomersbuynewelectricalandelectronicequipmentfrom
Tripp Lite they are entitled to:
• Sendoldequipmentforrecyclingonaone-for-one,like-for-likebasis(thisvariesdependingonthecountry)
• Sendthenewequipmentbackforrecyclingwhenthisultimatelybecomeswaste
ThepolicyofTrippLiteisoneofcontinuousimprovement.Specicationsaresubjecttochangewithoutnotice.
1111 W. 35th Street, Chicago, IL 60609 USA
www.tripplite.com/support
201109003•932957-EN
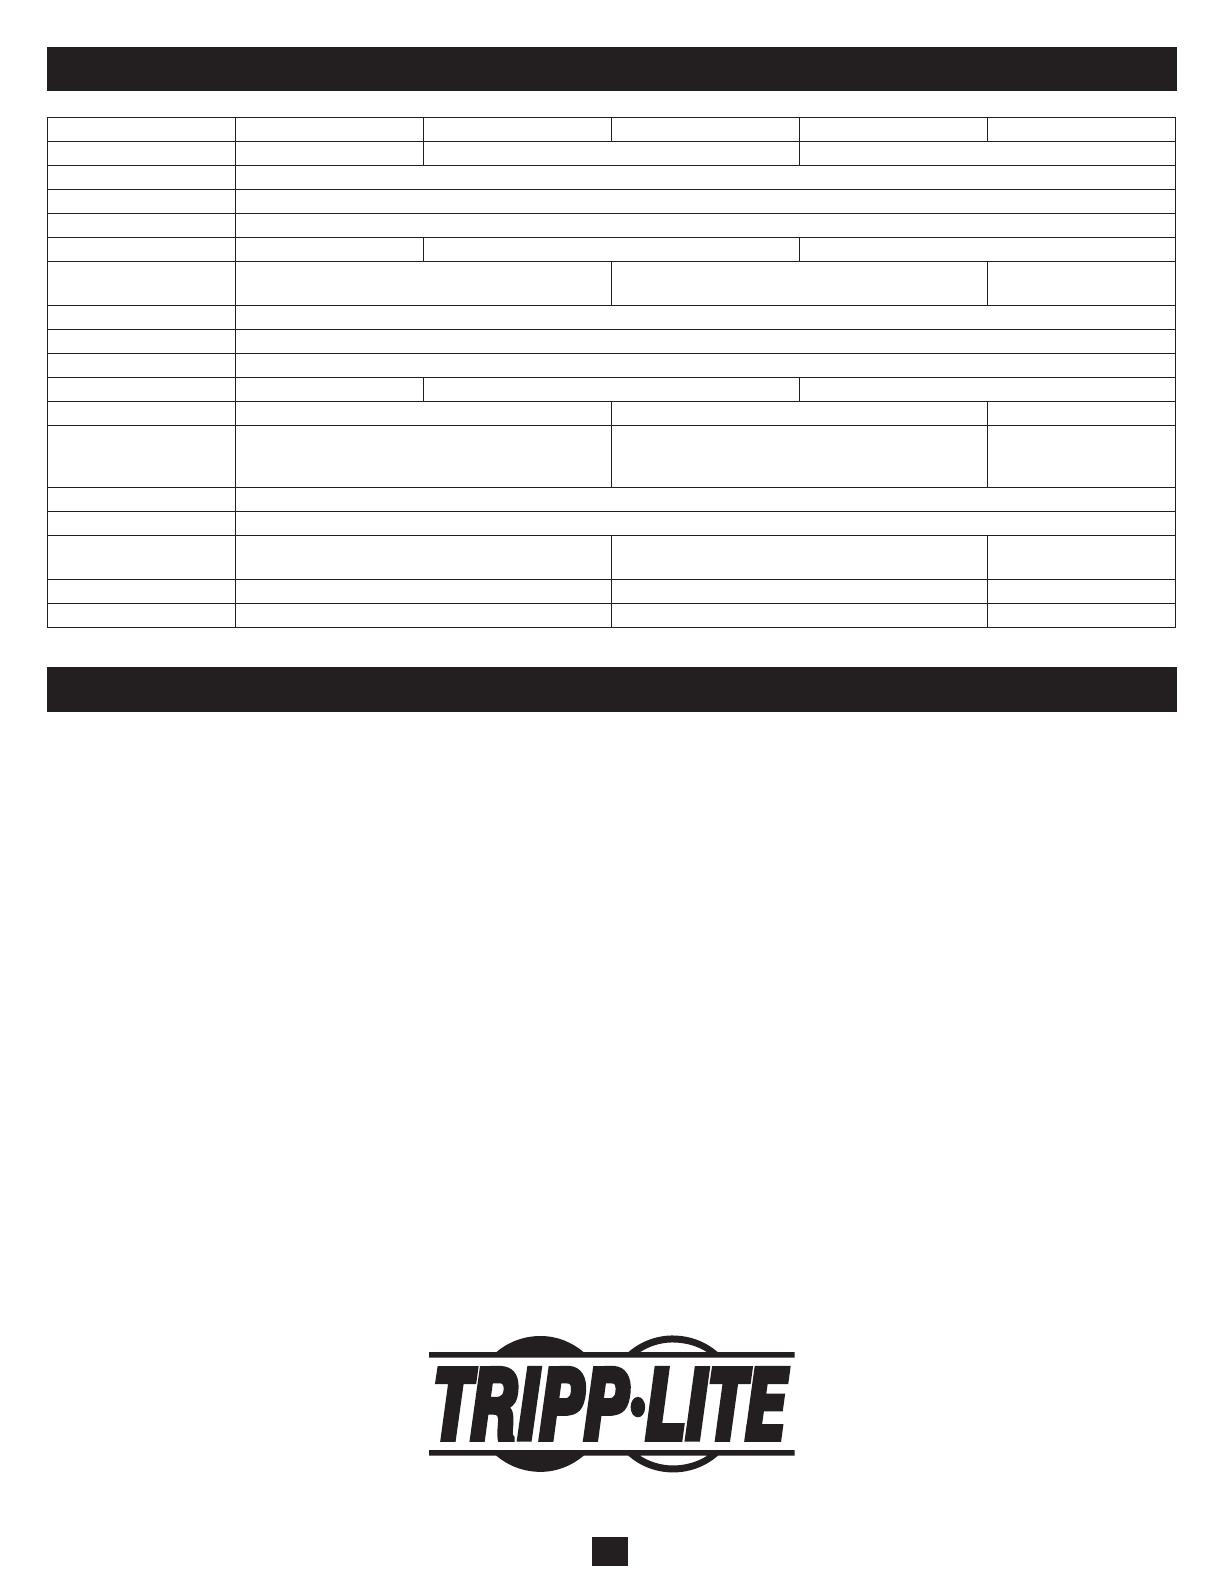
B042-004 B042-008 B040-008-19 B040-016-19 B042-016
#ofCPUPorts (x4)HD15F (x8)HD15F (x16)HD15F
KVMCableKits P780-SeriesUSB/PS2ComboKVMCableKits
PortSelection Push-buttons,Hotkeys,OSD
PasswordSecurity Yes(SinglePassword)
Built-InConsole No Yes(19inLCD) No
ExternalConsolePorts HD15F,(x2)USBAF,(x2)MiniDIN6F USBAF,HD15F
HD15F,(x2)USBAF,
(x2)MiniDIN6F
IPRemoteAccess Yes,withB051-000IPRemoteAccessUnit(SoldSeparately)
Expandable Yes;Daisy-Chainupto16levels
Daisy-ChainCable P781-SeriesCables
Max#ofConnectedCPUs 244 248 256
MaxResolution 2048x1536 1280x1024 2048x1536
Internal/ExternalPower
Supply
ExternalInput:100-240V,50/60Hz,0.3A
Output:9V,1A
Internal
100-240V,50/60Hz
ExternalInput:100-240V,
50/60Hz,0.3A
Output:9V,1A
OperatingTemperature 0to40C(32TO104F)
Storage Temperature -20to60C(-4TO140F)
Humidity 0to90%RH,Non-Condensing 20to90%,Non-Condensing
0to90%RH,
Non-Condensing
Dimensions(HWD,In.) 1.75x19x6.5 1.75x19x28 1.75x19x6.5
Certications CE,FCC,RoHS CE,FCC,RoHS,NOM,cTUV,TUV CE,FCC,RoHS
  • Page 1 1
  • Page 2 2
  • Page 3 3
  • Page 4 4
  • Page 5 5
  • Page 6 6
  • Page 7 7
  • Page 8 8
  • Page 9 9
  • Page 10 10
  • Page 11 11
  • Page 12 12
  • Page 13 13
  • Page 14 14
  • Page 15 15
  • Page 16 16
  • Page 17 17
  • Page 18 18
  • Page 19 19
  • Page 20 20
  • Page 21 21
  • Page 22 22
  • Page 23 23
  • Page 24 24
  • Page 25 25
  • Page 26 26
  • Page 27 27
  • Page 28 28
  • Page 29 29
  • Page 30 30
  • Page 31 31
  • Page 32 32
  • Page 33 33
  • Page 34 34
  • Page 35 35
  • Page 36 36

Tripp Lite NetController B040-008-19 Owner's manual

Category
KVM switches
Type
Owner's manual

Ask a question and I''ll find the answer in the document

Finding information in a document is now easier with AI