Craftsman 580.676530 Owner's manual

Category
High-pressure cleaners
Type
Owner's manual

This manual is also suitable for

Operator'siVlanual
®
2550 PSi MAX
2.3 GPM MAX
CLEAN GSYSTEM
Model No. 580.676530
PRESSUREWASHER ,_
CUSTOMERHELPLINE
HOURS: Mon. - Fri. 8 a.m. to 5 p.m. (CT)
WAReleG
Before usingthis product, readthis
manualand follow all SafetyRules
and Operating Instructions.
Sears Canada, Jnc,
Visit ourCraftsmanwebsite:www,sears,ca
Part No. 203800GS Draft - (07/26/2007)
AVERTJSSEMEHT
Avant d'utiliser ceproduit, veuillez lire le
manuelet suivre toutes les directives
relatives& la s6curit6et &I'utilisation.
Safety
Assembly
Operation
o Maintenance
Parts
,, Fran_ais,p. 34
0
WARRANTY.......................................... 2
SAFETYRULES...................................... 2-5
FEATURESANDCONTROLS.............................. 6
ASSEMBLY........................................ 7-10
OPERATION....................................... 11-14
SPECIFICATIONS..................................... 15
MAINTENANCE.................................... 16-20
STORAGE........................................... 21
TROUBLESHOOTING.................................. 22
NOTES ............................................. 23
REPLACEMENTPARTS.............................. 24-31
EMISSIONCONTROLWARRANTY..................... 32-33
FRAN_AIS........................................ 34-59
HOWTO ORDERPARTS........................ BACKPAGE
ONE-YEARFULLWARRAHTYONCRAFTSMAHPRESSUREWASHER
If this pressurewasher fails dueto a defectin material or workmanship within one year from the dateof purchase,return it to
any Searsstore, other Craftsman outlet, or SearsParts & RepairCenterin the UnitedStates or Canadafor free repair (or
replacementif repair proves impossible).
All warranty coverageapplies for only 90 days from dateof purchaseif this pressure washer is ever usedfor commercial or
rentalpurposes.
This warranty gives you specific legal rights, and you mayalso haveother rights which vary from stateto state.
Sears, Roebuck and Co., Hoffman Estates, IL 60178
Sears Canada Inc., Toronto, Ontario, Canada M5B 288
,_ Thisisthe safetyalert symbol.It isusedto alert youtopotentialpersonalinjuryhazards.Obeyall safetymessages
thatfollow thissymboltoavoid possibleinjuryor death.
_Read this manualcarefully andbecomefamiliar
with yourpressurewasher. Knowits applications,
its limitations, and any hazardsinvolved.
Thesafety alert symbol (_.) is usedwith a signal word
(DANGER,CAUTION,WARNING),a pictorial and/or a safety
messageto alert you to hazards.BANGERindicatesa hazard
which, if not avoided, willresult in deathor serious injury.
WARNINGindicates a hazardwhich, if not avoided, could
result in deathor serious injury. CAUTIONindicatesa hazard
which, if not avoided, might result in minor or moderate
injury. NOTICEindicatesa situation that could result in
equipment damage. Follow safety messagesto avoid or
reducethe risk of injury or death.
Hazard Symbolsand Meaninos
ToxicFumes Kickback
2 5-
SlipperySurface Fall
Fire
Explosion
ElectricalShock
FluidInjection
Operator'sManual
MovingParts FlyingObjects
HotSurface
© SearsBrands,LLC
WARHJNG
Theengineexhaustfromthisproductcontains
chemicalsknowntotheState of California tocause
cancer,birthdefects,or otherreproductiveharm.
WARHJHG
Runningengine gives off carbon monoxide, an
odorless, colorless, poison gas.
Breathingcarbon monoxide can cause headache,
_ atigue, dizziness,vomiting, confusion, seizures,
nausea,fainting or death.
Some chemicals or detergents may be harmful if
inhaled or ingested, causing severe nausea,
fainting, or poisoning.
* OperatepressurewasherONLYoutdoors.
Keepexhaustgasfromenteringaconfinedareathrough
windows,doors,ventilationintakes,or otheropenings.
DONOTstartor runengineindoorsorin anenclosedarea,
evenif windowsanddoorsareopen.
Usea respiratoror maskwheneverthereisa chancethat
vaporsmaybeinhaled.
Readall instructionswith masksoyouarecertainthemaskwill
providethenecessaryprotectionagainstinhalingharmful
vapors.
WARHIHG
isk of electrocution.
Contactwith power source can causeelectric
shock or burn.
* NEVERspraynearpowersource.
WARHIHG
Fueland its vapors are extremely flammable and
explosive.
Fireor explosion cancause severe burns or
death.
WHENADDINGORDRAININGFUEL
* TurnpressurewasherOFFandletit coolatleast2 minutes
beforeremovingfuelcap.Loosencapslowlyto relievepressure
in tank.
Fillor drainfueltankoutdoors.
DONOToverfilltank.Allowspaceforfuelexpansion.
Iffuelspills,waituntilit evaporatesbeforestartingengine.
Keepfuelawayfromsparks,openflames,pilotlights,heat,and
otherignitionsources.
DONOTlighta cigaretteorsmoke.
WHENSTARTIN6EQUIPMENT
* Ensuresparkplug,muffler,fuelcap,andaircleanerarein
place.
. DONOTcrankenginewith sparkplugremoved.
WHENOPERATINGEQUIPMENT
* DONOTtip engineor equipmentat anglewhichcausesfuelto
spill.
. DONOTsprayflammableliquids.
WHENTRANSPORTINGORREPAIRINGEQUIPMENT
* Transport/repairwithfueltankEMPTYor withfuelshutoffvalve
OFF.
. Disconnectsparkplugwire.
WHENSTORINGFUELOREQUIPMENTWITH FUELIN TANK
* Storeawayfromfurnaces,stoves,waterheaters,clothes
dryers,or otherappliancesthathavepilotlightor otherignition
sourcebecausetheycanignitefuelvapors.
WARHJHG
Startercord kickback(rapid retraction) can result
in bodily injury. Kickbackwill pull handand arm
_,_.< toward engine faster than you can let go.
Brokenbones, fractures, bruises, or sprains
could result.
NEVERpull starter cord without first relieving spray gun
pressure.
. When starting engine, pull cord slowly until resistance is felt
andthen pull rapidly to avoid kickback.
After eachstarting attempt, where enginefails to run, always
point spray gun in safe direction and squeezespray gun trigger
to releasehigh pressure. Engagespray guntrigger lock.
Firmly grasp spray gun with both handswhen using high
pressure spray to avoid injury when spray gun kicks back.
%
WARHIHG
Useof pressure washer cancreate puddles and
slippery surfaces.
Kickbackfrom spray gun cancause you to fall.
. Operatepressure washer from a stable surface.
The cleaningarea should haveadequate slopes and drainageto
reducethe possibility of afall due to slippery surfaces.
. Be extremelycareful if you must usethe pressure washer from
a ladder, scaffolding, or any other similar location.
Firmly grasp spray gun with both hands when using high
pressure spray to avoid injury when spray gun kicks back.
WARHIHG
_ Contact with muffler result in serious
area can
burns.
_ Exhaustheat/gases can ignite combustibles,structures or damagefuel tank causing a fire.
DO NOTtouch hot parts and AVOID hot exhaust gases.
. Allow equipmentto cool before touching.
Keepat least 5feet (1.5 m) of clearanceon all sides of
pressure washer including overhead.
Codeof FederalRegulation (CFR)Title 36 Parks, Forests,and
Public Property require equipment powered by an internal
combustion engine to havea spark arrester, maintained in
effective working order, complying to USDAForestservice
standard 5100-1C or later revision. Inthe State of California a
spark arrester is required under section 4442 of the California
Public resources code. Other statesmay havesimilar laws.
WARHIHG
The high pressure stream of water that this
equipment produces can cut through skin and its
_ nderlying tissues, leading to serious injury and
)ossible amputation.
Spray gun traps high water pressure, even when
engine is stopped and water is disconnected,
which can cause injury.
DONOTallow CHILDRENto operate pressure washer.
. NEVERrepair high pressure hose. Replaceit.
NEVERrepair leaking connections with sealantof any kind.
Replaceo-ring or seal.
NEVERconnect high pressure hoseto nozzle extension.
. Keephigh pressure hose connectedto pump and spray gun
while system is pressurized.
ALWAYS point spray gun in safe direction and squeezespray
gun trigger, to releasehigh pressure, everytime you stop
engine. Engagetrigger lock when not in use.
NEVERaim spray gun at people, animals, or plants.
. DONOTsecure spray gun in open position.
DO NOTleavespray gun unattendedwhile machine is running.
. NEVERusea spray gun which does not have atrigger lock or
trigger guard in place and in working order.
. Always be certain spray gun, nozzlesand accessories are
correctly attached.
WARHIHG
_ Unintentionalsparking can result in fire or
electric shock.
WHENADJUSTINGORMAKINGREPAIRSTOYOUR
PRESSUREWASHER
. Disconnectthe sparkplug wire from the spark plugand place
the wire where it cannot contact spark plug.
WHENTESTINGFORENGINESPARK
. Use approved sparkplug tester.
DONOTcheck for sparkwith spark plug removed.
WARHJHG
Starter and other rotating parts canentangle
hands, hair, clothing, or accessories.
* NEVERoperate pressure washer without protective housing or
covers.
* DO NOTwear looseclothing, jewelry or anything that may be
caught in the starter or other rotating parts.
* Tie up long hair and remove jewelry.
WARNING
Risk of eye injury.
" _ JSpraycan splash back or propel objects.
Alwayswear safetygoggles when using this equipment or in
vicinity of where equipment is in use.
Beforestarting the pressure washer, be sureyou are wearing
adequatesafety goggles.
NEVERsubstitute safety glasses for safety goggles.
NOTICE
High pressure spray may damage fragile items including
lass.
DO NOTpoint spray gun at glasswhen using red (0°) spraytip.
NEVERaim spray gun at plants.
NOTICE
Improper treatment of pressure washer can damage it and
shorten its life.
Ifyou have questions about intended use, ask dealer or contact
Sears.
NEVERoperate units with broken or missing parts, or without
protective housing or covers.
DONOT by-pass any safety device on this machine.
DONOTtamper with governed speed.
DONOToperate pressure washer above rated pressure.
DONOT modify pressure washer in any way.
Before starting pressure washer in cold weather, check all parts
of the equipment to besure ice has not formed there.
NEVERmove machine by pulling on hoses. Usehandle
provided on unit.
Checkfuel system for leaksor signs of deterioration, such as
chafed or spongy hose,loose or missing clamps, or damaged
tank or cap. Correct all defects beforeoperating pressure
washer.
This equipment is designedto be used with Searsauthorized
parts ONLY.If equipment is used with parts that DO NOT
comply with minimum specifications, userassumes all risks
and liabilities.
KNOWYOURPRESSUREWASHER
_Read the Operator'sManual andsafety rulesbefore operatingyourpressurewasher.
Comparethe illustrations with your pressurewasher to familiarizeyourself with the locations of various controls and
adjustments. Savethis manualfor future reference.
A- Spray Gun-- Controlsthe application of water onto
cleaningsurfacewith trigger device,includes trigger lock.
B - Cleaning Tank - Usedto provide pressure washer safe
detergents into the low pressure stream.
C- Spray Tips -- Detergent,0°, 15° and 40°: for various
high pressure cleaning applications.
D - Recoil Starter -- Used for starting the engine manually.
E - FuelTank -- Filltank with regular unleadedfuel. Always
leaveroom for fuel expansion.
F - Throttle Lever -- Setsengine in starting mode for recoil
starter and stops a running engine.
G - AirFilter -- Protects engine by filtering dust and debris
out of intake air.
H - Pump -- Developshigh pressure.
J - AutomaticCool DownSystem -- Cycleswater through
pump when water reaches125°-155°F.Warm water will
dischargefrom pump onto ground. This system prevents
internal pump damage.
K- High Pressure Outlet -- Connectionfor high pressure
hose.
L - Water Inlet -- Connectionfor garden hose.
IVl- Oil Fill/Dipstick -- Check,add and drain engine oil here.
N - High Pressure Hose-- Connectone end to water pump
and the other end to spray gun.
Items Not Shown:
Data Tag (near rear of base plate) -- Provides model and
serial number of pressure washer. Pleasehavethese readily
availableif calling for assistance.
NozzleExtensionwith QuickConnect-- Allows you to
switch betweenfour different spray tips.
Safety Goggles-- Always usethe enclosedsafety goggles
when running your pressure washer.
Warning/Operating instructionsTag-- identifies hazards
and proper procedureto start/stop pressure washer.
Yourcleaningsystemrequiressomeassemblyandisready
foruseonlyafterithasbeenproperlyservicedwiththe
recommendedoilandfuel.
If you haveany problemswith the assemblyof your
pressurewasher, please call the pressurewasher heipline
at 1-800-222-3135.
Attach Handle and Cleaning Tank
1. Placehandle (A) onto handlesupports (B) connectedto
main unit. Make sure holes (C) in handlealign with holes
(C) on handle supports.
UNPACKTHEPRESSUREWASHER
1. Removeeverything from carton exceptpressure washer.
2. Opencarton completely bycutting eachcorner from top
to bottom.
3. Removepressure washer from carton.
CARTONCONTENTS
Checkall contents, if any parts are missing or damaged,call
the pressure washer helpline at 1-800=222=3136.
* Main Unit
* Handle
* CleaningTankAssembly
* High PressureHose
* Spray Gun
* NozzleExtensionwith Quick ConnectFitting and Nozzle
Holder
* Oil Bottle
* DetergentSiphoning Hose/Filter
* Parts Bag (which includes the following):
* Operator's Manual
* SafetyGoggles
* GunHolderWireform
* Bagcontaining 4 multi-colored Spray Tips
* HandleFasteningHardwareKit (whichincludes):
* CarriageBolts (2)
* "L" Bolt
* Plastic Knobs (4)
* TreeClips (4)
Becomefamiliar with eachpiecebefore assemblingthe
pressure washer, identify all contents with the illustration on
page 6. If any parts are missing or damaged,callthe
pressure washer helpline at 1-800-222-3136.
ASSEMBLINGCLEAHIHGSYSTEM
Your Craftsmancleaningsystem will needassembly before
operation:
1. Attach handleand cleaningtank.
2. Connectdetergent siphon hoseto pump.
3. Add oil to engine crankcase.
4. Add fuel to fuel tank.
5. Connectpressure hoseto spray gun and pump.
6. Connectwater supply to pump.
7. Attach nozzleextensionto spray gun.
8. Select/attachquick connect spray tip to nozzleextension.
NOTE:It may be necessaryto move the handle supports
from sideto side in order to align the handle so it will slide
overthe handlesupports.
2. Insert carriagebolts (A) through holesfrom back of unit
and attacha plastic knob (B) from front of unit. Tighten
by hand.
3. Placecleaningtank (B) over holes (C)on handle
(viewing from front of unit). Pushthe tree clips (A) into
the holes until they sit flat againstthe cleaningtank.
/J
Insert "L" bolt (A) through hole just abovecleaning tank
on right side of handle (viewing from front of unit). Hold
bolt in placeand attachplastic knob (B) from inside of
unit. Tighten by hand.
,
Insert spray gun holder wireform (h) through holejust
abovecleaningtank on left side of handle (viewing from
front of unit). Hold wireform in placeand attach a plastic
knob (B) from inside of unit. Tighten by hand.
Attach Detergent Siphon Hose to Pump
Thepressure washer is equipped with two detergent
siphoning hoses.One is attachedto the cleaningtank and
one is loosefor siphoning pressure washer safe detergents
from a bottle or container.
Attach one of the detergent siphon hoses (A) to the barbed
hose fitting (B) on the pump.
IMPORTANT:Onlyone detergent siphoning hosecan be used
at a time. When cleaningtank is not used, makesure
detergent shut-off valve on cleaningtank is in the "Off"
position.
Add Enoine OiJ
1. Placepressure washer on a flat, levelsurface.
2. Cleanarea around oil fill and remove yellow oil fill
cap/dipstick.
NOTE:See Oil Recommendationsin Maintenancesection.
Verify provided oil bottle is the correct viscosity for current
ambient temperature.
3. Using oil funnel (optional), slowly pour contents of
provided oil bottle into oil fill opening.
HOTICE
Improper treatment of pressurewasher can damageit and
shorten its life.
DONOTattempttocrankor starttheenginebeforeit hasbeen
properlyservicedwith therecommendedoil.Thismayresultin
anenginefailure.
4. Replaceoil fill cap/dipstick and fully tighten.
Add Fuel
Fuelmustmeet theserequirements:
* Clean,fresh, unleadedgasoline.
* A minimum of 87 octane/87AKI (91 RON).High altitude
use, seeHigh Altitude.
* Gasolinewith up to 10% ethanol (gasohol) or up to 15%
MTBE(methyl tertiary butyl ether) is acceptable.
NOTICE
Avoid pressure washer damage.
Failureto follow Operator's Manualfor fuel
recommendations voids warranty.
DONOTuseunapprovedgasolinesuchasE85.
DONOTmixoil in gasoline.
DONOTmodifyengineto runon alternatefuels.
To protect the fuel system from gum formation, mix in a fuel
stabilizer when adding fuel. See Storage.All fuel is notthe
same. If you experiencestarting or performance problems
after using fuel, switch to a different fuel provider or change
brands. This engineis certified to operateon gasoline. The
emission control system for this engine is EM (Engine
Modifications).
WARHIHG
FueIand its vapors are extremely flammable and
explosive.
Fireor explosion can causesevere burns or
death.
WHENADDINGFUEL
. TurnpressurewasherOFFandletit coolatleast2 minutes
beforeremovingfuelcap.Loosencapslowlyto relievepressure
in tank.
. Fillfueltankoutdoors.
DONOToverfilltank.Allowspaceforfuelexpansion.
. Iffuelspills,waituntilit evaporatesbeforestartingengine.
Keepfuelawayfromsparks,openflames,pilotlights,heat,and
otherignitionsources.
DONOTlighta cigaretteorsmoke.
1. Cleanareaaround fuel fill cap, removecap.
2. Slowly add regular unleadedfuel (A) to fuel tank (B). Be
careful not to overfill. Allow about 1.5" (4 cm) (C) oftank
space for fuel expansion.
3. Installfuelcap and waitfor anyspilled fuelto evaporate.
CAUTION!Alcohol-blended fuels (calledgasohoI,ethanol or
methanol) can attract moisture, which leadsto separation and
formation of acids during storage.Acidic gascan damagethe
fuel system of an enginewhile in storage.
Toavoid engine problems, the fuel system should betreated
with a fuel preserver or emptied before storage of 30 days or
longer. If adding a fuel preserver,fill the fuel tank with fresh
fuel. if only partially filled, air in the tank will promote fuel
deterioration during storage, if fuel preserver is not used,
drain the fuel tank, start the engine and let it run until the fuel
lines and carburetor are empty. Usefresh fuel next season.
See Storagefor additional information.
NEVERuseengine or carburetor cleanerproducts in the fuel
tank as permanent damagemay occur.
HighAltitude
At altitudes over 5,000 feet (1524 meters), a minimum
85 octane/ 85 AKI (89 RON)gasoline is acceptable.To
remain emissions compliant, high altitude adjustment is
required. Operationwithout this adjustment will cause
decreasedperformance, increasedfuel consumption, and
increasedemissions. Seea qualified Searsdealer for high
altitude adjustment information. Operationof the engine at
altitudes below 2,500 feet (762 meters) with the high altitude
kit is not recommended.
Connect Hose and Water Supply to Pump
[ NOTICE
JDONOT the without the connected
run
pump
water
supply
and turned on.
L amageto equipmentresultingfrom failureto followthis
instructionwillvoidwarranty.
NOTE:Removeand discardthe shipping caps from the
pump's high pressure outlet and water inlet beforeattaching
hoses.
1. Uncoil high pressure hose and attach one end of hoseto
baseof spray gun. Tighten by hand.
WARNING
Thehigh pressurestream of water that this
_ quipment produces cancut through skin and its
underlyingtissues, leadingto serious injury and
)ossible amputation.
. NEVERconnecthighpressurehoseto nozzleextension.
Keephighpressurehoseconnectedto pumpandspraygun
whilesystemispressurized.
Alwaysbecertainspraygun,nozzlesandaccessoriesare
correctlyattached.
,
Attach other end of high pressure hoseto high pressure
outlet on pump. Tighten by hand.
3. 6. TurnONwater,pointguninasafedirectionandsqueeze
triggertopurgepumpsystemofairandimpurities.
Beforeconnectinggardenhosetowaterinlet,inspect
inletscreen(A).Cleanscreenifitcontainsdebrisorhave
itreplacedifdamaged.DONOTrun pressurewasher if
inlet screenis damagedor missing.
4. Run water through garden hose for 30 secondsto flush
it of debris. Turn off water.
IMPORTANT:DONOTsiphon standing water for the water
supply. UseONLYcold water (less than IO0°F (38%)).
5. Connectgarden hose (not to exceed50 feet (15.24 m) in
length) to water inlet. Tighten by hand.
NOTICE
Using a OneWay Valve(vacuum breakeror check valve)at
pump inlet cancause pump or inlet connector damage.
ThereMUSTbeatleasttenfeetofunrestrictedgardenhose
betweenthe pressurewasherinletandanydevice,suchasa
vacuumbreakeror checkvalve.
Damageto equipmentresultingfrom failuretofollowthis
instructionwillvoidwarranty.
WARHJHG
Riskof eyeinjury.
m_JSpray cansplash back or propel objects.
Alwayswearsafetygoggleswhenusingthis equipmentor in
vicinityof whereequipmentisin use.
Beforestartingthepressurewasher,besureyouarewearing
adequatesafetygoggles.
NEVERsubstitutesafetyglassesfor safetygoggles.
ChecklistBefore StartingEngine
Reviewthe unit to ensureyou have performed all of the
following:
1. Besure to read Safety Rubs and Operationsections
before usingthe cleaning system.
2. Makesure handle is in placeand secure.
3. Checkthat oil has beenadded to proper levelin engine
crankcase.
4. Add proper fuelto fuel tank.
5. Checkfor proper hoseconnections (high pressure and
water supply) and that there are no kinks, cuts, or
damageto the high pressure hose.
6. Provideproper water supply (not to exceedIO0°F
(38°C)).
10
HOWTOUSEYOURCLEANJHGSYSTEM
If you haveany problems operatingyour pressure washer,
pleasecallthe pressure washer helpline at 1-800-222-3136.
Pressure Washer Location
PressureWasherClearance
,_ WARNING
_ Exhaustheat/gases can ignitecombustibles,
structures or damagefuel tank causing a fire.
* Keepatleast5ft. (152cm)clearanceonall sidesofpressure
washerincludingoverhead.
Placepressure washer outdoors in an areathat will not
accumulate deadlyexhaustgas. DONOTplacepressure
washer where exhaustgas (A) could accumulateand enter
inside or be drawn into a potentially occupied building.
Ensureexhaustgas is kept awayfrom any windows, doors,
ventilation intakes, or other openingsthat can allow exhaust
gasto collect in a confined area. Prevailingwinds and air
currents should be taken into considerationwhen positioning
_ressurewasher.
,_ WARHJHG
Runningengine gives off carbon monoxide, an
_ dorless, colorless, poison gas.
Breathingcarbon monoxide can causeheadache,
fatigue, dizziness,vomiting, confusion, seizures,
nausea,fainting or death.
. OperatepressurewasherONLYoutdoors.
* Keepexhaustgasfromenteringaconfinedareathrough
windows,doors,ventilationintakes,or otheropenings.
. DONOTstartorrunengineindoorsor in anenclosedarea,
evenif windowsanddoorsareopen.
To Start Your Cleanin8 System
To start your engine-poweredcleaning system for the first
time, follow these instructions step-by-step. This information
also applies wheneveryou start the engine after you havelet
the pressure washer sit idle for at least a day.
1. Placepressure washer outside near an water source
capableof supplying water at a flow rategreater than
3.3 gallons (12.5 I) per minute and no less than 20 PSI
(1.38 BARS)at pressure washer end of garden hose.
2. Checkthat high pressure hose istightly connectedto
spray gun and pump. SeeAssembyfor illustrations.
3. Makesure unit is in a levelposition.
4. Connectgarden hoseto water inlet on pressure washer
pump.
5. Turn ONwater, point gun in a safe direction and squeeze
trigger to purge pump system of air and impurities.
{ NOTICE
% NOTrun the pump without the water supply connected
and turned on.
L amageto equipmentresultingfrom failureto followthis
instructionwillvoidwarranty.
6. Placecolored quick connect spray tips in slots on holder
that's attachedto nozzleextension.
\
7. Attach nozzleextension to spray gun. Tighten by hand.
B. Choose spray tipyou wantto use and insert it into
nozzleextension. SeeHow to UseSpray Tips.
9. Engagetrigger lock (A) on spray gun trigger.
10. Move throttle lever to "Fast" position (A), shown as a
rabbit.
\
IMPORTANT: Before starting the pressure washer, be sure
7ou are wearing adequate safety goggles.
WARNING
Risk of eye injury.
_Spray can splash back or propel objects.
Alwayswear safetygoggles when using this equipment or in
vicinity of where equipment is in use.
Beforestarting the pressure washer, be sureyou are wearing
adequatesafety goggles.
NEVERsubstitute safety glasses for safety goggles.
NOTE:This unit is equipped with a ReadyStartTM engine. A
ReadyStartTM engine meansthere is no priming or choking
required.
11. Whenstarting engine, position yourself as
recommendedand grasp starter grip handle and pull
slowly until you feelsome resistance.Thenpull rapidly
to start engine.
WARHIHG
Starter cord kickback (rapid retraction) can result
in bodily injury. Kickback will pull hand and arm
_ toward engine faster than you can let go.
Brokenbones, fractures, bruises, or sprains
could result.
NEVERpull starter cord without first relieving spray gun
pressure.
When starting engine, pull cord slowly until resistanceis felt
andthen pull rapidly to avoid kickback.
After eachstarting attempt, where enginefails to run, always
point spray gun in safe direction and squeezespray gun trigger
to releasehigh pressure. Engagespray gun trigger lock.
Firmly grasp spray gunwith both handswhen using high
pressure spray to avoid injury when spray gun kicks back.
12. Return recoil starter slowly. DO NOT let rope "snap
back" against starter.
NOTE: Always keep the throttle lever in the "Fast" position
when operating the pressure washer.
WARHIHG
Thehigh pressurestream of water that this
equipment produces cancut through skin and its
_ nderlying tissues, leadingto serious injury and
_ossibleamputation.
Spray gun traps high water pressure,evenwhen
engine is stopped and water is disconnected,
which can cause injury.
* DONOTallowCHILDRENtooperatepressurewasher.
. Keephighpressurehoseconnectedto pumpandspraygun
whilesystemispressurized.
. NEVERaimspraygunatpeople,animals,or plants.
* DONOTsecurespraygun inopenposition.
. DONOTleavespraygununattendedwhilemachineis running.
* NEVERusea spraygunwhichdoesnothaveatriggerlockor
triggerguardin placeandin workingorder.
. Alwaysbecertainspraygun,nozzlesandaccessoriesare
correctlyattached.
WARHIHG
_ Contact with muffler result in serious
area can
burns.
,_ Exhaustheat/gases can ignite combustibles,structures or damagefuel tank causing a fire.
* DONOTtouchhotpartsandAVOIDhotexhaustgases.
. Allowequipmenttocoolbeforetouching.
* Keepatleast5 feet(1.5m) ofclearanceonall sidesof
pressurewasherincludingoverhead.
. Codeof FederalRegulation(CFR)Title36Parks,Forests,and
PublicPropertyrequireequipmentpoweredbyaninternal
combustionengineto haveasparkarrester,maintainedin
effectiveworkingorder,complyingto USDAForestservice
standard51BB-1Corlaterrevision.IntheStateof Californiaa
sparkarresterisrequiredundersection4442oftheCalifornia
Publicresourcescode.Otherstatesmayhavesimilarlaws.
12
Howto StopYourCleaningSystem
1. Releasespray gun trigger and letengine idlefor two
minutes.
2. Movethrottle to SLOWposition,then STOPposition (A).
3. ALWAYSpoint spray gun in a safe direction and squeeze
spray gun trigger to releaseretainedhigh water
pressure.
IMPORTANT:Spraygun traps high water pressure,even
when engine is stopped and water is disconnected.
WARHIHG
The high pressure stream of water that this
equipment produces cancut through skin and its
_ nderlying tissues, leadingto serious injury and
)ossible amputation.
Spray gun traps high water pressure,evenwhen
engine is stopped and water is disconnected,
which can cause injury.
Keephighpressurehoseconnectedto pumpandspraygun
whilesystemispressurized.
. ALWAYSpointspraygunin safedirectionandsqueezespray
guntrigger,to releasehighpressure,everytimeyoustop
engine.Engagetriggerlockwhennotin use.
4. Engagetrigger lock on spray gun when not in use.
How to Use Spray Tips
Thequick-connect on the nozzleextensionallows you to
switch between four different quick connect spray tips. Spray
tips can be changedwhile pressure washer is running once
spray gun trigger lock is engaged.Thespray tips vary the
spray pattern asshown below.
FolJowthese instructionsto changespraytips:
1. Engagetrigger lock on spray gun.
2. Pull back collar on quick-connect and pull current spray
tip off. Storespray tips in holder provided on the nozzle
extension.
WARHIHG
The high pressure stream of water that this
_ quipment produces can cut through skin and itsunderlyingtissues, leadingto serious injury and
possible amputation.
. NEVERexchangespraytips withoutlockingthetriggerlockon
the spraygun.
. DONOTtwist spraytips whilespraying.
,
Select desiredspray tip:
Low Pressure
Black
Useto apply
chemical
High Pressure
40° White 15° Yellow
1750 PSi 2200 PSi
2.3 GPM 2.2 GPM
Red
255OPSi
2.0 GPM
,
* For delicate rinse (lower pressure and higher flow),
for gentlecleaning of cars/trucks, boats, RV's,patio
furniture, lawn equipment, etc., select white 40°
spray tip.
. Forgeneral rinsing (medium pressure and medium
flow), ideal for most all purpose cleaning such as
home siding, brick patios, wood decks, driveways
and sidewalks,garage floors, etc., selectyellow
15° spray tip.
. For maximum rinsing (higher pressure and lower
flow), for stubborn or hard to reachsurfacesuch as
second story surfaces,paint removal,oil stains, rust
removal or other stubborn substances (tar, gum,
grease,wax, etc.), select red 0° spray tip.
. Toapply detergent,appliesproject specific cleaners
to help breakdown stubborn dirt and grime on a
variety of surfaces, selectblack detergentspray tip.
Pull backon collar,insert newspraytip and releasecollar.
Tugon spraytip to makesureit is securelyinplace.
UsageTips
For most effective cleaning, keepspray tip from 8 to
24 inches (20 to 61 cm) awayfrom cleaningsurface.
If you get spray tip too close, especially usinga high
pressure spray tip, you may damagesurface being
cleaned.
DONOTget closer than 6 inches (15 cm) when cleaning
tires.
13
Cleaning and Applying Detergent
CAUTION
Chemicalscan causebodily injury, and/or property
damage.
NEVERusecausticliquidwith pressurewasher.
UseONLYpressurewashersafedetergents/soaps.Followall
manufacturersinstructions.
To applydetergent follow these steps:
1. Attach desireddetergent siphon hosefollowing
instructions Attach DetergentSiphon Hose to Pump.
IMPORTANT:Be sureengine is off and allowed to cool before
switching detergentsiphoning hoses.
WARNING
_ Contact with muffler result in serious
area can
burns.
_ Exhaustheat/gases can ignite combustibles,
structures or damagefuel tank causing a fire.
* DONOTtouchhotpartsandAVOIDhotexhaustgases.
* Allowequipmentto coolbeforetouching.
2. Reviewuse of spray tips.
3. Preparedetergent solution as required by job.
4. Make sure detergent shut-off valve on cleaningtank is in
"Off" position.
5. If using cleaningtank, pour detergent into cleaningtank.
NOT[: Thecleaningtank holds one gallon.
6. Make sure black detergent spray tip is installed.
NOT[: Detergentcannot be applied with the high pressure
nozzles(White, Yellow or Red).
7. Make sure garden hoseis connectedto water inlet.
Checkthat high pressure hose is connectedto spray gun
and pump. Turn on water.
NOTICE
You must attacha]] hoses before ou start the en ine.
Startingtheenginewithoutallthehosesconnectedandwithout
thewaterturnedONwill damagethepump.
Damageto equipmentresultingfrom failuretofollowthis
instructionwillvoidwarranty.
8. Engagetrigger lock on spray gun and start engine
following instructions How to Start Your Pressure
Washer.
9A. If using cleaningtank, rotate detergentshut-off valve on
cleaningtank to "On" position (A).
IMPOFITANT:if using detergent siphoning hose, make sure
detergentshut-off valve on cleaningtank is in the ,Off,
position.
9B. If using detergent siphoning hose, placesmall filter end
of detergent siphoning tube into detergent container.
NOTE:Makesure the filter is fully submerged in detergent
while applying detergent.
NOTICE
Contact with the hot muffler can damagedetergent
siphoning tube.
Wheninsertingthefilterintoa detergentsolutionbottle,route
thetubesoasto keepit from inadvertentlycontactingthehot
muffler.
10. Apply detergentto a dry surface, starting at lower
portion of areato be washed and work upward, using
long, even, overlappingstrokes.
11. Allow detergentto "soakin" for 3-5 minutes before
washing and rinsing. Reapplyas neededto prevent
surface from drying. DONOTallow detergent to dry on
(preventsstreaking).
Pressure Washer Rinsing
ForRinsing:
1. Engagetrigger lock on spray gun.
2. If using cleaningtank, rotate detergent shut-off valve on
cleaning tank to "Off" position.
3. Removeblackspray tip from nozzleextension.
4. Selectand install desiredhigh pressure spray tip
following instructions How to Use Spray Tips.
Keepspray gun a safe distancefrom areayou plan to
spray.
,
WARNING
6.
spray gun cancauseyou
Kickbackfrom to fall.
* Operatepressurewasherfrom astablesurface.
, Beextremelycarefulifyou mustusethepressurewasherfrom
a ladder,scaffolding,or anyothersimilarlocation.
* Firmlygraspspraygunwith bothhandswhenusinghigh
pressuresprayto avoidinjurywhenspraygunkicksback.
Apply a high pressure spray to a small areaand then
check surface for damage.If no damageis found, you
can assume it is okayto continue rinsing.
Start at top of areato be rinsed, working down with
same overlapping strokes asyou usedfor cleaning.
Automatic Cool Down System (Thermal Relief)
If you run the engine on your pressure washer for
3-5 minutes without pressing the trigger on the spray gun,
circulating water in the pump can reachtemperatures above
125°F.Thesystem engagesto cool the pump by discharging
the warmwater onto the ground.
14
EHGINETECHNICALINFORMATIOH PRODUCTSPECIFICATIOHS
This is a single cylinder, L-head,air cooled engine. It is a low
emissions engine.
Inthe Stateof California, Model 120000 enginesare certified
by the California Air Resources Boardto meet emissions
standardsfor 125 hours. Such certification does not grant
the purchaser, owner or operator of this engine any
additional warranties with respectto the performance or
operational life of this engine.Theengine is warranted solely
according to the product and emissions warranties stated
elsewherein this manual.
Power Ratings
Thegross power rating for individual gas engine modelsis
labeledin accordancewith SAE(Societyof Automotive
Engineers)code J1940 (Small EnginePower& Torque Rating
Procedure),and rating performancehasbeen obtainedand
correctedin accordancewith SAEJ1995 (Revision 2002-05).
Torquevaluesare derivedat 3060 RPM;horsepower values
are derivedat 3600 RPM.Actualgross engine powerwill be
lower and is affected by, among otherthings, ambient
operatingconditions and engine-to-enginevariability. Given
both the wide arrayof products on which enginesare placed
andthe varietyof environmental issuesapplicableto
operatingthe equipment,the gas enginewill not developthe
ratedgross power when usedin a givenpiece of power
equipment (actual "on-site"or net power). This differenceis
dueto a variety of factors including, but not limited to,
accessories(air cleaner,exhaust,charging, cooling,
carburetor,fuel pump, etc.), application limitations, ambient
operatingconditions (temperature,humidity, altitude), and
engine-to-enginevariability. Dueto manufacturingand
capacitylimitations, Briggs & Stratton maysubstitute an
engineof higher ratedpowerfor this Seriesengine.
Pressure Washer Specifications
Max Outlet Pressure............ 2,550 PSi (175.8 BARS)
Max Flow Rate........... 2.3 GPM (8.7 liters per minute)
ChemicalMix......................... Use asdirected
Water SupplyTemperature.... Not to exceedI O0°F(38° C)
Shipping Weight ..................... 72 Ibs. (32.7 kg)
Engine Specifications
Bore ................................. 2.69 in. (68mm)
Stroke ............................... 2.04 in. (52mm)
Displacement ........................ 11.57in. (190 cc)
SparkPlug
Type: ............. Briggs & Stratton 802592 or 5095D
SetGapTo: ...................... O.030inch(0.76ram)
ArmatureAir Gap: ........... 0.006-0.010in.(O.15-O.25mm)
Valveclearancewithvalvespringsinstalledand piston1/4in.
(6 ram)pasttopdeadcenter(checkwhenengineiscold).
Intake.................... 0.005-0.007in.(0.13-0.18ram)
Exhaust .................. 0.007-0.009in.(0.18-0.23mm)
FuelCapacity...................... 1.6 Quarts(1.5 liters)
OilCapacity........................ 18Ounces(0.5 liter)
NOTE:Forpractical operation, the engine load should not
exceed 85% of rated power. Enginepower will decrease
3-1/2% for each1,000 feet (300 meters) abovesea leveland
1% for each 10° F(5.6° C) above77° F(25° C). It should
operatesatisfactorily at an angle up to 15°.
15
OWNER'SRESPONSIBILITIES
Followthe hourly or calendarintervals,whichever occurs first.
More frequent service is required when operating inadverse conditions noted below.
MAINTENANCESCHEDULE
MAINTENANCETASK
PRESSURE WASHER
Checldclean water inlet screen
Check high pressure hose
Check detergent hose
Check spray gun and assembly for leaks
Purge pump of air and contaminants
Prepare pump for storage below 32°F
Before
EachUse
X 1
X
X
X
X
OPERATINGiNTERVALS
I Every25 Every50 Every 100
Hours or Hours or Hours or
Yearly Yearly Yearly
See Winter Storage
100-300
Hours
SERVICEDATES
FILL IN DATESASYOU COMPLETE
REGULARSERVICE
ENGINE
Check oil level
Clean debris
Change engine oil
Service air cleaner
Service spark plug
Service spark arrester
Clean cooling system
Clean combustion chamber
X
X
X_
X
X_
Prepare for storage If unit is to remain idle for longer than 30 days.
Cleanif clogged. Replace if perforated or torn.
2 Changeoil after the first (5) operating hours and every 50 hours or yearly thereafter. Changesooner when operating under dirty or dusty conditions.
3 Replacemore often under dirty or dusty conditions.
GeneraJRecommendations
Regularmaintenancewill improve the performanceand
extendthe life of the pressure washer. Seeany Searsor
other qualified service dealerfor service.
Thepressure washer warranty doesnot cover items that
havebeen subjectedto operator abuseor negligence.To
receivefull valuefrom the warranty, the operator must
maintain pressure washer as instructed in this manual
including proper storage as detailedin Storage.
Someadjustments will needto be madeperiodically to
properly maintain your pressure washer.
All serviceand adjustments should be madeat least once
eachseason.Follow the requirementsin the Maintenance
Schedulechart above.
NOTE:Onceayear you should clean or replacethe spark
plug and replacethe air filter. A new spark plug and clean air
filter assure proper fuel-air mixture and help your engine run
better and last longer.
Pump Oil
DONOTattempt any oil maintenanceon this pump. The
pump is pre-lubricated and sealedfrom the factory, requiring
no additional maintenancefor the life of the pump.
EmissionsControl
Maintenance, replacement, or repair of the emissions
control devices and systems may be performedby any non-
road engine repair establishment or individual. However,
to obtain "no charge" emissions control service, the work
must be performed by a Searsor other qualified service
dealer.Seethe Emissions Warranty.
Before Each Use
1. Checkengine oil level.
2. Cleandebris.
3. Checkwater inlet screen for damage.
4. Checkhigh pressure hose for leaks.
5. Checkcleaningtank for damage.
6. Checkgun and nozzleextension assembly for leaks.
7. Purge pump of air and contaminants.
16
PRESSUREWASHERMAINTENANCE
Clean Debris
Daily or before use, cleanaccumulated debris from cleaning
system. Keeplinkage, spring and controls clean. Keeparea
around and behind muffler free from any combustible debris.
Inspect cooling air slots and openings on the pressure
washer.These openings must be kept cleanand
unobstructed.
Cleaningsystem parts should be kept cleanto reducethe risk
of overheatingand ignition of accumulated debris.
Usea damp cloth to wipe exterior surfaces clean.
NOTICE
Jlmproper treatment of pressurewasher can damageit and
_horten its life. _ ....
[, DONOTinsertanyobjectsthroughcoolingslots.
Usea soft bristle brush to loosen cakedon dirt, oil, etc.
Usea vacuum cleanerto pick up loose dirt and debris.
Check and Clean Inlet Screen
Examinegarden hose inlet screen.Cleanif it is clogged or
replaceif it is torn.
Check High Pressure Hose
High pressure hoses can developleaks from wear, kinking,
or abuse. Inspect hose beforeeach use. Checkfor cuts,
leaks,abrasions, bulging of cover, or damageor movement
of couplings. If any of these conditions exist, replacehose
immediately.
WARHIHG
The high pressure stream of water that this
_ quipment produces cancut through skin and its
underlyingtissues, leadingto serious injury and
)ossible amputation.
NEVERrepairhighpressurehose.Replaceit.
, ReplacementhoseratingMUSTexceedmaximumpressure
ratingof unit.
Check Gun and Hozzle Extension
Examinehose connectionto spray gun and makesure it is
secure.Testtrigger by pressing it and making sure it springs
back into placewhenyou releaseit. Put safety latch in UP
position and test trigger. You should not beable to press
trigger. Replacespray gun immediately if it fails any of these
tests.
HozzJeMaintenance
A pulsing sensationfelt while squeezingthe spray gun trigger
may becaused by excessivepump pressure. Theprincipal
cause of excessivepump pressure is a spray tip clogged or
restricted with foreign materials, such asdirt, etc. Tocorrect
the problem, immediately cleanthe spray tip following these
instructions:
1. Shut off engine and turn off water supply.
2. ALWAYSpoint spray gun in a safe direction and squeeze
spray gun trigger to releaseretainedhigh water pressure.
WARNING
Thehigh pressure stream of water that this
equipment produces can cut through skin and its
_ nderlying tissues, leading to serious injury and
)ossible amputation.
Spraygun traps high water pressure, evenwhen
engine is stopped and water is disconnected,
which cancause injury.
Keephighpressurehoseconnectedto pumpandspraygun
whilesystemispressurized.
, ALWAYSpointspraygunin safedirectionandsqueezespray
guntrigger,to releasehighpressure,everytimeyoustop
engine.Engagetriggerlockwhennotin use.
3. Removespray tip from end of nozzleextension.
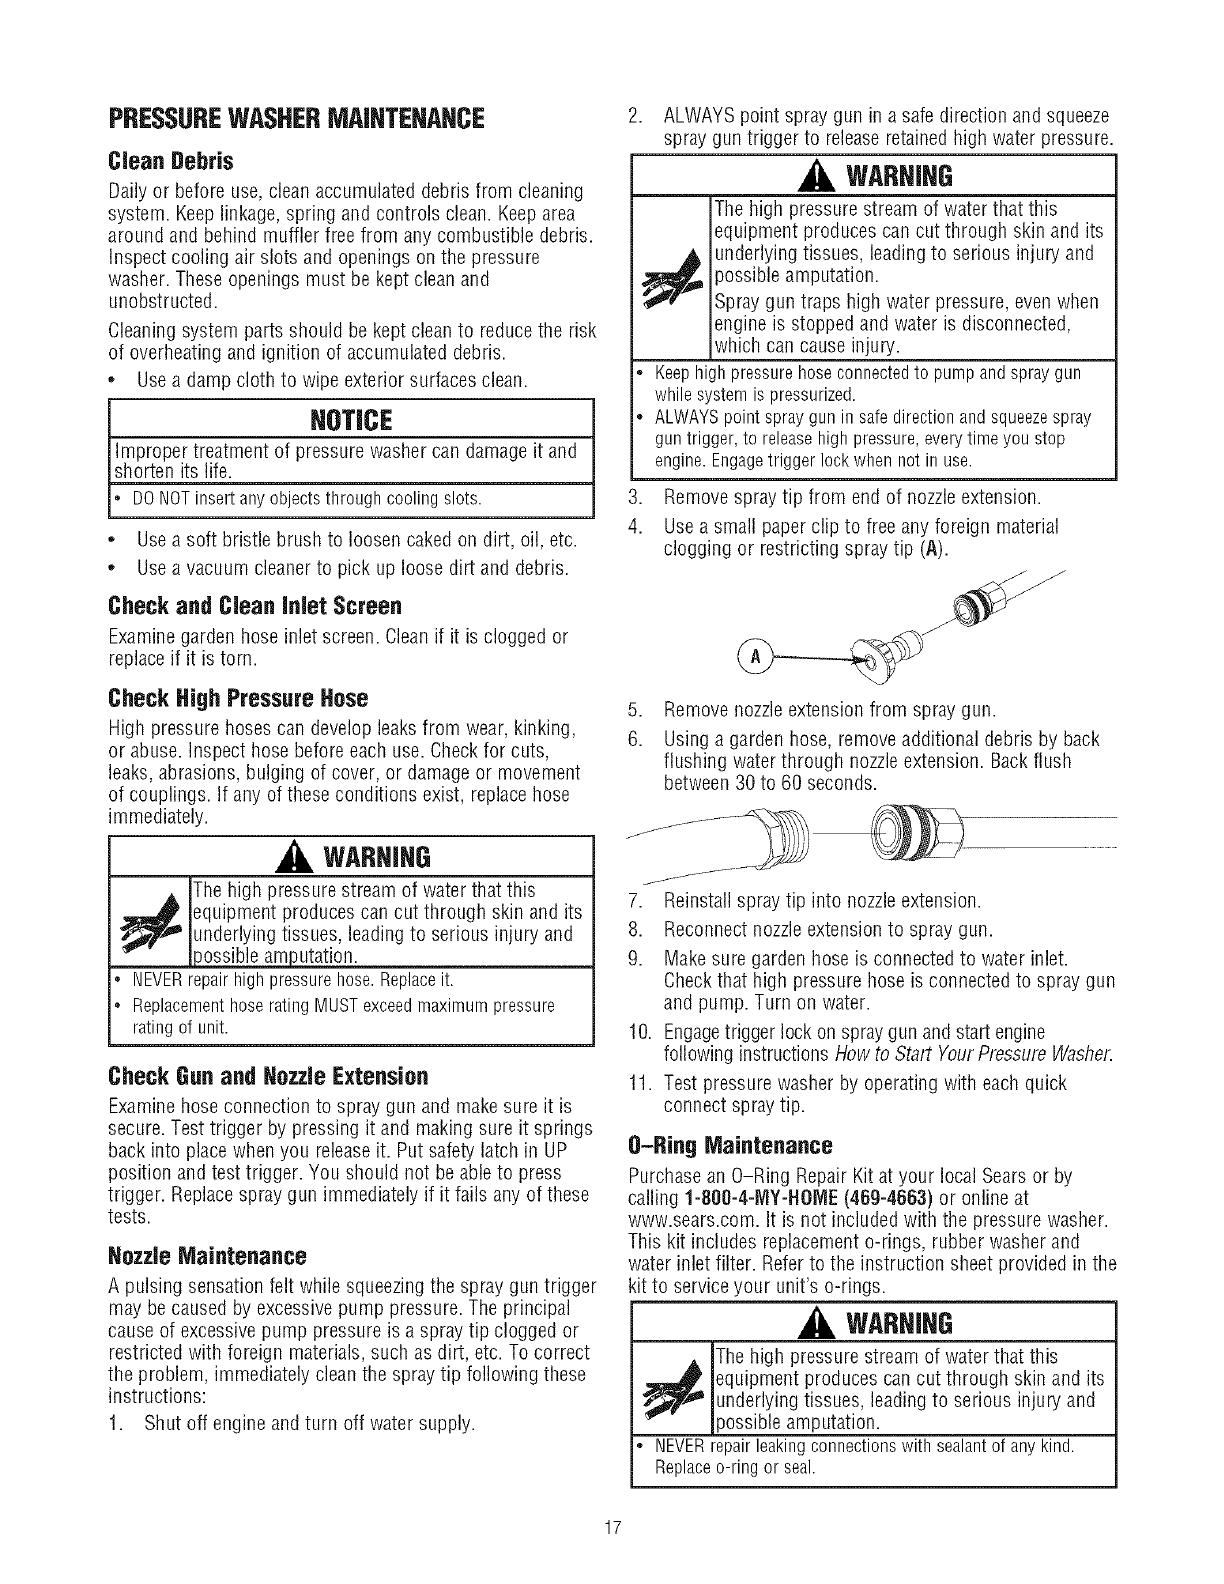
4. Usea small paperclip to free any foreign material
clogging or restricting spray tip (A).
5. Removenozzleextension from spray gun.
6. Using a garden hose, remove additional debris by back
flushing water through nozzle extension. Back flush
between 30 to 60 seconds.
7. Reinstallspray tip into nozzleextension.
8. Reconnectnozzleextensionto spray gun.
9. Makesure garden hose is connectedto water inlet.
Checkthat high pressure hose is connectedto spray gun
and pump. Turn on water.
10. Engagetrigger lock on spraygun andstart engine
following instructions How to Start YourPressure Washer.
11. Test pressure washer by operating with eachquick
connect spray tip.
O-Ring Maintenance
Purchasean O-Ring RepairKit atyour local Searsor by
calling 1-800-4-NIY-HOME(46g-4663) or online at
www.sears.com. It is not included with the pressure washer.
This kit includes replacemento-rings, rubber washer and
water inlet filter. Referto the instruction sheet provided in the
kit to serviceyour unit's o-rings.
WARHIHG
Thehigh pressurestream of water that this
_ quipment produces cancut through skin and its
underlyingtissues, leadingto serious injury and
)ossible amputation.
, NEVERrepairleakingconnectionswith sealantof anykind.
Replaceo-ringor seal.
17
ENGINEMAINTENANCE
,_ WARHIHG
,_ Unintentionalsparking can result in fire or
electric shock.
WHENADJUSTINGORMAKINGREPAIRSTOYOUR
PBESSUBEWASHER
* Disconnectthesparkplugwirefromthesparkplugandplace
thewirewhereit cannotcontactsparkplug.
WHENTESTINGFORENGINESPAEE
* Useapprovedsparkplugtester.
* DONOTcheckfor sparkwith sparkplugremoved.
Oil
Oil Recommendations
We recommendthe useof Briggs & Stratton Warranty
Certified oils for best performance. Otherhigh-quality
detergent oils are acceptableif classified for service SF,SG,
SH, SJ or higher. DONOTusespecial additives.
Outdoortemperatures determine the proper oil viscosity for
the engine. Usethe chart to selectthe best viscosity for the
outdoor temperature rangeexpected.
oF
104 Z_I_
86 w
68
5o _
32 _
14
-4
-22
°C
%_ 40
| 30
20
;_1-- to
__m mO
l-r =-10
oLIj LI-*o
,_--_-- -30
* Below40°F(4°C)theuseofSAE30 will resultin hardstarting.
** Above80°F(27°0)theuseof 10W30maycauseincreasedoil
consumption.Checkoil levelmorefrequently.
NOTE:Synthetic oil meeting ILSACGF-2,API
certification mark and API servicesymbol with
"SJ/CF ENERGYCONSERVING"or higher, is an
acceptableoil at all temperatures. Useof synthetic oil
doesnot alter required oil change intervals.
CheckingOil Level
Oil levelshould be checkedprior to each useor at least every
5 hours of operation. Keepoil level maintained.
1. Makesure pressure washer is on a levelsurface.
2. Removeoil dipstick and wipe dipstick with cleancloth.
Replaceand tighten dipstick. Removeandand check oil
level.
3. Verify oil is at "Full" mark on dipstick. Replaceand
tighten dipstick.
AddingEngineOil
1.
2.
3.
@
Makesure pressure washer is on a levelsurface.
Checkoil level as described in CheckingOil Level.
If needed,slowly pour oil into oil fill openingto the
"Full" mark on dipstick. DONOToverfill.
NOTICE
Overfilling with oil may causethe engineto not start, or
hard starting.
DONOToverfill.
IfovertheFULLmarkon dipstick,drainoil to reduceoil levelto
FULLmarkon dipstick.
4. Replaceand tighten dipstick.
18
ChangingEngineOil
Changeengine oil after the first 5 hours and every 50 hours
thereafter. If you are usingyour pressure washer under
extremely dirty or dusty conditions, or in extremely hot
weather,change oil more often.
CAUTION
Avoid prolonged or repeatedskin contact with usedmotor
oil.
Usedmotoroil hasbeenshownto causeskincancerin certain
laboratoryanimals.
Thoroughlywashexposedareaswith soapandwater.
KEEPOUTOFREACHOFCHILDREN.DON'T
POLLUTE.CONSERVERESOURCES.RETURN
USEDOILTOCOLLECTIONCENTERS.
Changeoil while engine is still warmfrom running,as
follows:
1. Drain fueltank by running pressure washer until fuel
tank is empty.
2. Disconnectspark plug wire and keepit away from spark
plug.
3. Cleanarea around oil fill, remove oil fill cap/dipstick.
Wipe dipstick clean.
4. Tipyour pressure washer to drain oil from oil fill into a
suitable container making sure you tip your unit away
from spark plug. When crankcaseis empty, return
pressure washer to upright position.
5. Slowly pour recommended oil (about 18 oz. (0.5 I))into
oil fill opening. Pauseto permit oil to settle. Fillto "Full"
mark on dipstick.
6. Wipe dipstick cleaneachtime oil levelis checked. DO
NOToverfill.
7. Replaceand tighten dipstick.
8. Wipe up any remaining oil.
9. Reconnectspark plug wire to spark plug.
Service Air Cleaner
Your engine will not run properly and may be damagedif you
run it with a dirty air cleaner.
Servicethe air cleaneronceevery 25 hours of operation or
onceeachyear, whichever comesfirst. Servicemore often if
operating under dirty or dusty conditions. Replacementsare
availableat your local Searsservice center.
To service the air cleaner, follow these steps:
1. Loosenscrew (A) and tilt cover (B) down.
2. Carefullyremove cartridge (C)assembly.
3. To cleancartridge, gently tap pleatedpaper side on a flat
surface.
4. Reinstallcleanor newcartridge assembly inside cover.
5. Insert cover's tabs (8) into slots in bottom of base(E).
6. Tilt cover up and tighten screw securelyto base.
NOTE:You canpurchase new air filter elements bycalling
1-800-4-MY-HOIVlE(469-4663).
ServiceSparkPlug
Servicethe spark plug every 100 hours of operation or
yearly, whichever occurs first.
1. Cleanareaaround spark plug.
2. Removeand inspect spark plug.
3. Replacespark plug if electrodesare pitted, burned or
porcelainis cracked. Usethe recommended replacement
plug. See Specifications.
4. Checkelectrode gap with wire feelergauge and set spark
plug gap to 0.030 inch (0.76 ram) if necessary.
_. f_ ..........._
5. Install spark plug and tighten firmly.
NOTE:You canpurchase a new spark plug bycalling
1-800-4-1VlY-HOIVlE(469-4663).
19
Spark Arrester Service
Your engine is not factory-equipped with a spark arrester. In
some areas,it is illegal to operatean engine without a spark
arrester. Checklocal laws and regulations. A spark arrester is
availablefrom your nearest Searsservicecenter. If you need
to order a spark arrester, pleasecall 1-SOO-4-F,,IY-HOF,,IE
(46g-4663).
Thespark arrester must be serviced every 50 hours to keepit
functioning as designed.
If the engine has been running,the muffler will be very hot.
Allow the muffler to cool before servicing the spark arrester.
WARHIHG
s_ Contact with muffler area can result in serious
burns.
,_ Exhaustheat/gases can ignite combustibles,structures or damagefuel tank causing a fire.
* DO NOTtouch hot parts and AVOID hot exhaust gases.
. Allow equipment to cool before touching.
* Keepat least 5feet (1.5 m) of clearanceon all sides of
pressure washer including overhead.
* Codeof FederalRegulation (CFR)Title 36 Parks, Forests,and
Public Property require equipment powered by an internal
combustion engine to havea spark arrester, maintained in
effective working order, complying to USDAForestservice
standard 5100-1C or later revision. Inthe State of California a
spark arrester is required under section 4442 of the California
Public resources code. Other statesmay havesimilar laws.
* Remove spark arrester screen for cleaning and inspection.
* Replace if screen is damaged.
Air Cooling System
Overtime debris may accumulate in cylinder cooling fins and
cannot be observed without partial engine disassembly. For
this reason,we recommendyou havea qualified Sears
servicedealer cleanthe cooling system per recommended
intervals (see MaintenanceSchedule). Equallyimportant is to
keeptop of engine freefrom debris. See CleanDebris.
Keepareaswithin heavyline clearof debris.
CleanCombustionChamber
Werecommendyou havea qualifiedSearsservicedealer
removecombustion depositsfrom the cylinder, cylinder head,
top of piston and around valvesper recommendedintervals
(seeMaintenanceSchedule).
AFTEREACHUSE
Water should not remain in the unit for long periods oftime.
Sedimentsor minerals can deposit on pump parts and
"freeze" pump action. Followthese proceduresafter every
use:
1. Flush detergentsystem byturning its detergent shut-off
valveto "Off" position and run pressure washer with
black detergent spray tip. Flushfor oneto two minutes.
2. Shut off engine,turn off water supply, point gun in a
safe direction and squeezetrigger to relievetrapped
pressure,engagetrigger lock on spray gun and let
engine cool.
WARHIHG
Thehigh pressurestream of water that this
equipment produces cancut through skin and its
_ nderlying tissues, leadingto serious injury and
_ossibleamputation.
Spray gun traps high water pressure,evenwhen
engine is stopped and water is disconnected,
which can cause injury.
. Keephighpressurehoseconnectedto pumpandspraygun
whilesystemispressurized.
* ALWAYSpointspraygunin safedirectionandsqueezespray
guntrigger,to releasehighpressure,everytimeyoustop
engine.Engagetriggerlockwhennotin use.
3. Disconnect hosefrom spray gun and high pressure
outlet on pump. Drainwater from hose, gun, and nozzle
extension. Usea rag to wipe off the hose.
4. Empty pump of all pumped liquids by pulling recoil
handle about6 times. This should remove most liquid in
pump.
5. Coil high pressure hoseand properly hang it on hook
provided on handle.
6. Store unit in a clean, dry area.
7. If storing for morethan 30 dayssee Long Term Storage
on next page.
WARHIHG
, uel and its vapors are extremely flammable and
explosive.
Fireor explosion cancause severeburns or
death.
WHENSTORINGFUELOREQUIPMENTWITH FUELIN TANK
* Storeawayfromfurnaces,stoves,waterheaters,clothes
dryers,or otherappliancesthathavepilotlightor otherignition
sourcebecausetheycanignitefuelvapors.
2O
1 / 1

Craftsman 580.676530 Owner's manual

Category
High-pressure cleaners
Type
Owner's manual
This manual is also suitable for

Ask a question and I''ll find the answer in the document

Finding information in a document is now easier with AI

Ask the document

in other languages