Easywalker June User manual

Category
Strollers
Type
User manual

Easywalker June is a versatile stroller designed for comfort, safety, and ease of use. It boasts adjustable features, including a reversible seat that allows your child to face forward or backward, a five-point safety harness for added security, and a height-adjustable push bar for your convenience. With its compact fold, the Easywalker June is perfect for travel and storage.

Easywalker June is a versatile stroller designed for comfort, safety, and ease of use. It boasts adjustable features, including a reversible seat that allows your child to face forward or backward, a five-point safety harness for added security, and a height-adjustable push bar for your convenience. With its compact fold, the Easywalker June is perfect for travel and storage.

1 2 3
4 5 6
7 8 9
10 11 12
easywalker june
13 14 15 25 26 27 37 38 39
16 17 18 28 29 30 40 41 42
19 20 21 31 32 33 43 44 45
22 23 24 34 35 36 46 47
EN - 1
Content
2 Easywalker june
3 How to assemble and use the easywalker june
4 Using the easywalker june
6 Carrycot
8 How to assemble and use the easywalker june carrycot
8 Using the easywalker june carrycot
9 Accessories
10 Maintenance
11 Warranty condions
EN - 2
Easywalker june
Congratulaons on the purchase of your easywalker june! The easywalker june has
been carefully created with comfort, safety, ease of use and design in mind. Assembly
and use of the easywalker june are comprehensively explained in the instrucons. To
get the most out of your easywalker june please follow the instrucons provided.
The easywalker june meets the following standards:
EN1888:2005
EN1466:2007
Do not forget to complete the warranty form on the website. (www.easywalker.eu).
Then you can be sure of the best service and warranty from easywalker.
We wish you a great deal of enjoyment with your easywalker june.
Easywalker.
IMPORTANT! KEEP THE MANUAL FOR FUTURE REFERENCE.
IMPORTANT! Read the instrucons carefully before use and keep them for
future reference. Your child’s safety may be aected if you do not follow these
instrucons.
WARNING! A CHILD’S SAFETY IS YOUR RESPONSIBILITY. Children should be harnessed
in at all mes and should never be le unaended. The child should be clear of
moving parts while making adjustments. This vehicle requires regular maintenance
by the user. Overloading, incorrect folding and the use of non-approved accessories
may damage or break this vehicle. Read the instrucons.
WARNING! This product is only suitable for children from newborn up to 4 years up to
a maximum weight of 30 kg / 66 lbs.
WARNING! Never leave your child unaended.
WARNING! Ensure that all the locking devices are engaged before use.
WARNING! The parking device shall be engaged during the loading and unloading of
your child
WARNING! The maximum load that can be stored in the storage basket is: 5 kg / 11
lbs.
WARNING! This product is only suitable for one child.
WARNING! Accessories or replacement parts which are not approved by the
manufacturer shall not be used.
WARNING! Any load aached to the handle bar may aect the stability of the stroller.
WARNING! Always use the restraint system.
WARNING! Always use the crotch strap in combinaon with the waist belt when
carrying your child in the seat.
WARNING! Check that the carrycot or seat unit aachment devices are correctly
engaged before use.
EN - 3
WARNING! This product is not suitable for running or skang.
WARNING! Carelessness causes re.
WARNING! Incorrect folding/overloading and the use of non approved accessories
may break or damage this product.
WARNING! Keep this plasc cover away from children to avoid suocaon.
Contents of the box
The following items must be contained in de easywalker june box:
Frame
4 wheels
Seat
Sun canopy
Storage basket
Instrucon manual
If items are missing, immediately contact the shop where you purchased the stroller.
The easywalker june is supplied with the storage basket already ed to the frame.
Be aware of environmental consideraons. When disposing of packaging, carefully
separate rubbish for recycling.
How to assemble and use the easywalker june
TIP: If the instrucons say le or right, this is always meant when looking from behind
the easywalker june push-bar.
IMPORTANT!: When assembling the easywalker june there should not be a child in the
seat or carrycot.
IMPORTANT!: Avoid dangerous situaons. Take your child out of the easywalker june if
you go up or down stairs, escalators or steep hills.
IMPORTANT! The easywalker june should only be used with the accompanying seat
and accessories. Only use the easywalker parts and accessories approved for use by
easywalker on the easywalker june.
IMPORTANT!: Do not use the easywalker june if any part is broken, torn, incomplete or
does not seem to be funconing correctly.
IMPORTANT!: The easywalker june is not designed for use when jogging or roller
skang.
EN - 4
Assembling the easywalker june
Frame
Take the easywalker june out of the box and place it on its carton, on the ground, in
front of you (image 10). Unfold the easywalker june. If you hear a click” the easywalker
june has unfolded correctly (image 11).
Wheels
Flip the parking brake upwards (image 12). Insert the rear wheel into the frame (image
13). If you hear a clear click” the wheel is locked (image 14). Repeat this process on the
opposite side with the second rear wheel. To remove the rear wheel, press the buon
on the inside of the frame while pulling the wheel out.
To aach the front wheel, insert the axle of the front fork in the appropriate opening of
the frame. If you hear a click” the wheel is locked (image 15). Repeat this process on
the opposite side with the second front wheel. To remove a front wheel, pull the locking
device backwards and the wheel, together with the fork, will come o easily (image 16).
IMPORTANT!: The ideal maximum tyre pressure is 1,4 Bar.
Using the easywalker june
Frame
When folding or unfolding the easywalker june make sure the parking brake is engaged
(image 17).
To fold the frame of the easywalker june, adjust the sun canopy and the handle bar to
the lowest posion (image 18+19). Then push the red safety-buons on the le and
the right side (image 20). While pushing the red safety-buons, pull the black knobs
upwards. When lied, the easywalker june will fold (image 21).
Unfold the easywalker june. If you hear a click” the easywalker june has unfolded
correctly (image 11).
Parking break
Always engage the parking brake (image 17) when the easywalker june is not in use. And
also when you put your child in the stroller, when you adjust or (un)fold the stroller. And
when its parked.
Push bar
To adjust the push bar in height, unlock the clips on both sides of the push bar. Move the
push bar to the desired height, hearing clicking sounds for the dierent posions, and
lock the clips (image 19). Protect the foam on the push bar against fricon and sharp
EN - 5
objects.
Wheels
To change the front wheels from swivelling to xed posion, place the front wheel
straight under the stroller and push down the locking device (image 22). Repeat this
process on the opposite side with the second front wheel.
Pull the locking device upwards to put the front wheel in the swivelling posion (image
23). Ensure that both front wheels always have the same seng: either swivelling or
xed.
IMPORTANT!: The ideal maximum tyre pressure is 1,4 Bar.
Suspension
The easywalker june has suspended rear wheels (image 24). This suspension gives extra
comfort for your child.
Seang
WARNING!: Use a harness as soon as your child can sit unaided.
WARNING!: Do not change the direcon of the seang while the child is in it.
The seat of the easywalker june can be used facing forward or backward. In both
direcons the seat has three dierent posions.
To place the seat facing forward:
Keep the seat folded. Place the two hooks under the seat over the middle bar (image
25). Push unl both hooks have made a clickingsound (image 26). Open the seat by
pulling the back of the seat upwards unl both hooks at the back of the seat (image 27)
are aached to the two knobs on the frame (image 28). Aer a clickingsound the
hooks are aached. Aach the foot plate to the frame by pushing the clamps on both
sides inwards (image 29). The seat is now ready for use.
Detaching the seat:
Detach the footplate by pushing the clamps on both sides inwards (image 30). Pull the
grip under the seang towards you (image 31). Li the seang while pulling the seat and
the back of the seat in the same me (image 32).
To place the seat facing backwards:
Repeat the steps under To place the seat facing forward:” in opposite posion: facing
backward.
To change the posion of the seat:
Press the lever under the seat and move the back of the seang to the required posion
(image 33). Support the back of the seang for your child’s comfort. When in place,
EN - 6
release the lever. The seang is now in posion.
Five-point safety harness
WARNING! Always use the restraint system.
WARNING! Always use the crotch strap in combinaon with the waist belt and
shoulder belts when carrying your child in the seat.
Adjusng the height of the shoulder straps:
The shoulder straps are standard in the lowest posion. You can adjust the height of
the shoulder straps by opening the rear of the seang (image 34) and adjust the height
of the shoulder straps by choosing dierent openings (image 35). Make sure that both
sides have the same height. Close the rear of the seang.
Adjusng the length of the straps:
You can use the sliding buckles on the shoulder straps, the waist straps and the crotch
strap to adjust the ve-point safety harness (image 36). Always make sure that the
harness ts your child exactly.
Sun canopy
IMPORTANT!: A small child has a very sensive skin. Never leave your child unaended
in the sun.
IMPORTANT!: Always use the sun canopy.
Aach the sun canopy on the easywalker june by placing the sun canopy hinges over
the knobs on the frame of the rear part of the sun canopy. Then use the zipper to fasten
the hood (image 37).
The sun canopy is height adjustable. Grab the bar at the back of the sun canopy and
move it up or down unl it is in the desired posion (image 18). With the extra extension
(image 38) you can provide extra shade for your child. For a compact fold put the sun
canopy in lowest posion.
The sun canopy is exchangeable between the easywalker june and the carrycot. In order
to detach the sun canopy from the easywalker june unzip the hood (image 37).
Storage basket
Under the seat of the easywalker june is a storage basket. This storage basket can be
used for groceries up to 5 kg / 11 lbs (image 39). You can take the basket o, using the
Velcro straps.
Carrycot
Congratulaons on the purchase of your easywalker june carrycot. The easywalker june
carrycot has been carefully created with comfort, safety, ease of use and design in mind.
EN - 7
Assembly and use of the easywalker june carrycot are comprehensively explained in
the instrucons. To get the most out of your easywalker june carrycot please follow the
instrucons provided.
The easywalker carrycot meets the standards:
EN1888:2005
EN1466:2007
IMPORTANT! KEEP MANUAL FOR FUTURE REFERENCE
IMPORTANT! Read the instrucons carefully before use and keep them for
future reference. Your child’s safety may be aected if you do not follow these
instrucons.
WARNING! This product is suitable for a child who cannot sit up unaided, roll over and
cannot push itself up on its hands and knees. Maximum weight of the child: 9 kg /
19,8 lbs.
WARNING! Never leave your child unaended.
WARNING! Ensure that all the locking devices are engaged before use.
WARNING! Never use a maress thicker than 35 mm / 1,9 inch.
WARNING! Carrying handles shall be le out of the carrycot during use.
WARNING! Never use this carrycot on a stand.
WARNING! Use only on a rm, horizontal level and dry surface.
WARNING! Do not let other children play unaended near the carrycot.
WARNING! Do not use if any part is broken, torn or missing.
WARNING! Use only replacement parts supplied or approved by the manufacturer.
WARNING! Be aware of the risk of open re and other source of strong heat, such as
electric bar res, gas res, etc., in the near vicinity of carrycot.
WARNING! Keep the plasc cover away from children to avoid suocaon.
NOTE: Check the handles and boom of the carrycot regularly for signs of damage and
wear.
Contents of the box
The following items must be contained in the easywalker june carrycot box:
1 carrycot
1 maress with air mesh
1 rain cover
1 mosquito net
1 instrucon manual
If items are missing, immediately contact the shop where you purchased the carrycot.
Be aware of environmental consideraons. When disposing of packaging, carefully
separate rubbish for recycling.
EN - 8
How to assemble and use the easywalker june carrycot
WARNING!: Do not li the carrycot by the sun canopy. Use the handles on the sides.
IMPORTANT!: Only use the easywalker june carrycot or accessories approved for use
by easywalker on the easywalker june.
IMPORTANT!: When assembling the easywalker carrycot there should not be a child in
the carrycot.
Assembling the easywalker june carrycot
Carrycot
Take the easywalker june carrycot out of the box, take the cover o the carrycot and
remove the accessories, the maress and the boom plate (image 40).
Pull the fastener nearest to the head-end in the direcon of the head-end unl it clicks”
(image 41). Pull the fastener nearest to the foot-end in the direcon of the foot-end
unl it “clicks”.
Replace the boom plate and the maress in the carrycot.
Sun canopy
IMPORTANT!: A small child has a very sensive skin. Never leave your child unaended
in the sun.
IMPORTANT!: Always use the sun canopy.
The sun canopy is exchangeable between the easywalker june and the easywalker june
carrycot. In order to detach the sun canopy from the easywalker june unzip the hood
from the back (image 37).
Aach the sun canopy to the carrycot by placing the sun canopy hinges over the knobs
on the frame of the carrycot. Then use the zipper to fasten the hood (image 42).
With the extra extension (image 38), you can provide extra shade for your child.
Using the easywalker june carrycot
Aaching the easywalker june carrycot onto the frame
Engage the parking brake of the easywalker june (image 17). Remove the seang from
the frame (see the manual of easywalker june).
Li the carrycot by the two handles on the sides and place it on the four bolts at the
inside of the frame (image 43). If you hear four clear “clicks” the carrycot is aached
correctly.
EN - 9
Always check whether the four connecons are xed. Put the handles back into the side
pockets of the carrycot.
Detaching the easywalker june carrycot from the frame
Engage the parking brake of the easywalker june (image 17).
To remove the carrycot from the frame, pull the grip under the head end of the carrycot.
Carefully li the carrycot by the handles. The carrycot will come o (image 44).
TIP: The carrycot can be used as a cot without a supporng frame.
Maress
The maress of the easywalker june carrycot has been specially designed to let your
child sleep hygienically and safely. It consists of a foam layer and an air-ow layer.
Always put the air-ow layer on top of the maress and cover it with the ed sheet
provided (image 45).
Mosquito net
The easywalker june carrycot is supplied with a mosquito net.
Place the mosquito net over the carrycot so that it connects properly to the carrycot
(image 46).
Rain cover
IMPORTANT!: The rain cover has venlaon holes. These ensure fresh air to circulate,
so do not block them.
IMPORTANT!: Do not let your child sit under the rain cover unnecessarily. Ensure that
your child does not get too hot.
The easywalker june carrycot is supplied with a rain cover.
Place the rain cover so that the venlaon window is by the opening of the carrycot
(image 47).
Make sure it connects properly to the carrycot.
Tip: The rain cover has reecve stching so that you are visible to other road users in
the dark and during bad weather.
Accessories
The easywalker june and the easywalker june carrycot have been carefully created with
comfort, safety, ease of use and design in mind. The easywalker june and the easywalker
june carrycot are supplied, as standard, with the most important accessories. In
addion to the standard, easywalker also oers a wide range of accessories. Go to www.
easywalker.eu for the opons.
EN - 10
Accessories for the easywalker june:
easywalker june carrycot
easywalker june car seat adapters
easywalker june rain cover
easywalker june UV-protecve mosquito net
easywalker june inlay
easywalker foot mu
easywalker nursery bag
easywalker june bumper bar
easywalker cup holder
easywalker parasol
easywalker mini pump
easywalker june travel bag
Maintenance
Check your easywalker june or easywalker june carrycot regularly.
Regularly clean the easywalker june. Use a damp cloth and a mild cleaning soluon if
necessary.
The swivel wheel holders and the front wheel axles get dirty. Take the wheels o on
a regular basis and clean them with lukewarm water. Ensure that all parts are dried
thoroughly and oil the axles lightly with oil or silicone spray before replacing the wheels.
Avoid exposing the easywalker june and easywalker june carrycot to extreme
temperatures.
The easywalker june is not resistant to salt water.
Never bleach, dry-clean.
Fabrics used on the easywalker june and easywalker june carrycot are removable and
washable. Wash the fabrics at maximum 30 degrees Celsius and never dry in the tumble
dryer. Before washing always remove the fastenings, foam, plasc or metal parts. Always
refer to the washing label on each part.
During wet weather always use the rain cover. If the easywalker june and the carrycot
are wet due to cleaning or rain do not fold but leave to dry, opened out, in a well
venlated room.
Parts of the easywalker june and the easywalker june carrycot can slightly discolour
or become worn as a result of weather condions and usage. This can also occur with
normal usage.
EN - 11
Warranty condions
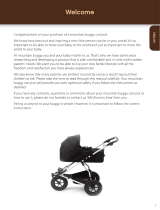
In its capacity as manufacturer, easywalker provides a warranty for the easywalker june
and the easywalker june carrycot produced by them, under the following condions:
The warranty commences on the date stated on the proof of purchase and is valid
for two years. This is in accordance with the manufacturers (importers) specicaon
concerning correct use of the product or what may be expected as normal when using
it.
The guarantee for rims, outer res, inner tubes, foam, spokes, covers and accessories
only relates to construcon and/or material faults. If you have any doubts about the
state of one or more of the components, contact the shop where you purchased the
product. The retailer will assess the product and carry out simple repairs. The retailer
will always contact the manufacturer should there be serious problems. You cannot
demand an exchange or refund. Repairs do not allow the warranty period to be
extended. Easywalker is never liable for damage other than to the product produced
by easywalker.
Warranty is not provided if:
The product is provided to the manufacturer/importer without a copy of the
original purchase receipt.
Defects have been caused by incorrect use or maintenance, deviang from what is
stated in the instrucons or what can be expected as reasonable when using the
product.
Repairs to the product have been carried out by third pares without prior
consent from the manufacturer.
The defect has been caused by neglect.
The defect was caused as a result of an accident.
It involves normal wear and tear that may be expected with daily use.
It concerns the loss of parts.
Damage caused by using accessories of another brand.
Otherwise not conforming with the aforemenoned warranty condions.
In the laer situaon, the ulmate decision as to whether the part falls under the
warranty will be taken by the manufacturer’s service department. Above warranty
condions are supplementary to legal rights. The warranty only applies to the rst
owner and is not transferable.
IMPORTANT!: Keep your proof of purchase and the instrucons safely.
IMPORTANT!: The serial number of the easywalker june can be found on the inner
side of the horizontal tube between the two rear wheels. The batch numbers of
the covers and other fabric parts can be found on the washing labels. The batch
number for the easywalker carrycot can also be found on the washing label.
If you have any quesons contact the shop where you have purchased the easywalker
EN - 12
june and the easywalker june carrycot. Ensure you have the following details to hand:
Type of easywalker and the serial and batch numbers of the frame and covers.
Purchase receipt
In order to improve the easywalker june and the easywalker june carrycot we would
love to hear your opinion. This may concern design, use, materials and instrucons.
Mail your ideas to info@easywalker.eu
We wish you a great deal of pleasure when using your easywalker june.
easywalker
The utmost care was exercised in designing and compiling these instrucons. The
content however, is subject to change without noce. Easywalker shall not be liable for
technical errors or omissions contained in this manual.
The purchased product may dier from the product as described in this manual. Check
for the most recent manuals the easywalker website. www.easywalker.eu
BeNeLux & UK
Easywalker BV
www.easywalker.eu
  • Page 1 1
  • Page 2 2
  • Page 3 3
  • Page 4 4
  • Page 5 5
  • Page 6 6
  • Page 7 7
  • Page 8 8
  • Page 9 9
  • Page 10 10
  • Page 11 11
  • Page 12 12
  • Page 13 13
  • Page 14 14

Easywalker June User manual

Category
Strollers
Type
User manual

Easywalker June is a versatile stroller designed for comfort, safety, and ease of use. It boasts adjustable features, including a reversible seat that allows your child to face forward or backward, a five-point safety harness for added security, and a height-adjustable push bar for your convenience. With its compact fold, the Easywalker June is perfect for travel and storage.

Ask a question and I''ll find the answer in the document

Finding information in a document is now easier with AI