NEC E322 User manual

Category
Public displays
Type
User manual

This manual is also suitable for

Users Manual
E552
E462
E422
E322
English-1
www.necdisplaysolutions.com
Index
Precautions And Reminders ���������������������������������������������������������������� English-1
Important Safety Instructions ��������������������������������������������������������������� English-2
Safety Instructions ������������������������������������������������������������������������������� English-4
Important Information �������������������������������������������������������������������������� English-5
Declaration Of Conformity ������������������������������������������������������������������� English-8
Preparation ���������������������������������������������������������������������������������������� English-10
Preparing Your LCD Display For Wall Mounting ��������������������� English-10
Attaching the Base �������������������������������������������������������������������English-11
Place The Display On A Solid Surface �������������������������������������English-11
Antenna Connection �����������������������������������������������������������������English-11
Battery Installation and Replacement�������������������������������������� English-12
Connect To The Power Source ����������������������������������������������� English-13
Power On/Off Your New LCD Display ������������������������������������� English-13
Source Connection Guide ������������������������������������������������������� English-14
RS-232C Port Specications ��������������������������������������������������� English-16
Power Mode Status ����������������������������������������������������������������� English-16
Operating Instructions ����������������������������������������������������������������������� English-17
Using The Side Panel Controls ����������������������������������������������� English-17
Using The Remote Control ������������������������������������������������������ English-18
Picture Format for Each Input Source ������������������������������������� English-19
Navigating The On-Screen Menu ������������������������������������������������������ English-20
Video Menu ����������������������������������������������������������������������������� English-20
Audio Menu ����������������������������������������������������������������������������� English-21
TV Menu ���������������������������������������������������������������������������������� English-22
Setup Menu ����������������������������������������������������������������������������� English-22
Parental Menu ������������������������������������������������������������������������� English-24
USB Menu ������������������������������������������������������������������������������� English-25
Tips ���������������������������������������������������������������������������������������������������� English-27
Care Of The Screen ���������������������������������������������������������������� English-27
Mobile Telephone Warning ������������������������������������������������������ English-27
End Of Life Directives�������������������������������������������������������������� English-27
License Notice and Trademark Acknowledgement ����������������� English-27
Product Specication ������������������������������������������������������������������������� English-28
Before Calling Service ����������������������������������������������������������������������� English-30
Glossary �������������������������������������������������������������������������������������������� English-31
Limited Warranty ������������������������������������������������������������������������������� English-32
References ���������������������������������������������������������������������������������������� English-33
English-1
English
Precautions And Reminders
Do not place the display
in conned spaces or in a
box when in use� Maintain
ample ventilation for the
display when in use�
Do not open the display
cabinet�
Call a NEC certied
service personnel for any
internal service needed
for your display
Keep the display away
from direct sunlight, dust,
humidity, and smoke�
Unplug immediately if any
foreign object is put in the
display or if the display
falls�
Unplug immediately if
there is a display malfunc-
tion such as a loss of
audio/video, the presence
of smoke, or a bad odor
coming from the display
Unplug the AC cord from
the AC outlet before
cleaning� Do not use
liquid cleaners or aerosol
cleaners to clean the
display
Do not place the display
near water such as a
bathtub, washbasin, sink,
laundry tub, swimming
pool, or a damp base-
ment�
Do not cover or block
any vents or openings�
Inadequate ventilation
may shorten the life of
the display and cause
overheating�
Place the unit on a sturdy,
even surface�
Do not insert any foreign
objects into the display
cabinet�
Unplug the power cord
from the outlet when
the display is not in use
for long periods of time
(days)�
Notice for Remote Controller
Avoid Liquids
1
2
3
4
5
6
7
8
9
0
Avoid Aerosol Cleaners
1
2
3
4
5
6
7
8
9
0
Avoid Dropping
1
2
3
4
5
6
7
8
9
0
www.necdisplaysolutions.com
English-3English-2
Important Safety Instructions
Read before operating equipment
The lamps in this product contain mercury. Please dispose according
to state, local or federal law.
Follow all warnings and instructions marked on this display
1� Read these instructions�
2� Keep these instructions�
3� Heed all warnings�
4� Follow all instructions�
5� Do not use this apparatus near water
6� Clean only with dry cloth�
7� Do not block any ventilation openings� Install in accordance with
the manufacturer's instructions�
8� Do not install near any heat sources such as radiators, heat
registers, stoves, or other apparatus (including ampliers) that
produce heat�
9� Do not defeat the safety purpose of the polarized or grounding-
type plug� A polarized plug has two blades with one wider than the
otherA grounding type plug has two blades and a third grounding
prong� The wide blade or the third prong are provided for your
safety. If the provided plug does not t into your outlet, consult an
electrician for replacement of the obsolete outlet�
10� Protect the power cord from being walked on or pinched
particularly at plugs, convenience receptacles, and the point where
they exit from the apparatus�
11� Only use attachments/accessories specied by the manufacturer.
12� Use only with the cart, stand, tripod, bracket, or table specied by
the manufacturer, or sold with the apparatus� When a cart is used,
use caution when moving the cart/apparatus combination to avoid
injury from tip-over
S3125A
13� Unplug this apparatus during lightning storms or when unused for
long periods of time�
14� Refer all servicing to qualied service personnel. Servicing is
required when the apparatus has been damaged in any way, such
as power-supply cord or plug is damaged, liquid has been spilled
or objects have fallen into the apparatus, the apparatus has been
exposed to rain or moisture, does not operate normally, or has
been dropped�
15� The display complies with the recommended safety standards
for stability� Do not put excessive force on the front or top of
English-3English-2
English
the cabinet� This could cause the product to tip over and cause
damage and/or personal injury
16� If monitor or glass is broken, do not come in contact with the liquid
crystal and handle with care�
17� Follow instructions for wall, shelf or ceiling mounting as
recommended by the manufacturer
18� An outdoor antenna should not be located near overhead power
lines or any electrical circuits�
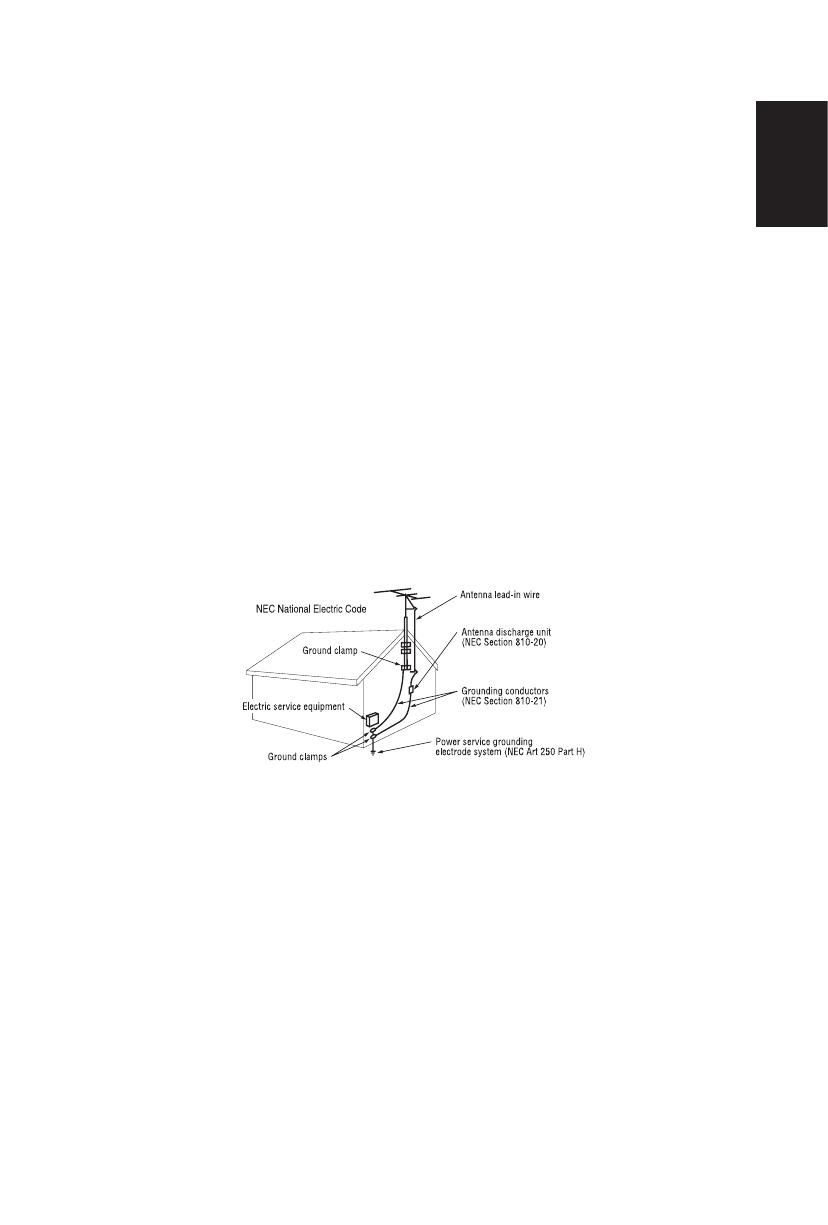
19� If an outside antenna is connected to the receiver, conrm that the
antenna system is grounded to protect against voltage surges and
built up static charges� Section 810 of the National Electric Code,
ANSI/NFPA No� 70-1984, provides information with respect to
proper grounding for the mast and supporting structure, grounding
of the lead-in wire to an antenna discharge unit, size of grounding
connectors, location of antenna discharge unit, connection
to grounding electrodes and requirements for the grounding
electrode�
NOTE: To the display system installer: This reminder is provided
to call attention to Article 820-44 of the National Electric Code that
provides guidelines for proper grounding and, in particular, species
that the cable ground shall be connected to the grounding system of
the facility, as reasonably close to the point of cable entry as possible
Power source
This LCD display operates on 120 volts 60 Hz, AC current� Insert the
power cord into a 120 volts 60 Hz outlet� The mains plug is used as
the disconnect device and shall remain readily operable�
To prevent electric shock from the display, do not use with an
extension cord, receptacle, or other outlet unless the blades and
ground terminal can be fully inserted to prevent blade exposure�
Never connect the LCD display to 50 Hz, direct current, or anything
other than the specied voltage.
CAUTION: Never remove the back cover of the LCD display as this
can expose you to very high voltages and other hazards� If the display
does not operate properly, unplug the LCD display and call your
authorized dealer or service center
Adjust only those controls that are covered in the instructions, as
improper changes or modications not expressly approved by NEC
could void the users warranty
English-5English-4
Safety Instructions
FCC STATEMENT
This equipment has been tested and found to comply with the limits for a
Class B digital device, pursuant to Part 15 of the FCC Rule� These limits are
designed to provide reasonable protection against harmful interference in
a residential installation� This equipment generates, uses and can radiate
radio frequency energy and, if not installed and used in accordance with
these instructions, may cause harmful interference to radio communications�
However, there is no guarantee that interference will not occur in a particular
installation� If this equipment does cause harmful interference to radio or
television reception, which can be determined by turning the equipment off
and on, the user is encourage to try to correct the interference by one or more
of the following measures:
1� Reorient or relocate the receiving antenna�
2� Increase the separation between the equipment and receiver
3� Connect the equipment into an outlet on a circuit different from that to
which the receiver is connected�
4� Consult the dealer or an experienced radio/display technician for help�
This device complies with Part 15 of the FCC Rules� Operation is subject to
the following two conditions:
1� This device may not cause harmful interference�
2� This device must accept any interference received, including interference
that may cause undesired operation�
FCC CAUTION
To assure continued compliance and possible undesirable interference, ferrite
cores may be used when connecting this LCD display to video equipment; and
maintain at least 400mm spacing to other peripheral device�
CANADIAN NOTICE
This Class B digital apparatus complies with Canadian ICES-003
English-5English-4
English
Important Information
WARNING
TO PREVENT FIRE OR SHOCK HAZARDS, DO NOT EXPOSE THIS
UNIT TO RAIN OR MOISTURE� ALSO, DO NOT USE THIS UNIT’S
POLARIZED PLUG WITH AN EXTENSION CORD RECEPTACLE OR
OTHER OUTLETS UNLESS THE PRONGS CAN BE FULLY INSERTED�
REFRAIN FROM OPENING THE CABINET AS THERE ARE HIGH
VOLTAGE COMPONENTS INSIDE�
REFER SERVICING TO QUALIFIED SERVICE PERSONNEL�
CAUTION
CAUTION:
TO REDUCE THE RISK OF ELECTRIC SHOCK, MAKE SURE
POWER CORD IS UNPLUGGED FROM WALL SOCKET
TO FULLY DISENGAGE THE POWER TO THE UNIT,
PLEASE DISCONNECT THE POWER CORD FROM THE AC
OUTLET� DO NOT REMOVE COVER (OR BACK)� NO USER
SERVICEABLE PARTS INSIDE� REFER SERVICING TO
QUALIFIED SERVICE PERSONNEL�
This symbol warns user that uninsulated voltage within the
unit may have sufcient magnitude to cause electric shock.
Therefore, it is dangerous to make any kind of contact with any
part inside this unit�
This symbol alerts the user that important literature concerning
the operation and maintenance of this unit has been included�
Therefore, it should be read carefully in order to avoid any
problems�
CAUTION: Please use the power cord provided with this display in
accordance with the table below� If a power cord is not supplied with this
equipment, please contact your supplier
Plug Type Plug Shape Region Voltage
North America U�S�A�/Canada AC 120 V
Apparatus shall not be exposed to dripping or splashing and no objects lled
with liquids, such as vases, shall be placed on the apparatus�
The Class I apparatus shall be connected to a mains socket outlet with a
protective grounding connection�
English-7English-6
Batteries installed warning
Caution - Danger of explosion if batteries are incorrectly replaced� Replace
only with the same or equivalent type� The batteries shall not be exposed to
excessive heat such as sunshine, re or the like.
CAUTION:
These servicing instructions are for use by qualied service personnel only.
To reduce the risk of electric shock, do not perform any servicing other than
that contained in the operating instructions unless you are qualied to do so.
Ventilation
The slots and openings in the TV are provided for necessary ventilation� To
ensure reliable operation of the TV and to protect it from overheating, these
slots and openings must never be blocked or covered�
Unless proper ventilation is provided, the TV may gather dust and get dirty
For proper ventilation, observe the following:
Do not install the TV face up, down or sideways�
Do not install the TV turned over or upside down�
Never cover the slots and openings with a cloth or other materials�
Never block the slots and openings by placing the TV on a bed, sofa,
rug or other similar surface�
Never place the TV in a conned space, such as a bookcase or built-in
cabinet, unless proper ventilation is provided�
Leave some space around the TV set as shown below� Otherwise, air-
circulation may be inadequate and will cause overheating, which may cause a
re or damage to the TV set.
Install on the wall
4 inches
10 cm
4 inches
10 cm
4 inches
10 cm
Leave at least this space
around the set.
11 7/8 inches
30 cm
English-7English-6
English
Installed with stand
4 inches
10 cm
4 inches
10 cm
Leave at least this space
around the set.
11 7/8 inches
30 cm
4 inches
10 cm
Never install the TV set where Air circulation is blocked�
Objects and ventilation holes
Never push objects of any kind into the TV through the cabinet slots as they
may touch dangerous voltage points or short out parts that could result in a
re or an electric shock. Do not place any objects on the TV.
English-9English-8
Declaration Of Conformity
This device complies with Part 15 of FCC Rules� Operation is subject to the
following two conditions� (1) This device may not cause harmful interference,
and (2) this device must accept any interference received, including
interference that may cause undesired operation�
U.S. Responsible Party: NEC Display Solutions of America, Inc.
Address: 500 Park Boulevard, Suite 1100
Itasca, Illinois 60143
Tel. No.: (630) 467-3000
Type of Product: Digital Signage Display
Equipment Classication: Class B Peripheral
Model: E552(L550UQ)
E462(L460UR)
E422(L420UT)
E322(L320UU)
We hereby declare that the equipment specied above
conforms to the technical standards as specied in the FCC Rules.
Canadian Department of Communications Compliance Statement
DOC: This Class B digital apparatus meets all requirements of the
Canadian Interference-Causing Equipment Regulations�
C-UL: Bears the C-UL Mark and is in compliance with Canadian Safety
Regulations according to CAN/CSA C22�2 No� 60065-03�
FCC Information:
1� Use the attached specied cables with the E322/E422/E462/E552 color
monitor so as not to interfere with radio and television reception�
(1) Please use the supplied power cord or equivalent to ensure FCC
compliance�
(2) Please use the supplied shielded video signal cable, Mini D-SUB 15
pin to Mini D-SUB 15 pin�
2� This equipment has been tested and found to abide by the limits of a
Class B digital device, pursuant to part 15 of the FCC Rules� These limits
are intended to provide reasonable security against harmful interference
in a residential deployment� This equipment generates, uses, and
can radiate radio frequency energy, and, if not installed and used in
accordance with the instructions, may cause harmful interference to radio
communications� However, there is no guarantee that interference will
not occur in a certain installation� If this equipment does cause damaging
interference to radio or television reception, which can be determined by
powering the equipment on and off, the user is encouraged to attempt
correcting the interference by one or more of the following procedures:
English-9English-8
English
3� following procedures:
Reorient or relocate the receiving display
Increase the separation between the equipment and display
Connect the equipment into a different outlet than the receiver
Consult your dealer or an experienced radio/display technician for
assistance�
If necessary, the user should contact the dealer or an experienced radio/
television technician for additional suggestions. The user may nd the following
booklet, prepared by the Federal Communications Commission, helpful: “How
to Identify and Resolve Radio-display Interference Problems�” This booklet is
available from the U.S. Government Printing Ofce, Washington, D.C., 20402,
Stock No� 004-000-00345-4�
Windows is a registered trademark of Microsoft Corporation�
NEC is a registered trademark of NEC Corporation�
All other brands and product names are trademarks or registered trademarks
of their respective owners�
®
HDMI, the HDMI logo and High-Denition Multimedia Interface are trademarks
or registered trademarks of HDMI Licensing LLC in the United States and
other countries�
English-11English-10
Preparation
IMPORTANT: Do not apply pressure to the screen display area which may
compromise the integrity of the display� The manufacturer’s warranty does not
cover user abuse or improper installations�
Preparing Your LCD Display For Wall Mounting
We suggest that you keep your display at least 2�36 inches (60 mm) from the
wall to prevent cable interference� Before mounting your display on the wall,
you need to remove the base� For your safety, only mount with a UL listed wall
mount bracket that supports the weight of the display� (Please see page 28 �)
To attach a wall mount bracket to your display:
E322 / E422 / E462 E552
screen size (inches) required pitch (mm) require mounting bolts
32 200 x 200 4 x M6
42 400 x 200 4 x M6
46 400 x 200 4 x M6
55 400 x 200 4 x M6
1� E322/E422/E462: Loosen the screws on the bottom of the stand and
base�
E552: Loosen the screws on the back of the stand-base�
2� Remove the stand base from your display
3� Secure the wall mount bracket to the back of your display using four M6
screws�
Note: Wall mounting solution is not included with the unit and is sold
separately� Contact your NEC representative for details�
English-11English-10
English
Attaching the Base
E322 / E422 / E462 E552
1� Place the display face down on a soft and at surface to prevent
scratching and damage�
2� Carefully align the base to the stand and fasten the screws with a cross-
head screwdriver
CAUTION: The base of the stand is very heavy� Install with care to avoid injury
such as dropping the base onto one's foot�
Place The Display On A Solid Surface
Ensure that the LCD display is
placed in a position to allow free ow
of air� Do not cover the ventilation
openings on the back cover� Do not
place the display near any open
ames. Do not allow the display to
be placed in an environment where
it can be exposed to heat, direct
sunlight, or rain and water� Do not
expose the equipment to any liquid�
Antenna Connection
Unless your LCD display is connected
to a cable TV system or to a centralized
antenna system, a good outdoor color
TV antenna is recommended for best
television performance� However, if you
are located in an exceptionally good
signal area that is free from interference
and multiple image ghosts, an indoor
antenna may be sufcient.
When using a 75-Ohm coaxial cable system, connect the CATV coaxial cable
to the AIR/CABLE (75-Ohm) terminal� Or if you have an antenna, connect the
coaxial cable to the same AIR/CABLE terminal�
Min
1 m
English-13English-12
Battery Installation and Replacement
The remote control is powered by two 1�5V AAA batteries� To install or replace
batteries:
1� Open the battery cover of the remote
control by pushing and pulling it in
the direction of the arrow
2� Insert two new “AAA” size batteries
for the remote control� When
replacing old batteries, push them
towards the springs and lift them out�
3� Match the batteries to the (+) and (-)
marks in the battery compartment�
4� Insert the bottom of the battery, the
(-) side, into the battery compartment
rst, push towards the springs and
insert the top of the battery, the (+)
side, into place� Do not force the battery into the battery compartment�
5� Close the battery cover making sure the tabs rest in the corresponding
holes and push down the cover until it clicks shut�
CAUTION: Incorrect usage of batteries can result in leaks or bursting�
NEC recommends the following battery use:
Do not mix battery brands�
Do not combine new and old batteries� This can shorten the battery life
or cause liquid leakage of the batteries�
Remove dead batteries immediately to prevent battery acid from leaking
into the battery compartment�
Do not touch exposed battery acid as it may injure skin�
Remove the batteries if you do not intend to use the remote control for a
long period of time�
English-13English-12
English
Connect To The Power Source
The display should be installed close to an easily accessible power outlet�
Fully insert the prongs into the power outlet socket� A loose connection may
cause image degradation�
If there is power to the display, the front LED at the bottom of the display will
be either blue or red� A blue LED means the display is powered on� A red LED
means the display is in standby mode�
Power On/Off Your New LCD Display
Press the power key on the remote control or press the power button located
on the side of the display� The display will power on�
DPNQ
Power Key
or
English-15English-14
Source Connection Guide
®
AC POWER
E322/E422/E462
E322/E462 E422
5
6
1
4
2
9
7
3
8
1
English-15English-14
English
E552
AC POWER
6
7
5
4
8
9
2
1
1� HDMI – Connect the primary source for digital video such as a DVD
multimedia player or set top box through this all digital connector
2� RGB/AUDIO – Connect the video and audio cables from a computer here�
3� AV Connect the primary source for composite video devices, such as
a VCR or video game� Use the white and red connectors to connect the
external audio from the same source�
4� COMPONENT (Y-PbPr with Audio L/R) – Connect the primary source for
component video devices such as a DVD Player or set top box here� Use
red for Pr, blue for Pb, green for Y, red for right audio (R) and white for left
audio (L) inputs�
5� AIR/CABLE – Connect to an antenna or digital cable (out of-the-wall, not
from Cable Box) for the digital tuner
6� DIGITAL OUT – When a digital audio signal is associated with the input
selected for viewing, the digital audio will be available on this DIGITAL
OUT connection to your home theater system�
7� Earphone Output – Connect to the headphones� When the headphone is
inserted to the plug, all the speakers will be muted�
English-17English-16
8� USB/SERVICE – Insert USB storage device to view photos and listen to
the music� /This USB slot is for future software upgrades�
9� RS-232C – Input from external equipment such as a PC or AV control
system in order to control RS-232C functions�
Once your AV device is connected, press the Source button on the remote
control to select the relevant source to view� (ex: Press COMP button to select
“Component” if you have connected a source to the Component input�)
RS-232C Port Specifications
PC control of the TV
Attach an RS-232C cable cross-type (commercially available) to the supplied
Din/D-Sub RS-232C for the connections�
Note: This operation system should be used by a person who is accustomed
to using computers�
Communication conditions
Set the RS-232C communication settings on the PC to match the TV's
communication conditions�
The TV's communication settings are as follows:
Baud rate: 9,600 bps
Data length: 8 bits
Parity bit: None
Stop bit: 1 bit
Flow control: None
Communication procedure
Send the control commands from the PC via the RS- 232C connector
The TV operates according to the received command and sends a response
message to the PC�
Do not send multiple commands at the same time� Wait until the PC receives
the response before sending the next command�
Power Mode Status
Mode
LED
Status
VGA AV Component HDMI 1-3 TV
On Blue v v v v v
Power
Saving
Purple v - - - -
Standby Red v v v v v
Power saving support automatically power on when signal appear
Standby to power on by touch up remote or keypad power button�
English-17English-16
English
Operating Instructions
1
2
3
5
6
4
7
5
6
1
3
4
2
7
E322/E422/E462 E552
Using The Side Panel Controls
1� VOL +
Press to increase the volume�
Press this key to shift Right in the OSD menu�
2� VOL -
Press to decrease the volume�
Press this key to shift Left in the OSD menu�
3� CH ▲/
Press to increase the channel number
Press this key to shift up in the OSD menu�
4� CH ▼/
Press to decrease the channel number
Press this key to shift down in the OSD menu�
5� MENU Press to open or exit the OSD (On-Screen Display) menu�
6� INPUT Press to select the input source�
7� POWER Press to turn on / off (standby) the display
English-19English-18
Using The Remote Control
Power
Press to turn On/Off (standby) the
power� (Note: To completely turn off
the power, unplug the AC cord from
the power outlet�)
TV
Press to choose ATSC/NTSC tuner
source mode�
AV
Press to choose Composite source
mode�
COMP
Press to choose Component source
mode�
HDMI/PC
Press repeatedly to choose PC IN or
HDMI source mode�
0 ─ 9 / - number
Press to enter the tuner channel
number to select channel (Press ‘-’ to
choose the sub-channel)�
PRE CH
Press to display the previous
channel�
Source
Press repeatedly to choose the
various input sources�
Mute
Switch the sound On/Off�
VOL+ / VOL-
Press + or - to adjust the volume�
CH+ / CH-
Press + or - to browse through the
channels�
Exit
Press to exit the OSD menu�
Display
Press to show the information about
the input source and tuner channel�
PRE CH
Ch-List
C O M P
FAV
Press to display the Favorite List�
Menu
Press to open the OSD menu�
▲, ▼, ◄, ►, OK
Press to select or confirm the various
function items on the menu�
  • Page 1 1
  • Page 2 2
  • Page 3 3
  • Page 4 4
  • Page 5 5
  • Page 6 6
  • Page 7 7
  • Page 8 8
  • Page 9 9
  • Page 10 10
  • Page 11 11
  • Page 12 12
  • Page 13 13
  • Page 14 14
  • Page 15 15
  • Page 16 16
  • Page 17 17
  • Page 18 18
  • Page 19 19
  • Page 20 20
  • Page 21 21
  • Page 22 22
  • Page 23 23
  • Page 24 24
  • Page 25 25
  • Page 26 26
  • Page 27 27
  • Page 28 28
  • Page 29 29
  • Page 30 30
  • Page 31 31
  • Page 32 32
  • Page 33 33
  • Page 34 34
  • Page 35 35
  • Page 36 36

NEC E322 User manual

Category
Public displays
Type
User manual
This manual is also suitable for

Ask a question and I''ll find the answer in the document

Finding information in a document is now easier with AI