Panasonic KX-TS550W User manual

Category
Telephones
Type
User manual

This manual is also suitable for

1 Getting Started
Getting Started
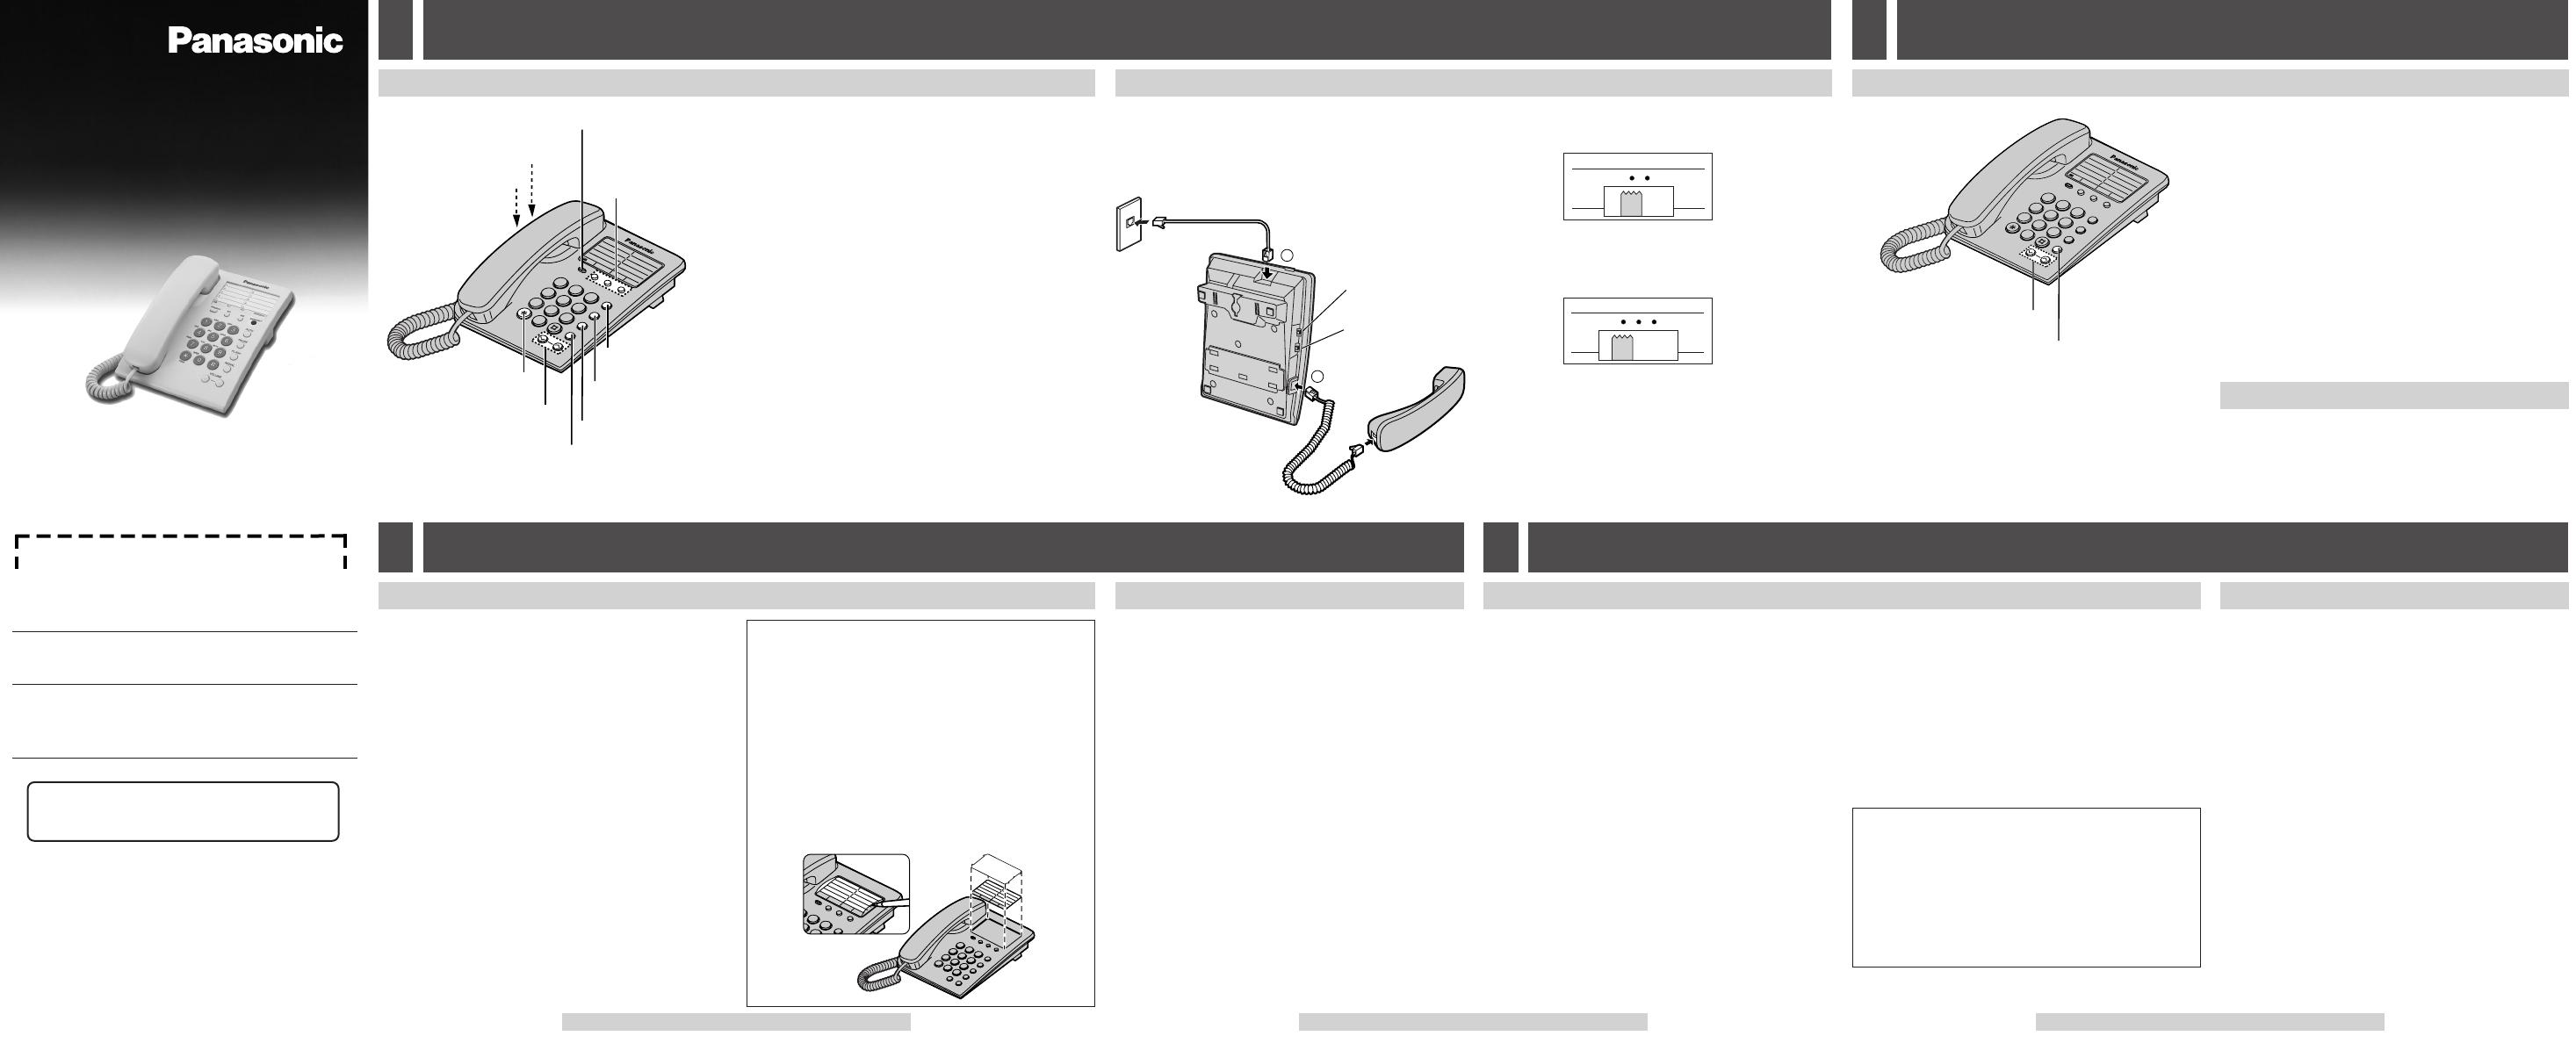
1-A Location of Controls 1-B Settings
2
ABC
PROGRAM
M1
M2
3
DEF
1
5
JKL
6
MNO
4
GHI
8
TUV
9
WXYZ
7
PQRS
0
TONE
FLASH
REDIAL
VOLUME
PAUSE
AUTO
1
6
2
7
3
8
4
9
50
M1
M2
OPER
EMERGENCY
EMERGENCY
1 Connect the telephone line cord (1).
2 Connect the handset cord (2), then confirm
the dial tone.
Single-Line
Telephone Jack (RJ11C)
Handset Cord
Handset
Telephone Line Cord
RINGER Selector
DIALING MODE
Selector
1
2
TONE PULSE
DIALING MODE
HIGH OFF
RINGER
3 Set the DIALING MODE selector to TONE.
If you cannot dial, set to PULSE.
4 Set the RINGER selector to HIGH, LOW or
OFF.
(Ex. “HIGH” is selected.)
When set to OFF, the unit will not ring.
1 When the unit rings, lift the handset.
2 When finished talking, hang up.
2-A Making Calls
2-B Answering Calls
1
Lift the handset.
2 Dial a telephone number.
If you misdial, hang up and start again from step 1.
3 When finished talking, hang up.
2 Making/Answering Calls
3 Speed Dialer
Speed Dialer 4 One-Touch Dialer
One-Touch Dialer
3-A Storing Phone Numbers in Memory
You can store up to 10 phone numbers in the
memory stations. The dialing buttons (
(0) to (9))
function as memory station numbers. Do not
press any memory stations before storing to
prevent misoperation.
1 Lift the handset.
2 Press (PROGRAM).
3 Press (AUTO).
4 Press a memory station number ((0) to (9)).
5 Enter a phone number up to 21 digits.
6 Press (PROGRAM).
7 When finished, hang up.
To store other numbers, repeat steps 1 through 7.
If a pause is required for dialing, press (PAUSE) in
step 5. A pause stored in a phone number counts as
one digit (5-C).
3-B Dialing a Stored Number
If you misprogram
Hang up.¤ Restart from step 1.
To erase a stored number
Lift the handset.¤ Press
(PROGRAM) ¤
¤
(AUTO)
¤ the memory station number
(
(0) to (9)) of the phone number to be erased ¤
¤
(PAUSE) ¤ (PROGRAM).¤ Hang up.
Speed Dial Card
Remove the speed dial card and use it as a name
or phone number index for the stored numbers.
1 Lift the handset.
2 Press (AUTO).
3 Press the memory station number ((0) to (9)).
The stored number is dialed.
The (REDIAL) button does not work for Speed Dialer.
To dial the number again, hang up and repeat steps 1
to 3.
If the telephone line cord is disconnected more than
3 days, the stored numbers may be erased. Store
phone numbers again, if necessary.
4-A Storing Phone Numbers in Memory
You can store up to 3 phone numbers in the
one-touch auto dial buttons ((M1), (M2) or
(EMERGENCY)).
Do not press any one-touch auto dial buttons
before storing to prevent misoperation.
It is recommended that you program an
emergency number in the (EMERGENCY) button.
1 Lift the handset.
2 Press (PROGRAM).
3
Press a one-touch auto dial button
((M1), (M2)
or (EMERGENCY))
.
4 Enter a phone number up to 21 digits.
5 Press (PROGRAM).
6 When finished, hang up.
To store other numbers, repeat steps 1 through 6.
4-B Dialing a Stored Number
1
Lift the handset.
2
Press the one-touch auto dial button
((M1),
(M2) or (EMERGENCY)).
The stored number is dialed.
The (REDIAL) button does not work for One-Touch
Dialer. To dial the number again, hang up and repeat
steps 1 and 2.
If the telephone line cord is disconnected more than
3 days, the stored numbers may be erased. Store
phone numbers again, if necessary.
Panasonic Consumer Electronics Company,
Division of Matsushita Electric Corporation of
America
One Panasonic Way, Secaucus, New Jersey 07094
Panasonic Sales Company,
Division of Matsushita Electric of Puerto Rico, Inc.
Ave. 65 de Infantería, Km. 9.5, San Gabriel Industrial
Park Carolina, Puerto Rico 00985
Printed in Mexico PQQX13992ZA F0803-0 D
For your future reference
Serial No.
(found on the bottom of the unit)
Date of purchase
Name and address of dealer
Integrated Telephone System
Operating Instructions
Model No. KX-TS550B
KX-TS550W
Pulse-or-tone dialing capability
PLEASE READ BEFORE USE AND SAVE.
(PROGRAM) Button (3-A, 4-A)
One-Touch Auto Dial
Buttons ((M1), (M2)
and
(EMERGENCY)
)
(4-A, 4-B)
DIALING MODE Selector (1-B)
RINGER Selector (1-B)
(AUTO) Button
(3-A)
(PAUSE) Button
(5-C)
($) (TONE) Button (5-B)
(REDIAL) Button (2-A)
(FLASH) Button (5-A)
VOLUME (_), (^)
Buttons (2-A)
KX-TS550W
Attach your purchase receipt here.
If you need assistance with the set-up or
operation,
please call 1-800-211-PANA(7262)
Panasonic World Wide Web:
http://www.panasonic.com
for customers in the USA or Puerto Rico
For assistance, please call: 1-800-211-PANA(7262) For assistance, please call: 1-800-211-PANA(7262) For assistance, please call: 1-800-211-PANA(7262)
Handset. . . . . . . one
Order No.
PQJXE0401Z (Black)
PQJXE0411Z (White)
Handset Cord. . . one
Order No.
PQJA212N (Black)
PQJA212M (White)
Telephone Line Cord
. . . . . . . . . . . . . one
Order No.
PQJA10075Z
Accessories (included)
For extra orders, call 1-800-332-5368.
If a pause is required for dialing, press (PAUSE) in
step 4. A pause stored in a phone number counts as
one digit (5-C).
WHEN PROGRAMMING EMERGENCY NUMBERS
AND(OR) MAKING TEST CALLS TO EMERGENCY
NUMBERS:
1) Remain on the line and briefly explain to the
dispatcher the reason for the call.
2) Perform such activities in the off-peak hours, such
as early morning or late evenings.
To redial the last number dialed
Lift the handset. ¤ Press (REDIAL).
(REDIAL) will dial the last number you called
manually, not a Speed Dialer number (3-B) or
One-Touch Dialer number (4-B).
To adjust the receiver volume (6 levels) while
talking
To increase, press (^).
To decrease, press (_).
Each time you press the button, the volume level will
change.
After hanging up, the volume level will be saved.
2
ABC
P
ROGRAM
M1
M2
3
D
EF
1
5
JKL
6
MNO
4
GHI
8
T
UV
9
W
XYZ
7
PQ
R
S
0
T
O
N
E
FLASH
REDIAL
VOLUME
PAUSE
A
UTO
1
6
2
7
3
8
4
9
5
0
M1
M2
O
PER
EMERGENCY
EMERGENCY
(REDIAL) Button
VOLUME (_), (^) Buttons
If you misprogram
Hang up.¤ Restart from step 1.
To erase a stored number
Lift the handset.¤ Press
(PROGRAM) ¤
¤
the one-touch auto dial button
(
(M1), (M2) or
(EMERGENCY)) of the phone number to be
erased ¤
(PAUSE) ¤ (PROGRAM).¤ Hang up.
5 Special Features
5-A For Call Waiting Service Users
5-B Temporary Tone Dialing
(For Rotary or Pulse Service Users)
Press (FLASH) if you hear a call-waiting tone
while talking.
The first call is put on hold and you can answer the
second call.
To return to the first caller, press (FLASH) again.
Press ($) (TONE) before entering access
numbers which require tone dialing.
The dialing mode changes to tone. You can enter
numbers to access answering services, electronic
banking services, etc. When you hang up, the mode
will return to pulse.
Access numbers entered after pressing ($) (TONE)
will not be included when redialing.
5-C Using the PAUSE Button
(For PBX Line/Long Distance Calls)
We recommend you press (PAUSE) if a pause is
required to dial with a PBX or to make a long
distance call.
Ex. Line access number (9) (PBX)
(9) ¤ (PAUSE) ¤
Pressing (PAUSE) once creates a few seconds
pause. This prevents misdialing when you redial or
dial a stored number.
Pressing (PAUSE) more than once increases the
length of the pause between numbers.
Phone number
6 Things You Should Know
Things You Should Know
6-A Wall Mounting
1 Press the tabs in the
direction of the arrows
(1), then remove the wall
mounting adaptor (2).
2
1
1
1
2 Tuck the telephone line
cord inside the wall
mounting adaptor, and
push it in the direction of
the arrow (1 and 2).
The word “UP WALL”
should face upward.
1
2
3 Connect the telephone line cord. Mount the
unit, then slide down.
Fasten the cord to prevent it from being
disconnected.
Wall Phone
Plate
Hooks
To temporarily set the
handset down during a
conversation, place it as
shown here.
The unit can be mounted on a wall.
6-B Troubleshooting
Problem
The unit does
not work.
The call cannot
be connected
even if you
dialed correctly.
The unit does
not ring.
You cannot
store a phone
number in
memory.
Remedy
Check the settings
(1-B).
Check whether the
DIALING MODE selector
setting is correct or not
(1-B).
The RINGER selector is
set to OFF. Set to HIGH
or LOW (1-B).
Confirm the handset is off
the cradle.
Do not enter a phone
number more than 21
digits long, or the entered
number and the
previously stored number
will be cleared.
Problem
The other party
suddenly cannot
hear your voice
during a
conversation.
You cannot
redial by
pressing
(REDIAL).
If you cannot
solve your
problem
Remedy
(PROGRAM) was pressed
during the conversation.
Press (PROGRAM) again.
If the last number dialed
was more than 31 digits
long, the number will not
be redialed.
Call our customer call
center at
1-800-211-PANA(7262).
Panasonic’s e-mail
address for customer
inquiries:
for customers in the USA
or Puerto Rico ONLY
When you ship the product
Carefully pack your unit, preferably in the original
carton.
Attach a letter, detailing the symptom, to the outside
of the carton.
Symptom
Send the unit to an authorized servicenter, prepaid
and adequately insured.
Do not send your unit to the Panasonic Consumer
Electronics Company listed on the back cover or to
executive or regional sales offices.
These locations do not repair consumer products.
Environment—do not place the unit in a room where
the temperature is less than 5°C (41oF) or greater
than 40°C (104oF). Allow 10 cm (4q) clearance around
the unit for proper ventilation. Avoid excessive smoke,
dust, mechanical vibration, shock, or direct sunlight.
Routine care—wipe the unit with a soft cloth. Do not
use benzine, thinner, or any abrasive powder.
If there is any trouble—disconnect the unit from the
telephone line and connect a known working phone. If
the known working phone operates properly, have
your unit repaired by one of the authorized Panasonic
Factory Service Centers. If the known working phone
does not operate properly, consult your telephone
company.
For product service
Call 1-800-211-PANA(7262) or 1-800-833-9626 for
the location of an authorized servicenter.
Panasonic’s e-mail address for customer inquiries:
for customers in the USA or Puerto Rico ONLY
6-D Helpful Information
6 Things You Should Know
Things You Should Know
6-C Specifications
Power Source: From telephone line
Dimensions (H x W x D):
Approx. 96 mm x 150 mm x 200 mm
(3
25
32
q k 5
29
32
qk7
7
8
q)
Mass (Weight): Approx. 495g (1.09 lb.)
Dialing Mode: Tone (DTMF)/Pulse
Operating Environment: 5°C–40°C (41oF–104oF)
Specifications are subject to change without notice.
For assistance, please call: 1-800-211-PANA(7262) For assistance, please call: 1-800-211-PANA(7262) For assistance, please call: 1-800-211-PANA(7262)
7 Referencia Rápida
Referencia Rápida
7-A Pasos Iniciales
Cordón del auricular
Auricular
Cable de la línea telefónica
Selector del
RINGER
Selector del
DIALING MODE
1
2
A toma de teléfono de
una sola línea (RJ11C)
TONE PULSE
DIALING MODE
HIGH OFF
RINGER
7-B Haciendo Llamadas
7-C Contestando Llamadas
1
Conecte el cable de la línea telefónica (1).
2 Conecte el cordón del auricular (2), luego
confirme el tono para marcar.
3 Coloque el selector del DIALING MODE a
TONE (tono).
Si Ud. no puede marcar colóquelo en PULSE
(pulso).
4 Coloque el selector del RINGER a HIGH
(alto), LOW (bajo) u OFF (apagado).
(Ej. se selecciona “HIGH”.)
Cuando esté colocado en OFF, la unidad no
sonará.
1 Cuando la unidad suene, levante el auricular.
2 Cuando termine de hablar, cuelgue.
1 Levante el auricular.
2 Marque el número de teléfono.
Si Ud. se equivoca al marcar, cuelgue y comience
de nuevo desde el paso 1.
3 Cuando termine de hablar, cuelgue.
Para remarcar el último número marcado
Levante el auricular. ¤ Presione (REDIAL).
(REDIAL) marcará el último número que se introdujo
manualmente, no llamará a un número de marcación
rápida (3-B) ni a un número de marcación de un solo
toque (4-B).
Para ajustar el volumen del auricular
(6 niveles) mientras habla
Para aumentar, presione (^).
Para disminuir, presione (_).
Cada vez que Ud. presione el botón, el nivel del
volumen cambiará.
Después de colgar, el nivel del volumen se guardará.
  • Page 1 1
  • Page 2 2

Panasonic KX-TS550W User manual

Category
Telephones
Type
User manual
This manual is also suitable for

Ask a question and I''ll find the answer in the document

Finding information in a document is now easier with AI