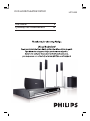
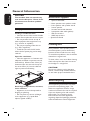
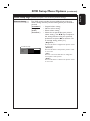
Philips HTS3320 User manual
- Category
- Home cinema systems
- Type
- User manual
This manual is also suitable for

English
DVD HOME THEATRE SYSTEM
HTS3320
User Manual 6
Руководство пользователя 50

2
LASER
Type Semiconductor laser
GaAIAs
Wave length 650 - 660 nm (DVD)
784 - 796 nm (CD)
Output Power 7 mW (DVD)
10 mW (VCD/CD)
Beam divergence 60 degrees
ATTENTION!
For Customer Use:
Read carefully the information located at the
bottom or rear of your DVD Home Theatre
System and enter below the Serial No. Retain
this information for future reference.
Model No. HTS3320
Serial No. _______________
CAUTION
Use of controls or adjustments or performance
of procedures other than herein may result in
hazardous radiation exposure or other unsafe
operation.
‘CONSUMERS SHOULD NOTE THAT NOT ALL HIGH
DEFINITION TELEVISION SETS ARE FULLY
COMPATIBLE WITH THIS PRODUCT AND MAY CAUSE
ARTIFACTS TO BE DISPLAYED IN THE PICTURE. IN
CASE OF 525 OR 625 PROGRESSIVE SCAN PICTURE
PROBLEMS, IT IS RECOMMENDED THAT THE USER
SWITCH THE CONNECTION TO THE ‘STANDARD
DEFINITION’ OUTPUT. IF THERE ARE QUESTIONS
REGARDING OUR TV SET COMPATIBILITY WITH THIS
MODEL 525p AND 625p DVD PLAYER, PLEASE
CONTACT OUR CUSTOMER SERVICE CENTER.’
Disposal of your old product
Your product is designed and manufactured with high quality materials
and components, which can be recycled and reused.
When this crossed-out wheeled bin symbol is attached to a product it
means the product is covered by the European Directive 2002/96/EC.
Please inform yourself about the local separate collection system for
electrical and electronic products.
Please act according to your local rules and do not dispose of your old products with
your normal household waste. The correct disposal of your old product will help
prevent potential negative consequences for the environment and human health.
Утилизация старого устройства (Русский)
Bаше устройство спроектировано и изготовлено из
высококачественных материалов и компонентов, которые можно
утилизировать и использовать повторно.
Eсли товар имеет символ с зачеркнутым мусорным ящиком на колесах,
это означает, что товар соответствует Eвропейской директиве
2002/96/EC.
Ознакомьтесь с местной системой раздельного сбора электрических и
электронных товаров. Cоблюдайте местные правила.
Утилизируйте старые устройства отдельно от бытовых отходов. Правильная
утилизация вашего товара позволит предотвратить возможные отрицательные
последствия для окружающей среды и человеческого здоровья.

3
English
Manufactured under license from
Dolby Laboratories, “Dolby”, “Pro
Logic” and the double-D symbol are
trademarks of Dolby Laboratories.
DivX Ultra Certi ed products: “DivX,
DivX Ultra Certi ed, and associated
logos are trademarks of DivX, Inc. and
are used under license.
Windows Media and the Windows logo
are trademarks, or registered
trademarks of Microsoft Corporation
in the United States and/or other
countries.

4
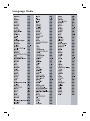
Language Code

English
5
Русский
Index
English ------------------------------------ 6
Русский ------------------------------- 50

6
English
Table of contents
General
General Information ........................................................................................................ 8
Setup precautions .................................................................................................................................................8
Accessories supplied ...........................................................................................................................................8
Cleaning discs ........................................................................................................................................................8
About recycling .....................................................................................................................................................8
Product Overview
Main Unit ........................................................................................................................... 9
Remote Control .........................................................................................................10-12
Using the remote control ................................................................................................................................12
Connections
Basic Connections .....................................................................................................13-16
Step 1 : Placing the speakers ...........................................................................................................................13
Step 2 : Connecting the speakers and subwoofer .....................................................................................14
Step 3 : Connecting to TV ...............................................................................................................................15
Option 1: Using the Video (CVBS) socket .........................................................................................15
Option 2: Connecting to a Progressive Scan TV or component video input ............................15
Step 4 : Connecting the FM/MW antennas ...................................................................................................16
Step 5 : Connecting the power cord ............................................................................................................16
Optional Connections .................................................................................................... 17
Connecting audio from TV .............................................................................................................................17
Connecting audio from an analogue audio/video device .........................................................................17
Basic Setup
Getting Started .........................................................................................................18-23
Step 1: Turning on the DVD system .............................................................................................................18
Turning off to Eco Power standby mode ..............................................................................................18
Step 2: Finding the correct viewing channel ...............................................................................................18
Step 3: Setting language preferences ............................................................................................................19
On-screen display (OSD) language ........................................................................................................19
Audio, Subtitle and Menu language for DVD playback .............................................................. 19-20
Step 4: Setting the TV ...................................................................................................................................... 20
Selecting the matching colour system ..........................................................................................20-21
Setting the TV Display ...............................................................................................................................21
Step 5: Setting up Progressive Scan feature ............................................................................................... 22
Step 6: Setting the speakers’ channels ........................................................................................................ 23
Disc Playback
Disc Operations ........................................................................................................ 24-32
Playable discs .......................................................................................................................................................24
Playing a disc ........................................................................................................................................................24
Basic playback controls .................................................................................................................................... 25
Selecting various repeat/shuf e functions ................................................................................................. 25
Programming disc tracks ................................................................................................................................. 26

7
English
Table of contents
Other playback features for video discs (DVD/VCD/SVCD) ............................................................. 26
Using the Disc Menu ................................................................................................................................. 26
Viewing playback information ..................................................................................................................27
Resuming playback from the last stopped point ................................................................................27
Zooming in ....................................................................................................................................................27
Changing subtitle language (DVD only) ................................................................................................27
Changing sound track language .............................................................................................................. 28
Selecting camera angles ............................................................................................................................ 28
Playback Control (VCD only) ................................................................................................................. 28
Preview function (VCD/SVCD only) .................................................................................................... 28
Playing an MP3/ JPEG/Window Media Audio disc ...................................................................................29
Playing a JPEG image le (slide show) ......................................................................................................... 30
Preview function ......................................................................................................................................... 30
Zoom picture ............................................................................................................................................. 30
Rotating/ ipping the picture ................................................................................................................... 30
Playing MP3 music and JPEG pictures simultaneously .............................................................................31
Playing a DivX disc .............................................................................................................................................31
Playing a Karaoke disc .......................................................................................................................................32
Microphone setting ...................................................................................................................................32
Setup Options
DVD Setup Menu Options ....................................................................................... 33-39
Accessing the DVD setup menu .....................................................................................................................33
General Setup Page ........................................................................................................................................... 34
Audio Setup Page ............................................................................................................................................... 35
Video Setup Page ......................................................................................................................................... 36-37
Preference Setup Page ...............................................................................................................................38-39
Radio Tuning
Tuner Operations ..................................................................................................... 40-41
Tuning to radio stations ................................................................................................................................... 40
Presetting radio stations ................................................................................................................................. 40
Using auto install ........................................................................................................................................ 40
Using automatic preset ..............................................................................................................................41
Using manual preset ...................................................................................................................................41
Selecting a preset radio station ......................................................................................................................41
Deleting a preset radio station .......................................................................................................................41
Others
Sound and Volume Controls .........................................................................................42
Selecting surround sound ................................................................................................................................42
Selecting digital sound effects ........................................................................................................................ 42
Volume control .................................................................................................................................................. 42
Other Features ...............................................................................................................43
Controlling ‘Philips’ TV with the remote control .................................................................................... 43
Software upgrades ............................................................................................................................................ 43
Troubleshooting ........................................................................................................ 44 -45
Glossary ..................................................................................................................... 46-47
Speci cations ..................................................................................................................48

8
English
General Information
CAUTION!
The machine does not contain any
user-serviceable parts. Please leave
all maintenance work to quali ed
personnel.
Setup precautions
Finding a suitable location
– Place the set on a at, hard and stable
surface. Do not place the set on a carpet.
– Do not position the set on top of
other equipment that might heat it up
(e.g., receiver or ampli er).
– Do not put anything under the set
(e.g., CDs, magazines).
– Install this unit near the AC outlet
where the AC power plug can be easily
reached.
Space for ventilation
– Place the apparatus in a location with
adequate ventilation to prevent internal
heat build up. Allow at least 10 cm (4”)
clearance from the rear and the top of
the set and 5cm (2”) from the left and
right to prevent overheating.
10cm (4.5")
10cm (4.5")
5cm (2.3")
5cm (2.3")
Avoid high temperatures, moisture,
water and dust
– Apparatus must not be exposed to
dripping or splashing.
– Do not place any sources of danger
on the apparatus (e.g., liquid lled
objects, lighted candles).
Accessories supplied
– 1 passive subwoofer
– 2 front speakers with speaker stands
– 2 rear speakers with speaker stands
– 1 centre speaker
– 1 remote control with batteries
– 1 composite video cable (yellow)
– 1 FM wire antenna
– 1 MW loop antenna
– Quick Start Guide
Cleaning discs
Some problems occur (frozen picture,
sound disruptions, picture distortions)
because the disc inside the unit is dirty.
To avoid these problems, discs should be
cleaned on a regular basis.
To clean a disc, use a micro bre cleaning
cloth and wipe the disc from the centre
to the edge in a straight line.
CAUTION!
Do not use solvents such as benzene,
thinner, commercially available cleaners,
or anti-static sprays intended for discs.
About recycling
These operating instructions have been
printed on non-polluting paper. The
electronic equipment contains a large
number of materials that can be recycled.
If you are disposing of an old machine,
please take it to a recycling centre.
Please observe the local regulations
regarding disposal of packaging materials,
exhausted batteries and old equipment.

9
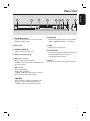
English
Main Unit
a STANDBY ON 2
– Turns on the system or turns off to Eco
Power standby mode.
b Disc tray
c OPEN CLOSE ç
– Opens/ closes the disc tray.
d System display panel
e u (PLAY PAUSE)
– DISC: starts/pauses playback.
– TUNER: starts auto tuner installation for
rst time setup.
Ç (STOP)
– Exits an operation.
– DISC: stops playback.
– TUNER: hold down this button to erase
the current preset radio station.
. >
– DISC: selects a track or hold down this
button to search backward/forward.
– TUNER: selects a preset radio station.
f SOURCE
– Selects the relevant active source mode:
DISC, TUNER (FM/MW), TV or AUX.
g VOL
– Adjusts the volume level.
h MIC LEVEL
– Activates microphone level mode and use
the VOLUME control to set the
microphone volume level.
i MIC
– For connecting the microphone socket.
9
8
1
2
3
4
6
7
5

10
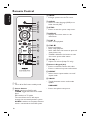
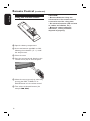
English
Remote Control
2
3
4
5
6
7
8
9
10
11
12
1
a 2
– Turns off to Eco Power standby mode.
b Source buttons
– DISC: switches to DISC mode.
TUNER: toggles between FM and MW
band.
TV: switches to TV mode.
The sound from the TV will output
through the connected speakers system.
AUX/DI: switches to the external device
which is connected to this DVD system.
c ZOOM
– Enlarges a picture on the TV screen.
d AUDIO
– Selects an audio language (DVD) or an
audio channel (CD).
e SETUP
– Enters or exits the system setup menu.
f DISPLAY
– Displays the current status or disc
information.
g PLAY É
– DISC: starts playback.
h STOP Ç
– Exits an operation.
– DISC: stops playback.
– DISC: hold down this button to open and
close the disc tray.
– TUNER: hold down this button to erase
the current preset radio station.
i TV VOL +-
– Adjusts TV volume (Philips TV only).
j Numeric Keypad (0-9)
– Enters a track/title number of the disc.
– Enters a number of a preset radio station.
k REPEAT
– Selects various repeat modes; turns off
repeat mode.
l VOCAL
– Toggles between various audio mode
options.
KARAOKE
– Enters microphone setup menu.

11
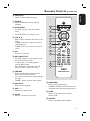
English
Remote Control (continued)
13
14
15
16
17
18
20
21
22
23
24
25
19
m SUBTITLE
– Selects a DVD subtitle language.
n ANGLE
– Selects a DVD disc camera angle (if
available).
o DISC MENU
– For DVD, enter or exit disc contents
menu.
– For VCD/SVCD, enter digest menu.
p W X S T
– DISC: selects movement direction in the
menu.
– TUNER: press left or right to tune the
radio frequency.
– TUNER: press up or down to start auto
search.
q OK
– Con rms a selection.
r RETURN/TITLE
– For DVD, go back to the previous menu.
– For VCD version 2.0 only;
In stop mode, turn on/off playback
control (PBC) mode.
During playback, display the disc title
menu or return to the main menu.
s . >
– DISC: hold down this button for fast
forward and backward search.
– TV: selects previous/next channel (Philips
TV only).
– TUNER: selects a preset radio station.
t PAUSE Å
– DISC: pauses playback.
u VOL +-
– Adjusts the volume level.
v MUTE
– Mutes or restores the volume.
w PROGRAM
– DISC: starts programming.
– TUNER: hold down this button to start
automatic/ manual preset programming.
x SURR.
– Selects multi-channel surround or
stereo mode.
y SOUND
– Selects a prede ned sound effect.

12
English
Remote Control (continued)
Using the remote control
A Open the battery compartment.
B Insert two batteries type R03 or AAA,
following the indications (+-) inside
the compartment.
C Close the cover.
D Point the remote control directly at the
remote sensor (iR) on the front panel.
E Select the source you wish to control by
pressing the DISC, TUNER, TV or
AUX/DI button on the remote control.
F Then select the desired function (for
example ., >).
CAUTION!
– Remove batteries if they are
exhausted or if the remote control
is not to be used for a long time.
– Do not mix batteries (old and new
or carbon and alkaline, etc.).
– Batteries contain chemical
substances, so they should be
disposed of properly.

13
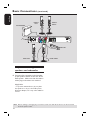
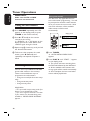
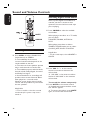
English
Step 1: Placing the speakers
The Philips Home Theatre System is
simple to install. However, proper
system placement is critical to ensure an
optimum sound experience.
A Place the front left and right speakers at
equal distances from the TV and at an
angle of approximately 45 degrees from
the listening position.
B Place the centre speaker above the TV or
the DVD system so that the centre
channel’s sound is localised.
C Place the rear speakers at normal
listening ear level facing each other.
D Place the subwoofer at the corner of the
room. Keep at least one metre away
from the TV.
Helpful Hints:
– The placement diagram shown here is only
a guideline that will provide great system
performance. You may nd other placement
choices that are more suitable for your room
layout and provide the sound experience you
enjoy.
– To avoid magnetic interference, do not
position the front speakers too close to your
TV.
– The rear speakers are labeled as REAR
LEFT or REAR RIGHT.
– The front speakers are labeled as
FRONT LEFT or FRONT RIGHT.
Basic Connections
TIPS: Before making or changing any connections, make sure that all the devices are disconnected
from the power outlet.

14
English
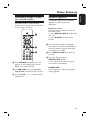
Step 2: Connecting the
speakers and subwoofer
Connect all the speakers and subwoofer
to the speaker sockets at the rear of the
DVD system. Make sure that the colours
of the plugs and sockets are matched.
Helpful Hint:
– To prevent unwanted noise, do not place
the speakers too close to the DVD system,
AC power adapter, TV or any other radiation
sources.
TIPS: Before making or changing any connections, make sure that all the devices are disconnected
from the power outlet.
Basic Connections (continued)
FRONT
LEFT
FRONT
RIGHT
REAR RIGHTREAR LEFT
CENTER
SUBWOOFER

15
English
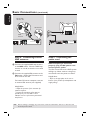
Basic Connections (continued)
Step 3: Connecting to TV
This connection enables you to view the
playback from this DVD system. You only
need to choose one of the options
below to make your video connection.
– For a standard TV, follow option 1.
– For a progressive scan TV, follow
option 2.
IMPORTANT!
Connect the DVD system directly
to the TV.
Option 1: Using the Video (CVBS)
socket (good picture quality)
Use the supplied composite video cable
(yellow) to connect the CVBS socket on
the DVD system to the video input
socket (or labeled as A/V In, Video In,
Composite or Baseband) on the TV.
OR
Option 2: Connecting to a
Progressive Scan TV or component
video input
The progressive scan video quality is only
available when using Y Pb Pr connection
and a progressive scan TV is required. It
provides superior picture quality when
watching DVD movies.
A Follow option 1 to make the basic video
connection.
B Use the component video cables (red/
blue/green - not supplied) to connect the
Y PB PR sockets on the DVD system to
the corresponding component video
input sockets (or labeled as Y Pb/Cb Pr/
Cr or YUV) on the TV.
C If your TV accepts progressive signals,
proceed to ‘Getting Started - Step 5:
Setting up Progressive Scan feature’ for
detailed progressive feature setup.
TIPS: Before making or changing any connections, make sure that all the devices are disconnected
from the power outlet.
Option 2
Option 1

16
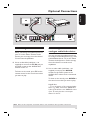
English
Step 4: Connecting the FM/
MW antennas
A Connect the supplied MW loop antenna
to the MW socket. Place the MW loop
antenna on a shelf, or attach it to a stand
or wall.
B Connect the supplied FM antenna to the
FM socket. Extend the FM antenna and
x its ends to the wall.
For better FM stereo reception, connect
an external FM antenna (not supplied).
Helpful Hints:
– Adjust the position of the antennas for
optimal reception.
– Position the antennas as far away as
possible from your TV, VCR or other
radiation source to prevent any unwanted
interference.
Step 5: Connecting the
power cord
After everything is connected
properly, plug the AC power cord
into the power outlet.
The Eco Power LED on the DVD system
will light up. Never make or change any
connections with the power turned on.
Helpful Hints:
– Refer to the type plate at the rear or
bottom of the product for identi cation and
supply ratings.
1
2
>
Basic Connections (continued)
TV
x the claw
into the slot
FM antenna
MW
antenna
TIPS: Before making or changing any connections, make sure that all the devices are disconnected
from the power outlet.

17
English
Optional Connections
Connecting audio from TV
When connecting the audio output from
your TV to this Home Theatre Audio
System, you can enjoy the multi-channel
surround sound capabilities.
Use an audio cable (red/white - not
supplied) to connect the TV IN jacks on
this DVD system to the AUDIO OUT
sockets on the TV.
To listen to the sound, press TV on the
remote control as the sound source that
you want to play.
Connecting audio from an
analogue audio/video device
You can connect the audio output from
an analogue audio/video device (e.g. VCR,
Cable/Satellite Box or TV) to this Home
Theatre Audio System in order to enjoy
the multi-channel surround sound
capabilities
Use an audio cable (red/white - not
supplied) to connect the AUX IN
sockets on this DVD system to the
AUDIO OUT sockets on the connected
device.
To listen to the sound, press AUX/DI as
the sound source that you want to play.
Helpful Hint:
– To see the picture of the connected video
device (e.g. VCR), connect the VIDEO OUT
socket of the device to the VIDEO IN socket
of the TV, and select the correct input
channel on the TV.
TIPS: Refer to the respective connected device’s user manual for other possible connections.

18
English
Step 1: Turning on the DVD
system
A Press STANDBY ON (2).
B
Press the SOURCE button on the front
panel repeatedly to select :
DISC ¤ FM ¤ MW ¤ TV ¤ AUX
¤ DISC ....
Or
Press DISC, TUNER, TV or AUX/DI
on the remote control.
Turning off to Eco Power standby
mode
Press STANDBY ON (2).
The display screen will turn off.
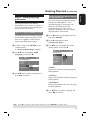
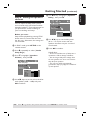
Getting Started
Step 2: Finding the correct
viewing channel
Before you start ...
Make sure you have completed all the
necessary connections before proceeding.
A Press SOURCE button until “DISC”
appears on the display panel.
B Turn on the TV and set it to the correct
video-in channel. You should see the
blue DVD background screen on the TV.
You may go to Channel 1 on your TV,
then press the Channel Down button on
your TV’s remote control until you see
the Video In channel.
You may press ° button repeatedly
on your TV’s remote control.
Usually this channel is between the
lowest and highest channels and may be
called FRONT, A/V IN, VIDEO. See your
TV manual for more details.

19
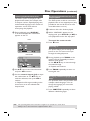
English
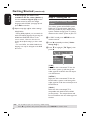
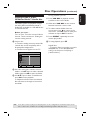
Step 3: Setting language
preferences
The language options are different
depending on your country or region. It
may not correspond to the illustrations
shown on the user manual.
On-screen display (OSD) language
The OSD (On-Screen Display) language
for this DVD system will remain as you
have set it, regardless of the changes
made to the DVD disc language.
A In ‘DISC’ mode, press SETUP on the
remote control.
{ General Setup Page } appears.
B Use ST keys to highlight { OSD
Language }, then press X.
General Setup Page
Disc Lock
Display Dim
Program
OSD Language
Screen Saver
DivX(R) VOD Code
English
Dansk
Deutsch
Espanõl
C Use ST keys to select a language and
press OK to con rm.
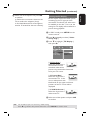
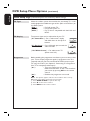
Audio, Subtitle and Menu language
for DVD playback
You can select your preferred language
settings for DVD playback. If the
selected language is recorded on the
DVD disc, the DVD system will
automatically play the disc in that
language. Otherwise, the disc’s default
language will be used instead.
A Press Ç twice to stop playback (if any),
then press SETUP.
B Press X repeatedly to select
{ Preference Page }.
C Use ST keys to highlight one of the
options below, then press X.
Preference Page
Audio
Subtitle
Disc Menu
PBC
MP3/JPEG Nav
Password
DivX Subtitle
Default
{ Audio }
Selects the preferred audio language for
DVD playback.
{ Subtitle }
Selects the preferred subtitle language for
DVD playback.
{ Disc Menu }
Selects the preferred disc menu language
for DVD playback.
D Use ST keys to select a language and
press OK to con rm.
Getting Started (continued)
TIPS: Press W to go back to the previous menu item. Press SETUP to exit the menu.

20
English
If the language you want is not
available in the list, select { Others }.
Use the numeric keypad (0-9) on the
remote control to enter the 4-digit
language code ‘XXXX’ (see page 4) and
press OK to con rm.
E Repeat steps C ~ D for other settings.
Helpful Hints:
– During DVD playback, you can switch the
audio and subtitle languages by pressing the
AUDIO and SUBTITLE buttons on the
remote control. However, this does not
change the default settings you have made
here.
– For some DVDs, the subtitle/audio/menu
language can only be changed via the DVD
disc menu.
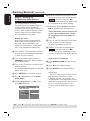
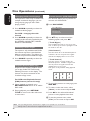
Step 4: Setting the TV
Selecting the matching colour
system
The colour system of the DVD system,
DVD and TV should match. Only then
will it be possible to play a DVD on this
system. Before changing the TV system,
determine the colour system of your TV.
A In ‘DISC’ mode, press SETUP on the
remote control.
B Press X repeatedly to select { Video
Setup Page }.
C Press T to highlight { TV Type }, then
press X.
Video Setup Page
TV Type
TV Display
Progressive
Picture Setting
NTSC
PAL
Multi
{ PAL }
Select this if the connected TV has the
PAL colour system. It will change the
video signal of an NTSC disc and output
it to PAL format.
{ NTSC }
Select this if the connected TV has the
NTSC colour system. It will change the
video signal of a PAL disc and output it to
NTSC format.
{ Multi }
Select this if the connected TV is
compatible with both NTSC and PAL
(multi-system). The output format will
be in accordance with the video signal of
the disc.
Getting Started (continued)
TIPS: The underlined option is the factory default setting.
Press W to go back to the previous menu item. Press SETUP to exit the menu.
Page is loading ...
Page is loading ...
Page is loading ...
Page is loading ...
Page is loading ...
Page is loading ...
Page is loading ...
Page is loading ...
Page is loading ...
Page is loading ...
Page is loading ...
Page is loading ...
Page is loading ...
Page is loading ...
Page is loading ...
Page is loading ...
Page is loading ...
Page is loading ...
Page is loading ...
Page is loading ...
Page is loading ...
Page is loading ...
Page is loading ...
Page is loading ...
Page is loading ...
Page is loading ...
Page is loading ...
Page is loading ...
Page is loading ...
-
 1
1
-
 2
2
-
 3
3
-
 4
4
-
 5
5
-
 6
6
-
 7
7
-
 8
8
-
 9
9
-
 10
10
-
 11
11
-
 12
12
-
 13
13
-
 14
14
-
 15
15
-
 16
16
-
 17
17
-
 18
18
-
 19
19
-
 20
20
-
 21
21
-
 22
22
-
 23
23
-
 24
24
-
 25
25
-
 26
26
-
 27
27
-
 28
28
-
 29
29
-
 30
30
-
 31
31
-
 32
32
-
 33
33
-
 34
34
-
 35
35
-
 36
36
-
 37
37
-
 38
38
-
 39
39
-
 40
40
-
 41
41
-
 42
42
-
 43
43
-
 44
44
-
 45
45
-
 46
46
-
 47
47
-
 48
48
-
 49
49


Philips HTS3320 User manual
- Category
- Home cinema systems
- Type
- User manual
- This manual is also suitable for
Ask a question and I''ll find the answer in the document
Finding information in a document is now easier with AI
Related papers
-
Philips HTS6510 User manual
-
Philips HTS9800W/12 User manual
-
Philips HTS3300/93 User manual
-
-
-
-
-
-
Philips HTS5310S User manual
-
Philips HTS5310K User manual

