Honeywell T6 Pro Programmable Thermostat Owner's manual
- Category
- Thermostats
- Type
- Owner's manual
This manual is also suitable for

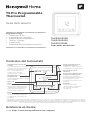
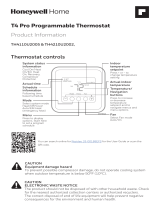
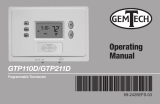
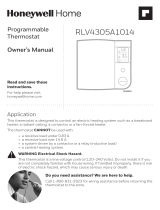
Package Includes:
• T6 Pro Thermostat
• UWP™ Mounting System
• Decorative Cover Plate
• Screws and Anchors
• 2 AA Batteries
• Thermostat Literature
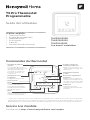
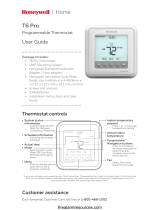
T6 Pro
Programmable
Thermostat
User Guide
–
+
TH6320U2008,
TH6220U2000,
TH6210U2001,
Read before installing
Visit https://www.honeywellhome.com/support
Customer assistance
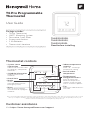
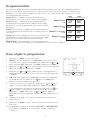
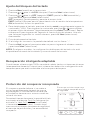
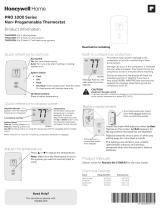
Thermostat controls
• System status
information
Cool On/Heat On/Em Heat
On, Recovery, Compressor
Protection
• Schedule information
Following time based
schedule
• Actual time
• Mode
Select system mode Heat/
Off/Cool/Auto/EM Heat
(emergency heat)
• Menu
Press to display options.
Start here to set a program
schedule
• Indoor temperature
setpoint
Press + or – to change
temperature setting
• Actual indoor
temperature
• Temperature/
Navigation buttons
Press to increase or
decrease temperature
setpoint and to navigate
menus and menu options
• Fan
Select Fan mode Auto/On/
Circulate
The screen will wake up by pressing any of the five buttons. If powered by the C wire, the screen stays lit for 45 seconds
after you complete changes. If powered by battery only, the screen stays lit for 8 seconds. Depending on how your
thermostat was installed, the screen light may always be on.

2
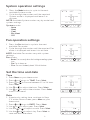
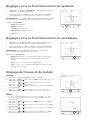
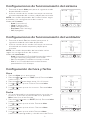
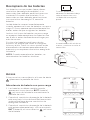
System operation settings
1 Press the Mode button to cycle to the next
available System mode.
2 Cycle through the modes until the required
System mode is displayed and leave it to
activate.
NOTE: Available System modes vary by model and
system settings.
System modes:
‒ Auto
‒ Heat
‒ Cool
‒ Em Heat
‒ Off
Set the time and date
Time
1 Press Menu on your thermostat.
2 Press
or to go to TIME. Press Select.
3 Press
or to choose between 12 or 24 hour.
Press Select.
4 Use
or to adjust the hour. Press Select.
5 Use
or to adjust the minutes. Press Select
to exit Time menu.
Date
1 If previously setting time, continue to Step
2. If at the Home screen, press Menu on your
thermostat.
2 Press
or to go to DATE. Press Select.
3 Use
or to adjust year. Press Select.
4 Use the
or to adjust month. Press Select.
5 Use the
or to adjust day. Press Select to
save and exit Date menu.
Fan operation settings
1 Press the Fan button to cycle to the next
available Fan mode.
2 Cycle through the modes until the required Fan
mode is displayed and leave it to activate.
NOTE: Available Fan modes vary with system
settings.
Fan modes:
‒ Auto: Fan runs only when the heating or cooling system
is on.
‒ On: Fan is always on.
‒ Circ: Fan runs randomly about 33% of the time.

3
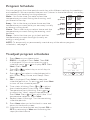
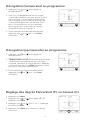
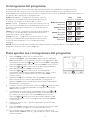
Program Schedule
To adjust program schedules
You can program four time periods each day, with different settings for weekdays
and weekends. We recommend the pre-sets (shown in the table below), since they
can reduce your heating/cooling expenses.
Wake - Set to the time you wake up and the
temperature you want during the morning, until
you leave for the day.
Away - Set to the time you leave home and the
temperature you want while you are away (usually
an energy-saving level).
Home - Set to the time you return home and the
temperature you want during the evening, until
bedtime.
Sleep - Set to the time you go to bed and the
temperature you want overnight (usually an
energy-saving level).
NOTE: To temporarily or permanently override any of the above program
schedules, see page 4.
1 Press Menu on your thermostat.
2 PROG is displayed. Press Select. Then ON
is displayed. (If you do not want to use a
schedule, press
or to display OFF. Press
Select.) Press Select.
3 Press
or to select day or set of days to
edit. Press Select.
4 Press
or to select a schedule period to
edit (Wake, Away, Home, and Sleep). Press
Select.
5 ON is displayed. Press Select to keep the
schedule period on. Or press
and then Select
to turn off the schedule period.
6 Time starts blinking. Press
or to adjust
the schedule period start time. Press Select.
7 Temperature starts blinking. Press
or
to adjust the “Heat” setpoint temperature.
Press Select. Press
or to adjust the “Cool”
temperature setpoint. Press Select.
8 Repeat steps 4 through 7 for the remaining
schedule periods.
9 Press Home when you’re finished to save and
return to the home screen.
10 Schedule can be adjusted and turned ON or
OFF by returning to Menu and following the
steps provided above.
Heat Cool
Wake
(6:00 am)
70
°
78
°
Away
(8:00 am)
62
°
85
°
Home
(6:00 pm)
70
°
78
°
Sleep
(10:00
pm)
62
°
82
°

4
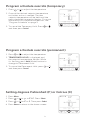
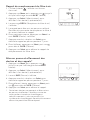
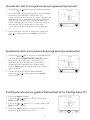
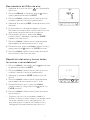
Program schedule override (permanent)
Program schedule override (temporary)
1 Press or to adjust the temperature.
2 Once at the desired setpoint temperature,
no further action is needed. The new
setpoint temperature will be held until the
next scheduled time period begins. For more
information on schedule time periods, see
“Program Schedule” on page 3.
3 To cancel the Temporary Hold, Press
or
and then press Cancel.
1 Press
or to adjust the temperature.
2 TEMPORARY HOLD is displayed and
the setpoint temperature flashes. While
it’s flashing, press Hold (Mode) button to
change to Permanent Hold.
3 To cancel the Permanent Hold, press
or
and then press Cancel.
Setting degrees Fahrenheit (F) or Celcius (C)
1 Press Menu.
2 Press
or to go to F / C. Press Select.
3 Press
or for F or C. Then press Select.
4 Press Home to return to the home screen.
Hold

5
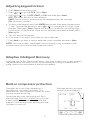
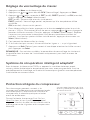
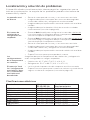
Adaptive Intelligent Recovery
Over time, the T6 Pro Thermostat “learns” how long it takes your system to reach
the temperature you want. It turns on the heating or cooling system earlier to
make sure you’re comfortable at the time you expect.
Damage can occur if the compressor is
restarted too soon after shutdown. This
feature forces the compressor to wait for a few
minutes before restarting.
During the wait time, the display will flash
the message Cool On (or Heat On if you have
a heat pump). When the safe wait time has
elapsed, the message stops flashing and the
compressor turns on.
Built-in compressor protection
Message flashes until safe
restart time has elapsed.
Adjusting keypad lockout
1 Press Menu on the thermostat.
2 Press
or to go to LOCK. Press Select.
3 Press
or to go to OFF, PART, or ON, and then press Select.
OFF: Unlocked, and full access allowed.
PART: Partial lockout, allowing only the temperature to be changed.
ON: No access allowed.
4 To unlock the keypad, press the CENTER button and then enter the password
“1234”. To enter the password, press
or to change the first digit of the
number. Then press Select. Repeat this process to enter the second through
fourth digits of the number. Once all four numbers have been entered, press
Select again.
5 This will unlock the keypad.
6 If the code is incorrect, the screen will flash the lines "--".
7 Press Back to go back a step to enter the correct number and press Select.
NOTE: On some models, the keypad lockout setting is only available in the
installer menu and not available in the user menu.

6
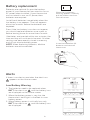
Batteries are optional (to provide backup
power) if your thermostat was wired to run on
AC power when installed. If your thermostat
was not wired to run on AC power, then
batteries are required.
Install fresh batteries immediately when the
low battery icon appears. The icon appears
about two months before the batteries are
depleted.
Even if the low battery icon does not appear,
you should replace batteries once a year, or
before leaving home for more than a month.
If batteries are inserted within two minutes, the
time and day will not have to be reset. All other
settings are permanently stored in memory,
and do not require battery power.
NOTE: When replacing batteries, alkaline
batteries are recommended.
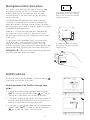
Battery replacement
Insert fresh alkaline AA
batteries and reinstall
thermostat.
When the low battery
warning appears, carefully
pull the thermostat from
the wall mount.
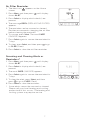
Alerts
If there is an alert or reminder, the alert icon
appears on the Home screen.
Low Battery Warning
1 The batteries need to be replaced when
BATT, the alert icon
, and the battery icon
are displayed on the Home screen.
2 When the battery power is very low, the
thermostat’s backlight is disabled to save
battery power.
3 When battery power is critically low, only
BATT, the alert icon
, and the battery icon
are displayed.
Fan On
Heat
Home
Back

7
Air Filter Reminder
1 The alert icon appears on the Home
screen.
2 Press Menu, and then press
until display
shows ALRT.
3 Press Select to display which alert(s) are
present.
4 The message REPL (REPLACE AIR FILTER)
appears.
5 The reminder can be snoozed or cleared.
Resideo recommends changing the air filter
before clearing the reminder.
6 To snooze, press Select. The word SNZE
(SNOOZE) appears.
7 Press Select again to snooze the reminder for
7 days.
8 To clear, press Select, and then press
to go
to CLER (Clear).
9 Press Select to clear the air filter reminder.
Home
Back
Select
Snoozing and Clearing Alerts or
Reminders*
1 Press Menu, and then press until display
shows ALRT.
2 Press Select to display which alert(s) are
present.
3 The word SNZE (SNOOZE) appears.
4 Press Select again to snooze the reminder for
7 days.
5 To clear the alert, press Select, and then
press
to go to CLER (Clear).
6 Press Select to clear the reminder.
* Some alerts cannot be snoozed or cleared.
Please call your local heating and cooling
professional if this occurs. The heating and
cooling system may require service.

8
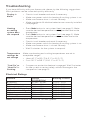
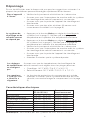
Troubleshooting
If you have difficulty with your thermostat, please try the following suggestions.
Most problems can be corrected quickly and easily.
Display is
blank
• Check circuit breaker and reset if necessary.
• Make sure power switch for heating & cooling system is on.
• Make sure furnace door is closed securely.
• Make sure fresh AA alkaline batteries are correctly installed
(see page 6).
Heating
or cooling
system does
not respond
• Press Mode button to set system Heat (see page 2). Make
sure the desired temperature is set higher than the inside
temperature.
• Press Mode button to set system Cool (see page 2). Make
sure the desired temperature is set lower than the inside
temperature.
• Check circuit breaker and reset if necessary.
• Make sure power switch for heating & cooling system is on.
• Make sure furnace door is closed securely.
• Wait 5 minutes for the system to respond.
Temperature
settings do
not change
Make sure heating and cooling temperatures are set to
acceptable ranges:
• Heat: 40 °F to 90 °F (4.5 °C to 32.0 °C)
• Cool: 50 °F to 99 °F (10.0 °C to 37.0 °C)
“Cool On” or
“Heat On” is
flashing
• Compressor protection feature is engaged. Wait 5 minutes
for the system to restart safely, without damage to the
compressor (see page 5).
Electrical Ratings
Terminal Voltage
(50 Hz/60 Hz)
Running Current
W Heating 20 Vac - 30 Vac 0.02 A - 1.0 A
W2 (Aux) Heating 20 Vac - 30 Vac 0.02 A - 1.0 A
E Emergency Heat 20 Vac - 30 Vac 0.02 A - 0.5 A
Y Compressor Stage 1 20 Vac - 30 Vac 0.02 A - 1.0 A
Y2 Compressor Stage 2 20 Vac - 30 Vac 0.02 A - 1.0 A
G Fan 20 Vac - 30 Vac 0.02 A - 0.5 A
O/B Changeover 20 Vac - 30 Vac 0.02 A - 0.5 A
L/A Input 20 Vac - 30 Vac 0.02 A - 0.5 A
NOTE: Not for use with 250, 500, or 750 MV systems.

9
https://www.honeywellhome.com/support
5-year limited warranty

www.resideo.com
© 2020 Resideo Technologies, Inc. All rights reserved.
The Honeywell Home trademark is used under license from Honeywell
International, Inc. This product is manufactured by Resideo Technologies, Inc.
and its affiliates.
Tous droits réservés. La marque de commerce Honeywell Home est utilisée
avec l’autorisation d’Honeywell International, Inc. Ce produit est fabriqué par
Resideo Technologies, Inc. et ses sociétés affiliées.
Todos los derechos reservados. La marca comercial Honeywell Home se utiliza
bajo licencia de Honeywell International, Inc. Este producto es fabricado por
Resideo Technologies, Inc. y sus afiliados.
Resideo Technologies, Inc.
1985 Douglas Drive North, Golden Valley, MN 55422
https://www.honeywellhome.com/support
33-00182EFS—09 M.S. Rev. 08-20 | Printed in United States
33-00182EFS-09
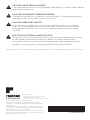
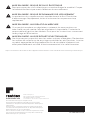
CAUTION: MERCURY NOTICE
If this product is replacing a control that contains mercury in a sealed
tube, do not place the old control in the trash. Contact your local waste
management authority for instructions regarding recycling and proper
disposal.
CAUTION: EQUIPMENT DAMAGE HAZARD
Compressor protection is bypassed during testing. To prevent equipment
damage, avoid cycling the compressor quickly.
CAUTION: ELECTRICAL HAZARD
Can cause electrical shock or equipment damage. Disconnect power before
beginning installation.
https://customer.resideo.com/enUS/support/residential/codes-and-standards/FCC15105/Pages/default.aspx
CAUTION: ELECTRONIC WASTE NOTICE
The product should not be disposed of with other household waste. Check
for the nearest authorized collection centers or authorized recyclers.
The correct disposal of end-of-life equipment will help prevent potential
negative consequences for the environment and human health.
Page is loading ...
Page is loading ...
Page is loading ...
Page is loading ...
Page is loading ...
Page is loading ...
Page is loading ...
Page is loading ...
Page is loading ...

www.resideo.com
© 2020 Resideo Technologies, Inc. All rights reserved.
The Honeywell Home trademark is used under license from Honeywell
International, Inc. This product is manufactured by Resideo Technologies, Inc.
and its affiliates.
Tous droits réservés. La marque de commerce Honeywell Home est utilisée
avec l’autorisation d’Honeywell International, Inc. Ce produit est fabriqué par
Resideo Technologies, Inc. et ses sociétés affiliées.
Todos los derechos reservados. La marca comercial Honeywell Home se utiliza
bajo licencia de Honeywell International, Inc. Este producto es fabricado por
Resideo Technologies, Inc. y sus afiliados.
33-00182EFS-09
Resideo Technologies, Inc.
1985 Douglas Drive North, Golden Valley, MN 55422
https://www.honeywellhome.com/support
33-00182EFS—09 M.S. Rev. 08-20 | Imprimé aux États-Unis
MISE EN GARDE : AVIS RELATIF AU MERCURE
Si ce produit remplace un régulateur contenant du mercure dans un
tube scellé, ne pas mettre l’ancien régulateur à la poubelle. Contacter le
responsable de gestion des déchets local pour les instructions concernant
le recyclage et l’élimination.
MISE EN GARDE : RISQUE DE DOMMAGES DE L’ÉQUIPEMENT
La protection du compresseur est annulée durant le test. Pour éviter
d’endommager l’équipement, éviter d’actionner le compresseur trop
rapidement.
MISE EN GARDE : RISQUE DE CHOC ÉLECTRIQUE
Peut provoquer des chocs électriques ou endommager le matériel. Couper
l’alimentation électrique avant d’effectuer le raccordement.
https://customer.resideo.com/enUS/support/residential/codes-and-standards/FCC15105/Pages/default.aspx
MISE EN GARDE : AVIS DE DÉCHETS ÉLECTRONIQUES
Ne disposez pas ce produit avec les autres ordures ménagères. Recherchez
les centres de collecte ou de recyclage accrédités les plus proches. La mise
au rebut appropriée de l’équipement en fin de vie aidera à prévenir tout
effet potentiellement nuisible à l’environnement et à la santé humaine.
Page is loading ...
Page is loading ...
Page is loading ...
Page is loading ...
Page is loading ...
Page is loading ...
Page is loading ...
Page is loading ...
Page is loading ...
Page is loading ...
Page is loading ...

www.resideo.com
© 2020 Resideo Technologies, Inc. All rights reserved.
The Honeywell Home trademark is used under license from Honeywell
International, Inc. This product is manufactured by Resideo Technologies, Inc.
and its affiliates.
Tous droits réservés. La marque de commerce Honeywell Home est utilisée
avec l’autorisation d’Honeywell International, Inc. Ce produit est fabriqué par
Resideo Technologies, Inc. et ses sociétés affiliées.
Todos los derechos reservados. La marca comercial Honeywell Home se utiliza
bajo licencia de Honeywell International, Inc. Este producto es fabricado por
Resideo Technologies, Inc. y sus afiliados.
33-00182EFS-09
Resideo Technologies, Inc.
1985 Douglas Drive North, Golden Valley, MN 55422
https://www.honeywellhome.com/support
33-00182EFS—09 M.S. Rev. 08-20 | Impreso en EE. UU.
PRECAUCIÓN: AVISO SOBRE EL MERCURIO
Si este producto está reemplazando a un equipo de control existente que
contiene mercurio en un tubo sellado, no coloque dicho equipo en la basura.
Contacte al organismo encargado del manejo y disposición de desechos
de su localidad para obtener instrucciones sobre cómo reciclar y desechar
adecuadamente.
PRECAUCIÓN: RIESGOS DE DAÑOS AL EQUIPO
Se evita la protección del compresor durante la prueba. Para prevenir daños
al equipo, evite encender y apagar rápidamente el compresor.
PRECAUCIÓN: PELIGRO DE ELECTROCUCIÓN
Puede causar descargas eléctricas o daños al equipo. Desconecte el
suministro eléctrico antes de comenzar la instalación.
PRECAUCIÓN: AVISO DE DESPERDICIO ELECTRÓNICO
El producto no se debe tirar con otros desechos domésticos. Verifique los
centros de recolección autorizados más cercanos o centros de reciclaje
autorizados. La eliminación correcta del equipo al final de su vida útil
ayudará a evitar posibles consecuencias negativas para el medio ambiente
y la salud humana.
https://customer.resideo.com/enUS/support/residential/codes-and-standards/FCC15105/Pages/default.aspx
-
 1
1
-
 2
2
-
 3
3
-
 4
4
-
 5
5
-
 6
6
-
 7
7
-
 8
8
-
 9
9
-
 10
10
-
 11
11
-
 12
12
-
 13
13
-
 14
14
-
 15
15
-
 16
16
-
 17
17
-
 18
18
-
 19
19
-
 20
20
-
 21
21
-
 22
22
-
 23
23
-
 24
24
-
 25
25
-
 26
26
-
 27
27
-
 28
28
-
 29
29
-
 30
30
-
 31
31
-
 32
32


Honeywell T6 Pro Programmable Thermostat Owner's manual
- Category
- Thermostats
- Type
- Owner's manual
- This manual is also suitable for
Ask a question and I''ll find the answer in the document
Finding information in a document is now easier with AI
in other languages
Related papers
-
Honeywell TH6210U2001 User guide
-
-
Honeywell T6 Pro TH6320U2008 Owner's manual
-
Honeywell T6 Owner's manual
-
-
-
Honeywell TH6320R User manual
-
Honeywell RTH6360D1002 User manual
-
Honeywell TL8100A1008 User manual
-
Honeywell TH4110D1007 User manual
Other documents
-
 Honeywell Home TH4110U2005/U Product information
-
 Honeywell Home T6 Pro Programmable Thermostat User guide
-
 Gemtech GTP110D Operating instructions
-
 Honeywell Home TH1110DV1009/U User guide
-
 Honeywell Home RLV3150 Electronic Thermostat User guide
-
Honeywell Home RLV3150 Installation guide
-
resideo WLD3CABLE Operating instructions
-
 Honeywell Home RTH7560E User manual
-
 Honeywell Home RLV4305A1000/U1 Owner's manual
-
 Honeywell Home RLV4305A1000/U1 Owner's manual


