ECOVACS DEEBOT OZMO 930 User manual
- Category
- Robotic vacuum cleaners
- Type
- User manual
This manual is also suitable for
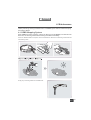
The ECOVACS DEEBOT OZMO 930 is a robotic vacuum cleaner and mop featuring SMART NAVI laser scanning and mapping technology which generates an efficient cleaning path for your home. The robot has multiple cleaning modes, including Auto, which allows DEEBOT to intelligently determine the most efficient cleaning path for your home. It also has Edge, Spot, and Single Room cleaning modes for specific cleaning needs. Its advanced OZMO mopping system allows the robot to vacuum and mop simultaneously, achieving a deeper clean.
The ECOVACS DEEBOT OZMO 930 is a robotic vacuum cleaner and mop featuring SMART NAVI laser scanning and mapping technology which generates an efficient cleaning path for your home. The robot has multiple cleaning modes, including Auto, which allows DEEBOT to intelligently determine the most efficient cleaning path for your home. It also has Edge, Spot, and Single Room cleaning modes for specific cleaning needs. Its advanced OZMO mopping system allows the robot to vacuum and mop simultaneously, achieving a deeper clean.


-
 1
1
-
 2
2
-
 3
3
-
 4
4
-
 5
5
-
 6
6
-
 7
7
-
 8
8
-
 9
9
-
 10
10
-
 11
11
-
 12
12
-
 13
13
-
 14
14
-
 15
15
-
 16
16
-
 17
17
-
 18
18
-
 19
19
-
 20
20
-
 21
21
-
 22
22
-
 23
23
-
 24
24
-
 25
25
-
 26
26


ECOVACS DEEBOT OZMO 930 User manual
- Category
- Robotic vacuum cleaners
- Type
- User manual
- This manual is also suitable for
The ECOVACS DEEBOT OZMO 930 is a robotic vacuum cleaner and mop featuring SMART NAVI laser scanning and mapping technology which generates an efficient cleaning path for your home. The robot has multiple cleaning modes, including Auto, which allows DEEBOT to intelligently determine the most efficient cleaning path for your home. It also has Edge, Spot, and Single Room cleaning modes for specific cleaning needs. Its advanced OZMO mopping system allows the robot to vacuum and mop simultaneously, achieving a deeper clean.
Ask a question and I''ll find the answer in the document
Finding information in a document is now easier with AI
Related papers
-
ECOVACS DG3G-BNDL User guide
-
ECOVACS OZMO-610 User manual
-
-
-
-
-
-
ECOVACS DEEBOT OZMO T8 User manual
-
 Deebot DM80Pro User manual
-
ECOVACS DEEBOT OZMO 960 User manual

Other documents
-
ECOVACS ROBOTICS DB3G Operating instructions
-
 Natco 8912DW28 User manual
-
-
 Mohawk Home 395742 User guide
-
Yeedi DVX34 User manual
-
-
Opodee Robotic Vacuum Cleaner User manual
-
Yeedi 2 Hybrid User manual
-
Sharper Image Self-Emptying Robot Vacuum with HEPA Filter Owner's manual
-
Philips FC8776/01 Important information

