Kemlan CELESTIAL 900 User guide

Category
Fireplaces
Type
User guide

Kemlan CELESTIAL 900 provides efficient heating solutions for medium-sized homes, ranging from 220 to 320 square meters. With an average peak heat output of 6.7kW and an impressive 68% efficiency, this freestanding softwood fireplace delivers reliable warmth, reducing particulate emissions to just 1.5g/kg.

Kemlan CELESTIAL 900 provides efficient heating solutions for medium-sized homes, ranging from 220 to 320 square meters. With an average peak heat output of 6.7kW and an impressive 68% efficiency, this freestanding softwood fireplace delivers reliable warmth, reducing particulate emissions to just 1.5g/kg.

Specialists in fireplace design and manufacture
CELESTIAL 900 FREESTANDING SOFTWOOD
INSTALLATION & OPERATING INSTRUCTIONS
IMPORTANT:
INSTALLER, PLEASE LEAVE THESE INSTRUCTIONS WITH THE UNIT ON COMPLETION.
10 YEAR FIREBOX WARRANTY
The firebox is covered by a 10 year warranty.
Other parts are covered by a one year limited warranty.
Head Office 13 French Avenue, Brendale, Queensland 4500
Telephone PH: (07) 3490 5500
Facsimile FAX: (07) 3490 5520
Website: - www.jetmaster.com.au
Business hours: - Monday to Thursday 7:30am-4:00pm. Friday 7:30am-2:00pm
Email: - [email protected].au
19/07/2023 Ver.14 1
E
C
CELESTIAL 900 FREESTANDING WITH METAL CASING
A
B
F
D
DIMENSIONS
E
A B C D E F G H
MEASUREMENTS
1060 602 465 491 530 239 776 268
GH
THE FIRST LENGTH
OF 8” DECRO FROM
THE UNIT MUST HAVE
DOUBLE HEAT SHIELD
8” DECRO
HEAT SHIELD
19/07/2023 Ver.14
IMPORTANT: ANY APPENDIX F APPROVED FLUE
KITS CAN BE USED ON THESE KEMLAN
FREESTANDING FIREPLACES AS LONG AS IT
COMPLIES WITH THE LABORATORY TESTED
HEAT SHIELDING”
2
NOTE:
The floor protector consists of an 80mm thick Bellis Board or similar
material which has a thermal resistance of 0.1m² k/W, under the unit.
18mm thick board can be used in front of unit.
New flue kit active + half heatshield – “Any single heatshield can be
used from 900mm up to 1200mm height”
“This heater has been tested with the fan connected to a standard 3
pin GPO socket outlet. The fan does not need to be hard wired”.
PERFORMANCE:
Heating capacity 220-320m2 (23-33 squares)
Average peak heat output 6.7kW
Average Particulate emission - 1.5g/kg
Average efficiency 68%
Heating capacity of this appliance is given as a guide only and may
vary depending on the climate zone and type of dwelling (floor plan
and degree of insulation). Consult your local authorised distributor to
determine realistic expectations for your home.
Heat output and fuel consumption of this appliance is dependent on
the moisture content, size, loading geometry and the type of softwood
used.
The appliance complies to the safety standards
AS/NZS 2918. When in use some parts may become hot. A suitable
fireguard is recommended where the very young, elderly or infirm are
concerned.
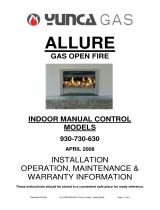
MINIMUM CLEARANCES FOR THE CELESTIAL 900
FREESTANDING SOLID FUEL APPLIANCE INSTALLED
WITH DEFAULT FLUE KIT
*As per Clause 3.3.2 of AS/NZS 2918:2001 for floor protector
construction requirements. This measurement only applies when
unit is 200mm above floor. (refer hearth measurement drawing if
unit is higher than 200mm from floor.)
** This is the minimum allowable distance to any combustible
material behind the unit.
Glass viewing area- 776mm wide x 268mm high
Flue pipe- ø150mm top exit
Shipping weight- 185 kg
All dimensions shown are approximate. Check all dimensions
accurately before installation. Before installing refer to the
installation instructions.
In line with our policy of continuous improvement, we reserve the
right to alter specifications without notice.
CONSTRUCTION:
6 mm heavy duty steel firebox fully welded
25mm thick firebrick lined floor, back and sides
19mm ceramic baffle plates
COMBUSTIBLE WALL COMBUSTIBLE WALL
AD
G
K
E
B
H
C
C
F
F
J
A B C D E F G H I J K
MEASUREMENT 100 200 45** 339 730 575 1051 1180 1401 910 460*
I
MINIMUM CLEARANCES:
K
19/07/2023 Ver.14 3
HEARTH MEASUREMENT
CELESTIAL 900
FREESTANDING
UNIT
B
A
A. UNIT HEIGHT ABOVE FLOOR 200
B. HEARTH DIMENSION FORWARD OF UNIT 460
19/07/2023 Ver.14
A MINIMUM 80MM
THICK FLOOR
PROTECTOR
SHOULD BE USED
UNDER THE
APPLIANCE.
4
A MINIMUM 18mm NON COMBUSTIBLE
MATERIAL FC SHEET OR SIMILAR CAN BE
USED IN FRONT OF THE APPLIANCE
HEARTH REQUIREMENTS FOR
INSTALLATION ONTO A RAISED HEARTH
Y
* NOTE: IF Y IS LESS THAN 200mm THEN REFER TO HEARTH MEASUREMENT ON PREVIOUS PAGE
X. MIN. DEPTH MEASUREMENT (mm) 300
Y. MIN. HEIGHT INCREASE (mm) 200*
X
19/07/2023 Ver.14
CELESTIAL 900
FREESTANDING
UNIT
5
A MINIMUM 80MM
THICK FLOOR
PROTECTOR
SHOULD BE USED
UNDER THE
APPLIANCE. A MINIMUM 18mm NON
COMBUSTIBLE MATERIAL
FC SHEET OR SIMILAR
CAN BE USED IN FRONT
OF THE APPLIANCE
19/07/2023 Ver.14 6
MINIMUM REQUIREMENTS FOR
INSTALLATION ON A STEEL TABLE
100
300
746
300
CELESTIAL 900
UNIT
METAL TABLE
* NOTE: NO FC SHEETING UNDER THE APPLIANCE IS REQUIRED FOR THIS ASSEMBLY.
BAFFLE PLATE INSTALLATION
1. REMOVE MIDDLE AIR TUBE BY PUSHING
UP AND REMOVING FROM FRONT AND
REAR BRACKETS.
2. PLACE ALL 4 BAFFLE PLATES ABOVE AIR TUBES
BOTH SIDES CLOSEST TO THE FIRE BOX WALL
AS SHOWN ( 2 LEFT AND 2 RIGHT)
3. PLACE BAFFLE PLATES AS FAR BACK AS
POSSIBLE, 222 MM FROM FRONT TO BACK.
222
4. BAFFLE PLATE SIDE OF 212 MM SHOULD EXTEND
FROM SIDE TO SIDE,
6. SLIDE THE BAFFLE PLATES ATOP THE OTHER
2 BAFFLE PLATES INTO THE MIDDLE POSITION
AS SHOWN. LEAVE GAP OF 1-2 MM IN
BETWEEN PLATES. THE GAPS SHOULD BE
ROUGHLY IN THE MIDDLE OF THE AIR
TUBES. UNIT IS NOW READY FOR USE.
5. RE- PLACE MIDDLE AIR TUBE BACK INTO
POSITION
( NB. MAKE SURE OPEN END OF AIR TUBE IS
PLACED INTO REAR OPENING. CLOSED END
TOWARDS DOOR. FAILURE TO INSTALL AIR
TUBES CORRECTLY WILL VOID WARRANTY.)
19/07/2023 Ver.14
7
19/07/2023 Ver.14
CELESTIAL 900 DOOR ADJUSTMENT
INFORMATION
1. OPEN THE DOOR AS FAR AS REQUIRED, AND
THE ADJUSTMENT ANGLE IS ACCESSIBLE. 2. MARK THE POSITION OF THE ADJUSTMENT
ANGLE ON THE FIREBOX. IT IS CRITICAL TO
PUT THE ADJUSTMENT ANGLE AT THE SAME
SPOT. SO THAT THE DOOR WILL LOCK
PROPERLY.
3. LOOSEN THE 2 BOLTS AS REQUIRED. DO NOT
UNSCREW THE BOLTS ALL THE WAY OUT.
4. PUSH THE PACKER FROM THE BOTTOM EDGE
OF THE ADJUSTMENT ANGLE UNTIL FULLY
REMOVED. ONLY TAKE OUT WHAT IS
NECESSARY. RE-POSITION THE ADJUSTMENT
ANGLE AT THE MARKERS AND TIGHTEN.
NOTE: UP TO 4 PACKERS CAN BE REMOVED IF
NECESSARY.
5. CLOSE THE DOOR AND CHECK IF THE LATCH
LOCKS PROPERLY, THE ADJUSTMENT IS
COMPLETE IF NO ADJUSTMENT IS NEEDED. 8
19/07/2023 Ver.14
Place the appliance on top of the meridian base.
Make sure to align the front and side edges of
the appliance to the meridian base.
Locate and align the holes on the underside
of the appliance and top of the meridian
base. Use the supplied bolts and washers,
then tighten, this will hold the appliance in
place.
Position the appliance and meridian base assembly
to the desired position. Make sure the flue hole is in
the required position. Use the existing holes at the
bottom of the meridian base to drill the holes for m8-
m10 dyna bolts. Use the preferred dyna bolt size
and affix the appliance and meridian base assembly
to the floor. When both dyna bolts are tightened the
installation is complete.
SEISMIC RESTRAINTS MERIDIAN BASE INSTALLATION
9
19/07/2023 Ver.14
Place the back of the appliance aligned to the
back edge of the cube table. Make sure the
appliance is centred from the left and right edges.
SEISMIC RESTRAINTS TABLE INSTALLATION
Attach the supplied bracket by locating the holes
in the appliance and table on both sides as
indicated. Use Tek screws and attach the
appliance by using the pilot holes on the bracket.
Position bracket to 10mm from the underside of
the table and edge of the appliance on the side.
Position the appliance and table assembly to the desired position. Make sure the flue hole is
in the correct position. Use Tek screws and attach the bracket to the table. Use the holes at
the bottom of the angle bracket to drill the holes for m8-m10 dyna bolts to the floor. Use the
preferred dyna bolt size and affix the appliance and table assembly to the floor. When both
dyna bolts are tightened the installation is complete.
Dyna bolts
Tek screws
Tek screws
10
19/07/2023 Ver.14 11
FREESTANDING UNIT WITH HEAT SHIELD
THE FIRST LENGTH
OF 6” ACTIVE FLUE
FROM THE UNIT MUST
HAVE A HALF 8” HEAT
SHIELD, ATTACH VIA
POP RIVETS SUPPLIED
BY INSTALLER
6” ACTIVE FLUE
1000MM LONG
HEAT SHIELD
HEAT SHIELD
6” ACTIVE
FLUE
A
THE HEAT SHIELD WILL COVER 33%
OF THE TOTAL CIRCUMFERENCE OF
THE ACTIVE FLUE.
DETAIL A
IMPORTANT:
NEW FLUE KIT ACTIVE + HALF
HEATSHIELD – “ANY SINGLE
HEATSHIELD CAN BE USED FROM
900MM UP TO 1200MM HEIGHT
“THIS HEATER HAS BEEN TESTED WITH
THE FAN CONNECTED TO A STANDARD
3 PIN GPO SOCKET OUTLET. THE FAN
DOES NOT NEED TO BE HARD WIRED”.
19/07/2023 Ver.14 12
SINGLE HEATSHIELD INSTALLATION
INFORMATION FOR FLAT CEILING
SUPPORT OUTER FLUE
WITH ANGLE BRACKET
SUPPLIED
ROOF FLASHING
SUPPLIED BY
CONTRACTOR
ALL CASING FLUE PIPES
MUST BE CONNECTED
VIA POP RIVETS SUPPLIED
BY INSTALLER
STAINLESS STEEL DOUBLE
CONE COWL
POP RIVET OR SCREW
BRACKETS TO THE
OUTSIDE OF THE
OUTER CASING
B
A
DETAIL A
10” FLUE
25
CEILING TRIM
8” FLUE
10” FLUE
8” FLUE
DETAIL
c
ALL
8”-
10” ASSEMBLED FLUES
MUST HAVE THE CRIMPS
POINTING UPWARDS
ALL
6” ASSEMBLED FLUES
MUST HAVE THE CRIMPS
POINTING DOWNWARDS
CRIMPED
PLAIN
DETAIL D
PLAIN
DETAIL B
RUN A BEAD OF SILICONE
DOWN THE VERTICAL SEAM
OF THE OUTER CASING
TO THE FLASHING
D
CEILING
25
150
VENTED CAP
DETAIL C
C
THE FIRST LENGTH
OF 6” ACTIVE FLUE FROM
THE UNIT MUST HAVE
SINGLE HEAT SHIELD
SHORT TUBE FROM
THE COWL FITS
INTO FLUE PIPE. ALL
FLUES SHOULD BE
TRIMMED LEVEL
THERE MUST BE
12MM GAP
BETWEEN THE
THE CEILING
AND THE CEILING
TRIM
CRIMPED
IMPORTANT:
New flue kit active + half heatshield – “Any single
heatshield can be used from 900mm up to 1200mm
height”
“This heater has been tested with the fan connected
to a standard 3 pin GPO socket outlet. The fan does
not need to be hard wired”.
19/07/2023 Ver.14 13
SUPPORT OUTER
FLUE
WITH ANGLE
BRACKET
SUPPLIED
ROOF FLASHING
SUPPLIED BY
CONTRACTOR
ALL CASING FLUE
PIPES
MUST BE CONNECTED
VIA POP RIVETS
SUPPLIED
BY INSTALLER
STAINLESS STEEL DOUBLE
CONE COWL
POP RIVET OR
SCREW
BRACKETS TO THE
OUTSIDE OF THE
OUTER CASING
SHORT TUBE FROM
THE COWL FITS
INTO FLUE PIPE. ALL
FLUES SHOULD BE
TRIMMED LEVEL
A
DETAIL A
6” FLUE
10” FLUE
FRONT VIEW
25
150
CEILING TRIM
VENTED CAP
25
10” FLUE
8” FLUE
DETAIL
c
ALL
8”-
10” ASSEMBLED FLUES
MUST HAVE THE CRIMPS
POINTING UPWARDS
RUN A BEAD OF SILICONE DOWN
THE VERTICAL SEAM OF THE OUTER
CASING TO THE FLASHING
ALL
6” ASSEMBLED FLUES
MUST HAVE THE CRIMPS
POINTING DOWNWARDS
CRIMPED
PLAIN
DETAIL D
PLAIN
CRIMPED
DETAIL C
C
THE FIRST LENGTH
OF 6” ACTIVE FLUE FROM
THE UNIT MUST HAVE
SINGLE HEAT SHIELD
SINGLE HEATSHIELD INSTALLATION
INFORMATION FOR RAKED CEILING
THERE MUST BE
12MM GAP
BETWEEN THE
THE CEILING
AND THE CEILING
TRIM
IMPORTANT:
New flue kit active + half heatshield – “Any single
heatshield can be used from 900mm up to
1200mm height”
“This heater has been tested with the fan
connected to a standard 3 pin GPO socket outlet.
The fan does not need to be hard wired”.
19/07/2023 Ver.14
CELESTIAL 900 FREESTANDING
INFORMATION FOR DECRO INSTALLATION
6” ACTIVE FLUE
INSTALL THE NEXT LENGTH OF DECRO.
A VENTED CAP IS ALSO SUPPLIED LOOSE
TO BE USED AS REQUIRED. CONNECT WITH
POP RIVETS SUPPLIED BY INSTALLER
IINSTALL THE FIRST 2 LENGTHS OF 6” ACTIVE
FLUE.ALL
6” ASSEMBLED FLUES MUST HAVE THE
CRIMPS POINTING DOWNWARDS. CONNECT THE
FLUE WITH POP RIVETS , SUPPLIED BY
INSTALLER.
IINSTALL THE FIRST LENGTH OF DECRO (DECRO A) USE
THE DECRO FLUE WITH THE VENTED CAP CLOSEST TO
THE TOP OF THE APPLIANCE.
MAKE SURE THE HEATSHIELD IS
POSITIONED ADJACENT TO THE
REAR WALL..
VENTED CAP
CRIMPED END
HEAT SHIELD
DECRO A
DECRO A
(WITH HEATSHIELD)
DECRO E
(NO VENTED CAP
NO CRIMP,
NO HEATSHIELD)
14
IMPORTANT: ANY APPENDIX F APPROVED FLUE
KITS CAN BE USED ON THESE KEMLAN
FREESTANDING FIREPLACES AS LONG AS IT
COMPLIES WITH THE LABORATORY TESTED
HEAT SHIELDING”
CELESTIAL 900 FREESTANDING
INFORMATION FOR FLAT CEILING
DETAIL B
SUPPORT OUTER FLUE
WITH ANGLE BRACKET
SUPPLIED
ROOF FLASHING
SUPPLIED BY
CONTRACTOR
ALL CASING FLUE PIPES
MUST BE CONNECTED
VIA POP RIVETS SUPPLIED
BY INSTALLER
STAINLESS STEEL
FLUE PIPE. ALL FLUE
PIPES MUST BE
CONNECTED WITH
POP RIVETS
SUPPLIED BY
INSTALLER
STAINLESS STEEL DOUBLE
CONE COWL
POP RIVET OR SCREW
BRACKETS TO THE
OUTSIDE OF THE
OUTER CASING
SHORT TUBE FROM
THE COWL FITS
INTO FLUE PIPE. ALL
FLUES SHOULD BE
TRIMMED LEVEL
B
A
DETAIL A
6” FLUE
8” DECRO
10” FLUE
FRONT VIEW
25 25
150
CEILING TRIM
VENTED CAP
8” DECRO
10” FLUE
THE FIRST LENGTH
OF 8” DECRO FROM
THE UNIT MUST HAVE
DOUBLE HEAT SHIELD
(refer page 2 for clarification)
8” FLUE
DETAIL
c
8”-
ALL
6” ASSEMBLED FLUES
MUST HAVE THE CRIMPS
POINTING DOWNWARDS
CRIMPED
PLAIN
DETAIL D
PLAIN
DETAIL C
CRIMPED
RUN A BEAD OF SILICONE DOWN
THE VERTICAL SEAM OF THE OUTER
CASING TO THE FLASHING
D
C
CEILING
19/07/2023 Ver.14 15
IMPORTANT: ANY APPENDIX F
APPROVED FLUE KITS CAN BE
USED ON THESE KEMLAN
FREESTANDING FIREPLACES
AS LONG AS IT COMPLIES
WITH THE LABORATORY
TESTED HEAT SHIELDING”
CELESTIAL 900 FREESTANDING
INFORMATION FOR RAKED CEILING
DETAIL B
SUPPORT OUTER FLUE
WITH ANGLE BRACKET
SUPPLIED
ROOF FLASHING
SUPPLIED BY
CONTRACTOR
ALL CASING FLUE PIPES
MUST BE CONNECTED
VIA POP RIVETS SUPPLIED
BY INSTALLER
STAINLESS STEEL
FLUE PIPE. ALL FLUE
PIPES MUST BE
CONNECTED WITH
POP RIVETS
SUPPLIED BY
INSTALLER
STAINLESS STEEL DOUBLE
CONE COWL
POP RIVET OR SCREW
BRACKETS TO THE
OUTSIDE OF THE
OUTER CASING
SHORT TUBE FROM
THE COWL FITS
INTO FLUE PIPE. ALL
FLUES SHOULD BE
TRIMMED LEVEL
A
DETAIL A
6” FLUE
8” DECRO
10” FLUE
FRONT VIEW
25
150
CEILING TRIM
VENTED CAP
CEILING
8” DECRO
25
10” FLUE
8” FLUE
DETAIL
c
8”-
RUN A BEAD OF SILICONE DOWN
THE VERTICAL SEAM OF THE OUTER
CASING TO THE FLASHING
D
ALL
6” ASSEMBLED FLUES
MUST HAVE THE CRIMPS
POINTING DOWNWARDS
CRIMPED
PLAIN
DETAIL D
PLAIN
CRIMPED
DETAIL C
C
THE FIRST LENGTH
OF 8” DECRO FROM
THE UNIT MUST HAVE
DOUBLE HEAT SHIELD
(refer page 2 for clarification)
B
19/07/2023 Ver.14 16
IMPORTANT: ANY APPENDIX F
APPROVED FLUE KITS CAN BE
USED ON THESE KEMLAN
FREESTANDING FIREPLACES
AS LONG AS IT COMPLIES
WITH THE LABORATORY
TESTED HEAT SHIELDING”
19/07/2023 Ver.14
NOTE:
The boost flap need to be left open for the first 20 minutes of operation, in order
to light the fire better. After this time, normal appliance operation will commence
and the boost flap will need to be shut for the duration of use.
CELESTIAL 900
BOOST OPERATION
BOOST FLAP, IN
OPEN POSITION.
PUSHED TOWARDS
THE RIGHT AS FAR
AS POSSIBLE.
17
INSTALLATION INSTRUCTIONS
MINIMUM HEIGHT OF FLUE SYSTEM EXIT
INSTALLATION TO COMPLY WITH AS/NZS 2918
19/07/2023 Ver.14
3000
OR LESS
INCREASE FROM 1000 MIN
UNTIL CLEAR WITHIN 3000 OF
TOP OF FLUE
3000
ANY NEARBY
STRUCTURE
6000 MORE THAN 3000
600 MIN 3000
1000 MIN IF CLEAR WITHIN
3000 OF TOP OF FLUE
INCREASE AS NECESSARY UNTIL
NOTHING WITHIN 6000 OF THE FLUE
TOP
600 MIN
3000 OR LESS MORE THAN 3000
DIMENSIONS IN MILLIMETRES
18
19/07/2023 Ver.14 19
19/07/2023 Ver.14 20
  • Page 1 1
  • Page 2 2
  • Page 3 3
  • Page 4 4
  • Page 5 5
  • Page 6 6
  • Page 7 7
  • Page 8 8
  • Page 9 9
  • Page 10 10
  • Page 11 11
  • Page 12 12
  • Page 13 13
  • Page 14 14
  • Page 15 15
  • Page 16 16
  • Page 17 17
  • Page 18 18
  • Page 19 19
  • Page 20 20
  • Page 21 21
  • Page 22 22
  • Page 23 23

Kemlan CELESTIAL 900 User guide

Category
Fireplaces
Type
User guide

Kemlan CELESTIAL 900 provides efficient heating solutions for medium-sized homes, ranging from 220 to 320 square meters. With an average peak heat output of 6.7kW and an impressive 68% efficiency, this freestanding softwood fireplace delivers reliable warmth, reducing particulate emissions to just 1.5g/kg.

Ask a question and I''ll find the answer in the document

Finding information in a document is now easier with AI