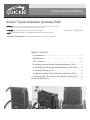
Quickie QXi®/QX is a versatile wheelchair that offers a range of features to enhance your mobility and comfort. With its adjustable seat, backrest, and armrests, you can customize the chair to fit your individual needs. The lightweight and durable frame makes it easy to maneuver, while the large wheels provide a smooth ride over various terrains. Whether you're navigating busy streets or exploring outdoor trails, the Quickie QXi®/QX is designed to give you the freedom and independence you need.
Quickie QXi®/QX is a versatile wheelchair that offers a range of features to enhance your mobility and comfort. With its adjustable seat, backrest, and armrests, you can customize the chair to fit your individual needs. The lightweight and durable frame makes it easy to maneuver, while the large wheels provide a smooth ride over various terrains. Whether you're navigating busy streets or exploring outdoor trails, the Quickie QXi®/QX is designed to give you the freedom and independence you need.


-
 1
1
-
 2
2
-
 3
3
-
 4
4
-
 5
5
-
 6
6
-
 7
7
-
 8
8


Quickie QXi®/QX is a versatile wheelchair that offers a range of features to enhance your mobility and comfort. With its adjustable seat, backrest, and armrests, you can customize the chair to fit your individual needs. The lightweight and durable frame makes it easy to maneuver, while the large wheels provide a smooth ride over various terrains. Whether you're navigating busy streets or exploring outdoor trails, the Quickie QXi®/QX is designed to give you the freedom and independence you need.
Ask a question and I''ll find the answer in the document
Finding information in a document is now easier with AI
Related papers
-
Quickie Q300 M Mini Owner's manual
-
Quickie Q700 M Owner's manual
-
-
Sunrise Medical Quickie XENON2 Owner's manual
-
SunriseMedical Quickie 2 HP Owner's manual
-
Sunrise Medical 7 Series Owner's manual
-
-
Quickie 2 Family Owner's manual
-
-
Other documents
-
-
 CLC 27540533 Installation guide
-
-
-
Human Touch Indoor Furnishings Massage Chair User manual
-
-
-
Drive Medical Cane/Sling Seat Owner's manual
-
-
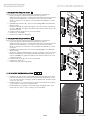
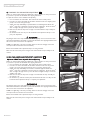
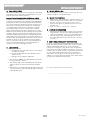
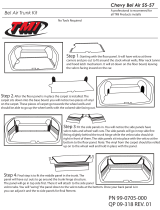 TMI Products 55-57 Chevy Trifive Trunk kit Installation guide

