

1
Table of Contents
CHAPTER 1 Welcome to the Mobile Connection Manager 3
About this Guide 3
Checklist 3
Owner Records 3
About your PC3220 Wireless PC Card Modem 3
What is the Mobile Connection Manager? 4
Caring for your PC3220 4
What is CDMA 4
The Basics 5
CHAPTER 2 Installing the Mobile Connection Manager and PC3220 on Your
Notebook PC 6
Installation Precautions 6
System Requirements 6
Installing the Mobile Connection Manager Software 7
Installing Fourelle Venturi Data Compression 8
Connecting the PC3220 and Drivers to your Notebook PC 9
Account Activation with Verizon Wireless 11
Establishing a Connection 12
Powering OFF/ON the PC3220 13
Exiting the Mobile Connection Manager (MCM) 13
Removing the PC3220 from your Notebook PC 14
CHAPTER 3 Using the Mobile Connection Manager 15
Understanding The Indicator Area and Icons 15
Signal Strength Indicator 15
Service Indicator 16
Data Compression 16
Roaming Status 16
Connection Indicator 17
Connection Time 17
Byte Counter 17
Service Status Dialog Box 17
Understanding the Action Buttons 18
Settings 19
Settings: General Tab 19
Settings: Connection Profiles Tab 19
Settings: About Tab 20
Call Log 20
Help 21
System Tray Shortcut 21

2
Table of Contents
CHAPTER 4 System Tray Mode (Connection Status Icon and Menu) 22
System Tray Icon 22
System Tray Menu 23
CHAPTER 5 Understanding Alert Windows 24
Express Network
SM
(1xRTT) and Quick 2 Net
SM
(14.4kbps) Alerts 24
Connection Lost Alert 24
Software Mismatch Alert 24
Power On Card Alert 24
Connection in Progress Alert 24
Delete Connection Profile Confirmation 25
Reset Call Log Information 25
CHAPTER 6 Networking and Dial-up Connections 26
Windows Networking 26
CHAPTER 7 Frequently Asked Questions 27
CHAPTER 8 Regulatory Information and Safety and Hazards 29
CHAPTER 9 Technical Specifications 32
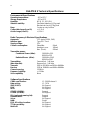
Environmental Specifications 32
Radio Frequency and Electrical Specifications 32
Software Specifications 32
Mechanical Specifications 33
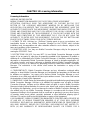
CHAPTER 10 Licensing Agreement 34
CHAPTER 11 Limited Warranty 37

3
CHAPTER 1 Welcome to the Mobile Connection Manager
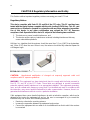
Congratulations and thank you for purchasing the PC3220 Wireless PC Card Modem! The
PC3220 is a dual band CDMA2000 1X product that enables you to communicate wirelessly from
your laptop. Now that you are equipped with a wireless modem, you no longer need to carry
chargers, cables, telephone jack converters, and batteries.
This product is simple to install and use. The Mobile Connection Manager software allows you
to easily monitor your connections and customize your settings.
NOTE: Before using the PC3220, you MUST review the Safety Information outlined on page 30.
About this Guide
This User’s Guide contains all the information you will need to properly install and use your
PC3220 Wireless PC Card Modem. Before you can begin using the PC3220, it is essential that
you follow the proper instructions for installation.
You must load the Mobile Connection Manager software located on the CD-ROM that was
included in your kit before you insert the PC3220 into your notebook PC. This initial setup
process just takes a few minutes and you’ll soon be on your way to wireless freedom.
Checklist
Make sure that the following items are included in the kit when you unpack it:
o A PC3220 Wireless PC Card Modem
o The Installation CD which contains the Mobile Connection Manager Software, the
Fourelle Venturi 2.1 Data Compression Software, and the Owner’s Manual
o A Quick Start Guide
Owner Records
Be sure to keep handy your PC Card’s ESN number, located at the bottom of your card, for
easy reference. Record your information here for easy reference:
ESN Number: ___________________________________
About your PC3220 Wireless PC Card Modem
The PC3220 is a wireless PC Card modem designed to fit into a Type II PC Card slot available
on most notebook PCs. This uniquely designed card allows you to connect to the Internet, send
and receive email efficiently, connect to your company’s network, and maximize productivity
when away from the office.
Power Management
Designed to take advantage of the power management and system overhead
benefits offered by the 32-bit CardBus electrical interface that extends battery life.
CardBus: another name for “advanced PC Card,” the CardBus interface works at
lower battery voltage and operates at a greater speed than the standard PC Card
interface.

4
Unique Antenna Design
The PC3220 includes a proprietary antenna design that optimizes data rate transfer
speeds, sensitivity, and increases power efficiency.
Other Features and Benefits
§ A Type II PCMCIA format supporting the CardBus I/O interface
§ Supports North American CDMA Cellular (800 MHz) and PCS (1900 MHz)
bands (analog not supported)
§ Based on the QUALCOMM MSM5100 chipset
§ Supports IS-95A/B and CDMA2000 1xRTT Release 0
§ Optimized data rates of up to 153.6 kbps on both the forward and reverse
links
§ Provides dial-up, Express Network
sm
(1xRTT) and Quick 2 Net
sm
(14.4kbps)
services
What is the Mobile Connection Manager?
The Mobile Connection Manager is an application designed to assist you in managing the
PC3220. With this application you can easily monitor and customize your connections.
The Mobile Connection Manager Software guides you through the wireless connection process.
Similar to a mobile phone display, the user interface of the Mobile Connection Manager instructs
you when to insert the PC3220 into your laptop, advises you on network availability, displays the
time of your session and amount of data being transferred and received, and when your
connection becomes dormant. Other features allow you to customize your settings, review your
connection history, and access a digital help file.
Caring for your PC3220
Storage:
§ When not in use, fold the antenna down and store in a compartment where the card can
be protected from being crushed or broken.
§ Do not apply adhesive labels to the PC3220. This may cause the card to jam inside the
PC Card slot of your notebook PC.
§ The antenna extends freely, do not forcefully hyper-extend the antenna. This may cause
it to break.
§ The PC3220 should easily fit into the PC Card slot. Forcing the PC3220 into the PC
Card slot may cause considerable damage.
§ Your PC3220 should be stored in a dry and clean place. Protect your card from liquids,
dust and excessive heat.
What is CDMA?
Your PC3220 operates on a wireless cellular network called CDMA (Code Division Multiple
Access). CDMA is a digital spread-spectrum wireless technology that offers reliable, high
speed, bi-directional throughput of up to 144 kbps for email, corporate databases and all the

5
services of the Internet. The PC3220 is a high performance card that enables you to both
send and receive data/email at maximum network rates.
Often times when using a dial-up connection, a "network busy" signal appears. That's
because there are "bottlenecks" slowing down the network. With the spread spectrum
technology of CDMA these frustrating bottlenecks are eliminated. In fact, CDMA technology
allows a network to handle more calls than competing digital technologies. Today, over 100
million consumers worldwide rely on CDMA technology for quality voice communications
and reliable, high-speed data.
What about privacy? The secure CDMA network is designed with digital coding that is
recognized only by the base station and unintelligible to eavesdroppers.
For more information on CDMA, visit the CDMA Development Group website: www.cdg.org
The Basics
Before you can begin using the PC3220 you will need to load the software on your notebook PC
and configure the PC3220. Here is a brief overview of the steps outlined in the next section:
ü Install the Mobile Connection Manager software, located on the Installation CD
ü Insert the PC3220 into your notebook’s PC Card slot and install the drivers
ü Activate your account when prompted by the Activation Wizard
ü Connect to your Service Provider's high-speed 1xRTT CDMA Network
CAUTION: Do not insert the PC3220 into your notebook’s PC Card slot until you are prompted to do so
by the Mobile Connection Manager software wizard. Failure to do so will result in fatal errors to your PC.
Follow the installation guidelines outlines in Section 2: Installing the Mobile Connection Manager and
PC3220 on your Notebook PC.

6
CHAPTER 2 Installing the Mobile Connection Manager and PC3220 on
Your Notebook PC
Installation Precautions
WARNING: DO NOT insert the PC3220 before you install the Mobile Connection Manager software
onto your notebook PC. Once you install the Mobile Connection Manager software, you will be
prompted to insert the PC3220 into the Type II PC Card slot.
CAUTION: Before beginning the installation process, it is recommended that you quit all open
applications.
WARNING: Once the card is inserted, do not physically remove the PC3220 from the PC Card slot
until you have completed the Unplug/Eject process. Removing the card improperly may cause a
fatal error to your PC.
NOTE: If you have previous versions of the Mobile Connection Manager or Venturi applications
installed on your notebook PC, you will need to remove the application(s) by utilizing the
Add/Remove Programs Windows utility. Once removed, proceed with the installation procedures
of the current version located on your Installation CD.
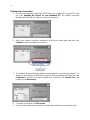
Uninstalling the Mobile Connection Manager and/or Fourelle Venturi software:
Windows XP
1. Go to: Start>Control Panel>Add/Remove Programs
2. Select Mobile Connection Manager and/or Fourelle Venturi and click Change/Remove
3. Next select Remove and click OK to proceed when prompted
4. You will need to restart your Laptop PC in order to complete the uninstall
Windows 2000
1. Go to: Start>Settings>Control Panel>Add/Remove Programs
2. Select Mobile Connection Manager and/or Fourelle Venturi and click Change/Remove
3. Next select Remove and click OK to proceed when prompted
4. You will need to restart your Laptop PC in order to complete the uninstall
Windows 98 and ME
1. Go to: Start>Settings>Control Panel>Add/Remove Programs
2. Select Mobile Connection Manager and/or Fourelle Venturi and click Add/Remove
3. Next click OK to proceed when prompted
4. You will need to restart your Laptop PC in order to complete the uninstall
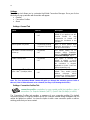
System Requirements
Before you begin the installation process, check that your notebook PC supports the following
system requirements.
1. Your PC3220 functions in notebook PCs with these Windows
®
operating systems:
Windows
®
98SE
Windows
®
ME
Windows
®
XP
Windows
®
2000
NOTE: This card is not designed to function in handhelds and Pocket PCs and does not support
Windows
CE.

7
2. In order to install the PC3220 and the Mobile Connection Manager software, these
minimum system resources are required:
Card slots: Type II PC Card slot (Cardbus)
Disk-Drive: CD-ROM
Memory: 32 MB
Disk Space: 14MB
Processor: Pentium 150MHz or higher
Dial Up Networking: DUN bound to TCP/IP
NOTE - Windows
98: You may need the original Microsoft
Windows
98 Installation CD.
NOTE: If you are planning to upgrade your Microsoft operating system, you will need to uninstall
the Mobile Connection Manager first. Once the Mobile Connection Manager is removed, proceed
with the operating system upgrade. After these steps are complete, you will need to reinstall the
Mobile Connection Manager.
Installing the Mobile Connection Manager Software
The Installation CD that was included in the PC3220 kit is equipped with the Mobile Connection
Manager software. This software is required for installation and is essential for optimum
performance of your PC3220.
1. Insert the Installation CD into your CD-ROM drive.
2. The Setup program should launch automatically and a Welcome window will appear.
NOTE: If the Setup program does not launch automatically, select Start>Run and enter
d:\Setup.exe, where d is the designation for the CD-ROM drive.
3. Click Next on the Mobile Connection Manager Setup Welcome Window.
4. Please read the Licensing Agreement carefully and click Yes to agree to the terms.
5. Click Next to install the software in the default folder. You may choose to install a
different folder by clicking the Browse button.
6. If you prefer to have the Mobile Connection Manager launch automatically each time
your notebook PC starts up, ensure the Run Mobile Connection Manager at Start up
checkbox is checked. If you prefer to add the Mobile Connection Manager shortcut to
your desktop, ensure the Desktop Shortcut checkbox is checked. Click Next.
7. Wait for the Setup Status to load 100% and the window will close automatically.
8. Installing the Venturi data compression software is recommended for accelerated
performance.
If you choose to install Venturi at this time:
Windows 2000/XP/ME:
Click Yes to install Venturi and proceed to step 9.

8
If you prefer to install Venturi later:
Windows 2000/XP:
If you choose to install Venturi later, select No and click Finish. Now proceed to step
18. Your notebook PC will not restart.
Windows ME:
If you choose to install Venturi later, select No and click Yes to restart your PC.
Continue to step 18, once your PC restarts.
Windows 98: You will need to manually install the Venturi software should you decide to
install at this time or later:
a. Once the "Installation Complete" screen appears, click Finish. (If you haven’t saved
and closed other active applications and critical files, do so at this time).
b. You must restart your notebook PC before the new settings will take effect. Click Yes
to restart your notebook PC.
c. Once your notebook PC does reboot, you will need to manually install Venturi. Go to
Start>Run and enter d:\Setup.exe, where d is the designation for the CD-ROM drive.
Select Fourelle Venturi 2.1 and click OK.
Installing Fourelle Venturi Data Compression
9. If you haven’t saved and closed other active applications and critical files, do so at this
time and click OK.
10. Wait while the Venturi Setup prepares the InstallShield™ Wizard. This window will close
automatically.
11. To begin installation of the Venturi, click Next.
12. Read the Licensing Agreement carefully and click Yes to agree to the terms.
13. Review the Readme document and click Next.
14. Click Next to install the Venturi software to the default folder. If you prefer to install it to a
different folder, click the Browse button.
15. A command box will appear briefly. No action is required when this screen appears; it
will close automatically.
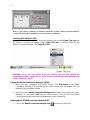
16. Before clicking Finish, close any open programs and save critical files. Your notebook
PC will restart automatically. Once Venturi is installed on your notebook PC, this icon
will appear in the system tray: . The “ X ” through the Venturi icon, signifies that
Venturi is “off ” (the application is not running).
Once an Internet connection is established with the Mobile Connection Manager, the
icon will change to look like this: , signifying that the application is now “on”. While
Venturi is actively compressing data the icon will transform into an animated tornado. As

9
soon as the Internet connection is terminated and you have disconnected, the Venturi
will return to the “off” icon.
Tip: The Settings tool in the Mobile Connection Manager allows you to control the
use of Venturi, offering the option to enable or disable the data compression
software. See page 19, Understanding Action Buttons.
17. Allow your computer to fully reboot before proceeding with the insertion of the PC3220
PC Card and drivers.
18. Skip to step 20 if you did not check the option Run Mobile Connection Manager at
Start up from the Mobile Connection Manager Setup window (see step 6, Installing the
Mobile Connection Manager).
19. Skip to step 21 if you did check Run Mobile Connection Manager at Start up from the
Mobile Connection Manager Setup window (see step 6, Installing the Mobile Connection
Manager).
20. In order to manually launch Mobile Connection Manager, double-click on the Mobile
Connection Manager icon located on your desktop or access the Mobile Connection
Manager from the Start menu: Start>Programs>Mobile Connection Manager.
21. The Mobile Wireless Connection Manager will launch at the start up of your notebook
PC. Do not insert the PC3220 until you have followed the instructions for proper
installation outlined in Section 2: Driver Installation.
Connecting the PC3220 and Drivers to your Notebook PC
WARNING: Once the card is inserted, do not physically remove the PC3220 until you have
completed the Unplug/Eject process. Removing the card improperly may cause a fatal error.
NOTE: Before inserting the PC3220 into your notebook PC’s PC Card slot, it is recommended that
you remove the Installation CD from your CD-ROM drive.

10
driver: a program that extends the operating system to support a device such as
a PC Card; or a program that enables an application to use a device such as a
printer. Hardware devices such as PC Cards must each have the proper driver
installed in order to run. 2. A driver acts like a translator between the device and
programs that use the device.
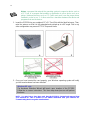
1. Insert the PC3220 into your notebook PC’s PC Card Slot with the label facing up. Then,
raise the antenna so that it is fully extended and pointed up at a 90° angle. Use in any
other configuration may exceed FCC RF Exposure Limits.
2. Once you have inserted the card properly, your Windows operating system will notify
you that new hardware has been detected.
NOTE: You may hear a short beep each time the PC3220 is inserted and removed from
your notebook PC. This is normal. It is an audible notification from your notebook PC
communicating that it recognizes new hardware.
Windows XP only:
The Hardware Detection Wizard will launch upon insertion of the PC3220.
Follow the on screen instructions. This three-step wizard process will per
form
five times.

11
Account Activation with Verizon Wireless
Once the PC3220 is properly inserted into the Type II PC Card slot of your notebook PC, the
Activation Wizard will automatically appear. (In order to use your PC3220, you must have an
account set up with Verizon Wireless). The process of setting up an account is called activation.
Follow these steps for activation:
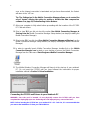
The Activation Wizard ‘Welcome’ window provides two methods for activation: ‘Auto Activation’
and ‘Manual Activation’. After reviewing the dialog on the Activation Wizard ‘Welcome’ window,
select your activation preference, Auto or Manual.
1. Write down the MIN (Mobile Identification Number) and SID (System ID) numbers [This
information can be found on the packaging materials found inside the box, if the PC3220
was shipped to you.]
Tip: Keep these numbers handy, you will be asked to enter these if you selected
Manual Activation.
Activation Code: 000000
MIN: ________________________________
SID: _________________________________
2. The Activation Process has been automated for your convenience.
a. To enable Auto Activation, click Auto
b. To initiate Manual Activation, click Manual (You will need to provide the
Activation Code, MIN and SID.)
3. Follow the on-screen instructions of the Activation Wizard.
a. Auto Activation:
1. If you selected Auto Activation, follow the on-screen instructions and wait
for the Wizard to automatically configure the account.
2. Now click OK to automatically reset the PC3220 and complete activation.
b. Manual Activation:
1. Follow the on-screen instructions.
2. You will be asked to enter an Activation Code. Enter six zeroes (000000)
and click Next.
3. Enter the MIN and SID that were provided with your card and then click
Next.
4. If the information is correct, click Yes. If no, select No and re-enter the
information when prompted.
5. Click Finish to complete Activation. Wait a few moments for the PC3220
to automatically reset.
You are now ready to use the PC3220 on the Verizon Wireless network.
* For further assistance, contact Verizon Wireless, toll-free, at 1- (800) 922-0204.
NOTE: If you have not activated your PC3220, an Activation Alert Notification will be
displayed once you click the Connect button explaining that you must activate your
card in order to establish a connection.

12
Establishing a Connection
1. Once you have properly inserted the PC3220 into your notebook PC's Type II PC Card
slot (See Installing the Drivers to your Notebook PC), the Mobile Connection
Manager will notify that it is ready to connect to the network.
2. Select your network connection preference from the pull down menu and then click
Connect in order to establish a connection.
3. The Mobile Connection Manager will take a few moments to connect to the network. The
dialog box at the bottom of the Mobile Connection Manager window will display the word
Connected to notify that you have established a connection. The Connect button will
change to read Disconnect.
4. To end the connection, click Disconnect.
5. Once you have ended your connection, the dialog box will return to the "Ready" state.

13
Note: A "No Service" message is displayed when the PC3220 cannot locate the network.
"Connected" message is displayed once a connection is established.
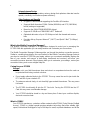
Powering OFF/ON the PC3220
In order to Power Off the Mobile Connection Manager click on the System Tray Icon and
the System Tray Menu will appear. Select Power Off Card. In order to Power On the
Mobile Connection Manager, click Power On Card.
WARNING: Do not eject the PC3220 from your notebook until you have followed the
Unplug/Eject Hardware instructions for proper removal. Removing the card improperly may
cause a fatal error to your PC.
Exiting the Mobile Connection Manager (MCM)
1. When you have completed your current session, click Disconnect on the Mobile
Connection Manager to ensure that you are disconnected from the network; this will
make the data connection inactive.
2. Next, click on the Mobile Connection Manager icon located in the system tray of your
notebook PC and select Exit from the shortcut menu. This will close the Mobile
Connection Manager and the icon will disappear from the system tray.
Removing the PC3220 from your Notebook PC
1. Click on the Mobile Connection Manager icon found in the system tray.

14
2. Select Exit from the menu. (The icon will disappear from the system tray).
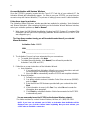
3. After the Mobile Connection Manager has exited, go to the system tray and click on the
Unplug and Eject Hardware icon.
4. A menu will appear:
Windows 98 and ME ONLY: Select "Stop AirPrime USB Open Host Controller"
Windows 2000 ONLY: Select “ Standard OpenHCD USB Host Controller”
Windows XP ONLY: Select “ Lucent USB OpenHost Controller”
5. Once the "Safe to Remove Hardware" message appears, click OK.
6. After the “Safe to Remove Hardware” message appears, click OK.
7. You may now remove the PC3220 from your notebook. When removing the PC3220,
always grip it by the sides of the card rather than from the top. Pulling on the antenna
over time may damage the card. If available, use the Card Ejector tool on your laptop.
Tip: Another option to safely remove hardware is the system tray menu shortcut.
1. Left-click on the Unplug/Eject Hardware icon and a menu will appear:
Windows 98 and ME ONLY: Select "Stop AirPrime USB Open Host Controller"
Windows 2000 ONLY: Select “ Standard OpenHCD USB Host Controller”
Windows XP ONLY: Select “ Lucent USB OpenHost Controller”
2. Once the "Safe to Remove Hardware" message appears, click OK.
3. You may now remove the PC3220 from your notebook.
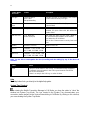
Windows 2000 & ME
Windows XP Windows 98SE

15
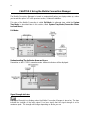
CHAPTER 3 Using the Mobile Connection Manager
The Mobile Connection Manager is turned on automatically when your laptop starts up, unless
you turned this option “off” in the previous section, Software Installation.
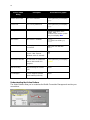
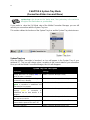
This view of the Mobile Connection is called Full Mode. An alternate view, called the System
Tray Mode, is described later in this section, titled: System Tray Mode (Connection Status
Icon and Menu).
Full Mode:
Understanding The Indicator Area and Icons
Depending on the PC3220’s operating mode, different indicators will be displayed.
Signal Strength Indicator
The Signal Strength icon displays when the Mobile Connection Manager is turned on. The bars
indicate the strength of the radio signal. Four bars signify that the signal strength is at its
maximum peak. The strength will change depending on where you are.

16
When no signal is available, the antenna symbol will change to red and the bars will be dimmed.
When this occurs, no connection is possible for one of the following reasons:
• You are outside of a CDMA network coverage area
• The signal strength is too weak
• A network problem is preventing the PC3220 from obtaining service
• The Mobile Connection Manager is not turned on or the PC3220 has not been inserted
• The antenna is not raised to a 90° angle
Service Indicator
or
The Service Indicator icon displays which network service is currently available at your location,
the Express Network
SM
(1xRTT) or the Quick 2 Net Network
SM
(14.4kbps).
Express Network
Connection
This default icon signifies that the Express
Network is available (even if Quick 2 Net is
also available)
Quick 2 Net Connection This icon signifies that only the Quick 2 Net
network is available
Note: The Express Network (3G) icon will appear even if the Quick 2 Net (2G) network is also
available.
data call: similar to making a voice call, a data call is the term used when you
access the Internet. Express Network data calls go dormant when the Internet
activity is inactive for ~30 seconds. When a data call goes dormant, you are not
being charged for airtime. Quick 2 Net calls do not go dormant.
Data Compression
The Data Compression icon appears when the Fourelle Venturi 2.1 data compression tool is
active.
When the Data Compression icon is dimmed, the Fourelle Venturi 2.1 application is inactive.
See Settings to learn about enabling and disabling this utility.
Roaming Status
The Roaming Status icon indicates the roaming status of your PC3220. When the indicator is
“on” (solid black) you are roaming within a “preferred” roaming area. When the icon is blinking,
you are roaming within a CDMA network, but not in a “preferred” zone.
No service The icon is dimmed when no service is
available

17
When the indicator is “off” (dimmed), you are within the local coverage area of Verizon Wireless.
You are not roaming.
Note: Your coverage area and billing charges depend upon your Verizon Wireless and the type of
account you have. There may be surcharges for roaming service that varies based on whether you
are in a preferred roaming area or a non-preferred roaming area. If there is no roaming agreement
between Verizon Wireless and the local carrier, you may be unable to complete calls in a non-
preferred zone.
Connection Indicator
The Connection Indicator icon signifies that a connection is established. The icon will flash while
you are in the process of connecting and will then remain static once you are connected.
If the Connection Indicator icon is dimmed, there is no connection nor is a connection attempt in
process.
Connection Time
The Connection Time field displays the duration of the current data call or connection. The timer
begins as soon as a connection is established.
The time format is 00hrs: 00min: 00sec.
Byte Counter
The Byte Counter displays the amount of data transferred and received during each session, as
soon as a connection is established in measurements of Kilobytes and Megabytes.
For 0 to 999KB: “XXX KB” format (I.e., “7 KB,” “68 KB,” or “768 KB”)
For 1MB and up: “XXX.X MB” format (I.e., “1.0 MB,” “3.2 MB” or “343.3 MB”)
Service Status Dialog Box
The Service Status Dialog Box explains the current status of your PC3220.

18
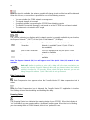
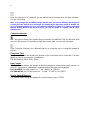
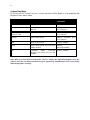
Understanding the Action Buttons
The Action Buttons allow you to customize the Mobile Connection Manager and monitor your
connections.
Service Status
Dialog
Description Associated icon graphic
Please insert Card No card is detected The system tray icon displays
gray
Card is Off PC Card is powered off The system tray icon displays
gray
Ready Service is available
or appear in the
Indicator area and the system
tray icon displays blue
No Service No service is available
This icon will be gray
Connecting Attempting to make a
connection
This icon will flash
Connected A connection is established
(Quick 2 Net, Express
Network active or dormant)
Dormant/Connected A connection is established
but no data transfer is in
progress
The system tray icon displays
yellow
Disconnecting Disconnecting the current
call
None
Call Dropped Call is dropped; transient
state returning to Ready
None

19
Settings
The Settings tool allows you to customize the Mobile Connection Manager. Once you click on
this button a pop-up window with three tabs will appear:
§ General
§ Connection Profiles
§ About
Settings: General Tab
Note: The "Run Activation Wizard" button will guide you through the activation process. Refer to
this tool, if the PC3220 still needs to be activated. (See Page 11, Activating the PC3220.)
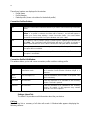
Settings: Connection Profiles Tab
connection profile: a predefined or user-created profile that signifies a type of
connection. (i.e. Express Network (1xRTT), Quick 2 Net (14.4kbps), or other).
The Connection Profiles tab provides a summary of your connection profiles. The default
connection profiles for Express Network and Quick 2 Net are created during installation and can
neither be deleted nor edited. You have the option to add a new connection profile or edit an
existing profile that you have created.
Option Choices Description
Enable Compression - On (default)
- Off
This option is turned "on" by
default. If you prefer to set the
Fourelle Venturi 2.1 data
compression to remain "off"
remove the checkmark in the
checkbox.
Start in System Tray Mode - In Full Mode (default)
- In System Tray Mode
None of these options allow
automatic placement of a data
call upon card insertion.
Run Mobile Connection Manager
at Start up
- On (default)
- Off
This default setting can be
changed during installation.
Refer to Installing the Mobile
Connection Manager, step 5.
Enable Call Drop Alert - On (default)
- Off
This option is checked by
default. It enables a pop-up
window and audible alert when
the connection is dropped.
Applicable to Quick 2 Net and
Dial-up Networking only.
Express Network
SM
(1xRTT) and
Quick 2 Net
SM
(14.4kbps) Alerts
- On (default)
- Off
These options are checked by
default. They enable pop-up
window messages before
connections to Express Network
or Quick 2 Net are established.
Page is loading ...
Page is loading ...
Page is loading ...
Page is loading ...
Page is loading ...
Page is loading ...
Page is loading ...
Page is loading ...
Page is loading ...
Page is loading ...
Page is loading ...
Page is loading ...
Page is loading ...
Page is loading ...
Page is loading ...
Page is loading ...
Page is loading ...
Page is loading ...
Page is loading ...
-
 1
1
-
 2
2
-
 3
3
-
 4
4
-
 5
5
-
 6
6
-
 7
7
-
 8
8
-
 9
9
-
 10
10
-
 11
11
-
 12
12
-
 13
13
-
 14
14
-
 15
15
-
 16
16
-
 17
17
-
 18
18
-
 19
19
-
 20
20
-
 21
21
-
 22
22
-
 23
23
-
 24
24
-
 25
25
-
 26
26
-
 27
27
-
 28
28
-
 29
29
-
 30
30
-
 31
31
-
 32
32
-
 33
33
-
 34
34
-
 35
35
-
 36
36
-
 37
37
-
 38
38
-
 39
39


Verizon Wireless PC 3220 User manual
- Type
- User manual
- This manual is also suitable for
Ask a question and I''ll find the answer in the document
Finding information in a document is now easier with AI
Related papers
-
Verizon Wireless V620 User manual
-
-
Verizon UM150 User manual
-
-
-
-
-
-
-
Other documents
-
 T'nB SLR164 Datasheet
-
 T'nB SLR163 Datasheet
-
Sierra Wireless Network Card 555 User manual
-
Sprint Nextel Network Card PC3200 User manual
-
-
-
Sierra Wireless AirCard 580 User manual
-
 Standers Network Router 580 User manual
-
-
Sierra Wireless Network Router 580 User manual


