Page is loading ...

1Hearth & Home Technologies • AK-225 Outside Air Kit Instructions • 200-900L Rev. B • 11/13
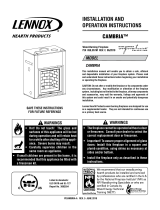
Figure 1. Kit Contents
AK-225
Installation Instructions
Leave this manual with party responsible for use
and operation.
CAUTION! Risk of Cuts or Abrasions. Wear protective
gloves and safety glasses during installation. Sheet metal
edges are sharp.
CAUTION! Do not install damaged components. If you
received components that are damaged, contact your
dealer for assistance.
The Hearth Technologies AK-225 Air Kit is used to bring in
outside make-up and combustion air to Heat & Glo solid
wood fuel fi replaces and some gas fi replaces. Check the
fi replace instructions.
The air that is drawn into the fi re chamber from outside
the home or unheated area helps relieve the demand for
combustion air being drawn into the fi replace from inside
the home.
Kit Contents:
(1) Duct Termination
(2) Side Collars
(1) Flex Duct
(4) 1-1/2 Inch Truss Head Screws
(3) 1/2 Inch Bit Tip Screws
(2) Plastic Tie Straps
For reference, see Figure 1.
DUCT TERMINATION SIDE COLLAR (2)
SCREWS
(QTY 4)
FLEX DUCT
PLASTIC TIE STRAPS (2)
SCREWS
(QTY 3)
NOTE: 4-inch Class 1 ducting material or metal duct may
be used with AK-225.
INSTALLATION PRECAUTIONS
The duct termination should be located so it is exposed to
an outdoor opening at least 100 square inches. If the duct
termination must be located in a crawl space or basement,
be sure the termination area has 100 square inches of
ventilation opening to outside air.
The duct termination must be located so it does not com-
pete for air fl ow with exhaust fans, gas vent hoods or
other air consuming devices or appliances. It must not
be obstructed by rafters, insulating materials, or other
obstructions. The less restrictive the air supply, the better
the AK-225 will perform.
INSTALLATION INSTRUCTIONS
Determine the location of the fi replace as described in the
fi replace installation manual. Then plan the location of the
duct termination and the route of the duct run between the
fi replace and the duct termination.
The duct run must be limited to a maximum distance of 40
feet from the fi replace pipe collar to duct termination. This
will provide the least restriction to air fl ow. No more than
four 90 degree elbows can be used. The duct run may be
horizontal, vertical inclined or any combination of these for
all models. Vertical duct runs must be at least three (3)
feet below the fi replace chimney fl ue exit. See Figure 2.
WARNING! Risk of Explostion! DO NOT install duct ter-
mination into area that cold contain fl ammable liquids or
fumes, such as an attic space or garage.

Hearth & Home Technologies • AK-225 Outside Air Kit Instructions • 200-900L Rev. B • 11/132
1. Remove and discard the outside air knockout (or cover
plate) located at the side or bottom of the fi replace. Use
care not to rub against the sharp edges of this opening
to avoid cuts. Some appliances may not have a cover
plate.
2. Attach the side collar with four (4) screws to the side or
bottom of the fi replace. Slide the duct over the collar and
attach the duct to the collar using the plastic tie straps
or three (3) screws (screws not provided). Continue
attaching the ducting together using three (3) screws
at each joint until you have installed suffi cient duct to
arrive at the duct termination location.
3. Install the duct termination from the outside of the home
and cover it with the rain cap. Cut a hole in the desired
location approximately 4 1/2 inches in diameter, caulk
around the hole, and slide the termination through the
opening from outside the home. The termination/rain
cap should be caulked around its perimeter to assure
a tight seal. The rain cap opening should be positioned
downward. See Figure 3.
ATTIC
CEILING
DUCT
DUCT
TERMINATION
DUCT TERMINATION
MUST BE MORE THAN
3 FT BELOW CHIMNEY
40 FT MAX.
DUCT RUN
EXTERIOR
WALL
DUCT
TERMINATION
RAIN CAP
40 FT MAX.
DUCT RUN
DUCT
SOFFIT TERMINATION
EXTERIOR WALL TERMINATION
Figure 2. Soffi t and Exterior Wall Termination
DUCT
TERMINATION
RAIN CAP
WALL
CAULKING
Figure 3. Termination Rain Cap

3Hearth & Home Technologies • AK-225 Outside Air Kit Instructions • 200-900L Rev. B • 11/13
Please contact your Hearth & Home Technologies dealer with any
questions or concerns.
For the location of your nearest Hearth & Home Technologies dealer,
please visit www.fi reside.com.
Hearth & Home Technologies Inc.
7571 215th Street West, Lakeville, MN 55044
www.fi reside.com
4. FOR MODELS EM-41 AND EM-48: Remove the 4
screws holding the cover plate over the outside air hole
in the side of the fi replace's outer skin. Attach the 2 foot
section of fl ex duct to one of the side collars with a plastic
tie strap. Insert the fl ex duct through the outer skin all
the way to the collar. Place the second side collar, (fl at
side towards the unit) against the other collar and using
the screws previously removed, secure both collars to
the fi replace outer skin.
Follow previous instructions to run air duct to termina-
tion.
Open lower grille and attach the fl ex duct to the duct
collar on the underside of the fi re chamber base. Secure
by using a plastic tie strap. See Figure 4.
BOTTOM
COLLAR
SIDE COLLAR
LOWER
GRILLE
FLEX DUCT
(CONNECTED TO COLLARS)
Figure 4. Attach the Flex Duct
NOTE: The outside air damper control for models EM-41
and EM-48 is located behind the lower grill in the middle of
the unit. To open the damper, pull the control rod forward
and left until the damper locks into open position. The
damper MUST be open for the unit to operate properly.
5. The AK-225 Outside Air Kit is now installed and ready
for use.
OPERATION PRECAUTIONS
AND INSTRUCTIONS
For all solid wood fuel fi replaces:
When operating with glass doors, open the doors and
close the fi replace outside air damper so your fi re will be
started using room air. After the fi re is well started, you
may open the outside air control and close the doors to
provide air to the fi re.
For gas fi replaces:
When lighting your gas fi replace, you MUST always fi rst
open the combustion air damper for the unit to operate and
the glass doors MUST be in place.
Periodically inspect the duct termination for any blockage.
Correct if necessary.
For maximum benefi t and effi cient usage, refer to operating
instructions in owner's manual.
Replacements parts and service may be obtained through
your dealer.
/