Page is loading ...

BENUTZERHANDBUCH
USER MANUAL /

TOTALLY WICKED
ARC GTI
ELECTRONIC
CIGARETTE KIT.
CONGRATULATIONS
ON PURCHASING YOUR

3
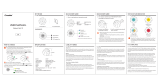
Mouthpiece
Tank
Airow adjuster
Power button
LED Screen
Adjustment buttons
USB-C charging port
YOUR ARC GTI

4
QUICK START GUIDE
For those familiar with e-cigarettes,
the steps below can be followed to
allow the device to be used in the
shortest possible time:
• Prime the atomizer head
• Fill the tank
• Switch the arc GTi on
(5 rapid clicks of the power button)
• Check the arc GTi is set to 10 watts
• Press the power button and inhale
• Charge the battery (it will possibly not
have been shipped with a full charge)

5
Priming the Atomizer Head
It is important to “prime” a new atomizer head before rst
use. Failure to do so can damage the atomizer head.
Grip the airow adjuster and unscrew the tank from the
battery. Holding the tank’s glass tube, unscrew the base
from the tank. Remove the atomizer head by pulling straight
out, drip a few drops of e-liquid onto the cotton wick
through the top of the atomizer head and the openings on
its sides, and push back into the tank. Screw the base back
onto the tank and ret to the battery.
USING YOUR ARC GTI

6
USING YOUR ARC GTI
Filling the Tank
Press the button on the side of the tank to unlock, and slide
the tank top in the direction indicated by the arrow symbol.
Insert the lling nozzle of your e-liquid bottle into the lling
port, and ll the tank, being careful not to overll. Push the
top back into place until you hear a click.
Note: To avoid leaking, ensure an air gap of around 2mm
remains above the e-liquid after lling.

7
Changing the Atomizer Head
Grip the airow adjuster and unscrew the tank from the
battery. Holding the tank’s glass tube, unscrew the base
from the tank and remove the atomizer head by pulling
straight out. Prime a new atomizer head following the steps
found in Priming the Atomizer Head, and push into the tank.
Screw the base back onto the tank and ret to the battery.
USING YOUR ARC GTI

8
Atomizer Head Lifespan
Atomizer heads do not last forever and need to be replaced
periodically. Lifespan is generally from a few days to several
weeks, depending on power used, vaping style, avour and
type of e-liquid. A slight burnt taste, general loss of vapour
production, or a reduction in avour intensity can all be
indicators that the atomizer head requires replacement.
Switching On and O
Press the power button 5 times in quick succession to turn
the arc GTi on. To turn the device o again, press the power
button 5 times quickly.
Vaping
Press and hold the power button as you inhale the vapour. A
pu timer will be displayed on screen.
USING YOUR ARC GTI

9
Charging the battery
To charge the battery, connect the charge port on the
battery to a USB port or suitable wall adaptor with the
supplied charge lead; the battery icon on screen will begin
to ash with a bolt icon until fully charged. Using a USB-C
compatible adaptor will ensure the battery can be charged
in the fastest possible time.
Setting the wattage
The arc GTi has adjustable wattage that can be set from
1 – 80 watts. Use the adjustment buttons to increase or
decrease the wattage on the battery.
Wattage adjustment lock
The arc GTi’s wattage adjustment can be locked to prevent
the wattage from accidentally being altered during use.
While the arc GTi is powered on, press the up and down
adjustment buttons simultaneously for 3 seconds. The
screen will display “Key Lock”. Repeating this process will
return the device to normal operation, and the screen will
display “Key UnLock”.
USING YOUR ARC GTI

10
Rotating the display
Pressing the power button and up adjustment button
simultaneously for 3 seconds when the arc GTi is powered
o will rotate the screen display through 180°. This can be
helpful if you are left-handed.
Short circuit protection
If a short circuit occurs whilst the power button is pressed,
the screen will display “ATOMIZER SHORT”. Replacing the
atomizer head should allow normal operation to resume.
Atomizer protection
If the power button is held down for longer than 10 seconds,
the device will stop producing any vapour. A message will
appear on screen stating “Over 10s Protection” and the
device will power o. Releasing the power button will allow
for normal operation to resume.
USING YOUR ARC GTI

11
The arc GTi has a number of advanced functions that can be
activated, adjusted or turned o entirely. They are functions
that you do not necessarily need, and are consequently
held in a hidden menu. If you are not the sort of person that
wants to worry about this sort of detail, you can ignore them
and use the standard factory settings. However, if you are
the sort of person that wants to fully customise your vaping
experience, read on!
ADVANCED FUNCTIONS
RETURN DISPLAY STEALTH PREHEAT
VERSION BATTERY
VOLTAGE
RESISTANCE
LOCK
CUSTOM
TCR

12
ADVANCED FUNCTIONS
Using the advanced function menu
To enter the advanced function menu press the power
button and the up button simultaneously for 3 seconds.
You can then use the up and down buttons to scroll along
the display and access each function. The rst function
shown is the Return symbol. Pressing the power button with
this symbol highlighted, or simply waiting 10 seconds while
taking no action, will exit the menu and return the arc GTi to
normal operation.
Display information
The arc GTi can display a choice of a pu counter, total
vaping time or voltage output beneath the atomizer
resistance reading. Use the up and down buttons to select
the Display icon, then press the power button. You can then
use the up and down buttons to choose your preferred
display information, and select it by pressing the power
button. Should you wish to reset the pu counter or the
total vaping time, pressing the up button for 3 seconds will
set the selected counter to zero. Pressing the power button
will return the arc GTi to the advanced menu.

13
Stealth mode
The arc GTi is equipped with provision for “stealth mode”,
where normal use will not activate the screen, but a short
press of the power button will allow the display to function
normally. Pressing the power button when the Stealth icon
is highlighted allows stealth mode to be turned on or o,
using up and down buttons to highlight, and power button
to select.
Preheat
The arc GTi’s preheat function allows the atomizer head to
heat up quickly by providing additional power for a short
period as the power button is pressed. To set the preheat,
access the menu by holding the up adjustment button and
power button simultaneously. Pressing the power button
when the Preheat icon is highlighted allows you to choose
your preferred pre-heat power (Power) and heating duration
(Duration) up to 2 seconds. Use these setting cautiously, as
preheat power much higher than you are normally using can
cause damage to your atomizer head. Setting the preheat
duration to zero (this is the default setting) disables the
preheat function. Preheat power is initially set at 20W.
ADVANCED FUNCTIONS

14
Version
Selecting the Version icon allows the current hardware and
rmware versions to be displayed.
Battery Voltage
Selecting the Battery Voltage icon allows the current
internal battery cell voltage to be displayed.
Temperature controlled vaping modes
Temperature Control vaping modes are pre-dened, and
should be used only when specic coil materials have been
used for atomizer head manufacture, generally nickel
(Ni), titanium (Ti) or 316 stainless steel (SS). To select the
appropriate temperature control mode, quickly press the
power button 3 times to enter the mode selection menu;
Then press either adjustment button to cycle between the
modes of Ni, Ti, SS, M1, M2, M3, Bypass, Variable Wattage.
Press the power button once to conrm the selection.
Note: the atomizer heads supplied with the arc GTi kit are
compatible with wattage mode only, and will not work in
temperature control mode.
ADVANCED FUNCTIONS

15
Setting the TCR
TCR (temperature coecient of resistance) settings
allow atomizer heads made from suitable alternative coil
materials to be used with eective temperature control. The
arc GTi allows 3 dierent coil materials to be pre-set as M1,
M2 and M3. To set the temperature coecient of resistance
to match a particular coil material, quickly press the power
button 3 times and select either M1, M2 or M3. Then press
and hold the power and right adjustment buttons at the
same time to enter the menu. Cycle to the M1-3 symbol
and select it using the power button, choose the mode
you are currently using and press the power button again.
When a specic TCR mode is selected, use the up or down
adjustment buttons to increase or decrease it. Leave the arc
GTi idle for 5 seconds to conrm your selection.
Note: TCR settings are not generally required for standard
coil material. If using standard nickel, titanium or 316
stainless steel coils, TCR settings will not have any
advantage over the standard temperature control settings.
ADVANCED FUNCTIONS

16
Note: The TCR value displayed is 105 (100,000) times
greater than the actual TCR value in standard units of K-1
Adjusting Wattage in Temperature Control/TCR Modes
The maximum wattage that is applied in Temperature
Control or TCR modes can be adjusted. Higher wattages
allow the target temperature to be reached quicker, while
lower wattages increase the time taken to reach the target
temperature. Setting the wattage too low may prevent the
target temperature from being reached at all. To adjust
the maximum wattage, quickly press the power button 4
times to enter the wattage adjustment screen. Increase or
decrease the wattage until the desired wattage is reached,
press the power button once to conrm the selection.
ADVANCED FUNCTIONS
Material TCR Value Range
Nickel 600 - 700
NiFe 300 - 400
Titanium 300 - 400
SS (303, 304, 316, 317) 80 - 200

17
Temperature Adjustment
When in temperature control or TCR mode, use the up or
down adjustment buttons to adjust the temperature from
100°C – 315°C (200°F – 600°F). Lower temperature settings
give a cooler and less dense vapour. Higher temperature
settings produce hotter vapour and larger clouds of
vapour, but can lead to poor avour or even a burnt taste.
Experiment to nd your own favourite setting.
Note: The screen displaying “TEMPERATURE
PROTECTION” is not an error or fault; it means the atomizer
head has reached or exceeded the set target temperature.
Switching between °C and °F
Press and hold the up adjustment button to increase the
maximum temperature to 315°C or 600°F, then press the
up adjustment button once more. The unit of measure will
switch to Fahrenheit if previously in Celsius mode, or Celsius
if previously in Fahrenheit mode. The same can be achieved
by pressing and holding the down adjustment button.
ADVANCED FUNCTIONS

18
Atomizer Head Resistance Lock
Locking an atomizer head’s resistance in a temperature
control mode is necessary, as the device measures the
change in resistance to calculate the temperature. To lock
the resistance of your atomizer head, in a temperature
control mode, press the power button and up adjustment
button, select the Resistance Lock setting from the menu
and turn on. The resistance of an atomizer head should only
be locked when the atomizer head is at room temperature.
ADVANCED FUNCTIONS

19
Kit contents
1 x arc GTi battery
1 x GT Air tank
2 x GT 1.2ohm atomizer heads
1 x USB-C cable
1 x User manual
Spare parts
Specications
Dimensions: 120mm (length) x 35mm (width)
x 28mm (depth)
Weight: 159g
Battery capacity: 3000mAh
Output modes: VW,VT (Ni, Ti, SS)/TCR (M1, M2, M3)
Wattage range: 1 – 80W
Maximum charging current: 2.0A
Screen size: 0.96 inch
Tank/Battery connection: 510 connection
Maximum tank diameter: 25mm
Atomizer head resistance compatibility:
0.05 – 3.5ohm (wattage mode)
Atomizer head resistance compatibility:
0.05 – 1.5ohm (TC/TCR mode)
KIT CONTENTS / SPECIFICATIONS

20
There are no reported medical side eects with this
product. If you believe you experience a side eect, please
contact the manufacturer.
Product Storage and Battery Precautions
• Store the arc GTi and its accessories away from children
when not in use.
• Ensure the arc GTi is powered o when not in use.
• Avoid accidentally pressing the arc GTi power button when
not in use.
• Please only use the charging cable provided.
• Please dispose of dead batteries in accordance with your
country’s appropriate legislation.
• Do not charge the batteries in a damp environment.
• Do not use the device when temperatures are outside the
range -10 - 60°C.
• Do not charge the battery when temperatures are outside
the range 0 - 45°C.
• Do not attempt to repair a faulty arc GTi as these are
sealed units with no serviceable parts. Attempted repairs
will void the warranty.
ADDITIONAL PRODUCT INFORMATION
/