Page is loading ...

© Copyright 2007, Cloyes Gear Company. All rights reserved. 9-3152A 1
Installation Instructions
9-3152A Hex-A-Just® Roller Timing Set
BEFORE YOU BEGIN: READ ALL OF THESE INSTRUCTIONS FIRST !!!
Note: The 9-3152A Hex-A-Just® timing set is not a direct bolt-on application. Machining is
required on the nose of the camshaft prior to installation. The following information explains
the modifications that must be made to the camshaft prior to assembly.
Camshaft Modification. The Viper production engine cam sprocket (OEM P/N 5245124) is
a single bolt installation design with a dowel pin for alignment. In order to apply the Cloyes
Hex-A-Just® system to the Viper engine, a 3-bolt pattern was incorporated into the design of
the high performance cam sprocket (S170DA). The camshaft modification requires three bolt
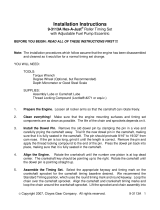
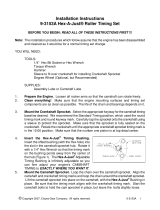
holes to be drilled and tapped into the nose of the camshaft. Below is a diagram illustrating
the dimensions and angular locations of the bolt holes.
As seen from the diagram, the position of the bolt holes is dependent upon the outer
diameter of the camshaft and the center of the dowel pin. They are centered around a
1.0310” bolt circle diameter and are equally spaced 120° apart. The angular location of the
bolt holes to the dowel pin is very important. Each bolt hole must be within .0050” of true
position, and they should be threaded at least .750” deep.
Ø1.0310
FRONT VIEW OF
CAMSHAFT NOSE
60°15'
59°45'
120°15'
119°45'
60°15'
59°45'
120°15'
119°45'
5/16-18 UNC BOLT HOLES
TYPICAL 3 PLACES
CAMSHAFT
DOWEL PIN
ORIGINAL BOLT HOLE
(NOT USED)
CENTERLINE OF DOWEL PIN
(MUST BE WITHIN .0050"
OF TRUE POSITION)
BOLT CIRCLE

© Copyright 2007, Cloyes Gear Company. All rights reserved. 9-3152A 2
Note: The installation procedures which follow assume that the camshaft has been modified
appropriately and that the engine has been disassembled and cleaned as it would be for a
normal timing set change.
YOU WILL NEED:
TOOLS:
1/4" Hex Bit Socket or Hex Wrench
Torque Wrench
Hammer
Sleeve to fit over crankshaft for installing Crankshaft Sprocket
Degree Wheel (Optional, but Recommended)
SUPPLIES:
Assembly Lube or Camshaft Lube
Thread Locking Compound (LockTite7 #271 or equiv.)
1. Prepare the Engine. Loosen all rocker arms so that the camshaft can rotate freely.
2. Clean everything! Make sure that the engine mounting surfaces and timing set
components are as clean as possible. The life of the chain and sprockets depends on it.
3. Mount the Crankshaft Sprocket. Select the appropriate keyway for the camshaft timing
baseline desired. We recommend the Standard Timing position, which used the round
timing mark and round keyway mark. Carefully tap the sprocket onto the crankshaft using
a sleeve to protect the sprocket. Make sure that the sprocket is fully seated on the
crankshaft. Rotate the crankshaft until the appropriate crankshaft sprocket timing mark is
in the 12:00 position.
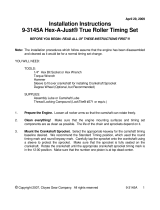
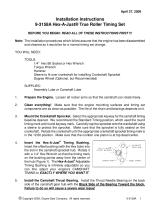
4. Insert the Hex-A-Just® Timing Bushing. Insert the offset bushing (with the Hex hole)
into the slot in the camshaft sprocket hub. Rotate it with a 1/4" Hex Wrench so that the
timing mark on the bushing points away from the center of the hub (Figure 1). The Hex-A-
Just® Adjustable Timing Bushing is infinitely
adjustable so you can fine adjust your engine's
CAMSHAFT TIMING to EXACTLY WHERE YOU
WANT IT.
5. Mount the Camshaft Sprocket. Loop the chain
over the camshaft sprocket. Align the camshaft and
crankshaft timing marks and loop the chain around
the crankshaft sprocket. Lift the camshaft sprocket
into place on the camshaft, with the Hex-A-Just®
Bushing in place. Be sure that the timing mark aligns
Inserting Offset Bushing
(Figure 1)

© Copyright 2007, Cloyes Gear Company. All rights reserved. 9-3152A 3
with the crankshaft timing mark. Bolt it in place using the three (3) 5/16-18 x 3/4" Hex
Socket Head Cap Screws supplied. Install these bolts slightly loose.
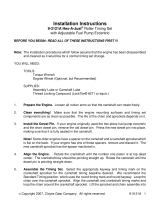
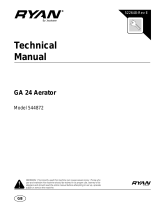
6. Adjust the Camshaft Timing. Do NOT try to turn the
camshaft with the bushing unless there is NO LOAD on
the camshaft. There must be NO VALVE SPRING
PRESSURE against the camshaft or the Hex-A-Just®
bushing will SPLIT. Make sure that the three camshaft
bolts are LOOSE. For a simple installation, adjust the
Hex-A-Just® bushing to the desired timing setting
(Figure 2). For a more accurate installation, use a
degree wheel. The degree wheel method is strongly
recommended.
7. Torque Loose Bolts. Remove each of the three (3) Cam Sprocket mounting bolts, one
at a time, and apply the Thread Locking Compound, then torque each bolt to 300 in-lb
(25 ft-lb).
8. Lubricate the Timing Set. Make sure that the engine oil has a clear path to the timing
set through the lifter valley oil drain-back holes, or through some other means. A timing
set requires plenty of oil to survive. Before installing the timing cover gasket and timing
cover, pour plenty of assembly lube over the sprockets. Assembly lube will stay on the
sprockets until the engine is started.
9. Assemble the engine. Install the timing cover, timing cover gasket and accessories.
Adjusting the Timing
(Figure 2)
/