Page is loading ...

1
COMP Cams
®
3406 Democrat Rd.
Memphis, TN 38118
Phone: 901.795.2400
Part #COMP4-134
Revised 6/24/13
Toll Free: 1.800.999.0853
www.compcams.com
COMP Cams
®
LS Timing Sets
Part Numbers: 3154, 3158KT, 3167KT, 3172KT, 3173KT, 7102, 7105, 7106, 7106-5, 7107,
9158KT, 9167KT, 9172KT, 9672T3, 9658T3, 9658T9, 9667T3, 9672T3, 9672T9, 9673T3, 9673T9
Thank you for choosing COMP Cams
®
products; we are proud to be your manufacturer of choice.
Please read this instruction sheet carefully before beginning installation, and also take a moment to
review the included limited warranty information.
We recommend the chain and sprockets be pre-assembled before final assembly of the motor to check
for any interference between the block and the timing set. During installation again observe for any
interference between the timing set and the engine block, if found, remove or grind until adequate
clearance is obtained. Also, look for any interference between the timing chain cover and oil pump
upon reinstallation. Some aftermarket oil pumps and double roller timing chain setups will require
timing chain cover clearance for proper fitment.
Check the following points to ensure the proper timing chain has been selected for
your application:
1. Number of camshaft bolts − There are single bolt camshafts and three bolt camshafts. Refer
to pages 186-187 of the COMP Cams 2010 Master Catalog if you do not know which style
your application requires.
INSTRUCTIONS

2
COMP Cams
®
3406 Democrat Rd.
Memphis, TN 38118
Phone: 901.795.2400
Part #COMP4-134
Revised 6/24/13
Toll Free: 1.800.999.0853
www.compcams.com
2. Camshaft positioning sensor reluctor is correct − There are three styles of cam position
sensors, 1X on early Gen IV engines and 4X on later version Gen IV engines which can not
be interchanged. Note: Gen III (LS1/LS6) engines will not be affected by camshaft timing
gear, as they use a rear camshaft sensor built into the camshaft.
Installation
:
1. Prepare for installation disassembling the front of your LS engine by removing the water
pump, timing cover. Then roll your engine over until your engine is at TDC using the
markings on your current timing set. This can easily be done by using COMP Cams® LS
crank turning socket #4914.
2. Remove loosen or remove the oil pan, and remove the oil pump by first carefully removing
the oil pickup tube bolt, ensuring it does not drop into your oil pan. Next, remove the four
bolts holing the oil pump to the engine block and remove the oil pump assembly.
3. Loosen your camshaft bolt(s) and remove the camshaft timing gear.
4. Loosen your rocker arms to allow the camshaft to rotate freely. Rotate 360 degrees to capture
the lifters in the guides.
5. Using a proper puller, remove the existing crank gear and oil pump drive.
6. Make sure to clean the mounting surfaces on the clock and your new COMP Cams® timing
sets, failure to do so may reduce chain and bearing life
7. Select the desired crankshaft keyway and install the crankshaft sprocket until fully seated,
using a sleeve to protect the sprocket. Make sure your corresponding timing mark is correct
and pointing in the 12:00 position. Use a marker to mark your selected timing mark as this
may help you remember later which of the timing marks is the one you have selected to use.
Notes: There are various demarcations depending on which timing set you have selected to
use. (Refer to pages 4-5 to see your specific timing chain options.)

3
COMP Cams
®
3406 Democrat Rd.
Memphis, TN 38118
Phone: 901.795.2400
Part #COMP4-134
Revised 6/24/13
Toll Free: 1.800.999.0853
www.compcams.com
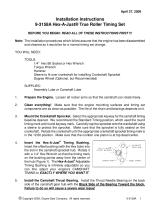
8. If your timing set uses a Hex-A-Just, insert
the Hex-A-Just offset timing bushing into the
camshaft sprocket hub. If it does not, skip to
#10. Using a ¼” hex wrench, rotate it so the
timing mark on the bushing points outward
and away from the center of the hub.
9. Install the camshaft thrust bearing. Install so
that the black side of the bearing is toward
the block! This is extremely important and
improper installation will cause sever wear.
Note that billet timing sets have the thrust
bearing pre-installed.
10. Mount the camshaft sprocket by first looping
the timing chain over the camshaft sprocket,
with the Hex-A-Just bushing installed, if
included. Next align the camshaft and
crankshaft timing marks and loop the chain
around the crankshaft sprocket and install
over the camshaft timing pin. Loosely install
the camshaft bolt(s) to hold the camshaft
sprocket in place.
11. If using a Hex-A-Just style timing chain set
now is the time to adjust the camshaft timing.
If not using a Hex-A-Just style timing chain
skip to the next step. To adjust you must
ensure the rocker arms have all been loosened
so there is no load on the camshaft. Failure to
do so will split the Hex-A-Just bushing! Ensure that your camshaft bolt(s) is (are) still loose.
Adjust the Hex-A-Just bushing to the desired timing setting.
12. It is highly recommend that you use a degree wheel to ensure your camshaft is installed
correctly! Failure to properly install your camshaft correctly may cause catastrophic engine
failure, as the pistons and valves may crash. Once you are sure your intake centerline is
where you desire it, it is recommended you also check your piston to valve clearance,
especially if also installing a new camshaft.
13. Torque camshaft bolts to 26lb./ft. for three bolt camshafts, using loctite. Single bolt camshafts
are torque to yield and must be replaced with a new bolt. Using a new bolt first torque to
55lb./ft. and add an additional 50 degrees, using Loctite.

4
COMP Cams
®
3406 Democrat Rd.
Memphis, TN 38118
Phone: 901.795.2400
Part #COMP4-134
Revised 6/24/13
Toll Free: 1.800.999.0853
www.compcams.com
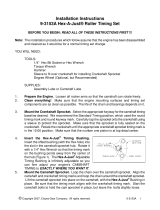
14. Recheck that your selected timing marks are aligned
“dot to dot” at 6:00 on the camshaft gear and 12:00
on the crankshaft gear.
15. Lubricate the timing set with fresh engine oil. Also
ensure the engine oil has a clear path to the timing
set through the lifter valley oil drain back holes.
16. Install oil pump drive, if it is separate from your
crankshaft gear, by aligning the crankshaft keyway
and install until fully seated against the timing gear.
Again using a sleeve to protect the oil pump drive
while seating it on the crankshaft.
17. If using a double roller chain, make sure to install
the supplied spacers while installing the oil pump.
The driver’s side space MUST
be installed
correctly. Check for proper alignment by ensuring
the hole for oil flow is proper aligned and isn’t
restricting oil flow before final installation, as an
improper installation will cut off oil flow and could
damage your engine.
18. Reinstall the oil pump, remembering to make sure
the pickup tube is reattached and the o-ring is
properly seated.
19. Reinstall your oil pan, timing cover (ensuring no
interferences are found), and water pump.
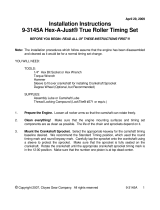
Crankshaft Timing Gear Options:
COMP Cams
®
Billet Steel 9 Keyway Timing Sets are the most
reliable units available. They give the installer the ability to fine-
tune the powerband of the cam by allowing the cam to be
positioned from 0 to 8-degrees advanced or retarded, in 2-degree
increments. The “A” crankshaft keyways are to be used when
intending to advance
the cam and by how many degrees desired.
Likewise the “R” labeled crankshaft keyways are to retard
the
camshaft, and by how many degrees desired. Remember to use
the corresponding timing mark on the crank gear. Note: The
camshaft angle is half the crankshaft angle, therefore the
camshaft will correspondingly advance or retard 1, 2, 3 or 4-
degrees. For example, to advance the cam 1° use the “A2”
crankshaft keyway, remembering you now must use the “A2”
timing mark to line up your cam and crank gears.

5
COMP Cams
®
3406 Democrat Rd.
Memphis, TN 38118
Phone: 901.795.2400
Part #COMP4-134
Revised 6/24/13
Toll Free: 1.800.999.0853
www.compcams.com
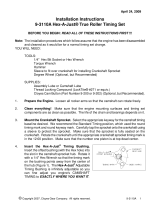
COMP Cams
®
3-keyway adjustable crank sprocket timing
sets allow crankshaft timing adjustment by ± 4 degrees.
Remembering the camshaft angle is half of the crankshaft
angle, therefore the camshaft will advance or retard by ± 2
degrees. Note: Notice the shape of the internal crankshaft
keyways. They are shaped to coincide with the timing
marks to be used. They have a round, rectangular and
square at the top of the crankshaft keyway to help you
position the crank gear as desired.
To keep factory timing use the “O” crankshaft keyway and
timing mark.
To advance
timing use the “Δ” crankshaft keyway and
timing mark.
To retard
timing use the “□” crankshaft keyway and timing mark.
Limited Warranty
Social Media
Stay up-to-date with the latest COMP Performance Group™ company and product
information by following us on any of our social media platforms.

6
COMP Cams
®
3406 Democrat Rd.
Memphis, TN 38118
Phone: 901.795.2400
Part #COMP4-134
Revised 6/24/13
Toll Free: 1.800.999.0853
www.compcams.com
Competition Cams, Inc. warrants that all of its products are free from defects in material and
workmanship, and against excessive wear for a period of (1) one year from the date of purchase. This
limited warranty shall cover the original purchaser.
Competition Cams, Inc.’s obligation under this warranty is limited to the repair or replacement
of its product. To make a warranty claim, the part must be returned within (1) one year of purchase to
the address listed below, freight prepaid. Items covered under warranty will be returned to you freight
collect.
It is the responsibility of the installer to ensure that all of the components are correct before
installation. We assume no liability for any errors made in tolerances, component selection, or
installation.
There is absolutely no warranty on the following:
A) Any parts used in racing applications;
B) Any product that has been physically altered, improperly installed or maintained;
C) Any product used in improper applications, abused, or not used in conjunction with the
proper parts.
There are no implied warranties of merchantability or fitness for a particular purpose. There are
no warranties, which extend beyond the description of the face hereof. Competition Cams, Inc. will
not be responsible for incidental and consequential damages, property damage or personal injury
damages to the extent permitted by law. Where required by law, implied warranties or merchantability
and fitness are limited for a term of (1) one year from the date of original purchase.
This warranty gives you specific legal rights and you may also have other legal rights, which vary from
state to state.
/