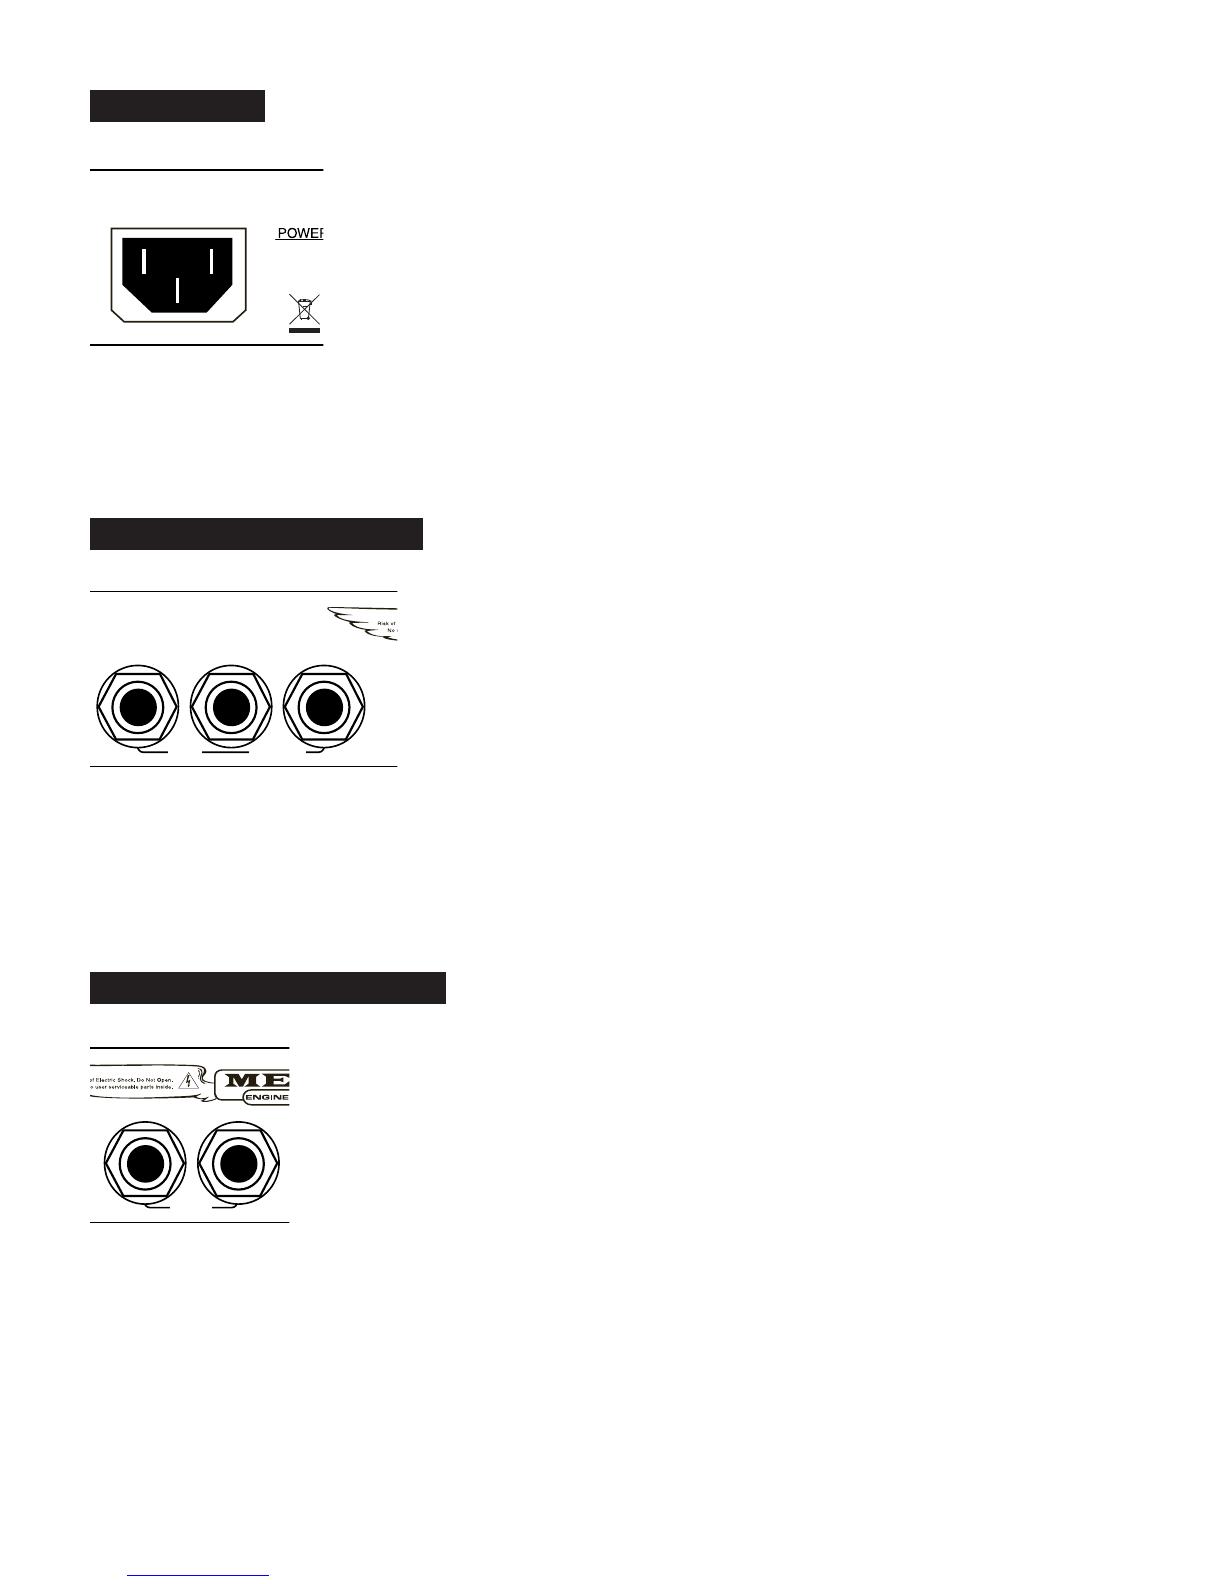
Mesa/Boogie Three Channel Dual & Triple Rectifier Solo Heads Owner's manual

Category
Supplementary music equipment
Type
Owner's manual

This manual is also suitable for

Owners Manual
THE HOME OF TONE®
Greetings from the Home of Tone®
...You, smart player and intuitive human, have put your trust in us to be your amplifier
company. This is something we do not take lightly. By choosing this instrument to be a
part of your musical voice, you have become part of the Mesa family...WELCOME!
Our goal is to never let you down. Your reward is that you are the new owner of an amp,
bred of fine all tube heritage...benefiting from the many pioneering and patented Mesa
circuits that led to the refinement of your new model. We feel confident this amp will
inspire many hours of musical satisfaction and lasting enjoyment. It was built with you in
mind by players who know the value of a fine musical instrument and the commitment it
takes to make great music. The same commitment to quality, value and support we make
to you...our new friend.
Precautions
Overview _________________________________________________________________________________________ 1-3
Helpful Hints _______________________________________________________________________________________ 4
FRONT PANEL:
INSTRUMENT INPUT _________________________________________________________________________________ 5
INPUT SELECT SWITCH ______________________________________________________________________________ 5
CONTROLS:
GAIN, BASS ________________________________________________________________________________________ 6
MID _____________________________________________________________________________________________ 6-7
TREBLE ___________________________________________________________________________________________ 7
VOICE ___________________________________________________________________________________________ 7-8
MASTER ___________________________________________________________________________________________ 8
MUTE / PLAY / SILENT RECORD SWITCH ________________________________________________________________ 8
FULL / HALF POWER SWITCH _________________________________________________________________________ 9
PRE / POST: D.I. OUTPUT SELECT SWITCH ___________________________________________________________ 9-10
D.I. LIFT / GROUND, D.I. LEVEL _______________________________________________________________________ 10
SOLO CONTROL ___________________________________________________________________________________ 10
POWER SWITCH ___________________________________________________________________________________ 11
STANDBY SWITCH _________________________________________________________________________________ 11
REAR PANEL:
AC MAINS FUSE, FUSE RATING AND REPLACEMENT ____________________________________________________ 13
POWER CABLE, EXTERNAL SWITCHING _______________________________________________________________ 14
SEND / RETURN _________________________________________________________________________________ 14-15
TUNER ___________________________________________________________________________________________ 15
SLAVE ____________________________________________________________________________________________ 15
FOOTSWITCH JACK ________________________________________________________________________________ 16
SPEAKER OUTPUTS _____________________________________________________________________________ 16-17
D.I. OUTPUT _______________________________________________________________________________________ 18
FACTORY SAMPLE SETTINGS ________________________________________________________________________ 19
PERSONAL SETTINGS ______________________________________________________________________________ 20
BIASING THE KT-88 POWER TUBES ________________________________________________________________ 21-22
SPEAKER IMPEDANCE MATCHING AND HOOKUP GUIDE ______________________________________________ 23-28
TUBE NOISE AND MICROPHONICS ________________________________________________________________ 29-30
TUBE REPLACEMENT CHART ________________________________________________________________________ 32
PARTS SHEET _____________________________________________________________________________________ 33
TABLE OF CONTENTS
READ AND FOLLOW INSTRUCTIONS OF PROPER USAGE
Read these instructions.
Keep these instructions.
Heed all warnings.
Follow all instructions.
Do not use this apparatus near water.
Clean only with dry cloth.
Do not block any ventilation openings. Install in accordance with the manufacturer’s instructions.
Do not install near any heat sources such as radiators, heat registers, stoves, or other apparatus (including amplifiers)
that produce heat.
Do not defeat the safety purpose of the polarized or grounding-type plug. A polarized plug has two blades with one
wider than the other. A grounding type plug has two blades and a third grounding prong. The wide blade or the third
prong are provided for your safety. If the provided plug does not fit into your outlet, consult an electrician for replace-
ment of the obsolete outlet.
Protect the power cord from being walked on or pinched, particularly at plugs, convenience receptacles, and the point
where they exit from the apparatus.
Only use attachments/accessories specified by the manufacturer.
Unplug this apparatus during lightning storms or when unused for long periods of time.
Refer all servicing to qualified service personnel. Servicing is required when the apparatus has been damaged in any
way, such as power-supply cord or plug is damaged, liquid has been spilled or objects have fallen into the apparatus, the
apparatus has been exposed to rain or moisture, does not operate normally, or has been dropped.
To insure proper ventilation always make sure there is at minimum four inches (101.6mm) of space behind the rear of
the apparatus. The ventilation should not be impeded by covering the ventilation openings with items, such as newspa-
pers, tablecloths, curtains, etc. Do not impede ventilation by placing objects on top of the apparatus which extend past
the rear edge of its cabinet.
No naked flame sources, such as lighted candles, should be placed on the apparatus.
The apparatus shall not be exposed to dripping or splashing and no objects filled with liquids, such as vases, shall be
placed on the apparatus.
Important Safety Instructions
READ AND FOLLOW INSTRUCTIONS OF PROPER USAGE
WARNING: To reduce the risk of fire or electric shock, do not expose this apparatus to rain or moisture.
The AC plug is the mains disconnect. The plug should remain accessible after installation.
WARNING: EU: permission from the Supply Authority is needed before connection.
WARNING: Always make sure proper load is connected before operating the amplifier. Failure to do so could pose a
shock hazard and may result in damage to the amplifier.
Do not expose amplifier to direct sunlight or extremely high temperatures.
Always insure the amplifier is properly grounded. Always unplug AC power cord before changing fuse, tubes or remov-
ing chassis. Use only same type and rating when replacing fuse.
Avoid direct contact with heated tubes. Keep amplifier away from children.
To avoid damaging your speakers and other playback equipment, turn off the power of all related equipment before mak-
ing the connections.
Do not use excessive force when handling buttons, switches and controls. Do not use solvents such as benzene or
paint thinner to clean the unit.
Always connect to an AC power supply that meets the power supply specifications listed on the rear of the unit. Export
models: always insure unit is wired for proper voltage. Make certain grounding conforms with local standards.
Your amplifier is LOUD! Exposure to high sound volumes may cause permanent hearing damage!
When Rack Mounting this unit proper ventilation space must be maintained. Do Not cover or block Front and Rear and
allow at least 2” of open “breathing” space on both sides of the unit. Allow 2 Rack Units of open space above the unit to
allow heat to escape the upper rear vents.
NOTE: IMPORTANT – Do Not flip the STANDBY SWITCH in and out of STANDBY mode (on and off) while the amplifier is being
played or with any type of signal being amplified. The large amount of current involved in this scenario can damage the STANDBY
SWITCH.
Your Mesa/Boogie® Amplifier is a professional instrument. Please treat it with respect and operate it properly.
Important Safety Instructions
PAGE 1
Congratulations on your choice of the BASS PRODIGY Four:88 and welcome to the MESA/Boogie ® Family! First, we would like to
thank you for choosing us as your amplifier company and trusting us to help create your musical voice. This is something we never
take for granted and you’ll find that we are here and ready to assist you should you ever need help. Our goal is to help you sound
your best at all times! We feel confident that your new amplifier will bring you many years of reliable service, rewarding inspiration
and create for you a newfound freedom to express your music.
You have chosen an amplifier bred of a fine all-tube heritage and this model is our testament to Tube Bass Tone. Its forefathers can
be traced back to the very first MESA amplifier ever built, the MESA 450 Bass Head. In fact, the first 5 MESA amplifiers built in the
Lagunitas mountain shack were Bass amps…a piece of trivia little known and overshadowed by our overwhelming notoriety for guitar
amplification. But we’ve always loved the Bass, and have - since day one - been committed to elevating its stature through our art
form. The bloodline for MESA bass continued with the first rack-mount chassis bass amplifier in 1980, the D-180. The mid-eighties
saw the introduction of the BASS 400 and later in 1988, the BASS 400+ with its stunning Pitch, Punch and Power delivered by an
additional 6 x 6L6s to bring the total to twelve 6L6s in the mighty power section.
The 400+ went on to become a classic used by the world’s most talented Bassists for two decades. Paul McCartney, Mark King,
Stanley Clark, Jack Blades, Michael Anthony, Blasko and Bootsy Collins, are but a few of the international stars that put the 400+
center stage to anchor the band during its 20 year build cycle. Those iconic amps still bring top dollar when you can find one changing
hands on the pre-owned market. While MESA has since pioneered an entire line of tube-driven mosfet amplifiers that shored up our
place in the Bass market, the discontinuation of the 400+ left a gaping hole in the world of tube Bass amp offerings.
Tone Freaks Rejoice! The BASS PRODIGY Four:88 is the next step in the MESA All-Tube Bass Amp Bloodline. Vastly improved
Tone, features, dial-ability, portability, packaging and control over the entire spectrum make the PRODIGY – and its big brother the
STRATEGY Eight:88 – an iconic step forward in Bass amplification. With an all-new tube preamp, a 5-position Rotary VOICE Selec-
tor, patented Multi-Watt 2-Way Selectable Power, Footswitchable SOLO and VOICE control, Front and Rear Tuner Outputs, and an all
new, high output power section utilizing four KT-88s – the PRODIGY is THE tube Bass Amplifier for the new millenium.
Operating Instructions
NORMAL
INPUT
FT. SW. D.I. OUT
MUTE
FUSE
SOLOVOICE 4 OHM8 OHM 4 OHM
SEND RETURN
POWER
ON
ON
STANDBY
D.I.
LEVEL SOLO
GAIN BASS MID TREBLE VOICE MASTER
D.I. LIFT
GROUND
FULL
HALF PWR
D.I. PRE
POST
CAUTION! WARNING!
h
5 A
SLO
BLO
120 V~
60 Hz
6 A
CAUTION: Unplug power before
servicing fuse or chassis
SWITCHEXT
FX
LOOP
TUNER SLAVE
OUT
USE
W/ TWO
8CABS
SPKRS
BASSPRODIGY 4:88
VACUUM TUBE AMPLIFIER
TUBE GUIDE
3 x 12AX
7
4 x KT88
MUTE ON UNLESS SPKR IN
HAND BUILT IN
PETALUMA, CALIFORNIA U.S.A.
3
2 4
51
HOME OF TONE ®
®
Four:88
PATENTED
6,724,897
MUTE
SIL. REC.
REAR VIEW: BASS PRODIGY
FRONT VIEW: BASS PRODIGY
PAGE 2
The PRODIGY begins with BRIGHT, NORMAL and ACTIVE INPUT Select choices feeding an all-new tube preamp that borrows
subsections from our CARBINE hybrid architecture. This design allows increased control over a broad spectrum of frequencies
and incorporates active BASS and TREBLE controls with increased shaping power - while retaining the sweet, musical blend of
our traditional passive MID control. In addition to these we’ve included a reworked-for-tubes version of the CARBINE’s 5-position
rotary VOICE feature that allows notching or enhancement of specific midrange regions in addition to bass and treble frequency
boosting. The VOICE feature puts you instantly in iconic stylistic realms – from elastic, mid-scooped Thumbing to articulate, mid-flat
Fingerstyle, to the Classic metallic, scooped American Pick sound – with a flick of a switch. The ability to jump right to these classic
“curves” makes re-voicing on the fly in performance situations a snap, is also footswitchable, and adds immensely to the PRODIGY’s
versatility.
Control over the Tone would be incomplete – at least in our minds – without control over the power as well. So the PRODIGY gives
you two choices as to how to utilize the power section. As wattage ratings are often misleading and irrelevant to volume when it
comes to describing tube power, the PRODIGY offers FULL and HALF power settings on the MULTI-WATT™ switch. Each of these
choices has a distinct tonal color and persona, with FULL delivering the maximum punch, authority and headroom. HALF can deliver
some valuable and surprising mid to lower power applications for tube-driven Bass while still offering plenty of volume for a lot of live
situations. An important collection of vintage-inspired sounds await you here in HALF POWER ranging from round and warm, to
edgy, to clipped and growling – depending how you dish it out from the MASTER, all the sounds in HALF POWER beg to be recorded.
A MUTE/PLAY/SILENT RECORD switch allows convenient Front Panel muting for instrument changes, silent tuning or recording, or
any time where signal muting is needed. An AUTO-MUTE circuit is fitted to the Speaker Jacks to protect the transformer and power
tubes if no speaker is connected and is indicated by the same Front Panel LED triggered by the mini-toggle MUTE/PLAY/SILENT RE-
CORD switch (Red LED ON = MUTE). The SILENT RECORD setting allows you to safely mute the signal at the Power Amp and use
the Prodigy preamp (including processing in the EFFECTS LOOP) to record using the D.I. OUTPUT without sound from the Speaker.
The Rear Panel D.I. OUTPUT signal can be derived from either PRE (your instrument) or POST (the entire preamp) with the Front
Panel D.I. Switch. The D.I. OUTPUT signal strength is controlled by the Front Panel D.I. LEVEL located at the far right side of the
Chassis next to the SOLO™ Control. And a valuable D.I. LIFT switch can float the Circuit Ground from Chassis Ground to reduce
noise into the Console when the Ground references are different.
The PRODIGY incorporates our SOLO™ feature that has become so popular on our guitar amplifiers, which gives you a pre-settable
and footswitchable boost for any time you want to feature a specific part or section in a song. The SOLO control can also be used to
compensate for an instrument with a lower output due to weaker pickups.
Jumping to the Rear Panel you are greeted with the EXTERNAL SWITCH jacks which make the PRODIGY compatible with virtually
any switching system’s architecture. These provide for external control of the MUTE, VOICE and SOLO™ features with a master
(usually midi) switcher or with any separate “tip to ground” latching-type switch logic.
From there we find the buffered Series EFFECTS LOOP that allows seamless interfacing of your high quality outboard processing.
Remember that this sensitive point between preamp and power section is an important Tone stage. Try to use outboard processing
of the same caliber as your amplifier. Ignoring this advice will likely result in compromised sound. The Loop is a critical junction/
impedance crossroads point between preamp and power and to put inferior foreign objects in the signal path here will produce Tone
of the lowest common denominator.
Next you’ll find a pair of jacks for the TUNER Output and the SLAVE Level. The TUNER output captures your instrument and preps
it for the long journey to the front of the stage or just upstairs to the top of your amp. The SLAVE provides an output for capturing the
sound of both preamp and power section for use in connecting your preamp and power section tonality to additional power sections
and cabinets for truly coliseum grade rigs.
O:
PAGE 3
To handle virtually any speaker cabinet scenario, the PRODIGY is fitted with 3 SPEAKER OUTPUTS capable of handling a variety
of impedance/cabinet loads. One 8 OHM and two 4 OHM Outputs ensure that you can always find an impedance-correct match
regardless of your cabinet choices.
The PRODIGY Footswitch DIN Input resides just to the right of the SPEAKER OUTPUTS and here is where the optional Footswitch
& Cable is connected to your amplifier.
Finally, a MESA first – a 2 position BIAS SET switch and trim pot resides on the rear Tube Deck labeled Operate and Set Bias. This
SET-BIAS position allows you to check and set your bias quickly and easily for maintenance or when replacing power tubes to set
BIAS on the big KT-88s. There’s no need to take the amp to a technician when it’s time to change tubes as this bias method is com-
pletely user-serviceable and easy to dial in your bias just right.
INSTANT GRATIFICATION
The PRODIGY is about the easiest amp on the planet to get a great sound from quickly – and with the VOICE Control – several great
sounds.. Just set most of the controls at noon…and enjoy! From those settings, may we recommend you sweep the VOICE Control
from position 1 to 5 and experience what a difference the various MID voicings combined with bass and treble enhancements can
provide.
NOTE: COLD START PROCEDURE: When powering up your PRODIGY from cold, ALWAYS follow this Start Up Procedure: We
have found the currently available KT88s require substantially more time than 6L6s or EL34s to warm up to full operating temperature.
If you hit them with high voltage with the STANDBY sooner than three minutes, you may hear some crackling as well as a slow volume
increase as they get up to full temperature. This subsides once they are fully warm, and while it might not hurt the tubes per se, it is
better to warm them up for at least three minutes (or longer) whenever you can.
NOTE: IMPORTANT! – Do Not flip the STANDBY SWITCH in and out of STANDBY mode (on and off) while the amplifier is being
played or with any type of signal being amplified. The large amount of current involved in this scenario can damage the STANDBY
SWITCH.
1. Begin with STANDBY in the STANDBY Position.
2. Switch POWER to ON and WAIT at least three minutes or longer for the tubes to “warm up”. (With STANDBY OFF and POWER
ON, the tubes internal components are allowed to warm up slowly before hitting them with the high voltage controlled by the
STANDBY being switched to ON).
3. Flip STANDBY to ON.
4. PLAY!
Following this startup procedure will lengthen the musical life of your power tubes and decrease the chances of untimely power tube
failures.
O: (Continued)
NORMAL
INPUT
POWER
ON
ON
STANDBY
D.I.
LEVEL SOLO
GAIN BASS MID TREBLE VOICE MASTER
D.I. LIFT
GROUND
FULL
HALF PWR
D.I. PRE
POST
3
2 4
51
Four:88
MUTE
SIL. REC.
PAGE 4
HELPFUL HINTS
IMPORTANT! The SPEAKER OUTPUT Jack’s AUTO-MUTE function is triggered anytime there is no Speaker Cabinet (Load)
plugged into one of the Speaker Jacks. The amp “knows” if a cabinet is not plugged into a speaker jack and mutes to protect itself
from damage. If there is no sound when you turn STANDBY to “ON” – ALWAYS and IMMEDIATELY – STOP PLAYING – and check to
make sure there is a Speaker Cabinet plugged in. The Front Panel MUTE LED will be illuminated red when either the MUTE/PLAY/
SILENT RECORD switch is set to MUTE or SILENT RECORD – OR – when there is no Speaker Cabinet connected to the Speaker
Jacks. AUTO-MUTE is also ON when the Set Bias switch is on.
NOTE: IMPORTANT! MAKE SURE YOU HAVE A SPEAKER CONNECTED TO THE SPEAKER OUTPUT JACKS AT ALL TIMES!
EVEN THOUGH THE PRODIGY HAS BUILT-IN PROTECTION, DON’T RELY ON THIS ALONE – IT IS A HIGH POWER AMPLIFIER
AND NEEDS A LOAD CONNECTED AT ALL TIMES!
NOTE: IMPORTANT! NEVER UNPLUG THE SPEAKER LOAD (Cabinet) WHILE THE AMPLIFIER IS IN USE (BEING PLAYED)!
NOTE: IMPORTANT! DO NOT ATTACH OR USE A CABINET OR CABINETS WHOSE IMPEDANCE/LOAD IS LOWER THAN
4 OHMS. USE OF A 2 OHM LOAD ON THE AMPLIFIER WILL DRAMATICALLY STRESS THE POWER TUBES AND OUTPUT
TRANSFORMER, AND MAY CAUSE EXTENSIVE AND EXPENSIVE NON-WARRANTY DAMAGE TO THE AMPLIFIER.
NOTE: IMPORTANT! – Do Not flip the STANDBY SWITCH in and out of STANDBY mode (on and off) while the amplifier is being
played or with any type of signal being amplified. The large amount of current involved in this scenario can damage the STANDBY
SWITCH.
Though it goes without saying, FULL POWER on the POWER SELECT mini toggle delivers the maximum headroom, punch and
perceived “speed” and control over the notes.
The VOICE Control is the most powerful single control on the PRODIGY and delivers many of the characteristics of several different
manufacturer’s iconic amplifiers in one simple to use control. Use the VOICE Control to take a “broad aim” at the sound/playing style
you are pursuing and then focus in and fine-tune with the rotary Tone Controls.
The VOICE Feature “preset sounds” are assembled with these stylistic applications in mind:
1. Slight Mid Scoop/Huge Low End: Funk/Thumbing/Slap
2. Subtle Wide “Q” Bass Boost-Approximately 20Hz – 180Hz: Smooth R&B/Fingerstyle
3. Flat: Articulate Rock Punch/Fingerstyle
4. Mid Scoop/Bass Boost/High Boost: Classic Rock/Pick, Fingerstyle, Thumbing
5. Radical Mid Scoop/Bass Boost/High Boost: Aggressive Rock/Pick, Hyper Slap/Thumbing
Sometimes less is more. Don’t fall prey to the classic Tone Trap… EQ HANGOVER. Don’t chase great Tone around in circles. Instead
use your IQ and constantly reference a “less altered state of play”. By going back and forth to a more “flat” or “conservatively voiced”
setting you will avoid ear fatigue and end up with a more balanced sound.
The SOLO Feature can be used to not only boost your level for featured parts, but as an additional MASTER VOLUME to compensate
for different footswitchable VOICE settings as well.
The D.I. OUTPUT will have signal present when in the PRE selection even when STANDBY is used to mute the signal to the power
section (STANDBY position) as this is the direct signal straight from your instrument before it goes through the amplifier.
The Cooling Fan is equipped with a thermostat that allows for different speeds depending on the operating conditions (temperature)
of the output transformer and tubes. Don’t be alarmed if the fan speed (and associated noise) increases while you are playing. This
is normal and essential to your amplifier’s wellbeing and reliability.
Now that you have an overview of your PRODIGY and some hints to achieve a great sound fast, let’s take a deeper look at the con-
trols and features of this mighty little Bass powerhouse.
PAGE 5
FRONT PANEL: (C  F)
INPUT:
This jack is the instrument INPUT and it feeds the first tube stage in the tube preamp of the PRODIGY. Both passive as
well as active instruments are provided for with a specific setting on the 3-position INPUT SELECT switch.
INPUT SELECT: BRIGHT/NORMAL/ACTIVE
This 3-position switch allows selection of three different Input configura-
tions, two of which are voicing options and a third that offers an Input Pad for Active Instruments. Select the option that best suits
your tonal/stylistic needs and impedance/headroom requirements.
BRIGHT This is the normal INPUT (to us anyway)- and while “normal” is a relative term – this setting would usually be the first
choice for most Passive instruments. As you might imagine, the BRIGHT selection offers a brighter, more detailed Tone and can also
give the impression of a more responsive or faster feel – which Passive Instruments might benefit from. This Input Mode would be
the choice anytime you’re looking for a more present or forward sound with enhanced top end characteristics and a more detailed
spectrum of upper harmonics. While the name suggests that this position might be better suited to traditional or passive instruments,
don’t be afraid to try BRIGHT for an exciting sound with Active Basses as well. Just keep in mind that the range of usable, unclipped
headroom on the GAIN control will be lower if you use BRIGHT with an active instrument. BRIGHT provides a snappy, alive sound
that has more bounce and clarity for vintage style basses that is really fun to play. The impression of headroom and more full-range
EQ curve of the BRIGHT Input creates a crisp, superbly clean sound with these more traditional instruments that will likely take them
down some new avenues. You may also want to use BRIGHT if the cabinets you’re using don’t offer high frequency horns or tweeters
and you’re looking for more detail in the high end.
NORMAL provides a purposeful “Low-Fi” sounding alternative to the crisp and detailed sound of the BRIGHT Input setting. The
NORMAL input is also a great choice if your bass or cabinet (or both) leans toward being a little on the bright side or if you find the
Prodigy to sound bright with other elements of your rig. A quick flip of the switch and the Prodigy is tuned to your playing style or other
aspects of your rig. NORMAL features a rounder, warmer Tone that is perfect for old school sounds and classic passive Basses. This
setting may also be preferable for overdriven or clipped sounds as the less prominent top end will produce a more musical clip and
help avoid ratty or buzzy distortion characteristics. NORMAL can also provide a warmer sound for modern Basses with higher output
pickups, but will probably start to run out of headroom and break up sooner - possibly before you want them to. It will not hurt the
amplifier to run active instruments in the NORMAL Input and in fact, you may want to use this to your advantage in certain musical
scenarios. However, if you are looking for the most Hi-Fi tonal response and greatest headroom you will likely find better performance
by using the ACTIVE Input.
ACTIVE provides the proper padded Input sensitivity for instruments that incorporate an on-board preamp and/or pickups that utilize
active electronics. This jack can receive the highest signal level before clipping and therefore provides the greatest headroom for
these higher output instruments. EQ-wise, ACTIVE is voiced much like the BRIGHT setting and provides the full spectrum of upper
harmonics. This clarity and detail nicely reinforces the higher headroom nature of this Input setting. While there is more headroom
- and therefore, ACTIVE requires a hotter signal to bring the whole amp to full power - don’t be afraid to try it for a different sound
with passive Basses as well. One thing is for sure, you won’t be running out of clean headroom at the INPUT if you run your passive
instrument in the ACTIVE setting. You can use this to your advantage when looking for the cleanest possible sound with traditional
Basses. Just keep in mind you may see higher settings on both GAIN and MASTER than you’re accustomed to in order to achieve
the volume you want for this hyper-clean Tone.
INPUT
GAIN
NORMAL
PAGE 6
THE CONTROLS
GAIN
This control determines the overall character of the sound along with input gain and sensitivity. The lower regions of the
control (below 12:00) offers the cleanest sounds and greater headroom with a scooped, brighter personality. The upper harmonics
come through more prominently in this area of the control making the top end sound more transparent
and crisp. This region is especially useful for funkier stuff when thumbing is in order. It keeps the rubber-
band feel intact in the lows and mids while voicing the snap just high enough to avoid harshness, or the
dreaded “gak” when the G string is plucked.
As the GAIN control is increased past 12:00 a richer, “well-rounded” and more blooming voice becomes
dominant. Headroom starts to diminish in increments until eventually, a tube overdrive sound appears
as the 12AX7 input preamp tube is driven into saturation.
The region between 12:00 and 2:30 is where classic, warm tube sounds reside. Within this narrow
band, you will discover a world of old-school tones. Tiny increments here produce subtle, but important differences in the attack
characteristic, which in turn, can feel like changes in the time domain.
By experimenting with the setting of the GAIN control, you can actually voice the amp to feel as if it bounces just ahead of the groove
(10:30 – 12:00) - or lays back a little deeper to produce a more ‘Fatback’ feel with tube drive (12:30 – 2:00). The difference in attack
and sustain produces striking results as to how the bassist - and in fact the whole band - perceives things in the time domain.
BASS
This control is responsible for the basic mix of low frequencies in the tube pre-amp. The BASS control is an “active” control
- as opposed to a “passive” style control. This means that a center “Q” point has been chosen for this control that allows you to either
boost or cut a range of low end centered on that frequency. While there is a specific frequency that
the Bass control “centers on”, the frequencies and harmonics on either side of this center Q point are
affected in a diminishing “bell shaped” curve as you sweep it one direction or another.
The BASS control is actually a gain and frequency control all rolled into one with the “Q” center at 55Hz.
As mentioned above, though it is centered here, frequencies (harmonics) in both low and high direc-
tions are affected because of its broader-band nature. Twelve o’clock (NOON) on the BASS control
delivers a basically “flat” response (no boost/no cut). As the BASS control is increased past 12:00
(NOON), it produces a 6db per octave boost in gain starting at the center point of 55Hz and tapering
gradually to the edges of the broad Q’s bell-shaped curve from 20Hz on the low side, all the way up to
321Hz on the high side. At 5:30 on the bass control a +6db increase in gain is possible. As the BASS control is dialed below 12:00,
55Hz and all associated harmonics are reduced and eventually notched almost completely out of the signal path. This lower range
of the control delivers a 6db per octave “cut” centered at 55Hz going down to 20Hz with an overall “cut gain” of -10db possible as the
control reaches 7:30 (off).
This type of active rotary control makes it possible to achieve bass control and characteristics far beyond that of a conventional pas-
sive type control. It can increase the low end to an almost absurd level and then, with a flick of the wrist, dip it to near transistor radio
skinniness. Needless to say, with any control this powerful a certain amount of finesse must be applied to achieve musical results.
MID
This is the only passive style control in the string of rotary tone controls. This scheme was chosen for its inherently musical
blend and for the way the passive style midrange control - with its wide footprint and smooth taper - fills in the “holes”. Unlike the
BASS, this control is a cut only, and while it can competently remove this broad spectrum of midrange
from the mix, it cannot provide the extreme focused attenuation of an active style control.
You will find that this passive, broad-band control works really well for shaping the midrange frequen-
cies and imparting a natural earthiness and character that is the perfect counterpart to its active style
neighbors. It’s hard to dial wrong with this more forgiving approach - as it gives you the ability to punch
through a mix or sweeten and smooth out the sound by adjusting just one control.
BASS MID
INPUT
GAIN
NORMAL
BASS MID
PAGE 7
Another useful property of the Passive MID when used above 12:00 is that it starts to impart a furry, tube growl as it is increased and
actually pushes things toward the threshold of clip at higher settings… especially in the #3 “Flat” VOICE Position. Use this to your
advantage when searching for aggressive Rock sounds with an edge or R&B Tones that have just a hint of tube saturation.
For radical and specific scooping of the midrange frequencies in modern R&B and Funk styles, there is plenty of notching power that
is infinitely more accurate stylistically, to be found in the VOICE Control. Because of this, we opted for the tried and true passive style
midrange control that has been working great in all of our amplifiers for decades. It’s hard to improve on a classic.
TREBLE
The TREBLE is also an active-style control like that found in the BASS and it was chosen for its ability to radically shape
the upper harmonic region. Like the BASS, it also has a center Q point with frequencies (harmonics) above and below, responding in
harmony in a bell-shaped curve as it is dialed for either cut or boost.
As the TREBLE control is increased past 12:00 (NOON), it produces a 6db per octave boost in gain
starting at the center point of 3.2KHz and tapering gradually to the edges of the broad Q’s bell-shaped
curve from 723Hz on the low side and all the way up to 6KHz on the high side. The maximum boost
available from 12:00 (Flat) is 5db. Dialing the TREBLE below 12:00 produces a 6db per octave cut
centered at 3.2KHz and decreasing in strength down to 723Hz and out to 6KHz. The maximum “cut” at-
tenuation of -10db is reached at the bottom of the control (7:30/off). The ability to cut these frequencies
more radically makes it possible to obtain incredibly rich and warm old-school R&B and Jazz sounds
that rival any of the classic recordings of the day. This broad Q scheme lends a sweetness of sound when boosted while retaining all
the focus and simple usability associated with a traditional passive TREBLE control.
The active TREBLE control completes the rotary tone control string to create a powerful and extremely accurate network to use as
your fundamental tools for Tone shaping. It’s no wonder many first-time PRODIGY players make the comment that just these three
controls (even set at noon) — combined with the GAIN — create the best tone they have ever heard!
NOTE: As with the BASS control, may we remind you that a control of this type, with its increased power, should be used with finesse
(in the TREBLE’s case, almost more so, because higher frequencies seem louder to the ear and are generally more painful when set
to extremes). Another reason to use care is that high frequencies tend to increase the ambient noise floor when set too high. This is
then exacerbated if the MID control is combined for added top end boost. Dial with care and music in mind.
VOICE
This simple to use feature puts the shaping power of a parametric EQ at your fingertips (without the learning curve)
and allows you to access some of the world’s most iconic bass sounds instantly either via the rotary switch or optional footswitch.
The 5-position rotary allows you to select from four distinct and different voices aimed at all the clas-
sic Bass sounds. Most of the dramatic changes occur in the midrange where the basic character of a
sound is determined right away. There are three positions that feature scooped midrange of different
frequencies (Positions 1,4 & 5) — two with increased lows (Positions 1 & 2) and two positions that
utilize scooped higher mids with boosted lows and boosted highs to achieve their curve (Positions 4 &
5). Position 3 is basically a “Flat” sound with no midrange cut or boost – so you can think of that as a
“BYPASS” for the VOICE feature.
Below is a synopsis of the 5 voicing choices (Modes) found on the VOICE control:
1. Midrange scoop (centered around 400-500Hz) accompanied by a boost in low end. Excellent for dramatic thumbing/slapping
styles or smooth chording.
2. Subtle Bass Boost from 20Hz-180Hz. Great for R&B and anytime you want to widen a sound.
THE CONTROLS (Continued)
VOICE
3
2 4
51
TREBLE
VOICE
3
2 4
51
TREBLE
PAGE 8
3. Voice Feature Bypassed – “Flat” with Tone controls set at 12:00.
4. Gentle Midrange scoop (centered around 600Hz) and low end boost with increased high end. Good choice for articulate Rock
styles with Fingers or Pick. Tracks your playing with articulation and enhanced definition.
5. Radical Mid Scoop (centered around 600Hz) and low end boost with increased high end. ‘Piano String’ clarity, great for aggres-
sive Rock Styles played with Fingers or Pick or Hyper-Funk Slap or Thumbing Styles.
Keep in mind these positions use a medium Q width to avoid a notchy sound and retain an organic quality. There will be some cut or
boost on the adjacent frequencies. Once you have selected a VOICE mode to use, consider fine-tuning the sound with the standard
tone controls.
Remember that the rotary tone controls might seem to react differently than they do when the VOICE feature is BYPASSED (set to
position 3) — as the basic character of the sound is altered substantially in positions 1, 2, 4 & 5. The Tone controls are still centered
in their respective regions, but the way they interact within the landscape of different frequencies being cut or boosted by the VOICE
mode causes a perceived shift in their response.
MASTER
The MASTER control is the feed to the power section and determines the overall playing volume of the PRODIGY as
well as determining the FX SEND Level. An optimum setting will be partially determined by the setting of the GAIN control as well
as the entire Tone Control network – and how loud you want the amp. All these controls affect the signal
strength at the end of the preamp and can make the MASTER control very sensitive. The MASTER
allows you to set the preamp’s GAIN control across a wide range of input headroom possibilities — from
completely clean to tube overdrive — and compensate for these extremes, giving you independent control
over the playing volume.
NOTE: Remember to use caution with the MASTER as it is the gas pedal for the significant power avail-
able with the Prodigy. We suggest a zero setting at each power up to avoid surprise damage to speakers
and ears.
MUTE/PLAY/SILENT RECORD
This mini toggle provides a MUTE Mode for silent tuning, cable swapping or any time you
need to mute the sound without powering down. The SILENT RECORD MODE allows for silent (no live speaker) recording when us-
ing the D.I. OUTPUT interface to a console. This function mutes the signal at the input of the Driver stage
and also (for protection of the transformer and power tubes) at the SPEAKER OUTPUT jacks. The FX
LOOP signal is derived and returned before this mute point, so all your processing will be intact at the D.I.
OUTPUT when using the SILENT RECORD feature. Use the SILENT RECORD position to shut off the
signal to the power amp and speakers and PLAY to use the PRODIGY in a normal (live) scenario. There
is an LED indicator just below the toggle switch that illuminates when the MUTE or SILENT RECORD
Modes are engaged.
The MUTE Mode can also be engaged from the optional PRODIGY Footswitch by hitting the MUTE button located there.
A dedicated trigger jack for the MUTE Mode is located on the Rear Panel in the EXTERNAL SWITCH section. The MUTE Mode can
be triggered from there via a remote switcher such as any standard ¼” tip-to-ground latching-type switch. This type of control logic is
standard on nearly all master switching units on the market.
FULL
HALF PWR
MASTER
MUTE
SIL. REC.
FULL
HALF PWR
MASTER
MUTE
SIL. REC.
PAGE 9
MULTI-WATT ™ Switchable Power: FULL / HALF PWR
As you might have guessed, this switch allows you to select be-
tween two distinct ranges of power, enabling you to better tailor the output response of the PRODIGY to the preamp sounds you have
dialed up and/or the venue you’re playing in. In some cases you will want to use it to create an appropriate
volume level, while in other scenarios to further authenticate a certain sound, style or vibe.
While the two settings – FULL and HALF – refer to both power rating and available headroom, each of
these also has an effect on the Tone and personality of the sound. You’ll quickly learn to use these choices
as part of your Tone palette along with the rotary Tone controls and VOICE Feature to craft sounds that are
appropriate in volume and clarity as well as authentic in shape and feel.
FULL incorporates all four power tubes to create the maximum power and headroom – approximately 250
watts RMS of tube power – that sounds and feels more like 500. This is the choice any time you need the
maximum clean transient attack, clarity and headroom. FULL will also track complex rhythmic passages with the most accuracy as it
has the quickest recovery time between notes. Tone-wise, FULL has the best balance of punch and authority, sparkle and detail and
creates a “Hi-Fi” experience, particularly when used with the BRIGHT input selection. Tight delivery and tracking in the low mids and
bottom end is beautifully integrated with top end detail and angelic sounding upper harmonics. Up here the air is fresh and inspiring
as only an all-tube circuit can create.
HALF PWR utilizes two of the four KT88s to provide approximately 125 watts of sweet, tube power. This option has a less shim-
mering top end, warmer detail and a little less emphasis on midrange punch. HALF can be pushed into a furry clip in medium size
venues for added Rock attitude or for an old school R&B sound that can meet lower to medium headroom requirements. HALF is the
perfect Studio power mode. Clean enough, but not too clean. It makes up, in personality and color, what it lacks in brute power. It
also can save you money on tube replacement costs. By using the HALF position for your applications that don’t require maximum
output and headroom, you can lengthen the interval between re-tubing if you employ power tube rotation (swapping the ones used in
HALF Power with the ones that remain in STANDBY during HALF Power operation). If you do end up using HALF for much of your
playing, you can rotate the “unused” tubes and get twice the Tone-full life out of a set of output tubes. (See the TUBE TASK CHART
in the Rear Section of this Manual to identify the tubes in use during HALF Power Operating Mode).
NOTE: When using the HALF power setting, to obtain the maximum headroom and power and retain tight, punchy attack character-
istics, move an 8 Ohm speaker cabinet to the 4 Ohm SPEAKER OUTPUT on the Rear Panel. (See the SPEAKER OUTPUT section
later in the manual for more details and options on speaker connections in HALF Power.)
However you decide to utilize the PRODIGY’S Multi-Watt™ Switchable Power, it adds a level of versatility that’s hard to beat in Tone,
adaptability and authenticity. Be sure to experiment enough to learn the personalities, applications and boundaries of these classic
power choices so that you can apply them quickly and appropriately to your style and your musical endeavors.
PRE/POST: D.I. OUTPUT SELECT
This switch toggles the output signal at the D.I. OUTPUT between a POST signal –
where the entire preamp and control settings affect the sound – and a PRE signal – where the instrument signal is fed directly to the
D.I. OUTPUT, bypassing the preamp and tone controls.
PRE is the direct sound of your instrument before it goes through the preamp. In this setting, the controls
will not affect the signal at the DIRECT OUTPUT. The PRE setting is useful for large venues when the
sound you have dialed up for your optimum stage tone might have too much low end for the front of house
engineer to balance through a large PA where there are subs employed.
POST gives you the entire preamp signal including INPUT SELECT, Tone Controls, the VOICE Mode se-
lection and processing in the Effects Loop. POST is appropriate for recording situations where you want
to capture the closest thing to what you are hearing when you play, or live situations where the sound
engineer requests your “stage sound” as a Direct feed to the front of house.
THE CONTROLS (Continued)
MASTER
FULL
HALF PWR
MUTE
SIL. REC.
D.I.
LEVEL
D.I. LIFT
GROUND
D.I. PRE
POST
Four:88
PAGE 10
NOTE: The D.I. OUTPUT will have signal present when in the PRE selection even when STANDBY is used to mute the signal to the
power section (STANDBY position) as this is the direct signal straight from your instrument before it goes through the amplifier.
NOTE: POST does not capture and include the power section of your amplifier.
D.I. LIFT / GROUND
This 2-position mini toggle offers the ability to lift the Circuit Ground from the Chassis Ground, effectively
isolating the path to Ground for the PRODIGY circuit. This can be very helpful in live sound front of house or Monitor applications as
well as in Recording environments.
LIFT isolates the Circuit to Chassis Ground, preventing these types of ground loops when interfacing to
consoles.
GROUND connects the Circuit Ground to the Chassis and should be used whenever possible. Use this
position at all times when you are NOT connecting the D.I. OUTPUT to a console.
Sometimes – not always – this will help you isolate and remove unwanted hum or buzz from the equa-
tion. Remember that there are a myriad of noises and hums that can be caused from many sources,
including things beyond your control elsewhere on the AC Line you are connected to (outside your house, studio or venue). The D.I.
LIFT/GROUND switch can’t cure those other outside factors, but it can relieve one of the more common sources of hum found when
interfacing to Consoles that arises when the amplifier’s Ground and the Console Ground create a loop.
D.I. LEVEL
This Control determines the signal strength at the Rear Panel XLR D.I. OUTPUT Jack. We have located the D.I.
LEVEL on the Front Panel to offer you easy adjustment of the D.I. Level at Sound Check or even during a performance. The D.I.
OUTPUT on the Rear Panel is optimized for use directly into mixing consoles and the D.I. LEVEL Control
will allow for more than adequate signal level and plenty of room for adjustment within that window.
NOTE: IMPORTANT! It is a wise practice whenever interfacing with Consoles – whether Recording
or Live Sound – to ALWAYS begin your set-up regimen by zeroing out the D.I. LEVEL control BEFORE
flipping the POWER switch to the ON position. This will prevent damage to the Console, Speakers or
bystanders’ ears should the D.I. LEVEL accidentally be set too high. This practice allows you to bring up
the D.I. LEVEL slowly while the Engineer monitors the incoming signal strength and safely reaches an
optimum level.
It is also wise to follow this regimen in reverse. Make it habit to zero out the D.I. LEVEL at the end of each performance or session. If
you are in a hurry when you set-up to use the PRODIGY you’ll avoid an embarrassing and sonically unpleasant mistake.
SOLO CONTROL™
Your PRODIGY is equipped with our patented SOLO™ Feature that provides you with a pre-settable,
footswitchable boost for when it’s time to step out and showcase important parts during a performance. You can use the (optional)
PRODIGY Footswitch to engage this feature or you can trigger the SOLO LEVEL via a tip-to-ground
latching switch connected to the Rear Panel jack labeled SOLO in the EXT. (external) SWITCHING jacks
section (left rear).
This feature can be used to increase the playing volume to the amount set by the SOLO control when
engaged. To use SOLO, simply connect your Footswitch or external trigger, set your playing volume with
the MASTER control, hit the SOLO button on the Footswitch, and set the desired amount of boost with
the SOLO control. Now you have the added flexibility of a second “MASTER” control that you can call up
at any time from the Footswitch.
NOTE: The SOLO may not be used to achieve a volume level lower than that set by the MASTER control… it is a boost only feature.
NOTE: The SOLO control is optimized for performance level operation and therefore provides the best functionality in the middle
range of the MASTER control. It is normal to experience decreased effectiveness of the SOLO Feature at both the lowest and highest
regions of the MASTER control.
D.I.
LEVEL
D.I. LIFT
GROUND
D.I. PRE
POST
Four:88
D.I.
LEVEL
D.I. LIFT
GROUND
D.I. PRE
POST
Four:88
POWER
ON
ON
STANDBY
SOLO
Four:88
PAGE 11
POWER
This switch controls the incoming AC Line power to the PRODIGY. Make sure you are connecting the PRODIGY to a
grounded outlet with the proper voltage rating present (120V / 60Hz AC for US Models).
Never Alter your power cable! This will void your warranty and put you at risk of damaging your amplifier
and increasing your risk of electrical shock.
NOTE: COLD START PROCEDURE: When powering up your PRODIGY from cold, ALWAYS follow
this Start Up Procedure: We have found the currently available KT88s to require substantially more time
than 6L6s or EL34s to warm up to full operating temperature. If you hit them with high voltage sooner
than three minutes you may hear some crackling as well as a slow volume increase as they get up to full
temperature. This subsides once they are fully warm, and while it might not hurt the tubes per se – it is
better to warm them up for at least three minutes whenever you can.
1. Always begin with the STANDBY switch set to STANDBY.
2. Switch POWER to ON and WAIT at least three minutes or longer for the tubes to warm up. With STANDBY OFF and POWER
ON, the tube’s internal components are allowed to warm up slowly before hitting them with the high voltage controlled by the
STANDBY being switched to ON.
3. Move STANDBY to the ON Position
4. Play (your butt off)!
Following this startup procedure will lengthen the musical life of your power tubes and decrease the chances of untimely power tube
failures.
You may leave the POWER set to ON and use the STANDBY to cool your amp down and put it in an “idle state” during set breaks.
This is actually easier on the tubes than turning the POWER completely off, only to fire it back up again 15 minutes later. The shock
of in-rush current at the instant of POWER ON puts more stress on them than staying at idle (in STANDBY) once they are warm. This
scheme will ensure the longest tube life and best reliability from your PRODIGY.
STANDBY
This switch controls the high voltage on the tubes. When set to OFF, this switch puts the PRODIGY in an “idle” mode
that is essential at “cold power up” and very handy — even frugal – during breaks in performance. Be sure to follow the cold-start
procedure outlined in the previous section on POWER to get the best tube life and reliability from your
PRODIGY.
Use the STANDBY to mute the signal anytime you take a break or want to do something other than play
for a short time but know you will return soon… like a few minutes or a ½ hour or so. If you know you won’t
resume using the amplifier within a reasonably short time, go ahead and turn the POWER switch off and
save the electricity and your tubes. Just be sure to follow the Cold Start procedure every time you wish
to play. It will save your Tone and your money.
NOTE: IMPORTANT! – Do Not flip the STANDBY SWITCH in and out of STANDBY mode (on and off)
while the amplifier is being played or with any type of signal being amplified. The large amount of current
involved in this scenario can damage the STANDBY SWITCH.
Well that about wraps it up for the Front Panel Features and controls. Now let’s review the Rear Panel and get familiar with those
features.
THE CONTROLS (Continued)
POWER
ON
ON
STANDBY
SOLO
Four:88
POWER
ON
ON
STANDBY
SOLO
Four:88
PAGE 12
REST AREA
PAGE 13
AC MAINS FUSE
The AC MAINS Fuse for the PRODIGY is located at the far left of the Rear Panel. Should your Fuse ever
blow from either a surge in the line voltage or from a faulty power tube, REPLACE IT ONLY WITH A SLO-BLO TYPE FUSE OF
THE PROPER RATING AS LISTED NEAR THE FUSE HOLDER. THIS IS EXTREMELY IMPORTANT AS THE
PRODIGY DRAWS A SUBSTANTIAL AMOUNT OF CURRENT.
FUSE Rating for USA/Japan - 5A S.B.
FUSE RATING AND REPLACEMENT
A little known fact is that slo-blo fuses, as used in tube amplifiers, are rated for 135%
of stated value for one full hour of operation. This means a 5 amp rated fuse will carry almost 7 amps for one hour before blowing.
In order to comply with UL “fault condition testing” we have furnished a fuse value that will provide trouble free operation while at
the same time being low enough to protect your power transformer from over heating should it ever get too hot (extremely unlikely).
In addition, the high voltage plate of each KT-88 is protected via a special fusing type resistor to remove that tube from the circuit
should it experience a hard short-circuit type failure. This will limit damage and likely allow the amp to continue functioning, getting
you through the gig, though “on one less cylinder”. A hard tube short may occasionally damage the ceramic tube socket and your amp
should be serviced right away by a competent Authorized Mesa technician in the unlikely event this occurs.
During two years of prototype development and overall amp torture, the ONLY tube failures occurred when the amp was hit with a
big bass note… and no speaker was connected. To protect against such accidental misuse, we have added internal switches to the
speaker jacks that trigger the MUTE circuit until a plug is inserted into any one of the speaker jacks. For this system to be totally ef-
fective, you must insure that the plug is FULLY inserted into the amplifier and that the other end of the speaker cable is also connected
to your cabinet (duh!). Failures resulting from “no load” misuse will not be covered under warranty as they constitute gross user error.
NOTE: We cannot overemphasize the importance of making sure you have a speaker properly connected to your PRODIGY AT ALL
TIMES. The higher plate voltages of KT-88 power tubes creates potential for expensive repair bills and premature tube failures with
no speaker load connected. Never play loud or long if you hear no sound from your amp and always check the speaker connection
first in any no sound situation.
NOTE: Remember – the Front Panel MUTE LED Indicator will illuminate as a safeguard against a no load condition when there is no
speaker jack connected to the SPEAKER OUTPUT! If you see this light on – CHECK YOUR SPEAKER OUTPUT and PUT A LOAD
(cabinet) ON ONE if necessary BEFORE TURNING STANDBY ON!
REAR PANEL CONTROLS
NORMAL
INPUT
FT. SW. D.I. OUT
MUTE
FUSE
SOLOVOICE 4 OHM8 OHM 4 OHM
SEND RETURN
POWER
ON
ON
STANDBY
D.I.
LEVEL SOLO
GAIN BASS MID TREBLE VOICE MASTER
D.I. LIFT
GROUND
FULL
HALF PWR
D.I. PRE
POST
CAUTION! WARNING!
h
5 A
SLO
BLO
120 V~
60 Hz
6 A
CAUTION:
Unplug power before
servicing fuse or chassis
SWITCHEXT
FX
LOOP
TUNER SLAVE
OUT
USE
W/ TWO
8CABS
SPKRS
BASSPRODIGY 4:88
VACUUM TUBE AMPLIFIER
TUBE GUIDE
3 x 12AX
7
4 x KT88
MUTE ON UNLESS SPKR IN
HAND BUILT IN
PETALUMA, CALIFORNIA U.S.A.
3
2 4
51
HOME OF TONE ®
®
Four:88
PATENTED
6,724,897
MUTE
SIL. REC.
NORMAL
INPUT
FT. SW. D.I. OUT
MUTE
FUSE
SOLOVOICE 4 OHM8 OHM 4 OHM
SEND RETURN
POWER
ON
ON
STANDBY
D.I.
LEVEL SOLO
GAIN BASS MID TREBLE VOICE MASTER
D.I. LIFT
GROUND
FULL
HALF PWR
D.I. PRE
POST
CAUTION! WARNING!
h
5 A
SLO
BLO
120 V~
60 Hz
6 A
CAUTION: Unplug power before
servicing fuse or chassis
SWITCHEXT
FX
LOOP
TUNER SLAVE
OUT
USE
W/ TWO
8CABS
SPKRS
BASSPRODIGY 4:88
VACUUM TUBE AMPLIFIER
TUBE GUIDE
3 x 12AX
7
4 x KT88
MUTE ON UNLESS SPKR IN
HAND BUILT IN
PETALUMA, CALIFORNIA U.S.A.
3
2 4
51
HOME OF TONE ®
®
Four:88
PATENTED
6,724,897
MUTE
SIL. REC.
PAGE 14
POWER CABLE
The IEC Removable AC cord that is supplied with the PRODIGY makes set-ups and tear-downs after the
gig a snap. Make sure the AC cord is firmly in its socket (receptacle) before powering up the amplifier. Also, make sure the AC wall
outlet you are connecting to is a reliable source of 120 volt AC power. Additional heavy-duty cords
are available from MESA should you ever need one... simply call us and we can send one directly to
you for a nominal charge (plus shipping).
NOTE: The PRODIGY draws a substantial amount of AC current due to its high power and robust
power transformer. Having multiple amplifiers connected to the same AC source (power strip or even
the same 15 amp Circuit), using long extension cords or playing at extreme volumes can increase the
likelihood of a circuit breaker tripping. If a breaker does trip, check to see what else may be on that
same circuit (refrigerator, fans in use, other amplifiers, etc.) and remove any “unconditioned” power strips, extension cords and ampli-
fiers and try to plug the PRODIGY directly into the wall Outlet – preferably one with only the PRODIGY or very little else on that circuit.
NOTE: NEVER ALTER THE 3-PRONG POWER CORD IN ANY WAY. Doing so will void your warranty and increase the risk of
electrical shock.
EXT (EXTERNAL) SWITCHING
These three ¼” phone jacks allow external, remote switching of the MUTE, VOICE and
SOLO Features for easy interfacing with a master (usually MIDI) switching system. Most MIDI controllers and switching interfaces uti-
lize simple tip-to-ground latching-type switch logic, which is industry standard and provided
for on virtually all brands and types of master switching systems on the market.
These jacks may also be used with single button tip-to-ground latching-type footswitches to
isolate any of the three features for individual control. This allows those who don’t need all
three features to be footswitchable to just use single or smaller boxes on their pedal board
for just the features they need to control. There are common individual Control Footswitches
offered by many manufacturers and Mesa also sells single button tip-to-ground footswitches
for these functions as well. You can purchase Mesa single button footswitches from your local Mesa Authorized dealer or direct from
the factory.
NOTE: Use unshielded cables for the EXT. SWITCHING functions.
NOTE: The EXT SWITCHING Features are controlled by standard tip-to-ground latching-type logic.
SEND / RETURN (EFFECTS LOOP)
NOTE: To avoid any loud and potentially dangerous pops and noises, set the amp to Standby before connecting or disconnecting any
effects to the Send or Return jacks. This will prevent any potential damage to speakers, console inputs
or ears.
These two ¼” jacks provide the interface for outboard effects devices and pedals and offers a way to use
these processors with the least amount of degradation to your Tone. The LOOP is a critical Tone path in
the PRODIGY and is best used for time-based effects (delay, chorus, flange, etc). Effects like overdrive,
distortion, wah, envelope or compression often offer substantial gain increase potential beyond UNITY
GAIN if used at extremes. Use of these types of effects in the LOOP can be a cause of issues ranging
from microphonics, squealing, breakup, unwanted distortion or reduced headroom, just to name a few, if UNITY GAIN is exceeded
via your effect(s) output into the FX RETURN. That said, many players successfully use compression (or for that matter, any of these
devices) in the LOOP to control the dynamics there instead of between the Bass and the INPUT, although usually very sparingly.
There is no right way to apply compression (or the other above mentioned effects), so where you place them in your signal path is
up to you. Typically though, the devices mentioned above sound better and are more widely usable when used on the “Front End”
and not in the LOOP.
The Effects Loop is a junction point between the end of the preamp and the driver stage to the power section and these jacks are
NORMAL
INPUT
FT. SW. D.I. OUT
MUTE
FUSE
SOLOVOICE
4 OHM8 OHM 4 OHM
SEND RETURN
POWER
ON
ON
STANDBY
D.I.
LEVEL SOLO
GAIN BASS MID TREBLE VOICE MASTER
D.I. LIFT
GROUND
FULL
HALF PWR
D.I. PRE
POST
CAUTION! WARNING!
h
5 A
SLO
BLO
120 V~
60 Hz
6 A
CAUTION: Unplug power before
servicing fuse or chassis
SWITCHEXT
FX
LOOP
TUNER SLAVE
OUT
USE
W/ TWO
8CABS
SPKRS
BASSPRODIGY 4:88
VACUUM TUBE AMPLIFIER
TUBE GUIDE
3 x 12AX
7
4 x KT88
MUTE ON UNLESS SPKR IN
HAND BUILT IN
PETALUMA, CALIFORNIA U.S.A.
3
2 4
51
HOME OF TONE ®
®
Four:88
PATENTED
6,724,897
MUTE
SIL. REC.
NORMAL
INPUT
FT. SW. D.I. OUT
MUTE
FUSE
SOLOVOICE 4 OHM8 OHM 4 OHM
SEND RETURN
POWER
ON
ON
STANDBY
D.I.
LEVEL SOLO
GAIN BASS MID TREBLE VOICE MASTER
D.I. LIFT
GROUND
FULL
HALF PWR
D.I. PRE
POST
CAUTION!
WARNING!
h
5 A
SLO
BLO
120 V~
60 Hz
6 A
CAUTION: Unplug power before
servicing fuse or chassis
SWITCHEXT
FX
LOOP
TUNER SLAVE
OUT
USE
W/ TWO
8CABS
SPKRS
BASSPRODIGY 4:88
VACUUM TUBE AMPLIFIER
TUBE GUIDE
3 x 12AX
7
4 x KT88
MUTE ON UNLESS SPKR IN
HAND BUILT IN
PETALUMA, CALIFORNIA U.S.A.
3
2 4
51
HOME OF TONE ®
®
Four:88
PATENTED
6,724,897
MUTE
SIL. REC.
NORMAL
INPUT
FT. SW. D.I. OUT
MUTE
FUSE
SOLOVOICE 4 OHM8 OHM 4 OHM
SEND RETURN
POWER
ON
ON
STANDBY
D.I.
LEVEL SOLO
GAIN BASS MID TREBLE VOICE MASTER
D.I. LIFT
GROUND
FULL
HALF PWR
D.I. PRE
POST
CAUTION! WARNING!
h
5 A
SLO
BLO
120 V~
60 Hz
6 A
CAUTION:
Unplug power before
servicing fuse or chassis
SWITCHEXT
FX
LOOP
TUNER SLAVE
OUT
USE
W/ TWO
8CABS
SPKRS
BASSPRODIGY 4:88
VACUUM TUBE AMPLIFIER
TUBE GUIDE
3 x 12AX
7
4 x KT88
MUTE ON UNLESS SPKR IN
HAND BUILT IN
PETALUMA, CALIFORNIA U.S.A.
3
2 4
51
HOME OF TONE ®
®
Four:88
PATENTED
6,724,897
MUTE
SIL. REC.
PAGE 15
wired in SERIES with the signal. This means that the entire signal goes through the LOOP. The SEND jack will feed the signal out of
the preamp without interrupting it. The RETURN jack will break the path and interrupt the signal.
When nothing is plugged in to the SEND and RETURN jacks the EFFECTS LOOP is effectively bypassed and the signal is unaffected
by any loop circuitry. Because these jacks are stereo-type jacks and have two elements in them, be sure you firmly seat the cables
all the way in to the base of the “Ring” (shaft part) on the ¼” phono plug to ensure a good connection.
NOTE: DON’T COMPROMISE YOUR TONE! The EFFECTS LOOP is wired in SERIES with the dry signal. Use the best quality
processors and pedal effects possible in the EFFECTS LOOP to ensure a good impedance match and minimal signal degradation.
Also use the best quality (low capacitance) cable possible of the shortest length to minimize the loss of high end or punch (TONE).
We suggest 1-3 feet of FX related cabling, at most, to preserve tonal integrity. Everything you put in your signal path affects your
sound – so use the best!
TUNER
This jack captures the sound of your Instrument right off the INPUT jack - before it enters the preamp - and sends it
directly to the TUNER output providing a feed for tuning devices. It is a buffered signal so longer cable lengths are not an issue.
You may mute the audio signal at the SPEAKER OUTPUTS by using the TUNER MUTE function on the
optional PRODIGY Footswitch or, by triggering the MUTE feature via the EXT. SWITCHING jacks with an
external master switching device or a single tip-to-ground on/off latching footswitch.
NOTE: Use shielded audio cable for connecting the TUNER Output to an external tuner.
SLAVE
This jack is the output for the SLAVE circuit. Its signal is derived from the SPEAKER OUTPUT and then padded down
substantially to optimize it for driving additional amplifiers such as an additional PRODIGY or other power amp for large venues
The primary application for the SLAVE is to add additional power while using just the one PRODIGY
preamp. It is common practice to use the SLAVE jack to feed the EFFECTS LOOP RETURN jack of
other PRODIGY or STRATEGY amplifiers and bypass their preamps. This scheme provides minimal
“tweaking” when you want to add power and also allows for a backup preamp should you ever need one
(tube failure, etc.).
While it is possible to feed Mixing Consoles with the SLAVE, it is not recommended as it is not voiced
accordingly and the signal level is on the hot side. Use the D.I. OUTPUT whenever possible for interfacing to Consoles as you will
achieve better results.
NOTE: IMPORTANT! Always begin using the SLAVE by setting the Front Panel MASTER to 7:30 (OFF) and increase it slowly as
this approach will help protect INPUT Stages, Speakers and most importantly... Ears!
NOTE: Once a signal is taken out of the SLAVE OUT it can not be inserted back into the amplifier anywhere as a feedback loop will
occur, producing a loud squeal akin to holding a microphone up to the PA Speaker.
NOTE: Use only shielded high quality (low capacitance) audio cable when taking a signal from the SLAVE OUT to other power
amplifiers or effects..
REAR PANEL CONTROLS (Continued)
WARNING!
TUNER SLAVE
OUT
HOME OF TONE
®
®
WARNING!
TUNER SLAVE
OUT
HOME OF TONE
®
®
  • Page 1 1
  • Page 2 2
  • Page 3 3
  • Page 4 4
  • Page 5 5
  • Page 6 6
  • Page 7 7
  • Page 8 8
  • Page 9 9
  • Page 10 10
  • Page 11 11
  • Page 12 12
  • Page 13 13
  • Page 14 14
  • Page 15 15
  • Page 16 16
  • Page 17 17
  • Page 18 18
  • Page 19 19
  • Page 20 20
  • Page 21 21
  • Page 22 22
  • Page 23 23
  • Page 24 24
  • Page 25 25
  • Page 26 26
  • Page 27 27
  • Page 28 28
  • Page 29 29
  • Page 30 30
  • Page 31 31
  • Page 32 32
  • Page 33 33
  • Page 34 34
  • Page 35 35
  • Page 36 36
  • Page 37 37
  • Page 38 38
  • Page 39 39
  • Page 40 40

Mesa/Boogie Three Channel Dual & Triple Rectifier Solo Heads Owner's manual

Category
Supplementary music equipment
Type
Owner's manual
This manual is also suitable for

Ask a question and I''ll find the answer in the document

Finding information in a document is now easier with AI