BURY Smart User manual

Category
Motor vehicle electronics
Type
User manual
Index
Introductory information 2
1. General 2
2. Security guidelines 2
Installation of the hands-free car kit 4
3. Scope of supply 4
4. Positioning and mounting 6
5. Connections on the electronics box 9
6. Installation of the loudspeaker switch box AC 5120 13
Operating guidelines 17
7. Using the hands-free car kit for the first time 17
8. Handling possibilities 17
9. Voice control 17
10. Handling via Touch screen 19
11. Establishing a
Bluetooth
®
connection 19
12. Menu navigation 21
13. Accepting, making, ending calls 35
Further Information 37
14. Service 37
BURY Smart
2
Introductory information
1. General
Dear customer,
Congratulation on purchasing a BURY hands-free car kit. You have cho-
sen a high quality product that is extremely easy to use. All aspects of
BURY production through to sales and service are subject to strict qua-
lity management according to DIN EN ISO 9001. All BURY hands-free
car kits meet CE and e1 security standards. Furthermore, we provide a
two-year warranty on all components.
Please read the operating manual carefully so that you can fully enjoy
your BURY hands-free car kit. If you have any further questions concer-
ning installation or operation of your car kit, please contact your dealer.
He will be happy to give you reliable advice. You can also contact our
hotline. Our phone and fax numbers are listed in the chapter Service at
the end of the operating instructions.
Have a good trip!
2. Security guidelines
Installation – who and where
The installation of this system can be carried out by yourself but please
observe the installation requirements of the automotive manufacturer
(VAS 1978). During the installation, park the car at a place where the
road traffic is not impaired. We recommend to let a specialised work-
shop perform the installation.
Power supply
This system has been designed for the use in vehicles with an on-board
supply system of 12 volts (passenger car). If you intend to install the
device in a vehicle with an on-board supply system of 24 volts (lorry),
please use a voltage converter. If you have queries regarding this sub-
ject, please contact our hotline.
3
Position, volume
Install the components of the device in the vehicle so that your field of
vision is not impaired and the components are not mounted in the im-
pact zone of the passenger compartment or in the airbag inflation
zones. The removal of coverings (with and without airbags) or compo-
nents of the dashboard requires in some cases special tools and
special knowledge.
Intended use
We shall not be liable for damages or malfunctions due to improper use
of the hands-free system. Therefore, do not expose the device to moi-
sture, extreme temperatures or shocks and carefully follow the proce-
dure described in the installation and operating guidelines.
Use while driving
Operate the system only when the situation allows it and when you do
not endanger, harm, constrain, or annoy other road users. The volume
of the device has to be set in a way that exterior noise is still audible.
Faults
Do not commission the device if you detect or assume a defect. In this
case, contact a BURY specialised dealer or our hotline. Improper repair
efforts can be dangerous for you. Therefore, only skilled personnel may
perform inspections.
Important:
The driver is ultimately responsible for the safe operation X
and control of their vehicle at all times. You should never
use a hand held phone, including sending or reading text or
picture messages, while driving.
Research indicates that there is a risk to safety when the X
driver of a motor vehicle is distracted and using a mobile
phone while driving can be a distriction.
The manufacturer strongly recommends that you use a X
hands-free solution when driving.
4
Installation of the hands-free car kit
3. Scope of supply
150 cm
9
8
5
The hands-free car kit (HFCK) is supplied with different combinations of
components, depending on the sales regions (countries). The operating
manual refers to all versions.
Description of the components:
1) Electronics box
2) Monitor and installation pad
3) Fixing screws for electronics box, rider,
adhesive pad, cleaning cloth
4) Microphone
5) Installation and Operating manual on CD, printed Quick user guide
6) Power supply cable with fuses
7) External loudspeaker switch box AC 5120
8) External loudspeaker
9) Loudspeaker connection cable
Version 1:
- Electronics box without integrated loudspeaker switch box
- With external loudspeaker switch box AC 5120
Version 2:
- Electronics box without integrated loudspeaker switch box
- with power supply cable
- with external loudspeaker
Version 3:
- Electronics box with integrated loudspeaker switch box
- with power supply cable
- with loudspeaker connection cable
Hinweis:
If certain components are added or omitted you will recei- X
ve the corresponding information on a separate enclosure.
6
Installation of the hands-free car kit
Step 1:
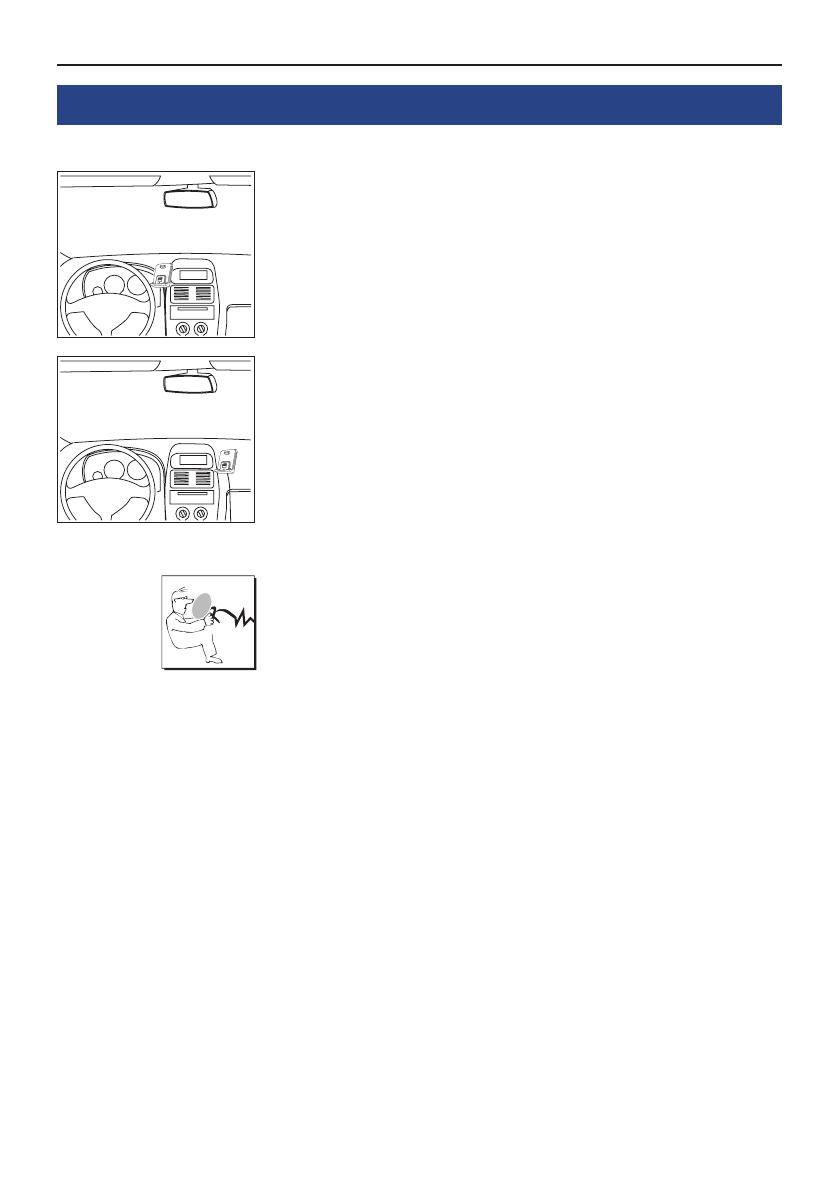
First of all, please choose the most convenient position for the attached
monitor on the holder and the installation pad in your vehicle by che-
cking different positions in the vehicle.
If you would like to use the device during your journey, positioning it in
the front area on the driver’s side is advisable. Sit in the vehicle and
check whether you can reach the device without difficulty.
After having found a suitable position for the monitor in the vehicle you
can now mount / attach the installation pad / the holder with or without
the installation pad accordingly. Please use a cleaning cloth for degre-
asing the surfaces to which you want to attach the corresponding
adhesive surface of either the holder or the installation pad.
The end of the cable with the small Molex connector on the holder is
ideally suited for placing through small openings in the dashboard area.
This facilitates a practically invisible installation of the cable. Take the
length of the cable into account and make sure that it is of sufficient
length to reach the intended location of the electronics box.
Important:
When positioning the monitor please take care that the X
monitor does not impair the view onto the road, that it will
not be installed in the impact zone of the passenger com-
partment (amongst others in the airbag inflation zones) and
that the cable may be laid without any problems.
The installation pad can be affixed just once, removing X
could damage the adhesive area. In case of high variations
in temperatures - depending on the structure and the fea-
tures - decolourisations of the surfaces can occur during the
subsequent utilization.
Please avoid direct sunlight on the monitor or high inter- X
nal temperatures, which can be rapidly reached in parked
vehicles. In such cases, remove the monitor of the hands-
free car kit from the cradle and put it in the car glove pocket
or glove box for instance.
4. Positioning and mounting
7
Example of installation 1:
Example of installation 2:
8
Installation of the hands-free car kit
Step 2:
Depending on the vehicle type and its equipment (e.g. airbags), it is
reasonable to install the microphone either at the A-pillar, at the sun
shield or at the roof interior. For details about the equipment features
please refer to the vehicle documents.
Step 3:
Remove or loosen up cladding and covers to be able to install all of the
cables in the vehicle as comfortably as possible. Please lay the cables
in a way that they do not lie/hang unsecured in the vehicle and that
they may not influence the conducting of the vehicle. When laying a
cable, please take care that it is not under traction stress but that it has
some tolerance. Avoid crushing the cable as damages of the insulation
can be caused by friction/rubbing.
Step 4:
Install the electronics box at a convenient place in the vehicle. This can
e.g. be behind the radio, in the glove box, or in the centre console.
Please mind that you can access the connections of the box without
difficulty. It is possible that you will have to connect the components
before attaching the electronics box, if it isn’t possible to do this after-
wards due to a lack of space. A description of the connections is provi-
ded in the next section.
Before connecting the components to the electronics box you should
branch off the battery for safety reasons. In doing so, take into account
that there might be a radio coding (confer radio manual).
Important:
Please install the electronics box behind a cover or so- X
mewhere you can only reach by opening or unfastening a
protective cover / a cover. The terminal box must not hang
loosely in the vehicle.
9
5. Connections on the electronics box
The additional components of the HFCK are connected to the electronics box. The following connec-
tions are provided:
Connection options:
1 Power supply
2 basePlate System 9 adapted for BURY Smart
3 Internal loudspeaker switch box
(with or without an internal switch box, depending on version)
4 External loudspeaker
5 Mikrophone
6 Aux Out
7 Monitor
1 - Power supply
Version 1:
Refer to the separate chapter: Installation of the audio switch box AC 5120
Note:
If the DIN ISO plug of the AC 5120 does not fit in your vehicle, numerous adapters are X
available from dealers.
Version 2 and 3:
The power supply of the hands-free car kit is established via a 4-core cable (no. 6). Connect the black
(clamp 31 minus), the red (clamp 30 steady plus) and the blue cable (clamp 15 – ignition plus) to
the power supply of your radio (where required via the cigarette lighter or the fuse box). After connec-
tion to the counterpart, the yellow cable provides for radio muting during a phone conversation. Please
connect the white Molex connector with connection 1.
10
Installation of the hands-free car kit
Attention:
If you also connect the blue cable to clamp 30 (steady X
positive), the HFCK will be permanently supplied with
power. If the vehicle is not running for a longer period, this
could lead to a discharge of the car battery.
If you deviate from the specified connection descrip- X
tions it may be the case that certain functions on the HFCK
(e.g. the on-call duty) will not function correctly.
Installation instructions for the fuses
Please cut through the red, the black and the blue cable by means of a wire cutter or scissors. Now
insert the two endings of the red cable resulting from the cut into one of the binders, then close it. If
you hear two clicking noises, the clamp snapped in properly. Now insert one of the fuses and then
repeat the procedure with the other cables.
2 - Connection for System 9 basePlate compatible with the BURY Smart
This is where you connect the basePlate for the System 9. This basePlate is specially adapted for the
electronics box of the HFCK. The basePlate is supplied with power via the electronics box. You can
charge your mobile phone here and also leave it here for safekeeping.
11
3 - Internal loudspeaker switch box
The cable provided serves the purpose of transferring the voice output
to one of the loudspeakers in the car. In the best case scenario, this
speaker should be on the passenger side of the vehicle in order to pro-
vide sufficient distance from the microphone and to prevent possible
echoes from occurring. The jack plug (no. 4) remains unused during the
use of the internal loudspeaker switch box.
RR
FL
RL
FR
RR
FL
RL
FR
12
Installation of the hands-free car kit
4 - Voice output of the hands-free car kit
Version 1:
Refer to separate chapter: Installation of the audio switch box
AC 5120
Version 2:
Connect the external loudspeaker here if you do not want to or are not
able to make use of the vehicle’s own sound system. When installing
the loudspeaker, make sure it is positioned the correct distance from
the microphone.
Version 3:
With version 3, this connection remains unused. Please refer to the
description for connection 3.
5 - Microphone input
This is where you plug in the microphone jack. After connection 3 has
already been occupied use the rider. This ensures that neither of the
jacks is able to loosen as a result of vibrations.
6 - AUX-Out connection
Stereo music is output at connection 2. Here you can connect the AUX-
In input of your radio (if existent) via adapters available at local retai-
lers. For the connection to the hands-free car kit, the adapter must
have a 3.5 mm stereo jack. Depending on the car radio, the other end
must be selected otherwise. If your radio does not have an AUX-In, you
can use the car CD/MP3 adapter from the BURY accessories programme
to enable the reproduction of music via your radio.
7 - Monitor jack
Please plug the 9 pole plug of the monitor connection cable into this
jack. Tighten at least one of the two fixing screws hand-tight so that
this plug cannot become unplugged as a result of vibrations.
13
6. Installation of the loudspeaker switch box AC 5120
With the AC 5120 speaker switch box, you get the possibility of being able to mute the feedback of your
car radio / CD player etc. and to transfer the voice output of your conversation partner during a tele-
phone call to your vehicle’s speakers. This means that the installation of additional speakers isn‘t re-
quired. If your radio has a mute function, then the vehicle speakers are turned onto mute using the
radio. If your car radio doesn‘t have this function, then the signals will be suppressed by the speaker
switch box. You can use the AC 5120 through the connections that your BURY hands free car kit offers,
which guarantee voltage supply via molex plugs and also have a speaker output.
If you want to make a telephone call in the hands-free mode, your car radio will be automatically swit-
ched on to mute. The Audio switch box now uses one or two loudspeakers in your car for the telephone
conversation, even if your radio is switched off. This function will be automatically activated after the
installation of the unit, there are no subsequent manual settings required.
Some mobile phones do not support a radio mute function. Please read your telephone user manual
for more details. You can find out more detailed information at your specialist retailer, in the internet
under www.bury.com, or over our telephone hotline.
After checking that all the cable lengths are sufficient, decide where you are able to attach the Audio
switch box. Now secure the Audio switch box so that it isn’t able to flap about and/or rattle against
other parts of your vehicle.
Connect the white power out cable connector (1) of your Audio switch box to the power supply socket
of your hands-free kit. Now connect the audio switch box plug (4) to the hands-free car kit. (The other,
smaller box is used by the plug for the microphone.)
1
4
14
Installation of the hands-free car kit
Now disconnect the (a) and/or the (b) loudspeaker connector from the speaker socket on the
radio at the back. Connect this connector with the suitable socket (3) on the AC 5120. Now con-
nect the plug (4) with the radio.
Depending on the switcher position (5), the voice of your conversation partner will be fed back
through either the front right speaker, the front left speaker, or through both of the front lou-
dspeakers. The ‘OFF position is to be selected if you connect the switch box to the radio using
the ‘Phone-IN’ cable (6).
The two ‘Phone-In’ cables are marked accordingly and must be plugged into the appropriate
connections on the radio (blue, green or yellow). In this regard, please refer to the instructions
concerning the connection configuration of your car radio in your car radio handbook. In lots of
radios, the volume level (feedback of your conversation partner) can be controlled via the phone
input and the selection of the loudspeaker.
15
Different connections of the ISO plug on the radio
The layout of the pins on the ISO plug used in a car depends on the type of car. Before using the switch
box, you should make sure that the connections are correct in order to prevent possible damage to the
device.
Configuration I
If the assignment of pin 7 of the ISO plug is connected to the DC Power Supply, and pin 4 is connected
to the ignition, you should check if the connection looks like the connection presented on the drawing
below.
Configuration II
If the assignment of pin 7 of the ISO plug is connected to the ignition, and pin 4 is connected to the
DC power supply, the connection of the cables should look like the connection presented on the draw-
ing below.
Switchbox Vehicle
red 7 (red)
blue 4 (blue)
red 7 (red)
blue 4 (blue)
Switchbox
red 7 (red)
blue 4 (blue)
Switchbox
Vehicle
Vehicle
16
Installation of the hands-free car kit
In the operating manual of the radio device, you can find the pin assignment for the “mute” signal. This
signal can occur on one of three cables marked with “mute1, “mute2”, or “mute3”.
Connect the yellow mute” cable to the switch box using the correct cable from the car radio: “mute
1, “mute 2” or “mute3”.
Attention:
The positive wires and ignition wires are protected in the casing of the switch box with X
3A fuses. For this reason a separate fuse, as shown in the next chapter, is not necessary.
mute 1
radio device Switch box
mute 2
mute 3
mute (yellow)
17
Operating guidelines
7. Using the hands-free car kit for the first time
After power supply of the hands free car kit (HFCK) is sucessful con-
nected, the HFCK is activated when you have started the vehicle.
After this, you have to select the menu language if several are available
for you to select. Regional differences may occur in this context. If the
HFCK is only equipped with one language then this should load auto-
matically.
You can select other languages using the arrows on the left or the right.
Once you have found the menu language that you want, you select it
by highlighting the text in the touchscreen.
You can change the menu language again by selecting the More touch-
screen field, then selecting the Settings in the Head menu, and then
changing the Language in the Device menu item.
8. Handling possibilities
The system can be operated in two ways:
1. Operation using voice control
2. Handling via the touch screen
9. Voice control
The menu items of the HFCK can be selected using voice commands
once this function has been activated. There are exceptions, however,
when you still have to use the touchscreen. During an active telephone
call, for instance, you can’t use voice commands. You have to select any
additional functions using the touchscreen.
To start the voice control feature, briefly press the head symbol down
on the main menu. If the Magic Word function is activated, you can
also start the voice control by stating the ACTIVATE VOICE DIAL
Startscreen without paired
telephone
Touch screen
Voice dial
commands
The „VOICE COMMANDS are high-
lighted in the further explanatory notes.
18
Operating guidelines
command. In certain situations, however, with an incoming call and
activated voice recognition for instance, the HFCK will start the voice
control system automatically. The HFCK signals that it is ready to recei-
ve a command by emitting an acoustic signal.
If you aren’t sure of the right command to use, then simply state
„HELP / WHAT CAN I SAY. The HFCK will then read out the com-
mands available for the particular menu in which you currently find
yourself. If the HFCK fails to understand one of your commands, or the
particular option isn’t available, the help function will start automatical-
ly and list the possible commands.
Please remember that certain commands are only available if a tele-
phone is connected with the HFCK. When entering voice commands,
please ensure you speak naturally, clearly and at a regular speed.
Note:
With the use of the voice control it is recommended to X
turn down the volume of components which are indepen-
dent of the audio system (e.g. a navigation system) or to
switch off the broadcast of traffic jam warnings in order to
avoid unintended voice entries.
In addition to these commands, the HFCK recognises the numbers from
zero to nine. Numbers which are larger than nine must be spoken indi-
vidually (e.g. 10 = one, zero). To search in the phone book, the HFCK
recognises the letters A“ to Z“ as well as the NATO alphabet. For the
entry of telephone numbers abroad, the command „PLUS is also
available.
When using voice control, in all menus these four commands are
always available:
Cancel
Help
Back
Head menu
breaks off the
current action
back to head menu
one step back
names all commands which are
available
19
10. Handling via Touch screen
The display is divided up into several zones. In almost all of the menus you can find symbols on the
left and the right with which you are able to initialise functions directly or browse through in the menu.
In the centre of the display you nearly always find two lines of text with menu items which you can also
select by pressing them briefly. To scroll up or down one menu level or to go back, please press the
upper entry for two seconds, or the blank line above.
Here are two examples:
Note:
Please be sure to clean the display as necessary using a damp lint free cloth. Please do X
not use any detergent.
11. Establishing a
Bluetooth
®
connection
If you wish to establish a
Bluetooth
®
connection between your mobile and the HFCK for the first time,
you have to activate the
Bluetooth
®
function of your mobile phone and search for
Bluetooth
®
devices.
In this case, search for a device labelled „CC 9060“. If several devices were identified, please select
the HFCK and enter the PIN number 1234. The
Bluetooth
®
connection (pairing) will then be establis-
hed between your mobile phone and the HFCK. It is possible that you will also have to click on ‘connect
or ‘allow data transfer’ on your mobile phone if you want to be able to make a connection.
With a connection which has successfully been made, the name of the coupled mobile telephone and
of the provider (stays visible) will be shown and the data from the telephone book (SIM card) and the
address book (storage of the telephone) are transmitted to the HFCK. Depending on the amount of
stored data, this can take a few seconds. If the synchronisation of the phone book is interrupted, e.g.
though an incoming call, it is possible that all entries will not be transmitted. If this happens, the phone
book should once again be manually synchronised.
Activate voice control Start / stop automatic connection
Select additional options from the main menu
Display of the product name
Scroll up Scroll down
Open the text messages menu
Select the music menu
20
Operating guidelines
Note:
The telephone book on your mobile phone is generally synchronised by the hands-free X
car kit at regular intervals. For the duration of this short moment, the voice control will
not be available to you and you will receive a corresponding message.
If it is not possible to establish a connection, please check and update the software release (firmware)
of your mobile phone or of the HFCK. You will find an overview dealing with this subject on the Internet
at www.bury.com.
Note:
In the internet you can find an overview with a large number of mobile telephones X
which have been tested with this hands-free car kit. Please note, however, the use of
firmware which deviates from the list and is installed on a listed mobile telephone can
lead to the fact that certain displays and functions are no longer possible or only possible
to a limited extent.
In addition it is possible that you must delete all devices connected to your mobile phone first in order
to enable a correct identification of the HFCK and the establishment of a connection. If you have que-
ries regarding the menu navigation, functions and operation of your mobile phone, please refer to the
operating guidelines of your mobile phone. Depending on the manufacturer and type, this can differ
considerably between phones.
Note:
If the rechargeable battery of the mobile phone is low, it is sometimes not possible to X
establish a
Bluetooth
®
connection.
The HFCK has a memory for the storage of the identification of up to 10 mobile phones. In case an
eleventh mobile phone is connected, the oldest entry in the HFCK memory will be cancelled.
If you wish to cancel a Bluetooth connection, you can either disconnect it conveniently at the HFCK or
at your mobile phone. In addition, the connection is disconnected, if you move too far away from the
vehicle while taking your mobile phone with you and thus leave the reception radius of the HFCK.
Please note that the capacity of your mobile phone‘s storage battery can quickly decrease when the
Bluetooth function is active. If you do not want to use the Bluetooth function anymore, e.g. if you
leave the vehicle for a longer period, it is recommended to deactivate this function.
Start screen subsequent to successful connection
  • Page 1 1
  • Page 2 2
  • Page 3 3
  • Page 4 4
  • Page 5 5
  • Page 6 6
  • Page 7 7
  • Page 8 8
  • Page 9 9
  • Page 10 10
  • Page 11 11
  • Page 12 12
  • Page 13 13
  • Page 14 14
  • Page 15 15
  • Page 16 16
  • Page 17 17
  • Page 18 18
  • Page 19 19
  • Page 20 20
  • Page 21 21
  • Page 22 22
  • Page 23 23
  • Page 24 24
  • Page 25 25
  • Page 26 26
  • Page 27 27
  • Page 28 28
  • Page 29 29
  • Page 30 30
  • Page 31 31
  • Page 32 32
  • Page 33 33
  • Page 34 34
  • Page 35 35
  • Page 36 36
  • Page 37 37
  • Page 38 38

BURY Smart User manual

Category
Motor vehicle electronics
Type
User manual

Ask a question and I''ll find the answer in the document

Finding information in a document is now easier with AI