Page is loading ...

User`s Guide
Alphanumeric Pager
(POCSAG Protocol)
128 Addresses
(32 RICs with 4 Sub-addresses each)
Tone Only
Numeric
Alphanumeric

Display Annunciators
& Power On
$ Auto On/ Off Mode Enabled
% Power On and Auto On/ Off Mode Enabled
/ Audible Alert Mode Enabled
Message Status Symbols
M Message In Memory Indicator
L Cursor On Message
A Locked Message
P Cursor On Locked Message
O Maildrop Indicator
N Cursor On Maildrop Indicator
2 Memory Full Indicator
Function Menu Symbols
B Set On/ Off Function
C Set Alert Melody
W Set Time
X Set Alarm
D Set Alarm Mode
) Set User
3 Turn Magnifier Glass Function On
4 Turn Magnifier Glass Function Off
Y Turn Pager Off
Z Escape to Main Screen
- Lock Message
I Unlock Message
J Delete Message
K Delete All Messages
Other Symbols
B Auto On/ Off Mode Enabled
S Auto On/ Off Mode Not Enabled
5 24 Hour Time Indicator
. AM Time Indicator
, PM Time Indicator
X Alarm Enabled
8 Alarm Not Enabled
/ Audible Alert Mode Enabled
0 Silent Alert Mode Enabled
+ Increment Value
< Press Left Arrow Button
> Press Right Arrow Button
R Message Continuation Indicator
9 Low Battery Alert Level 1
= Low Battery Alert Level 2
6 Pager Inside Charger Indicator
pc Pager Inside Programmer Indicator
1 Out Of Range Indicator

Important Notice
This alphanumeric pager is used by members of e.g. fire brigades,
rescue or maintenance services. The intended use of this product is
to receive important messages and to give audible or non-audible
(vibration) alert. Any other use does not comply with the intended
use. Misuse may constitute risks to persons or the product.
• Do not disassemble your pager (loss of warrenty).
•
Keep batteries away from small children, batteries might be
swallowed.
•
Do not dispose of batteries in household trash. Use a proper
dispose of according to your area.
• Do not dispose of batteries in fire. They might explode.
• The pager must not be subject to the influence of strong
magnetic fields, e.g. loudspeakers, TV sets, monitors etc.
• Keep the pager away from direct sunlight.
• Your pager is not suitable to be used within explosive
areas.
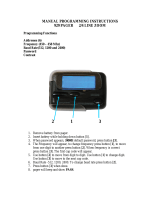
Turning Your Pager On
Press the Read Button ( (for 2 seconds). Your pager alerts.
Afterwards the On & indicator is shown in the upper left corner of
the display.
The Function Menu
The function menu gives you access to the many features of your
pager through a series of symbols and prompts. To get to the func-
tion menu please press the Function Button #. In the lower display
line all available functions are displayed through symbols.
A flashing symbol indicates the present position of the cursor. As
you move the cursor right " or left ! across the symbols, a corre-
sponding prompt appears in the upper display line. To activate
your function selection, press the Function Button #.
Note: Any function may have been disabled during programming
so that it is not available on your LX2 plus pager.
Turning Your Pager Off
In case you do not want to receive messages, this is how to turn the
pager off:
1. Press the Function Button # to display the function menu.
2. Move the cursor until the Turn Off symbol Y flashes. Use
the ! and " buttons.
3. Press the Function Button # to select the Turn Off function
and press it again to turn your pager off.

Out Of Range Indication
Whenever you are too far away from your paging system`s trans-
mitter to reliably receive messages, your pager displays the Out Of
Range symbol 1 and a Out Of Range alert is started. If you do not
recognize the alert (you do not press any button) there will be a
repetition in regular intervals and the Out Of Range symbol 1
flashes.
Setting The Clock
Whenever you turn your LX2 plus on it shows you time and date.
Setting The Clock is done this way:
1. Press the Function Button # to display the function menu.
2. Move the cursor until the Set Time symbol W flashes using
the ! and " buttons.
3. Press the Function Button #
to display the Set Time screen.
4. Now set the time exactely. The cursor flashes in the hour
position. Change the hour value using the ! button. Press
"
to move over to the next field (minute) and set the right
value (! button). Repeat the procedure for each time field.
To escape from any field without making changes press
(
.
5. Press the Function Button # to iniate your changes.
Setting The Alert Pattern
You can choose the one (out of 16) alert pattern that you like most
and that shall be audible when a message is received.
1. Press the Function Button # to display the function menu.
2. Press ! or " until the Set Alert C symbol flashes.
3. Press # to display the Set Alert screen.
4. Using the buttons ! and " choose the alert pattern you like
most. The number of the chosen pattern flashes („1..16“
selectable pattern, „C“ pattern fixed by programming), the
selected alert plays through the internal speaker. To escape
without making changes, press ( .
5. Confirm your selection by pressing the # button. The
selected alert plays through the internal speaker.

Setting The Alert Mode
You can choose one out of four different Alert Modes:
D audible plus vibration
D audible (without vibration)
D gentle (low sound level)
Gsilent (vibration only)
1. Press # to display the function menu.
2. Move the cursor ( ! and " buttons) until the speaker
symbol D flashes.
3. Press # again to display the Set Alert Mode screen.
4. Now select the wanted Alert Mode ( ! and " buttons) The
symbol for audible D or silent G Alert Mode flashes, your
pager emits a short alert according to the chosen alert mo-
de. To escape without making changes, press ( .
5. Confirm your selection by pressing the # button. Your
pager emits a short alert according to the chosen Alert
Mode.
Receiving And Reading Messages
As soon as your LX2 plus receives a message, it alerts and the
Message In Memory indicator is displayed. It indicates an in-
coming message.
1. Press any button to stop the alert.
2. If you do not recognize the alert (you do not press any
button) there will be a repetition in regular intervals.
3. To read the message press the Read Button (.
4. The flashing arrow R at the bottom right corner of the
screen indicates that the received message continues
beyond the first two lines of the display. To be able to con-
tinue reading, press the Read Button ( again. Each (
press advances the message to the next two lines. Press and
hold ( to rapidly scroll through your message.
5. If more than one message exists, press ! or " to select the
message you want to read. The reversed arrow cursor L in-
dicates the location of your message in memory.
6. The Message In Memory Indicator of a message, that has
not yet been read, flashes until the message is read com-
pletely one time.
7. A flashing On & symbol indicates a message has been
received, but has not yet been read.

Magnifier Glass Function
Received messages may also be displayed in flowing large letters
for better readability.
1. Press the Function Button # to display the function menu.
2. Move the cursor with the ! and " buttons, until the Magni-
fier Glass symbol 3 flashes.
3. Press # again to turn on the Magnifier Glass Function.
4. Repeat the three steps to turn off the Magnifier Glass
Function 4.
Backlighting
To view your display in low light conditions, turn on your pager`s
backlight by pressing (2 seconds) the Function Button #
. Backlight
turns off automatically or by pressing # for 2 seconds, again.
Setting The User Number
The LX2 plus knows up to eight different User Numbers. There
are different Pocsag protocol addresses associated with the User
Numbers (adaption to different users or working fields).
1. Press the Function Button # to display the function menu.
2. Move the cursor with the ! and " buttons, until the User
symbol ) flashes.
3. Press the Function Button # to display the User Number
screen.
4. Select the wanted User Number using the ! and " buttons.
To escape without making changes, press ( .
5. Confirm the chosen User Number by pressing #.
Locking And Unlocking Messages
Up to 10 messages can be „locked“ in memory, so that they can be
read again at any time. Locked messages are not being replaced
when your pager`s memory is full and even not being deleted if the
Delete All function K is chosen.
1. Display the message to be locked (see „Receiving and
Reading Messages“).
2. Press the Function Button # to display the function menu.
3. Move the cursor (! and " buttons) until the Lock Message
symbol A flashes.
4. Press # again to lock the message. The padlock A symbol
appears, indicating the message has been locked.
Repeat steps 1-4, to unlock (I) the message again.

Deleting Messages From Memory
Often it is sufficient to read a new message only one time. If you
do not want to store a message, you can delete it while you are
viewing it, or through the function menu. Only messages that have
been read and being unlocked can be deleted.
1. Display the message to be deleted (see „Receiving and
reading messages“).
2. Press the Function Button # to display the function menu.
3. Move the cursor (using ! and ") until the Delete Message
symbol J flashes.
4. Press # again to select the Delete Messages function and
press # once more to delete the message from memory.
Delete All Messages
You can Delete All Messages from memory at one time. But only
messages that have been read and that are unlocked, can be dele-
ted.
1. Press the Function Button # to display the function menu.
2. Move the cursor (using ! and ") until the Delete All Mes-
sages symbol K flashes.
3. Press the Function Button # twice, to select the function
and Delete All Messages.
Setting The Alarm
Your LX2 plus is equipped with an Alarm feature. This is how to
set the alarm:
1. Press the Function Button # to display the function menu.
2. Move the cursor (using ! and ") until the Set Alarm
symbol X flashes.
3. Press the Function Button # to display the Set Alarm
screen.
4. Now Set The Alarm time exactely. The active position
flashes. Change the value of the active position using the !
button. Press " to move over to the next position.
5. The left-most position defines the alarm status: alarm
enable (X) or alarm disable (8).To escape from any field
without making changes press ( .
6. Press # to confirm your alarm settings.
If an alarm has been Set The Alarm Indicator X is displayed right
hand to the date. At the selected time, your pager vibrates or emits
an audible alert. If you do not recognize the alert (you do not press
any button) there will be a repetition in regular intervals and the
alarm symbol X flashes.

Setting The Auto On/Off Mode
You decide how long you want to be reached daily. You simply
define switching times for automatically switching On and Off
your pager.
1. Press the Function Button # to display the function menu.
2. Move the cursor (using ! and ") until the symbol B flas-
hes.
3. Press the Function Button to display the Auto On/Off
screen.
4. Set the time for On (left hand) and Off (right hand). The
active position flashes. Pressing ! increments the flashing
digits. Press " to move the cursor to the next position.
5. At the left-most position you turn the Auto On/Off Mode
On (B) or Off (S).To escape from the Auto On/Off screen
without making changes, press ( .
6. Confirm your selection by pressing the Function
Button #.
The Auto On/Off symbol $ is displayed at the upper left side of
the screen if the Auto On/Off Mode was selected.
Programming The Pager
Your LX2 plus can be adapted individually to your needs by pro-
gramming.
A lot of pager settings (e.g. Pocsag protocol addresses, alert pat-
tern, alert duration, alert reminder, out of range alert, user numbers
etc.) can be programmed. All prompts can be changed and pro-
grammed to your liking. When delivered, the pager is programmed
according to german TR BOS needs.
Programming is done via PC and Programming Kit (Software and
Adapter).
Maintenance And Repair
Check the battery or accumulator for corrosion or salt exit, regu-
larly. If necessary, replace the battery.
Clean the pager as required using a moist cloth. Under no circum-
stances must strong solutions as methylated spirits, petrol or mail
varnish remover be used. Do not use running water for cleaning!
If your LX2 plus ever requires service,your dealer or Motorola`s
National Service Organization offers repair and maintenance
facilities.
Accessory
In order to carry your pager in a comfortable way, the product is
delivered together with a holster, having a robust plastic clip and
preventing the display from damage. The following accessories are
available:
• carrying chain
• leather / nylon case
• Charging Unit
• Rod Antenna
• Alert Siren
• Programming Kit (Adapter and PC Software)

Low Battery Alert
When the battery voltage drops, the symbol 9 (warning level 1)
is displayed instead of the date. Whenever the symbol = (war-
ning level 2) is displayed, the battery must been charged or repla-
ced very soon.
When the battery voltage reaches one of the warning levels the
pager emits a low battery alert. If you do not recognize the alert
(you do not press any button) there will be a repetition in regular
intervals and the symbol 9 or = flashes.
Battery Replacement
The battery door is hinged and does not need to be removed. To
install or replace the battery, place the pager face down in the palm
of your hand. Then:
1. Unlock the battery door by sliding the door latch up with
your thumb.
2. Slide the battery door to your right.
3. Lift the battery door toward you and install or replace the
battery without removing the battery door.
Important: Take care to ensure correct polarity of the battery (see
polarity markings next to the battery door). All stored messages
remain stored during a battery change.
Do not use carbon zinc batteries.
Caution: Never operate your pager in the charging unit if it is
fitted with a non-chargeable battery – Risk of explosion.

Charging The Accumulator (Chargeable Battery)
If your pager`s power is provided by an accumulator, a regular
charging in the LX2 plus Charging Unit is necessary.
For charging, open the hinged frame of the charging unit and put
the pager into the charger. Afterwards close the hinged frame
again. Now the symbol 6 is displayed. In case, after a while, it
does not, please take off the pager and place it again.
If the pager`s accumulator is totaly discharged it may happen that
it is not turned on automatically, when being inside the charger. In
that case leave your LX2 plus inside the charger for some minutes.
Afterwards take it off and place it again in order to start the super-
viced charging procedure.
The accumulator is charged in a superviced way inside the LX2
plus Charging Unit, i.e. it is charged as long as necessary, depen-
ding on the charging state. After the superviced charging is done,
the charger moves over to a trickle charge mode. This procedure is
to achieve the longest possible accumulator life. The accumulator
should be charged no earlier than the Low Battery Alert is indica-
ted (audible or optical). So any overcharging is avoided.
Do not leave your LX2 plus inside the charger, permanently.
Important: To make possible the superviced charging procedure
and reliable Low Battery Alert function , it is necessary to set the
nominal capacity of the battery or accumulator during program-
ming of the pager (refer to statements of the manufacturer, i.e.
300mAh).
Note: If you want to use a new accumulator, it has to be charged
one time, first. Otherwise the charging state is unknown and the
charging procedure (described above) cannot work. Therefore, the
accumulator should not be taken out of the pager
unnecessarily. Factory-new accumulators reach there maximum
possible capacity after several cycles of charge and discharge,
only.
Being inside the charging unit, the pager is set to audible alert
mode automatically (vibrator turned off).

Technical Data
Frequency range: 137,975 .. 174MHz
Channel separation: 20 / 25kHz
Number of channels: 1
Radio protocol: POCSAG
programmable Baud-rate
(512, 1200, 2400 Baud)
Sensitivity (on man model/ typical):
at 512 Baud 5µV/m
at 1200 Baud 7µV/m
at 2400 Baud 9µV/m
Antenna: built-in single loop antenna
External connections:
charging and signal connections
interconnection with charger and programmer
Power supply: 1,2 V DC (Size AAA)
chargeable NiCd Battery i.e. 250mAh
or NiMH Battery i.e.500mAh
or non-chargeable Battery
Temperature range:
Operation -10 .. +55°C
Store (without Battery) -40 .. +80°C
Degree of protection: IP 52
Measures (L/W/H): appr. 78 / 52 / 19mm
Weight: battery incl., appr. 65 g
German BOS-Approval No.: DME II - 14/02
when used inside the BOS frequency range
Conformity: directive 1999/5/EC
Motorola GmbH © 2002
Content is subject to change without notice!
/