La Crosse C83332 User manual

Category
Weather stations
Type
User manual

This manual is also suitable for

Model: C83332/C83349 www.lacrossetechnology.com/support Page | 1
Model: C83332/C83349
Instruction Manual
DC: 121314
WIRELESS COLOR WEATHER STATION
Mold Risk for Weather Station & Indoor Remote Sensor Location
Button Press
for Mold Risk
Indicator When
Using Remote
Sensor Indoors
Remote
Humidity &
Temperature
with Trend
Time
Button Press
for Mold Risk
Indicator for
Weather
Station
Indoor
Humidity &
Temperature
with Trend
Calendar +
Alarm
Color Animated Forecast with Tendency
IN/OUT Temperature
Alerts
Battery
Compartment
3 “AAA
AC Power
Jack
Sensor
Battery
Compartment
2 “AA
LED
TX
Model: C83332/C83349 www.lacrossetechnology.com/support Page | 2
Quick Setup
Step 1: Insert the 5 volt AC cord (included) into the wall outlet then into the weather station.
Step 2: Insert 3 new AAA Alkaline batteries (included) into the weather station. Observe the
correct polarity.
Step 3: Insert 2 new AA batteries (included) into the TX141TH-B remote sensor. Observe the
correct polarity. The red LED will flashes during transmission.
Restart: If there is no remote temperature data after 3 minutes, unplug the AC adapter and
remove batteries from the weather station & remote sensor for 15 minutes. Return to Step 1.
Table of Contents
WIRELESS COLOR WEATHER STATION ...................................................................... 1
Quick Setup ............................................................................................................... 2
Table of Contents ....................................................................................................... 2
Introduction .............................................................................................................. 3
Features .................................................................................................................... 3
Detailed Setup: Weather Station and Remote Sensor ................................................ 4
Button Functions ....................................................................................................... 4
(Down) Button: ........................................................................................................ 4
TIMESET Button: .......................................................................................................... 5
SNOOZE/LIGHT (HI-LOW-OFF) Button:............................................................................ 5
HEAT/DEW/SENSOR SEARCH button ............................................................................... 5
(UP) Button: ............................................................................................................ 5
ALERT Button: .............................................................................................................. 5
ALARM Button: ............................................................................................................. 5
Set Time, Date, Temperature Unit.............................................................................. 6
WWVB Reception ON/OFF .............................................................................................. 6
Time Zone ................................................................................................................... 6
Daylight Saving Time Indicator ....................................................................................... 6
12-hour or 24-hour Time Format .................................................................................... 7
Set Time ..................................................................................................................... 7
Set Calendar ................................................................................................................ 7
Fahrenheit/Celsius ........................................................................................................ 7
Temperature Alerts .................................................................................................... 7
Arm/Disarm Temperature Alerts ..................................................................................... 8
Temperature Alert Sounds ............................................................................................. 8
Alarm Set ................................................................................................................... 8
Deactivate Alarm .......................................................................................................... 8
Snooze ........................................................................................................................ 8
Indoor Comfort Display ............................................................................................. 9
Model: C83332/C83349 www.lacrossetechnology.com/support Page | 3
Heat Index/Dew Point/Mold Risk Indicator .............................................................. 9
Heat Index................................................................................................................... 9
Dew Point Temperature ................................................................................................. 9
Mold Risk Indicator ....................................................................................................... 9
Temperature/Humidity Trend indicators ................................................................. 10
Search for Remote Sensor ....................................................................................... 10
MIN/MAX (View, Reset) .......................................................................................... 10
Animated Color Forecast Icons ................................................................................ 10
Forecast Tendency Indicators (Up, Right, Down Arrows) ........................................ 11
Manual WWVB Time Signal Search .......................................................................... 11
Remote Positioning and Use .................................................................................... 12
Low Battery icon ...................................................................................................... 13
Care and Maintenance ............................................................................................. 13
Specifications .......................................................................................................... 12
Warranty Information ............................................................................................. 13
FCC Statement ......................................................................................................... 14
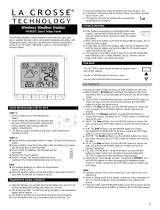
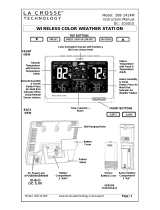
Introduction
La Crosse Technology® introduces a Wireless Color Weather Station with precise, real-time backyard
weather. New Monitor the mold risk for two separate areas using the indoor weather station and multi-use
remote sensor. Place the remote sensor outdoors to monitor backyard weather conditions, or use it indoors
to monitor high mold risk areas like in a crawl space or a basement. Animated color forecasts with trends
react to changing barometric pressure. Monitor the indoor comfort level. Monitor in/out temperature trends
with high and low alert settings. Measure in/out temperature and humidity with daily min/max records -- all
on one easy-to-read color display with adjustable brightness.
Features
12/24 hr. atomic time (manual setting)
Remote Sensor mold risk display when using sensor indoors (shows with button press)
Signal strength icon for sensor transmission
Remote humidity (%RH) with trend indicator
IN / OUT remote temperature (°F / °C) with trend
Animated forecast icons
Forecast tendency indicator
Customize IN / OUT temp. alerts (low / high) for weather station and remote sensor
Perpetual calendar (day / month / date / year)
Weather Station mold risk display (shows with button press)
Indoor comfort level based on humidity
Indoor humidity (%RH) with trend indicator
Indoor temperature (°F / °C) with trend
Back light control (high / low / off)
Time alarm
Heat index and dew point
Min. / max. temperature and humidity
Mold Risk (0, LOW, MED, HI)
Station and sensor low battery icon
Atomic reception indicator
Snooze / alarm icon
Model: C83332/C83349 www.lacrossetechnology.com/support Page | 4
Detailed Setup: Weather Station and Remote Sensor
STEP 1:
Insert the 5-volt A/C power adapter into the designated area on the
back of the Weather station.
Plug the A/C power adapter into a wall outlet for continuous
backlight (ON/OFF), and dimmer feature.
STEP 2: (optional battery operation)
Slide tab to down and pull out to remove the battery cover.
Insert three new AAA Alkaline batteries into the back of the weather
station. Observe the correct polarity (see marking inside the battery
compartment).
The weather station will light up and show indoor temperature, humidity and
time.
(Backlight will illuminate for 8 seconds when using only battery power with a press/release of
the SNOOZE/LIGHT button)
Do Not Mix Old and New Batteries
Do Not Mix Alkaline, Standard, Lithium or Rechargeable Batteries
STEP 3:
Ensure that the transmitter is within 10 feet of the Weather station.
Remove battery cover from transmitter. Slide the battery cover down and
lift off the front.
Insert two new AA batteries into the TX141TH-B transmitter. Observe the
correct polarity.
Within three minutes, the Weather station will show readings in the outdoor
temperature area on the LCD.
Note: Use Alkaline batteries (or Lithium for temperatures below -20°F/-
28.8°C).
Button Functions
(Down) Button:
Setting-
Press to decrease values during setting.
Hold 2 seconds to quickly adjust values.
Default Time Display-
Press to display minimum temperature/humidity.
Hold 2 seconds to clear minimum temperature/humidity memory.
Temperature Alert-
Press to disarm alerts
The weather station has 5 buttons across the top and 2 on the front.
Model: C83332/C83349 www.lacrossetechnology.com/support Page | 5
TIMESET Button:
Default Time Display-
Press to start or stop a WWVB time signal search
Hold for 3 seconds to set time/calendar, etc.
SNOOZE/LIGHT (HI-LOW-OFF) Button:
Default Time Display-
Press to change the LCD backlight brightness. HI/LOW/OFF
Press to activate backlight for 10 seconds.(without adaptor)
Time Alarm-
Press to activate the snooze function when alarming
HEAT/DEW/SENSOR SEARCH button
Default Time Display-
Press once to view Heat Index.
Press twice to view Dew Point.
Press a third time to view Indicator for Indoor Mold Risk (weather station) and Remote Mold
Risk (sensor).
Hold to search for Remote sensor.
(UP) Button:
Setting-
Press to increase the values during setting.
Hold 2 seconds to quickly adjust values.
Default Time Display-
Press to view maximum temperature/humidity.
Hold 2 seconds to clear maximum temperature/humidity memory.
Temperature Alert-
Press to arm alerts
ALERT Button:
Default Time Display-
Press to toggle between Remote High Alert, Remote Low Alert, Indoor High Alert and Indoor
Low Alert.
Hold to enter Alert setting
ALARM Button:
Default Time Display-
Press once to show alarm time
Hold for 2 seconds enter alarm setting mode
Alarm Mode-
Press to activate or deactivate time alarm.
Model: C83332/C83349 www.lacrossetechnology.com/support Page | 6
Set Time, Date, Temperature Unit
Hold the TIME SET button to enter time set mode.
1. Press the or buttons to adjust the values.
2. Press the TIME SET button to confirm adjustments and move to the next item.
Time Set Order:
1. WWVB time signal (On/Off)
2. Time Zone - 7 time zones
3. DST (Daylight Saving Time On/Off)
4. 12/24 hour time format
5. Hour
6. Minutes
7. Year
8. Month
9. Date
10. Fahrenheit/Celsius
Press the TIME SET button to exit, or wait 20 seconds without pressing buttons to return to the
normal time display.
WWVB Reception ON/OFF
The WWVB atomic time reception defaults to ON.
To turn the WWVB reception OFF:
1. Hold the TIME SET button for 5 seconds.
2. WWVB and ON will flash above the date.
3. Press and release the or buttons to turn this OFF if you do not want to receive the WWVB
time signal.
4. Confirm with the TIME SET button and move to the Time Zone.
Time Zone
This station offers seven time zones listed in letter format (default is EST):
AST Atlantic Time
EST Eastern Time
CST Central Time
MST Mountain Time
PST Pacific Time
AKT Alaskan Time
HAT Hawaiian Time
1. EST will flash above the date.
2. Press and release the or buttons to select a different Time Zone.
3. Confirm with the TIME SET button and move to Daylight Saving Indicator.
Daylight Saving Time Indicator
DST will default to the ON position as most of the country observes the DST change. If you live in
an area does not observe the DST change, switch this to the OFF position.
1. DST and ON will flash above the date.
2. Press and release the or buttons to turn DST to OFF.
3. Confirm with the TIME SET button and move to 12/24 hour time format.
ON
WWVB
EST
TIME
ZONE
ON
DST
Model: C83332/C83349 www.lacrossetechnology.com/support Page | 7
12-hour or 24-hour Time Format
The Time may be displayed in 12-hour or 24-hour format. Default is 12-hour time.
Note: When in 12-hour format AM or PM will show in front of the hour.
1. 12H will flash in the time display.
2. Press and release the or buttons to select 24-hour time.
3. Confirm with the TIME SET button and move to Set Time.
Set Time
To set the time manually:
1. The hour digit will flash.
2. Press and release the or buttons to select the hour.
3. Press and release the TIME SET button to set the minutes.
4. The minute’s digit will flash.
5. Press and release the or buttons to select the minutes.
6. Confirm with the TIME SET button and move to Set Calendar.
Set Calendar
The date default of the weather station is 1. 1. 2014.
To set the calendar:
1. The year will flash.
2. Press and release the or buttons to set the year (between
years 2000-2039).
3. Press the TIME SET button again to confirm and to enter the month setting.
4. The month will flash.
5. Press and release the or buttons to set the month.
6. Press the TIME SET button again to confirm and enter the date setting.
7. The date will flash.
8. Press and release the or buttons to set the date.
9. Confirm all calendar settings with the TIME SET button to confirm and move to select
Fahrenheit/Celsius.
Note: The day of the week will set automatically once the year, month and date are set.
Fahrenheit/Celsius
1. °F will flash.
2. Press and release the or buttons to select Fahrenheit or Celsius.
3. Confirm with the TIME SET button and exit the program menu.
Temperature Alerts
The weather station offers individual, programmable high and low temperature alerts.
Hold the ALERT button for five seconds, until the weather station beeps, to select and set
temperature alert values. Each alert value will flash separately during alert set mode.
REMOTE HIGH alert will flash. Press the or buttons to set the alert value, and press the
ALERT button to confirm. Then press the ALERT button again switch to REMOTE LOW setting.
12H
Model: C83332/C83349 www.lacrossetechnology.com/support Page | 8
REMOTE LOW alert will flash. Press the or buttons to set the alert value, and press the
ALERT button to confirm. Then press the ALERT button again switch to INDOOR HIGH setting.
INDOOR HIGH alert will flash. Press the or buttons to set the alert value, and press the
ALERT button to confirm. Then press the ALERT button again switch to INDOOR LOW setting.
INDOOR LOW alert will flash. Press the or buttons to choose the value, and press the
ALERT button to confirm and exit.
Note: After selecting temperature alert values use the next step to turn individual alerts ON or
OFF.
Arm/Disarm Temperature Alerts
In normal time mode, press and release the ALERT button to toggle between:
o Remote HI
o Remote Lo
o Indoor HI
o Indoor LO
Press the button to arm the selected alert. The alert bell appears when each alarm is
activated.
Press the button to disarm the selected alert.
OFF will show in the Alerts area if no alert is active.
Temperature Alert Sounds
When temperature alert sounds, the corresponding alert bell will flash.
The alert beeps once every minute, until the temperature is out of alert range.
Press any button to stop alert. The alert bell will still show.
Disarm Alert: In normal mode, hold and release the ALERT button to select the alert to
disarm. With HI or LO alert selected, press the button disarm alert.
Alarm Set
Hold the ALARM button for 5 seconds to enter the alarm time set mode.
1. The alarm hour digit will flash in the time display.
2. Press and release the or buttons to select the hour.
3. Press and release the TIME SET button to set the minutes. The minute digits will flash.
4. Press and release the or buttons to select the minutes.
5. Confirm with the TIME SET button and exit.
6. The bell icon will show next to the weekday indicating the alarm is active.
7. The bell icon will flash when the alarm is sounding.
Deactivate Alarm
1. Press and release the ALARM button once to show alarm time.
2. Press and release the ALARM button to deactivate the Alarm.
3. The bell icon will disappear indicating the alarm is no longer active.
Snooze
1. When the alarm sounds, press the SNOOZE/LIGHT button to trigger snooze alarm for 10
minutes. The snooze icon Zz will flash by the weekday when the snooze feature is active.
2. To stop alarm for one day, press ALARM button, while in snooze mode. The bell icon will
remain solid.
Note: When the alarm sounds, it continues for 2 minutes and then shuts off completely.
Model: C83332/C83349 www.lacrossetechnology.com/support Page | 9
Indoor Comfort Display
The indoor comfort display is based off of the humidity read by the weather station. Air that is too
dry or too wet can cause discomfort. The weather station will automatically display the indoor
comfort of your home with a simple statement:
Heat Index/Dew Point/Mold Risk Indicator
The HEAT/DEW button toggles between Heat Index, Dew Point, and Mold Risk.
Each feature will display for 10 seconds then return to defualt disply is the button
is not pressed again.
Heat Index
Heat Index combines the effects of heat and humidity. It is the apparent temperature of how hot
it feels to a human being. As humidity increases, the body is unable to cool effectively; therefore,
the temperature will feel warmer.
View Heat Index: From a normal display, press the HEAT/DEW button once and Heat Index will
show in place of the remote temperature.
Note: Heat index will be the same number as the temperature until the remote temperature is
above 80 °F (26.7°C).
Dew Point Temperature
Dew Point Temperature is the saturation point of the air, or the temperature to which the air has
to cool in order to create condensation. The higher the dew points, the higher the moisture
content of the air at a given temperature.
View Dew Point Temperature: From a normal display, press the HEAT/DEW button twice and
Dew Point will show place of the remote temperature.
Note: Dew Point is lower than the actual temperature.
Mold Risk Indicator
Mold Risk is based on temperature and humidity. Monitor the mold risk for two separate areas
using the indoor weather station and multi-use remote sensor. Place the remote sensor outdoors
to monitor backyard weather conditions, or use it indoors to monitor high mold risk areas like in a
crawl space or a basement.
View Mold Risk Indoor and Remote locations: From a normal display, press the HEAT/DEW button
three times and the Mold Risk will show next to the remote and indoor humidity.
1%-25% 26%-39%
40%
-75%
76%-83%
83%-99%
Model: C83332/C83349 www.lacrossetechnology.com/support Page | 10
Temperature/Humidity Trend indicators
The indoor and outdoor temperature/humidity trend indicators will update every 30 minutes or
less. These trends represent temperature changes over the past three hours.
Example: At 1:00pm, the arrow indicates the change in temperature since 10:00am. At 1:30pm,
the arrow will indicate the temperature change since 10:30am.
Temperature has risen in the past 3 hours.
Humidity has risen in the past 3 hours.
Temperature has not changed in the past 3 hours.
Humidity has not changed in the past 3 hours.
Temperature has fallen in the past 3 hours.
Humidity has fallen in the past 3 hours.
Search for Remote Sensor
Hold the HEAT/DEW button to search for the remote sensor.
The strength signal icon will animate until the sensor signal is received or for 3
minutes if no signal available.
MIN/MAX (View, Reset)
The Weather station provides the daily minimum and maximum temperatures each day
starting at midnight (12:00 AM). The Weather station automatically resets the min/max
temperatures at midnight (12:00 AM).
View MIN data: Press and release the button to view the minimum Indoor and Remote
Temperatures.
Reset MIN data: Hold the button for five seconds and the Indoor and Remote Minimum
Temperatures will be reset.
View MAX data: Press and release the button to view the maximum Indoor and Remote
Temperatures.
Reset MAX data: Hold the button for five seconds and the Indoor and all Remote Maximum
Temperatures will be reset.
Note: The temperature areas will show dashes briefly then return to current temperatures.
Animated Color Forecast Icons
Animated forecast icons use changing atmospheric pressure to predict weather conditions for the
next 12-hours with 70-75% accuracy.
INTELLIGENT WEATHER FORECAST
This station learns; please allow 3 to 4 weeks for barometric calibration. This will ensure an
accurate personal forecast for your location.
Model: C83332/C83349 www.lacrossetechnology.com/support Page | 11
The Weather station samples the barometric pressure every twelve minutes.
These samples are averaged hourly and daily then stored in nonvolatile memory.
The three hour pressure icon change is based off of the last four average hourly readings.
IMPORTANT: As the Weather station builds memory, it will compare the current average
pressure to the past forty day average pressure for increased accuracy. The longer the Weather
station operates in one location, the more accurate the forecast icons will be.
The icons forecast the weather in terms of getting better or worse and not necessarily sunny or
rainy as each icon indicates. For example, if the current weather is cloudy and the rainy icon is
displayed, it does not mean that the product is faulty because it is not raining. It simply means
that the air pressure has dropped and the weather is expected to get worse, but not necessarily
rainy.
Common to weather forecasting, absolute accuracy cannot be guaranteed. The weather
forecasting feature is estimated to have an accuracy level of about 75% due to the varying areas
the Weather station has been designed for use. In areas that experience sudden changes in
weather (for example from sunny to rain), the Weather station will be more accurate compared to
use in areas where the weather is stagnant most of the time (for example mostly sunny).
Forecast Tendency Indicators (Up, Right, Down Arrows)
Working with the forecast icons, the tendency indicators let you know if the weather is improving,
steady or worsening.
Rising Pressure Weather is
Expected to Improve
Steady Pressure Weather is
Expected to Stay the Same
Falling Pressure Weather is
Expected to Worsen
Manual WWVB Time Signal Search
Press the TIME SET button to start or stop a manual signal search. The WWVB
Icon flashes during signal search.
For information about WWVB visit:
www.nist.gov/pml/div688/grp40/wwvb.cfm
WWVB
ATOMIC
ICON
Model: C83332/C83349 www.lacrossetechnology.com/support Page | 12
Specifications
Indoor
Temperature Range:
+32°F to +122°F (0°C to 50°C)
Humidity Range:
1%-99% (RH)
Interval:
About every 30 seconds
Outdoor
Temperature Range:
-40°F to 140°F (-40°C to 60°C)
Alkaline Batteries:
-20°F to 140°F (-29°C to 60°C)
Lithium Batteries:
-40°F to -20°F (-40°C to -29°C)
NOTE:
Temperatures below - 20°F (-29°C) require
Lithium batteries in the remote sensor
Humidity Range:
1%-99% (RH)
Distance:
Over 200 ft. (60 meters) RF 433MHz (open air)
Power
Weather Station
Primary AC Power:
5-volt AC 150mA power adapter (included in
lower panel)
AC Adapter No.:
GPU280500150WD00
Optional/Battery Backup
Optional 3-AAA, IEC, LR3 batteries
(included in lower panel)
TX141TH-B Remote Sensor:
2-AA, IEC, LR6 batteries (included in lower
panel)
Battery Life
Weather Station
Battery Backup:
Battery life is over 36 months when using the
AC adapter for primary power
TX141TH-B Remote Sensor:
Battery life is over 12 months when using
reputable battery brands for both Alkaline and
Lithium batteries
Dimensions
Weather Station:
5.91"L x 1.66"W x 4.84"H (150 x 42 x 123
mm)
TX141TH-B Remote Sensor:
1.57"L x 0.79"W x 5.12"H (40 x 20 x 130mm)
Remote Positioning and Use
Outdoor use: Mount the Remote Sensor on a north-facing wall or in any well shaded area. Under
an eave or deck rail is preferred.
Indoor use: Mount the Remote Sensor indoors to monitor high mold risk areas like in a crawl
space or basement.
The maximum wireless transmission range to the weather station is over 200 feet (60 meters)
in open air, not including walls or floors.
Be sure the remote sensor is mounted vertically.
Model: C83332/C83349 www.lacrossetechnology.com/support Page | 13
Low Battery icon
Low battery icon indicates low battery for station or sensor.
If the icon is displayed in the Remote Temperature section, replace batteries in
the Remote Sensor.
If the icon is displayed in the Indoor Temperature section, replace batteries in
the Weather Station.
Care and Maintenance
Do not mix old and new batteries
Do not mix Alkaline, Standard, Lithium or Rechargeable Batteries
Always purchase the correct size and grade of battery most suitable for intended use.
Replace all batteries of a set at the same time.
Clean the battery contacts and also those of the device prior to battery installation.
Ensure the batteries are installed with correct polarity (+and -).
Remove batteries from equipment with is not to be used for an extended period of time.
Remove used batteries promptly.
Do not expose to extreme temperature, vibration or shock.
Clean with a soft damp cloth. Do not use solvents or scouring agents.
The product is not a toy. Keep it out of reach of children.
The product is not to be used for medical purpose or for public information. It is intended for
home use only.
The specs of this product may change without prior notice.
Improper use or unauthorized opening of housing voids warranty.
If the product is not working properly, change the batteries and/or check the AC cord
connection.
Warranty Information
La Crosse Technology, Ltd. provides a 1-year limited time warranty (from date of purchase) on
this product relating to manufacturing defects in materials & workmanship.
View full warranty details online at:
www.lacrossetechnology.com/warranty_info.pdf
For warranty work, technical support or other information contact:
La Crosse Technology, Ltd
2830 South 26
th
St.
La Crosse, WI 54601
Contact Support:
1-877-408-2678
Product Registration:
www.lacrossetechnology.com/support/register
Online Product Support:
www.lacrossetechnology.com/support
Protected under U.S. Patents:
5,978,738//6,076,044//RE43903
Low Battery
Icon
Model: C83332/C83349 www.lacrossetechnology.com/support Page | 14
FCC Statement
This equipment has been tested and found to comply with the limits for a Class B digital device, pursuant to part
15 of the FCC Rules. These limits are designed to provide reasonable protection against harmful interference in
a residential installation. This equipment generates, uses and can radiate radio frequency energy and, if not
installed and used in accordance with the instructions, may cause harmful interference to radio communications.
However, there is no guarantee that interference will not occur in a particular installation. If this equipment does
cause harmful interference to radio or television reception, which can be determined by turning the equipment
off and on, the user is encouraged to try to correct the interference by one or more of the following measures:
Reorient or relocate the receiving antenna.
Increase the separation between the equipment and receiver.
Connect the equipment into an outlet on a circuit different from that to which the receiver is connected.
Consult the dealer or an experienced radio/TV technician for help.
This device must not be co-located or operating in conjunction with any other antenna or transmitter. Operation
is subject to the following two conditions:
(1) this device may not cause harmful interference, and
(2) this device must accept any interference received, including interference that may cause undesired
operation.
Caution!
The manufacturer is not responsible for any radio or TV interference caused by unauthorized modifications to
this equipment. Such modifications could void the user authority to operate the equipment.
All rights reserved. This manual may not be reproduced in any form, even in part, or duplicated or processed
using electronic, mechanical or chemical process without the written permission of the publisher.
This booklet may contain errors or misprints. The information it contains is regularly checked and corrections are
included in subsequent editions. We disclaim any responsibility for any technical error or printing error, or their
consequences.
All trademarks and patents are recognized.
  • Page 1 1
  • Page 2 2
  • Page 3 3
  • Page 4 4
  • Page 5 5
  • Page 6 6
  • Page 7 7
  • Page 8 8
  • Page 9 9
  • Page 10 10
  • Page 11 11
  • Page 12 12
  • Page 13 13
  • Page 14 14

La Crosse C83332 User manual

Category
Weather stations
Type
User manual
This manual is also suitable for

Ask a question and I''ll find the answer in the document

Finding information in a document is now easier with AI