
1
L
E
G
G
E
R
O
M
E
D
I
O
F
O
R
T
E
C
A
P
P
U
C
C
I
N
O
COFFEE MACHINE
MACHINE A CAFE
CAFETERA ELÉCTRICA
CAFETEIRA ELÉTRICA
Owner’s instructions
Mode d’emploi
Instrucciones para el uso
Manual de Instruções
READ AND SAVE THESE INSTRUCTIONS
LISEZ ET GARDEZ CES INSTRUCTIONS
REPASE Y GUARDE ESTAS INSTRUCCIONES
LEIA E GUARDE ESTAS INSTRUÇÕES
Page is loading ...

3
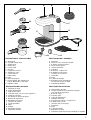
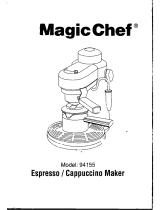
DESCRIPTION OF THE APPLIANCE
A. Water tank
B. Cap with safety valve
C. Steam knob
D. Steam tube
E. Power cable
F. Drip tray
G. Cappuccino nozzle
H. Adaptor for cups
I. Carafe with lid
L. Filter-holder
M. Filter
N. Measuring spoon
O. Flow regulator with selection for
LIGHT, MEDIUM or STRONG
P. ON/OFF switch
P
L
E
G
G
E
R
O
M
E
D
I
O
F
O
R
T
E
C
A
P
P
U
C
C
I
N
O
AO B
C
D
E
F
GH
I
L
M
N
DESCRIPTION DE L'APPAREIL
A. Réservoir
B. Bouchon avec vanne de sécurité
C. Poignée ouverture vapeur
D. Tuyau sortie vapeur
E. Cordon électrique
F. Egouttoir
G. Buse pour "cappuccino"
H. Adaptateur pour tasses
I. Carafe avec couvercle
L. Porte-filtre
M. Filtre
N. Cuillère de dosage
O. Régulateur pour sélectionner
un café fort, moyen ou léger
P. Interrupteur ON/OFF
DESCRIÇÃO DO APARELHO
A. Reservatório de água
B. Tampa removível do reservatorio de água
com válvula de segurança
C. Botão de vapor
D. Tubo de vapor
E. Cabo de alimentação
F. Bandeja removível
G. Acessório para fazer o “cappuccino”
H. Adaptor para xícaras
I. Jarra de vidro com tampa
L. Porta filtro
M. Filtro
N. Colher dosadora
O. Regulador de fluxo
P. Interruptor general para ligar e desligar a cafeteira
DESCRIPCIÓN DEL APARATO
A. Depósito de agua
B. Tapón del depósito
C. Selector del vapor
D. Tubo del vapor con pico para capuchino
E. Cable de corriente
F. Recipiente recolector de gotas
G. Batidor de capuchinos
H. Adaptador para tazas
I. Garrafa com tampa
L. Copita portafiltro
M. Filtro
N. Medida
O. Regulador de flujo
P. Interruptor ON/OFF
Page is loading ...
Page is loading ...

6
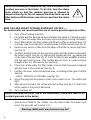
IMPORTANT SAFEGUARDS
When using electrical appliances, basic safety precautions should always be
followed, including the following:
• Read all instructions.
• Do not touch hot surfaces. Use handles and knobs.
• To protect against fire, electrical shock and personal injury, do not immerse
cord, plug or appliance in water or other liquid.
• Close supervision is necessary when any appliance is used by or near
children.
• Unplug from the outlet when not in use and before cleaning. Allow to cool
before putting on or taking off parts, and before cleaning the appliance.
• Do not operate with a damaged cord or plug, or after the appliance malfunctions,
or has been damaged in any manner. Return the appliance to the nearest
authorized service facility for examination, repair or adjustment.
• The use of accessory attachments or spare parts not recommended by the
appliance manufacturer may result in fire, electrical shock or personal injury.
• Do not use outdoors.
• Do not let the cord hang over the edge of table or counter, or touch hot
surfaces.
• Do not place on or near a hot gas or electrical burner, or in a heated oven.
• Always attach plug to appliance first, then plug cord into the wall outlet. To
disconnect, turn any control to "off", then remove plug from wall outlet.
• Do not use the appliance for other than the intended use.
• DO NOT unscrew or remove boiler cap while the machine is in operation. Wait
until brewing cycle is completed and all water and steam has been used up.
• Appliances with Glass Containers:
A. The container is designed for use with this appliance. It must never be
used on a range top.
B. Do not set a hot container on a wet or cold surface.
C. Do not use a cracked container or a container having a loose or weakened
handle.
D. Do not clean container with cleansers, steel wool pads, or other abrasive
material.
SAVE THESE INSTRUCTIONS

7
SPECIAL CORD SET
INSTRUCTIONS
Regarding Your Cord Set:
A. A short power-supply cord (or detachable power-supply cord) is provided
to reduce risks resulting from becoming entangled in or tripping over a
longer cord.
B. Longer detachable power-supply cords or extension cords are available
and may be used if care is exercised in their use.
C. If a long detachable power-supply cord or extension cord is used, the
marked electrical rating of the detachable power-supply cord or extension
cord should be at least as great as the electrical rating of the appliance. If
the appliance is of the grounded type, the extension cord should be a
grounding-type 3-wire cord, and the longer cord should be arranged so that
it will not drape over the counter-top or table top where it can be pulled on
by children or tripped over.
D. Your product is equipped with a polarized alternating current line plug ( a
plug having one blade wider than the other). This plug will fit into the power
outlet only one way. This is a safety feature. If you are unable to insert the
plug fully into the outlet, try reversing the plug. If the plug should still fail to
fit, contact your electrician to replace your obsolete outlet. Do not defeat the
safety purpose of the polarized plug.
CAUTION
This appliance is for household use only. Any servicing, other than cleaning and
user maintenance, should be performed by an authorized service representative.
Do not immerse base in water.
To reduce the risk of fire or electric shock, do not dis-assemble the base. No
user serviceable parts inside. Repair should be done by authorized service
personnel only.
• Check voltage to be sure that the voltage indicated on the name plate agrees
with your voltage.
• Never use warm or hot water to fill the water container! Use cold water only!
• Keep your hands and the cord away from hot parts of the appliance during
operation.
• Never clean with scouring powders or hard implements.
• Never fill the water tank with milk or coffee.

8
TABLE 1
IMPORTANT SAFETY NOTICE
CAUTION ! To avoid injury it is important that you:
• never unscrew the water tank cap when unit is under pressure
• correctly attach the filter holder to the machine
• do not move or try to remove the filter holder while the machine is in use.
Therefore before unscrewing the watertank cap and filter holder check whether there is pressure
in the water tank as follows:
• Switch the machine off.
• Remove the plug from the wall socket.
• Turn the steam knob slowly counter-clockwise.
• If steam escapes from the tube, then the water tank is still under pressure.
• Place a receptacle under the steam tube.
• Open the steam knob so that the residual steam can escape.
• When all the steam has escaped from the tube, close the steam knob by turning it clockwise.
At this point, the water tank cap and the filter-holder can be removed.
Therefore to properly insert the filter-holder :
• Make sure that the brackets of the filter-holder are lined up with the relevant holes on the brew head
• Raise the filter-holder up into the brew head and turn the filter-holder firmly to the right, until it can't go
no further.
If you are uncertain as to how to insert the filter holder contact Dè Longhi America at 1-800-322-3848.
!
To make
Coffee quantity in the
filter
Water quantity in the
carafe
2
ESPRESSO'S
2
4
4
ESPRESSO'S
4
2
Milk quantity in the
carafe
2
CAPPUCCINO'S
2
4
WATER LEVEL MUST COINCIDE WITH
BOTTOM PART OF METAL BAND.
4
CAPPUCCINO'S
4
2
WATER LEVEL MUST COINCIDE WITH
STEAM SYMBOL ON THE CARAFE
USE MAX 2 CARAFES
FILLED UP TO THE LEVEL
USE MAX 1 CARAFES
FILLED UP TO THE LEVEL

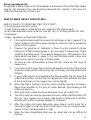
9
USE OF THE MACHINE
THIS MACHINE IS FOR HOUSEHOLD USE ONLY
A) Before making espresso/cappuccino for the first time, wash all accessories
(filter-holder, measuring spoon, filter, carafe, adaptor and cappuccino nozzle)
with detergent and warm water, then rinse thoroughly.
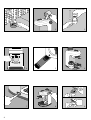
B) FLUSH OUT THE WATER TANK
1. Always switch the machine off and unplug before filling the water tank.
2. Use the glass carafe (I) to fill the water tank (see fig. 1)
3. Unscrew the water tank cap by turning counterclockwise (B). FILL THE
TANK WITH WATER (FIG. 2), BY USING THE CARAFFE (FIG. 1).
4. Close the water tank cap securely by turning clockwise.
5. Plug the appliance into the wall socket. (Remember safety instructions).
6. Put the filter (M) in the filter holder (L). (See fig. 3).
7. To attach the filter holder to the machine, place the filter holder underneath
the boiler nozzle (see fig. 4), aligning the handle with the impressed
on the side of the machine (fig. 5). Push the filter holder upwards and turn
it to the right until secure. (The handle doesn't have to necessarily be
straight when it is attached to the machine).
8. Place the carafe under the filter holder. Ensure that the spout is aligned
with the hole in the carafe lid (see fig. 6).
9. Turn the lever (O) to "LIGHT" position.
10. Check that the steam knob (C) is closed by turning clockwise until
tightened.
11. Press switch (P) to on. The switch will light. (If the switch does not light,
check to see if it is plugged in).
12. In about 2 minutes hot water will begin to flow into the carafe. when the
water is done flowing turn the machine off.
C) FLUSHING THE STEAM TUBE AND CAPPUCCINO NOZZLE
1. Fill carafe to steam line - directly above the 2 cup line.
2. Pour into water tank and secure cap.
3. Turn machine on.
4. After hot water has filled to the 2 cup line in carafe, turn the flow regulator
to cappuccino (steam symbol).
5. Remove carafe (remove lid) and place under the steam tube (D).
6. Open steam knob slowly (turn counterclockwise). When steam no longer
comes out of nozzle, close steam knob.
7. Turn switch off.
▼

10
Before unscrewing the water tank cap, check that there is no
residual pressure in the boiler. To do this, turn the steam
knob slowly so that the residual pressure is allowed to
disperse (see fig. 8). Do not remove the water tank cap and
filter holder until the steam ceases to escape from the steam
tube.
NOW YOU ARE READY TO MAKE ESPRESSO COFFEE……
For best results, we recommend the use of coarse-ground espresso coffee.
1. Turn off and unplug machine.
2. Fill carafe with the desired amount of water (see table A "Filling the water
tank"). Pour into water tank and close cap securely by turning clockwise.
3. Insert filter basket into filter holder and fill with coffee to desired level of 2
or 4 cups (see level indicators marked inside the filter basket) (see fig. 9).
4. Remove any excess coffee from the edge of the filter to secure tight seal
(see fig. 9).
5. To attach the filter holder to the machine, place the filter holder underneath
the boiler nozzle (see fig. 4), aligning the handle with the impressed
on the side of the machine (fig. 5). Push the filter holder upwards and turn
it to the right until secure. (The handle doesn't have to necessarily be
straight when it is attached to the machine).
6. Place the carafe under the filter holder. Ensure that the spout is aligned
with the hole in the carafe lid (see fig. 6).
7. Position the lever within the desired area, according to the type of coffee
desired:
- LIGHT, MEDIUM or STRONG (see fig. 10).
8. Insert the plug into the power socket; press switch to on. The switch will
light.
9. After about 2 minutes, the coffee will start to flow (see fig. 11). Wait until
all the water in the tank is delivered.
10. Turn machine off.
Before removing the boiler cap or the filter-holder, check that there is no
residual pressure in the boiler.
11. To remove the used coffee grounds block the filter in position using the
special lever fitted to the handle, turn the filter-holder face-down and
knock the grounds out (see fig. 12).
Warning: Metal parts may become very hot
!
▼

11
Using cup adapter (H)
If you prefer to brew 2 cups only, fit the adaptor to the lower section of the filter-holder
(see fig. 13) and place the cups directly underneath the nozzles. In this way, the
coffee will flow directly into the cups.
HOW TO MAKE GREAT CAPPUCCINO…
HERE'S WHAT YOU NEED BEFORE YOU START…
• Coarse ground espresso coffee…
• Fresh milk (should be chilled before use; lower fat milk steams best)
• A tall small-diameter metal container (see fig. 15) (i.e. frothing pitcher) for milk
• A teaspoon
• Sugar, sweetener or flavorings if desired.
1. Fill a metal container with the amount of milk shown in tab. 1 (page 8). The
metal container should be large enough to allow the milk to expand to
around 3X its volume.
2. Prepare the machine as indicated in "Now You Are Ready To Make
Espresso Coffee" following steps 1 - 8. If you want 2 cappuccinos, fill the
carafe to the steam mark. If you want 4 cappuccinos, fill to bottom of the
metal band (See table 1 - page 7). For best frothing results, make sure
cappuccino nozzle is secure on frothing tube.
3. As soon as the coffee starts to flow into the carafe set the lever to
cappuccino.
4. From time to time, move the container downward so the tip of the nozzle
skims the surface of the milk (see fig. 16). In this way, the milk will become
frothed.
5. If your coffee machine is supplied with a flow regulator (fig.10), when the
coffee starts to flow, set the lever to cappuccino, then immerse the tube
to the level shown on the cappuccino nozzle (fig.14).
6. When the milk is frothed, close the steam knob by turning it clockwise.
Reset flow regulator to the type of coffee desired. The brewing of the
coffee will resume.
7. Wait until all the coffee has been delivered, then turn switch off.
8. The frothy milk can now be spooned onto your coffee. Add hot milk to fill
the cup. Your cappuccino is ready. Add sugar to taste and if you like,
sprinkle with a little chocolate powder or cinnamon.
9. After the coffee has been delivered, open steam control knob for a
moment in order to clear the tube of milk. (Place cup or container under
nozzle to catch residual steam or milk).
10. Wipe the tube immediately after use, as dried milk can be difficult to
remove.

12
CLEANING THE CAPPUCCINO NOZZLE
1. Unscrew the cappuccino nozzle by turning gently (fig. 17).
2. Clean the cappuccino nozzle carefully in hot water.
3. From time to time, use a pin to clean the holes in the cappuccino nozzle
(fig. 18).
IMPORTANT:
NEVER unscrew the water tank cap or remove the filter-holder when the
machine is switched on, as the boiler is under pressure.
In order to check whether there is pressure in the water tank:
• Switch the machine off.
• Remove the plug from the wall socket.
• Turn the steam knob slowly counter-clockwise.
• If steam escapes from the tube, then the water tank is still under
pressure.
• Place a receptacle under the steam tube.
• Open the steam knob so that the residual steam can escape.
• When all the steam has escaped from the tube, close the steam knob by
turning it clockwise.
At this point, the water tank cap and the filter-holder can be removed.
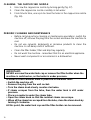
PERIODIC CLEANING AND MAINTENANCE
• Before carrying out any cleaning or maintenance operations, switch the
machine off, remove the plug from the socket and leave the machine to
cool.
• Do not use solvents, detergents or abrasive products to clean the
machine. A soft damp cloth is sufficient.
• Clean the filter-holder, filter and drip tray regularly.
• Do not wash the machine - remember that it is an electrical appliance.
• Never wash components or accessories in a dishwasher.

13
USING STEAM TO HEAT LIQUIDS
(to prepare tea, hot chocolate, etc.)
1. Unscrew the water tank cap, after having unplugged the machine.
2. Fill the carafe up to the level marked "2" and pour the water into the water tank.
3. Replace the cap.
4. Set the flow regulator to cappuccino.
5. Plug the machine in and switch on.
6. Place the receptacle containing the liquid underneath the steam tube (see fig.
15).
7. Turn the steam knob to the open position.
8. After about two minutes, the steam will start to flow from the steam tube.
9. When the liquid has reached the desired temperature, turn the steam knob back
to the closed position and switch the appliance off.
Before removing the water tank cap, turn the steam knob to the open
position in order to check that there is no residual pressure in the
water tank.
DESCALING
If you live in a hard-water area, minerals and calcium found in the water will
accumulate and affect the operation of the machine.
Approximately every six months (depending on the hardness of the water), your
DE'LONGHI espresso maker should be cleaned with vinegar as follows:
1. Before cleaning your Espresso maker, turn the switch to OFF and unplug
machine.
2. Fill the carafe with vinegar and pour into the water tank.
3. Replace the cap.
4. Set the flow regulator to LIGHT.
5. Fit the filter and filter-holder (without any coffee).
6. Place the carafe on the drip tray.
7. Insert the plug into the wall socket.
8. Turn the switch to ON. After a few minutes, the hot vinegar will begin to flow
through the filter-holder into the carafe.
9. Place the steam tube in a glass or mug. Open the steam knob for a few seconds
while the vinegar flows through the filter-holder. This will clear any milk residue
from the inside of the tube.
10. Close the steam knob (the vinegar will continue to flow into the carafe).
11. When no more vinegar flows into the carafe, turn the switch to OFF and allow the
machine to cool. Remove the filter-holder, the filter and the carafe and rinse with
hot water.
12. Repeat starting from step two using cold water in order to remove any residual
vinegar. Repeat twice.

14
COFFEE RECIPES
Cappuccino
Prepare a cup of espresso coffee and add an equal quantity of steam-heated (not
boiled) milk and milk froth. Serve in large cups and sprinke with chocolate powder or
cinnamon.
Viennese coffee
Delicious Viennese coffee is easy to make. Prepare strong coffee and cover it with
a very thick layer of whipped cream.
Mocha
Mocha coffee shows how well coffee and chocolate blend together. Mix a cup of
coffee with a cup of hot chocolate. Do not let it boil. Sweeten to taste.
American coffee
For each person, place the following in a shaker: one quarter of a glass of sweetened
concentrated milk, half a cup of strong coffee, a tablespoon of crème de cacao and
crushed ice. Shake and serve.
Irish coffee
For each person, place the following in a large glass: 30g. (1 oz.) of caster sugar, two
fingers of whisky, half a cup of hot, black coffee and a spoonful of fresh cream. Drink
without stirring.
Café au chocolat
Melt in a small pan three small bars of chocolate with half a glass of water. Mix with
half a litre of strong coffee. Add 100 g. (3.5 oz.) of sugar, three tablespoons of fresh
cream and a pinch of cinnamon. Serve chilled.
Café Royal
Hold a spoonful of rum over a hot, well-sweetened cup of coffee. Set the rum alight
and, while flaming, pour it into the cup.
Coffee Ice Liégeois
Bring to the boil a pint of milk containing half a vanilla pod. Mix this with a pint of coffee
sweetened with 300 g. (10.5 oz.) of sugar, and add 1/4 litre of fresh cream. Place the
mixture in an ice cream maker, if available, and freeze until half frozen. Whisk with
an electric mixer and leave in the freezing compartment until hard. Beat the mixture
again on removing from the refrigerator. Serve in dishes or tall glasses and top with
a spoonful of whipped cream.
Iced Yogurt
For each person, whisk a container of plain yogurt until creamy. Mix in 50 g. (1.5 oz.)
of sugar, a teaspoon of cream and half a cup of very strong coffee. Pour into large
glasses and chill in the refrigerator.

15
Granita
For each person, place one cup of very strong, cold, sweet coffee in a shaker. Shake
well with a quarter of a cup of crushed ice. Pour the coffee into a glass and mix in a
tablespoon of whipped cream. Serve immediately while cold.
Winter coffee
For each person, place the yolk of an egg and 30 g. (1 oz.) of sugar in a whisky glass
and mix until frothy. Stir in a cup of hot coffee and a liqueur glass of rum. Serve while
still frothy.
Tropical Nectar
Place a scoop of coffee ice cream and a teaspoonful of angostura bitters in half a
glass of iced coffee. Cover with heavy cream.
Iced Coffee Opéra
For each person, use a blender to mix half a glass of cold coffee with one or two
tablespoons of vanilla ice cream.
Italian Tipple
For each person, mix half a cup of very strong coffee, a spoonful of sweetened
concentrated milk, half an egg yolk, half a glass of Vermouth, the rind of a lemon, a
little cinnamon and crushed ice. Mix in a shaker or blender and serve at once.
Café Frappé
For each person, mix in a shaker two tablespoons of sweetened concentrated milk,
a small cup of strong coffee, a pinch of powdered vanilla and a little crushed ice.
Brazilian Coffee
For each person, mix in a shaker two tablespoons of rum, a glass of black coffee,
50 g. (1.5 oz.) of icing sugar, a pinch of vanilla sugar, a spoonful of fresh cream, the
rind of a lemon and crushed ice.

16
TROUBLESHOOTING
• Switch to "ON" position
• Plug in
• Check that the switch is set to "ON "
• Fill the water tank
• Grind coffee more coarsely
• Reduce the quantity of coffee in the filter
• Use finer ground coffee
• Increase the quantity of coffee in the filter
• Use more coarsely-ground coffee
• Reduce the quantity of coffee in the filter
• Insert the filter-holder correctly and pull to
the right
• Clean the edge of the filter-holder
• Rinse filters, filter-holder and cups (or
carafe) in hot water before making espres-
so coffee
• Use low-fat fresh milk (not boiled)
• Check that steam comes out of the tube
• If your coffeemachine is supplied with a
cappuccino nozzle, the perforations in the
cappuccino nozzle could be obstructed. Use
a needle to clean the perforations (fig. 18)
• Check that the switch is in the "ON" position
• Check that the steam knob (if supplied) has
been turned correctly
• No water in the reservoir tank
• Check the flow regulator is set to
cappuccino
• Machine does not work and switch light
does not come on
• Coffee does not come out
• Coffee comes out too quickly
• Coffee comes out too thick or too slowly
• Coffee comes out from the filter-holder edge
• Coffee in the cup is cold
• The milk does not foam
• No steam is produced
PROBLEM SOLUTION

17
Limited Warranty
What DoesThis Warranty Cover? We warrant each Espresso Coffee Machine to be free from defects in material and workmanship. Our
obligation under this warranty is limited to replacement or repair, free of charge at our factory or authorized service centers, of any defective part
or parts thereof other than parts damaged in transit, which shall be returned to us, transportation prepaid. This warranty shall apply only if the
Espresso Coffee Machine is used in accordance with the factory directions which accompany it.
How Long Does The Coverage Last? This warranty runs for one year from the date of delivery and applies only to the original purchaser for
use.
What Does This Warranty Not Cover? This warranty does not cover defects or damage of the Espresso Coffee Machine which result from
repairs or alterations to the machine outside our factory or authorized service centers, nor shall it apply to any Espresso Coffee Machine which
has been subject to abuse, misuse, negligence or accidents. Also, consequential and incidental damages resulting from the use of this product
or arising out of any breach of contract or breach of this warranty are not recoverable under this warranty. Some states do not allow the exclusion
or limitation of incidental or consequential damages, so the above limitation may not apply to you.
How Do You Get Service? If repairs become necessary or spare parts are needed, please write to:
De’Longhi America Inc.
Park 80 West Plaza One, 4th floor
Saddle Brook NJ 07663
or call Service Tel. No 1-800-322-3848
or visit our internet site:
www.delonghiusa.com
The above warranty is in lieu of all other express warranties and representations. All implied warranties are limited to the applicable warranty
period set forth above. This limitation does apply if you enter into an extended warranty with De' Longhi. Some states do not allow limitations
on how long an implied warranty lasts, so the above exclusions may not apply to you. De' Longhi does not authorize any other person or company
to assume for it any liability in connection with the sale or use of its Espresso Coffee Machine.
How Does State Law Apply? This warranty gives you specific legal rights, and you may also have other rights which vary from state to state.
GARANTIE
Nous garantissons que tous les APPAREILS ELECTRIQUES DE’ LONGHI sont exempts de tout défaut de
matériaux et de manufacture. Notre obligation sous cette garantie est limitée au remplacement ou à la
réparation gratuite dans notre usine de toutes les pièces défectueuses autre que les pièces endommagées
durant le transport, qui nous seront retournées - transport pré-payé - en dedans d'un an après la livraison
à l’acheteur - utilisateur. Cette garantie ne sera applicable que si l’appareil a été utilisé selon les instructions
du fabricant qui accompagnent l’appareil, et sur courant alternatif (AC). Cette garantie remplace toutes les
autres garanties et représentations, exprimées ou impliquées, et toute autre obligation ou responsabilité de
notre part. Nous n’autorisons aucune autre personne ou compagnie à assumer pour nous une quelconque
responsabilité en relation avec la vente ou l’utilisation de nos appareils.
Cette garantie ne s’appliquera ni aux appareils qui seront réparés ou endommagés hors de notre usine, ni
aux appareils qui auront été sujets à une mauvaise utilisation, à une négligence ou à un accident.
Si des réparations ou des pièces de rechange sont nécessaires, vous êtes priés d’écrire à:
De’Longhi America Inc.
Park 80 West Plaza One, 4th floor
Saddle Brook NJ 07663
Tel. No 1-800-322-3848
ou bien contacter notre site Internet:
www.delonghiusa.com
-
 1
1
-
 2
2
-
 3
3
-
 4
4
-
 5
5
-
 6
6
-
 7
7
-
 8
8
-
 9
9
-
 10
10
-
 11
11
-
 12
12
-
 13
13
-
 14
14
-
 15
15
-
 16
16
-
 17
17


Ask a question and I''ll find the answer in the document
Finding information in a document is now easier with AI
Related papers
-
DeLonghi BAR91U Owner's manual
-
DeLonghi BAR6U Owner's manual
-
-
-
-
-
-
-
-
Other documents
-
Toastmaster MEX1B, MEX1BCAN User manual
-
Farberware 4 Cup Espresso User manual
-
 MagicChef 94155 User manual
-
Matsui MCE100 User manual
-
Mellerware Coffeemaker 29001 User manual
-
 Mr. Coffee ECM7 Operating Instructions Manual
-
-
 Mr. Coffee ECM7 User manual
-
Melitta MEX1BCAN User manual
-
West Bend 55129 User manual


