
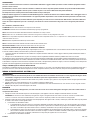
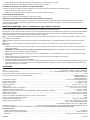
MODEL 306DS INSTRUCTION GUIDE
EN
DeVilbiss iGo
®
Portable Oxygen
System
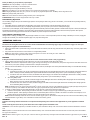
WARNING– Read instruction guide before operating this equipment.
CAUTION– Federal (U.S.A.) law restricts this device to sale by or on the order of a
physician.
DANGER–NO SMOKING
ES
Sistema de oxígeno portátil
DeVilbiss
iGo
®
ADVERTENCIA–Lea la guía de instrucciones antes de poner a funcionar este
equipo.
PRECAUCIÓN–La ley federal de EE. UU. limita la venta de este dispositivo a
médicos o a personas que dispongan de la correspondiente orden médica.
PELIGRO–NO FUMAR
FR
Système d’approvisionnement por-
table en oxygène DeVilbiss iGo
®
AVERTISSEMENT–Lisez ce guide d’instructions avant d’utiliser l’équipement.
ATTENTION–En vertu de la loi fédérale américaine, cet appareil ne peut être vendu
que par un médecin ou sur ordonnance de celui-ci.
DANGER–NE PAS FUMER
DE
Tragbares DeVilbiss
iGo
®
Sauerstoffsystem
WARNUNG–Vor Inbetriebnahme des Gerätes Bedienungshinweise lesen.
ACHTUNG–Nach US-Bundesgesetzen darf dieses Gerät nur von einem Arzt bzw.
auf Anordnung eines Arztes verkauft werden.
GEFAHR–RAUCHEN VERBOTEN
IT
Sistema portatile DeVilbiss
iGo
®
per
ossigenoterapia™
AVVERTENZA– Non mettere in funzione l’apparecchiatura senza aver prima letto
le istruzioni riportate in questo manuale.
ATTENZIONE– La legge federale statunitense limita la vendita di questo dispositivo
ai medici o su loro prescrizione.
PERICOLO – VIETATO FUMARE
NL
DeVilbiss iGo
®
draagbaar zuurstof-
systeem
WAARSCHUWING– Lees dit instructiehandboekje zorgvuldig door voordat u het
apparaat gaat gebruiken.
ATTENTIE– De federale wetgeving in de Verenigde Staten schrijft voor dat dit
apparaat uitsluitend mag worden verkocht of voorgeschreven door een arts.
GEVAAR– VERBODEN TE ROKEN
0044
FAA
for air travel!
Approved

A-306-12
7
15
13
14
8
1
10
2
4
3
5
9
1
306D-037 Rev C
LPM
1
2
4b
4a
6b
7
6a
5a
5b
3
4c
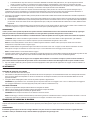
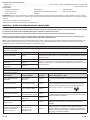
IMPORTANT PARTS
iGO CONTROL PANEL
EN ENGLISH ................................................................................................................................................................................... EN-3
ES ESPAÑOL .................................................................................................................................................................................. ES-13
FR FRANÇAIS ................................................................................................................................................................................. FR-24
DE DEUTSCH .................................................................................................................................................................................. DE-35
IT ITALIANO .................................................................................................................................................................................. IT-46
NL NEDERLANDS ........................................................................................................................................................................... NL-57
A
B
D
1
E
6
11
12
16
C

EN - 3A-306-1
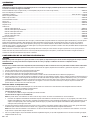
TABLE OF CONTENTS
Important Safeguards .................................................................................................................................................................................................................................. EN - 3
Dangers/Warnings/Cautions/Notes..................................................................................................................................................................................................... EN - 3
Physician Notes ........................................................................................................................................................................................................................................... EN - 4
Provider Checklist ....................................................................................................................................................................................................................................... EN - 4
IEC Symbols and Symbol Definitions .......................................................................................................................................................................................................... EN - 5
Indications for Use ....................................................................................................................................................................................................................................... EN - 5
Important Parts of Your DeVilbiss iGo Personal Oxygen System
iGo Portable Oxygen System and Accessories .................................................................................................................................................................................. EN - 5
iGo Control Panel .............................................................................................................................................................................................................................. EN - 5
Accessories ............................................................................................................................................................................................................................................... EN - 6
Setting Up Your iGo Portable Oxygen System .......................................................................................................................................................................................... EN - 6
Before Operating Your iGo ................................................................................................................................................................................................................. EN - 6
Selecting the iGo Power Source ....................................................................................................................................................................................................... EN - 6
AC Operation ............................................................................................................................................................................................................................... EN - 7
DC Operation ............................................................................................................................................................................................................................... EN - 7
Battery Operation ......................................................................................................................................................................................................................... EN - 7
Initial Battery Operation ......................................................................................................................................................................................................... EN - 8
Typical Battery Recharge Time ............................................................................................................................................................................................. EN - 8
Operating Your iGo ..................................................................................................................................................................................................................................... EN - 8
Travel ........................................................................................................................................................................................................................................................... EN - 9
Reserve Oxygen System ............................................................................................................................................................................................................................. EN - 9
Troubleshooting .......................................................................................................................................................................................................................................... EN - 9
Caring for Your iGo System ....................................................................................................................................................................................................................... EN - 10
Provider’s Notes ......................................................................................................................................................................................................................................... EN - 11
Specifications .............................................................................................................................................................................................................................................. EN - 11
Guidance and Manufacturer’s Declaration .................................................................................................................................................................................................. EN - 12
IMPORTANT SAFEGUARDS
When using electrical products, especially when children are present, basic safety precautions should always be followed. Read all instructions before using. Important
information is highlighted by these terms:
DANGER
Urgent safety information for hazards that will cause serious injury or death.
WARNING
Important safety information for hazards that might cause serious injury.
CAUTION Information for preventing damage to the product.
NOTE Information to which you should pay special attention.
Important safeguards are indicated throughout this guide. Pay special attention to all safety information.
READ ALL INSTRUCTIONS BEFORE USING.
SAVE THESE INSTRUCTIONS
DANGER
DANGER - NO SMOKING
• Oxygen causes rapid burning. DO NOT SMOKE WHILE USING YOUR DEVILBISS OXYGEN EQUIPMENT, or when you are near a person utilizing oxygen therapy.
Keep matches, cigarettes, burning tobacco or candles away from the area where the system is being stored or operated.
• Toreducetheriskofre,burnsorinjurytopersons:
Oxygen,thoughnon-ammable,vigorouslysupportsandacceleratesburningofanyammablematerial.Ifyouknoworsuspectoxygenhasescapedotherthanthrough
normal operation, open doors and windows to ventilate the area.
• To prevent high concentrations of oxygen:
Do not leave iGo running when not in use. Do not leave cannula unattended while unit is delivering oxygen. High concentrations of oxygen can cause rapid burning.
Keep the equipment in a well-ventilated area.
• KeeptheiGoatleast5feet(1.6m)fromhot,sparkingobjectsoropensourcesofame.Positionyourunitatleast6inches(16cm)fromwalls,draperiesoranyother
objectthatmightpreventtheproperowofairinandoutofyouriGo.TheiGoshouldbelocatedsoastoavoidpollutantsorfumes.
• Use no oil or grease. A spontaneous and violent ignition may occur if oil, grease or other petroleum substances come into contact with oxygen under pressure. Keep
these substances away from the oxygen system, tubing and connections and any other oxygen source. DO NOT use any petroleum based or other lubricants.
• Avoid creation of any spark near oxygen equipment. This includes sparks from static electricity created by any type of friction.
• Neveruseaerosolspraysorammableanestheticsneartheequipment.
• Electric Shock Hazard. Do not disassemble. The DeVilbiss iGo Portable Oxygen System contains no user-serviceable parts. If service is required, contact your DeVilbiss
provider or authorized service center.
WARNING
• Keep all units away from children. Do not allow unauthorized or untrained individuals to operate the equipment. Never tamper with or try to repair the equipment yourself.
If you have any questions or suspect your equipment is not operating properly, contact your oxygen provider.
• IftheiGohasadamagedcordorplug,isnotworkingproperlyorhasbeendropped,damagedorsubmersedinwater,donotuseandcallaqualiedtechnicianfor
examination and repair.

EN - 4 A-306-1
• The iGo is equipped with a High Pressure Relief Valve to ensure the user’s safety.
• ChangingtheL/min.settingwillaffectthedoseofoxygendelivered.DONOTreadjusttheL/min.settingunlessdirectedbyyourphysician.
• DO NOT ignore alerts. The iGo is not intended for life supporting or life sustaining applications, nor does it provide any patient monitoring capabilities. Consult your
physician for the type of back-up system required.
• DO NOT leave the iGo or DC Adapter plugged into the vehicle without the engine running or attempt to start the vehicle while the DC Adapter is connected to the vehicle.
This may drain the vehicle’s battery.
• DO NOT operate device or accessories in standing water and DO NOT submerse or expose to water. Electric shock or damage to the unit may result.
• ProtecttheBatteryandAC/DCAdaptersfromuidspillsordripstoavoidpossibleshockhazards.
• TheRechargeableBatterymayexplodeandcausepotentialinjuryifexposedtoordisposedofinare.
• DONOTshortcircuitthebattery’smetalcontactswithmetallicobjectssuchaskeysorcoins.Itmaycausesparksorexcessiveheat.
• DO NOT disassemble, puncture or crush the Battery. Rechargeable Battery electrolytes may be toxic if swallowed and can be harmful to skin and eyes. Use of a
damagedBatterymaycausepersonalinjury.KeeptheBatteryawayfromchildren.
• This device contains electrical and/or electronic equipment. Follow local governing ordinances and recycling plans regarding disposal of device components.
• Equipmentnotsuitableforuseinthepresenceofaammableanestheticmixturewithair,oxygenornitrousoxide.
CAUTIONS
• Federal (U.S.A.) law restricts this device to sale by or on the order of a physician.
• Do not use in an area where the air may be contaminated with carbon monoxide or hydrocarbons, as this may shorten the life of the unit (i.e. near running gasoline
engines, furnace or heater).
• Use only the iGo AC Adapter and DC Adapter supplied with your iGo. Use of another power supply will void the warranty. Do not use parts, accessories or adapters other
than those authorized by DeVilbiss.
• Locate oxygen tubing and power supply cords to prevent tripping hazards.
• Donotusewithotherequipment(i.e.humidier,nebulizer,etc.)wheninPulseDose
®
delivery mode.
• DONOTexposeunittotemperatureoutsideofspeciedoperatingorstoragetemperatures,asthismaydamagetheunit.DONOTexposetheRechargeableBatteryto
temperatures above 140°F (60°C) such as in a vehicle parked in the sun or on a hot day.
• IftheExternalPowerlightashesandtheaudiblealertsounds,buttheunitisnotoperating,thereisnopowertotheunit.RefertoTroubleshootingandcontactyour
DeVilbiss provider if necessary.
• Donotplacethisdevicenearotherequipmentordevicesthatcreateorattractelectromagneticelds.Placingtheunitinelectromagneticeldsgreaterthan10V/mcan
affectitsoperation.Examplesofsuchequipmentaredebrillators,diathermyequipment,cellulartelephones,CBradios,radio-controlledtoys,microwaveovens,etc.
PHYSICIAN’S/RESPIRATORY THERAPIST’S NOTES
1. Useonlycontinuousowmodeofoperationwithpatientswhobreathebelow6BreathsPerMinute(BPM).Refertospecicationsformaximumbreathrate.
2. Useonlycontinuousowmodeofoperationwithpatientswhoconsistentlyfailtotriggerequipment(i.e.mouthbreathingwithclosedsoftpalates).
3. PulseDosesettingsshouldbedeterminedforeachpatientindividually.SettingsfromcontinuousowapplicationsmaynotbeapplicabletoPulseDosemode.
4. Verify patient is getting adequate Pa02 or Sa02 levels in PulseDose delivery mode.
5. UseonlystandardnasalcannulawithPulseDosedelivery.Donotusepediatric(low-ow)nasalcannulawithPulseDosedelivery.Anynasalcannulacanbeusedwith
continuousowdelivery.
6. Donotusewithotherequipment(i.e.humidier,nebulizer,etc.)wheninPulseDosedeliverymode.
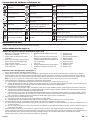
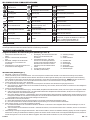
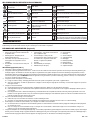
PROVIDER’S CHECKLIST
1. Upon arrival, check the iGo for damage that may have occurred during shipping and notify DeVilbiss of any damage. (Obvious shipping damage should be reported
within 10 calendar days after arrival.) Do not use damaged equipment. Save the carton, noting the position of the unit and placement of the packing material for possible
future return.
2. Record the number of hours on the hour meter underneath the unit.
3. Verifythattheairlterisinplaceinthehandlecavity.
4. Plug the unit into an electrical outlet, turn the unit ON and check the audible and visible alerts.
5. Settheowto3LPMincontinuousowmodeandlettheunitrunforatleast20minutes.
6. Use an oxygen analyzer to check the concentration.
NOTE–Iftheunitfailstooperateproperly,oxygenconcentrationisnotwithinspecication,orexternal/internaldamageisfound,contactDeVilbissforinstructions.
7. Instruct the user on the safe operation of the portable oxygen system. Review the Important Safeguards and observe all Warnings and Cautions on the product and in
the instruction guide.
8. Leave a copy of this instruction guide with the user.
NOTE–DeVilbiss recommends leaving a reserve oxygen supply with the patient when setting up the iGo and instructing the patient to always keep reserve oxygen on hand.

EN - 5A-306-1
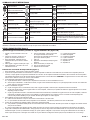
IEC SYMBOLS AND SYMBOL DEFINITIONS
Attention - Consult Instruction Guide WEEE Taiwan Service Required
Danger-No Smoking or Naked Flame Recyclable Li-ion Battery Flow Indicator
Electric Shock Hazard RBRC Recycle Mode Select (Continuous Flow/PulseDose) Button
Alternating Current Power Button Increase Flow Setting
Direct Current (DC Power)
No Breath Detected in PD Mode with
audible alert
Decrease Flow Setting
Type BF Equipment
External Power Present Indicator (solid
light).PowerFailAlarm(ashinglight)
Rechargeable Battery Status Symbol
Drip Proof Equipment IPX1 Normal Oxygen Low Oxygen
IPX0
Non-protected (ordinary equipment) No Naked Flames Use no oil or grease
Follow instructions for use Manufacturer
The device contains electrical and/or electronic equipment
that must be recycled per EU Directive 2012/19/EU - Waste
Electrical and Electronic Equipment (WEEE)
INDICATIONS FOR USE
The Model 306 DeVilbiss iGo Portable Oxygen Concentrator System is indicated for the administration of supplemental oxygen. The device is not intended for life support, nor
does it provide any patient monitoring capabilities.
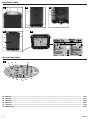
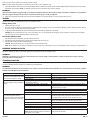
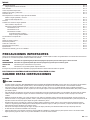
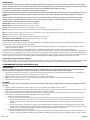
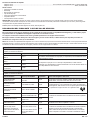
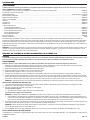
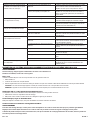
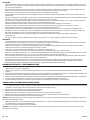
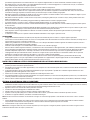
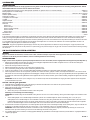
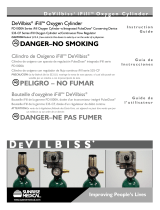
IMPORTANT PARTS (Page 2)
DeVilbiss iGo Portable Oxygen System (Fig. A-E)
1. Handle (one on top rear/two on bottom-sides)
2. Control Panel - Refer to iGo Control Panel below
3. Power Button - Press and hold the Power On/Off
Button to turn your unit on or off.
4. Oxygen Outlet - oxygen is dispersed through this
port.
5. Power Input - Connect either AC or DC power.
6. Communication Port - This port allows service
personnel to diagnose and monitor iGo
performance. It is not for patient use.
7. Air Filter
8. Rating Label (on bottom)
9. Exhaust Vents (on each side)
10. Cart Connection
11. Battery Bay
12. Slot in Battery Bay
13. Rechargeable Battery
14. Battery Tabs
15. Battery Latch
16. Battery Contacts
17. AC Adapter
18. DC Adapter
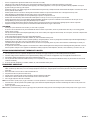
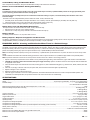
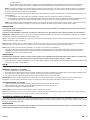
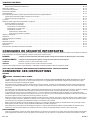
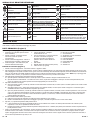
iGo Control Panel (Fig. 1)
1. Power Button - turns the system ON or OFF
2. NoBreathDetectedinPulseDoseModeLight--WhentheiGoisinPulseDosemodeanddoesn’tsenseanybreathingfor30seconds,alightashesandanaudiblealert
will beep every 3 seconds when this activates. If a breath is detected during the alert, the alert condition is cleared. If a breath is not detected during the alert, the unit
changes to Continuous Flow mode after 60 seconds of alerting. NOTE–Once the unit changes to Continuous Flow, use the Mode Select Button to change back to
PulseDose.
3. External Power Present Light/Power Fail Alert
3a. External Power Present Light – Light illuminates when the iGo system is connected to either AC or DC power.
3b. PowerFailAlert–AudibleAlertsoundsinconjunctionwithashinglightfor15minuteswhenPowerFailAlertactivates.PressingthePowerButtonstopsthealert.
4. Oxygen Concentration Lights
4a. Green Normal Oxygen Light = Normal Operation, Acceptable Oxygen Level; illuminates when your iGo is operating properly.
4b. Yellow Low Oxygen Light = Operating Below an Acceptable Oxygen Level; illuminates when there is a problem with your unit. Refer to Troubleshooting for
instructions
4c. Red Service Required Light = Abnormal Operation/Malfunction, Concentration Below an Acceptable Oxygen Level. Illuminates with an audible alert when there is a
problem with your unit. Switch to your reserve oxygen system. Refer to Troubleshooting and/or call your DeVilbiss provider for instructions. Do not attempt any other
maintenance.
5. Mode Select Button and Flow Indicator Light
5a. Use Mode Select Button to select either PulseDose or Continuous Flow.
5b. Flow Indicator Light pulses with every breath when in PulseDose mode and illuminates continuously when in Continuous Flow mode
6. Green Flow Rate Setting Lights (1-6) and Flow Rate Setting Buttons
6a. YourproviderhassetyourprescribedowratesforbothPulseDoseandContinuousFlow.Donotchangethesesettingsunlessitisundertheorderofyour
physician.
6b. IncreaseFlowRateSettingButtonandDecreaseFlowRateSettingButton–usebuttonstoincreaseordecreaseyourowrateifachangeisorderedbyyour
physician.
7. Battery Status Gauge and Low Battery Alert – when a Battery is installed, this indicates the charge remaining in battery. All 6 lights illuminate Green when fully charged.
As battery becomes depleted, the top lights will go out. When battery gets to lowest operating level, the lowest light will turn Yellow, and one short, audible alert will
sound. The lights cycle when battery is being charged.

EN - 6 A-306-1
ACCESSORIES
WARNING
Certain oxygen accessories not specied for use with the iGo Portable Oxygen System may impair the performance. ONLY use recommended oxygen delivery
accessories.
Humidifier Kit includes Remote Stand and Elbow Adapter (only for use in Continuous Flow mode) ..........................................................................................................306DS-627
Elbow Humidifier Adapter Kit .............................................................................................................................................................................................................................444-507
Bubble Humidifier ..........................................................................................................................................................................................................Salter Labs 7600 or equivalent
DeVilbiss Rechargeable Battery ..................................................................................................................................................................................................................... 306D-413
Deluxe Rolling Carry Case ...........................................................................................................................................................................................................................306DS-635
Detachable Wheeled Cart ............................................................................................................................................................................................................................306DS-626
Air Filter ........................................................................................................................................................................................................................................................ 306DS-611
DC Adapter ...................................................................................................................................................................................................................................................306DS-652
AC Adapter ...................................................................................................................................................................................................................................................306DS-651
AC Power Cords
USA Power Cord ....................................................................................................................................................................................................................................306DS-601
Continental Europe Power Cord .............................................................................................................................................................................................................306DS-602
UK Power Cord.......................................................................................................................................................................................................................................306DS-603
Australia Power Cord..............................................................................................................................................................................................................................306DS-604
China Power Cord ..................................................................................................................................................................................................................................306DS-605
iGo Accessory Bag .......................................................................................................................................................................................................................................306DS-655
iGo Battery Charger ............................................................................................................................................................................................................................................306CH
Therearemanytypesofhumidiers,oxygentubingandcannulas/masksthatcanbeusedwiththisdevice.Certainhumidiersandaccessoriesmayimpairthedevice’s
performance.Useonlystandardnasalcannulacapableofsupportingaminimumowrateof10LPMwithPulseDosedelivery.Donotusepediatric(low-ow)nasalcannulaor
maskwithPulseDosedelivery.Amaskoranynasalcannulacanbeusedwithcontinuousowdeliveryandmaybesizedaccordingtoyourprescriptionasrecommendedby
your homecare provider who should also give you advice on the proper usage, maintenance and cleaning.
NOTE–Theoxygensupplyaccessory(patienttubing)shallbeequippedwithameansthat,incaseofre,stopsthedeliveryofoxygentothepatient.Thismeansofprotection
shouldbelocatedasclosetothepatientaspracticableandnotadverselyaffectthedeliveryofoxygenduringnormaluseineithercontinuousoworPulseDosemodesof
operation.
SETTING UP YOUR IGO OXYGEN SYSTEM
DANGER
Keep the iGo at least 5 feet (1.6 m) from hot, sparking objects or open sources of ame. Do not locate near ammable materials or in the direct path of any heat
source, such as a heat register or car heater.
WARNING
Before moving or repositioning the iGo, always disconnect the power cord. Failure to do so may result in damage to the unit or personal injury.
1. DonotoperatetheiGoPortableOxygenSystemwithoutrstreadingtheImportantSafeguards.ObserveallWarningsandCautionsontheproductandintheinstruction
guide.
2. Position the iGo so that alerts can be heard.
3. Do not use in a closet or any small, enclosed space.
4. Routeoxygentubingsuchthatitdoesnotkinkandisnotsubjecttoocclusion.
5. If this is a new unit, or you have installed a New Battery, refer to Initial Battery Operation section on page EN-8.
6. Positionyourunitnearanelectricaloutletatleast6inches(16cm)fromwalls,draperiesoranyotherobjectsthatmightpreventtheproperowofairinandoutofyour
iGo. The iGo should be located so as to avoid pollutants or fumes and placed in a well -ventilated place so that the air inlet and exhaust are not blocked. Do not cover unit
with a blanket, towel, quilt or other covering, as the unit may overheat.
NOTE– Do not connect the iGo to an extension cord or to an electrical outlet controlled by a wall switch. No other appliances should be plugged into the wall outlet.
Before Operating Your iGo
1. AlwayschecktoseethattheAirFilterisclean.PropercleaningofthislterisdiscussedintheCaringforYouriGoSystemsection.
2. Check to be sure that the Exhaust Vents are not blocked.
3. Attach the appropriate accessories to the oxygen outlet.
Oxygen Tubing Connection:
a. Attach the tubing to the oxygen outlet. Make sure it is securely attached.
Oxygen Tubing Connection with Humidication:
NOTE–
A humidier can be used in Continuous Flow mode ONLY. Do not use a humidier when in PulseDose mode:
a. Attachtheelbowhumidieradapterdirectlytothehumidierbottle.Attachoxygentubing(50’max)totheelbowhumidieradapterandoxygenoutlet.Makesureit
issecurelytightened.Placethehumidierbottleonthehumidierstandandsecurethestandonasturdy,atsurfacenearthepatientwhereitwillbesafeandwill
notbeknockedover.Thehumidierbottlemustremainuprighttopreventwaterfromenteringthecannula.
4. Your physician has prescribed a nasal cannula. In most cases, they are already attached to the oxygen tubing. If not, follow the manufacturer’s instructions for
attachment.Attachthecannulatubing(7’max)directlytothehumidierbottle.
NOTE–UseonlystandardnasalcannulawheninPulseDosemode.Donotusepediatric(low-ow)nasalcannulawithPulseDosedelivery.Anynasalcannulacanbe
used with Continuous Flow mode.
5. For portable use, ensure fully charged battery is installed, and necessary accessories (e.g. AC or DC cords/adapters) are packed.
Selecting the iGo Power Source
The iGo is a lightweight, portable oxygen concentrator capable of being operated directly from three different power sources: (1) AC Power (2) DC Power or (3) Rechargeable
Battery.

EN - 7A-306-1
WARNING
Do not expose any power cords/adapters to water or other liquid spills or drips. Electric shock or serious injury may result.
Improper use of the power cords, plugs and/or adapters can cause a burn, re or electric shock hazard. Do not use any power cord/adapter that is damaged.
Do not operate device or accessories in standing water and do not submerse or expose to water. The iGo enclosure does not provide protection against the
harmful effects of liquid ingress. Electric shock or damage to the unit may result.
AC Operation
The iGo includes a universal AC Adapter which attaches to the AC Power Cord for use at home or where standard AC power is available. To use AC power:
1. Connect the AC Adapter by aligning the arrow on the plug locking ring with the white dot on the receptacle of the unit. Push until the locking ring twists slightly
counterclockwise then snaps back into alignment with the dot on the receptacle. To disconnect: grasp the plug, twist counterclockwise and pull. When properly
connected, a green indicator light on the AC Adapter will illuminate, and the External Power Present light will appear on the control panel.
2. Connect the AC Power Cord to the AC Adapter and to a grounded power outlet. Do not connect the iGo to an extension cord or to an electrical outlet controlled by a wall
switch. No other appliances should be plugged into the wall outlet.
NOTE–Use with grounded, 3-pin receptacle. DO NOT remove ground pin from cord. Use only with DeVilbiss approved cords.
NOTE– The AC Power Cord used with the iGo must meet the requirements of the country where the product is used.
DC Operation
Your iGo includes a DC Adapter that allows the system to operate from DC accessory power port outlets such as those found in motor vehicles.
1. Determine the Fuse rating in your motor vehicle. The rating must be 15 AMP or greater—-consult the Operator’s Manual for your vehicle or look at your fuse panel in the
vehicle.
2. Start your vehicle. NOTE–DO NOT leave the iGo or DC Adapter plugged into the vehicle without the engine running or attempt to start the vehicle while the DC Adapter
is connected to the vehicle. This may drain the vehicle’s battery.
3. Insert the DC Adapter into the Power Input on the side of the iGo. Connect the adapter by aligning the arrow on the plug locking ring with the white dot on the receptacle
of the unit. Push until the locking ring twists slightly counterclockwise then snaps back into alignment with the dot on the receptacle. To disconnect: grasp the plug, twist
counterclockwise and pull.
4. Ensure the DC accessory power port is clean, and a good connection can be made. Insert the other end of the DC Adapter into the vehicle’s DC accessory power port.
When properly connected and receiving power from the DC source, a green indicator light on the DC Adapter and the External Power Present light on the control panel
will illuminate.
5. Secure the iGo and the DC Adapter in your vehicle and make sure the air inlet and exhaust vents are not blocked.
NOTE–The battery will not charge when connected to a DC accessory power port.
Battery Operation
WARNING
Electronics are static-sensitive and may be an electric shock hazard. When the battery is removed, do not touch the contacts in the Battery Bay or on the battery.
The communication port is also static-sensitive and should not be touched.
The iGo can also be powered by a Rechargeable Battery. If the battery is installed, and adequate power is available, the iGo will charge the battery any time AC power is
present, and the battery temperature is below a safe charging temperature. If external power is disconnected, the iGo will automatically switch over to the battery (if installed).
When external AC power is restored, the iGo will accept power from the external source and charge the battery.
Installing the Battery:InsertthebatterytabsintotheslotsintheBatteryBayandpushthebatteryuntilitissecureandushwiththebackofthesystem.Whenthebatteryis
properly installed and the iGo is On, the Battery Status Gauge will appear on the Control Panel. (If you DO NOT have a Battery installed, the Status Gauge will not light up).
Removing the Battery: Push down on the Battery latch. The Battery will tilt so that you can grasp it for removal. CAUTION–When the battery is removed, the Communication
Port is exposed. Do not attach any cables to this port. It is for service only. The Battery Contacts inside the bay and on the battery are also exposed and should not be
touched.
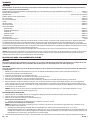
Battery Capacity:ThecapacityoftheBatteryislituponthecontrolpanel.Avarietyoffactors,suchasbatteryage,owrateandPulseDoseorContinuousFlowMode
operation, determine the duration of operating time. The following table provides estimates of amount of time that a new, fully charged iGo Battery will operate.
Typical New Battery Operation Time
Setting Continuous Flow PulseDose (20 BPM)
1.0 4.0 hours 5.4 hours
2.0 2.4 hours 4.7 hours
3.0 1.6 hours 4.0 hours
4.0 — 3.5 hours
5.0 — 3.2 hours
6.0 — 3.0 hours
NOTE–Be sure to check the battery charge level before travel. Battery will discharge over time.
WARNING
Do not short circuit the Battery’s metal contacts with metallic objects such as keys or coins. It may cause sparks or excessive heat.
Do not tamper with, disassemble, puncture or crush the Battery. There are no serviceable parts inside the Battery. Do not open. Battery electrolytes may be toxic if
swallowed and can be harmful to skin and eyes. Keep the Battery away from children.
Exposing the Battery to water or other liquids may cause personal injury.
Replace the Battery with only approved DeVilbiss Rechargeable Battery. The iGo system can only work with a DeVilbiss Battery. Use of a damaged battery or a
non-approved Battery may damage the unit, present a risk of re or explosion, cause personal injury and void the warranty.
The Battery used in this device may present a risk of re or chemical burn if mistreated. DO NOT disassemble, incinerate or heat above 140°F (60°C) such as in a
vehicle parked in the sun or on a hot day.

EN - 8 A-306-1
Return your Battery to your provider for proper disposal.
CAUTION–DO NOT drop the Battery or expose it to mechanical shock.
CAUTION–Only use the Battery for its intended purpose.
NOTE–Operating time will degrade with Battery use and age.
NOTE– Store your Battery in a cool, dry location when not in use to help assure the longevity of your Battery.
NOTE– Charging the Battery below 50°F (10°C) or above 104°F (40°C) may degrade the performance. The Battery will not charge above 45°C.
NOTE– Fully recharge battery after each use.
NOTE– Unit run time will also be reduced by letting the battery sit at a discharged state.
STORAGE NOTE– Battery should be charged at least once every 3 months.
Initial Battery Operation
ThenewbatterypackagedwithyouriGoPortableOxygenSystemisnotfullycharged.BeforeusingyouriGoforthersttime,youmustinstallandfullydischargethenfully
charge the battery.
1. Using battery power only, operate the iGo until the battery is fully drained. The unit will turn off and the power failure alarm will sound.
2. Connect the AC Power Cord and plug in to completely charge the battery. This may require up to 4.5 hours of uninterrupted charging.
In the event of a power interruption, the iGo Portable Oxygen System will automatically switch to the battery operation if installed. When AC power is restored, the battery will
automatically start recharging. If the battery is not present during a power interruption, the Power Fail alert will activate, and the iGo will stop operation. When power is
restored, unit will resume oxygen production unless the Power Button was pressed to stop the Power Fail Alert.
Typical Battery Recharge Time
Thetypicaltimetorechargeyourbatteryfromafullydischargedconditionis2.0hoursto4.5hoursdependentupontheowsetting.IftheBatteryistoowarm,chargingwill
notbeginuntilitsufcientlycools.Extremetemperature(highorlow)mayextendchargetime.
OPERATING YOUR IGO
WARNING
Do not leave iGo running when not in use. Do not leave cannula unattended while unit is delivering oxygen. High concentrations of oxygen can cause rapid
burning. Keep the equipment in a well-ventilated area.
1. Checktoseeiftheairlterisinplacebeforeusing.Iftheairlterneedstobecleaned,washwithsoapywaterandallowtodrybeforeusing.Ifnecessary,replacewitha
newairlter.
2. Plug unit into AC Power, DC Power or make sure there is a charged Battery installed.
NOTE–Every time a button is pressed or when a change to the power source occurs, the iGo will give a short, audible chirp.
3. Connect the tubing to the oxygen outlet and the cannula.
DANGER
If tubing becomes disconnected during operation, iGo does not alert. Check ow at the cannula to verify oxygen delivery.
4. Attach a standard nasal cannula to the oxygen outlet and to your nose and face. Breathe normally through the cannula.
CAUTION–Toensurethereisadequateowtodeliveroxygen,thelengthofthetubingmustnotexceed50feet(15.2m)whenusingContinuousFlowModeandmustnot
exceed 35 feet (10.5m) when operating in PulseDose Mode for adequate breath detection.
5. PressandholdthePowerButtontoturnyouriGoOn.WhentheunitisturnedOn,allthelightsonthecontrolpanelwillilluminatebriey,andanaudiblealertwillbriey
activate.
a. When using External Power:
1) In PulseDose mode: After a few seconds, the External Power, Normal Oxygen and Flow Rate lights will remain lit. The Flow Indicator Light will pulse with each
breath. If a battery is installed, the Battery Status Lights will either illuminate to indicate battery charge level or cycle to indicate battery is charging.
2) In Continuous Flow mode: After a few seconds, the External Power, Normal Oxygen, Flow Indicator and Flow Rate lights will remain lit. If a battery is installed,
the Battery Status Lights will either illuminate to indicate battery charge level or cycle to indicate battery is charging.
b. When using Battery Power:
1) In PulseDose mode: After a few seconds, the Normal Oxygen and Flow Rate lights will remain lit. The Battery Status Gauge Lights will also be lit indicating
battery charge level. The Flow Indicator Light will pulse with each breath.
2) In Continuous Flow mode: After a few seconds, the Normal Oxygen, Flow Rate and Flow Indicator lights will remain lit. The Battery Status Gauge Lights will
also be lit indicating battery charge level.
NOTE–The DeVilbiss iGo has an oxygen sensing device (OSD
®
)tomonitoroxygenpurityoncetheoxygenstabilizationprocessiscomplete(afterapproximatelytherst
20minutesofoperation).Oncestabilized,theOSDmonitorstheoxygenpurityandwillalertifpurityfallsbelowanacceptablelevel.
6. TochangeyourDeliveryMode,presstheModeSelectbutton.TheiGowillcomeonatthelastmodeandowsettingused.
a. ContinuousFlowOperation-WhenoperatinginContinuousFlowMode,acontinuoussupplyofoxygenwillowthroughyourtubingandnasalcannula.
b. PulseDose Operation - When operating in PulseDose mode, an alert will beep after 30 seconds if a breath is not detected. If another 60 seconds elapses, and no
breath is detected, the unit will switch to Continuous Flow at the last Continuous Flow setting used.
NOTE–PulseDosedramaticallyextendstheusetimeoftheiGoPortableOxygenSystemtoofferincreasedmobilitywithimprovedcomfortandincreasedefciency.Many
usersndPulseDoseoxygendeliverymorecomfortablethancontinuousowdeliverysystems.
WARNING
PulseDose Flow settings should be determined for each patient individually. Settings from Continuous Flow applications may not be applicable to PulseDose
Mode.
As with conserving devices, the iGo may not be able to detect some respiratory efforts in PulseDose mode.
CAUTION–Donotusewithotherequipment(i.e.humidier,nebulizer,etc.)wheninPulseDosedeliverymode.TheiGowillnotdetectabreathandwilldefaulttoContinuous
Flow.
NOTE–Apediatricorlow-owcannulashouldnotbeusedinPulseDosedeliverymode.Thereduceddiameterofthecannulacausestoomuchbackpressureandwillaffect
the oxygen volume delivered.
NOTE–PulseDose delivers oxygen in a very short “puff.” It does not deliver oxygen continuously. The length of time that PulseDose delivers oxygen will not vary from breath to

EN - 9A-306-1
breath. The time is set in correlation to the patient’s prescription setting.
NOTE– You will get longer operating time on your Battery if you operate your iGo in PulseDose mode.
7. ChecktheFlowRatetomakesureitissettoyourprescriptionsetting.Ifadjustmentisneeded,usetheFlowRateSettingbuttonstoadjusttheowratetothesetting
prescribed by your physician. NOTE– YourDeVilbissprovidermayhavesettheowsothatitcannotbeadjusted.
WARNING
Under certain circumstances, oxygen therapy can be hazardous. Seeking medical advice before using an oxygen concentrator is advisable. It is very important to
follow your oxygen prescription. Do not increase or decrease the ow of oxygen - consult your physician.
8. WhenyouhavenishedusingtheiGo,pressandholdthePowerButtontoturnOff.StoretheiGoinacool,drylocationwhennotinuse.
TRAVEL
The iGo has two options for portability. Both are for use on pedestrian surfaces:
Rolling Carry Case
1. Place the iGo in the carry case.
2. Thecarrycasehasanopeningforthecannulaandoneforexternalpowerconnections.Italsohasseveralscreenedopeningsforairow.Neverblocktheairopenings.
Do not use a carry case other than one approved by DeVilbiss.
3. Toadjustthehandleheighteitherpulluponthehandleand/orpressthebuttonandpushdownonthehandle.
CAUTION–The iGo should be taken as a carry-on item if traveling by air. If you are checking the iGo as luggage, it must be packed in a protective case. The Rolling
Carry Case does not provide adequate protection if checking the iGo.
Detachable Wheeled Cart
1. Align the locator holes on the bottom of the unit to the tabs on the cart.
2. Align the screw to the insert on the back of the iGo and hand- tighten the knob on the cart.
3. Pushthebuttononthecarthandletoadjusttheheight.
CAUTION– When transporting the iGo, care should be taken to avoid excessive shock.
NOTE–Beforestartingatrip,checkwithyourDeVilbissproviderforoptions(e.g.extrabattery/ACCordforuseatdestination).RefertoAccessoriesforappropriatecord.
RESERVE OXYGEN SYSTEM
As a precaution, your DeVilbiss provider may supply you with a reserve oxygen system. If your unit loses electrical power or fails to operate correctly, the Patient Alert System
will sound to signal you to switch to your reserve oxygen system (if provided). Contact your DeVilbiss provider.
WARNING
Availability of an alternate source of oxygen is recommended in case of power outage or mechanical failure. Consult your physician for the type of back-up
system required. Do not ignore alerts.
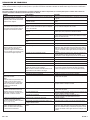
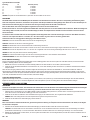
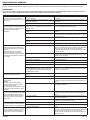
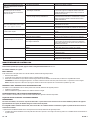
TROUBLESHOOTING
The following troubleshooting chart will help you analyze and correct minor iGo malfunctions. If the suggested procedures do not help, switch to your reserve oxygen system
and call your DeVilbiss homecare provider. Do not attempt any other maintenance.
WARNING
To avoid electric shock hazard, do not remove the covers. There are no user-serviceable internal components. The covers should only be removed by a qualied
DeVilbiss provider/DeVilbiss homecare technician.
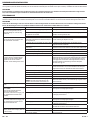
SYMPTOM POSSIBLE CAUSE REMEDY
Unit does not operate. No lights are
illuminated and nothing happens when power
button is pressed and held for 1 second.
1. Power button was not held. 1. Press Power button and hold for 1 second.
2. No External Power and no charged battery installed. 2. Plug into external power or install charged battery.
3. Unit malfunction. 3. Contact your DeVilbiss provider.
Unit does not operate. External Power Light
asheswithaudiblealert.PowerFailAlertis
activated.
1. AC power cord not properly inserted into wall outlet
or DC adapter not attached.
1. Check power cord connection at the wall outlet and adapter connection to
unit.
2. Charged battery not installed or defective battery. 2. Install charged battery or contact your provider for a replacement battery.
3. No power at wall outlet. 3. Check your home circuit breaker and reset if necessary. Use a different wall
outlet if the situation occurs again.
4. Faulty AC Adapter. 4. Contact your DeVilbiss provider.
5. Faulty DC accessory power port outlet. 5. Check automotive fuse.
6. Faulty DC Adapter. 6. Contact your DeVilbiss provider.
NoBreathDetectedlightashingandaudible
alert sounding (PulseDose Mode only).
Unit set up for PulseDose mode but changed
to Continuous Flow because no breath was
detected.
1. Obstructed cannula or oxygen tubing. 1.Detachcannula.Ifproperowisrestored,cleanorreplaceifnecessary.
Disconnecttheoxygentubingattheoxygenoutlet.Ifproperowisrestored,
check oxygen tubing for obstructions or kinks. Replace if necessary.
2.Cannulaisnotadjustedproperly. 2.Checkallcannulaconnectionstomakesuretheyaretight,andadjustthe
cannulatotcomfortablyinyournose.Ensuretubingisnotkinked.
3. Tubing/cannula too long. 3. Replace with shorter tubing/cannula.
4.Humidierattached. 4.Removehumidier.
5.Lowowcannulabeingused. 5. Replace with standard cannula.
6. Atmospheric Pressure Port obstructed. 6. Remove obstruction.
7. Patient not candidate for PulseDose delivery.
NOTE-Unit will automatically change to CF Mode if
this condition is not corrected.
7. Use CF delivery for patients that fail to trigger equipment (e.g. mouth
breather with closed soft palate.)

EN - 10 A-306-1
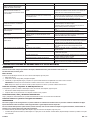
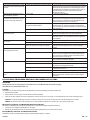
SYMPTOM POSSIBLE CAUSE REMEDY
Cannotadjust/changetheowrate. 1. Flow rate has been locked by your provider. 1. Contact your DeVilbiss provider.
2. Unit malfunction. 2. Contact your DeVilbiss provider.
Yellow Low Oxygen light is illuminated.
OR
Red Service Required light is illuminated with
audible alert.
External Power and/or Battery Power lights
illuminated. Unit is operating.
1.Airlterisblocked. 1.Checktheairlter.Ifthelterisdirty,washitfollowingthecleaning
instructions.
2. Exhaust is blocked. 2. Check the exhaust area and make sure there is nothing restricting the unit
exhaust.
Red Service Required light is illuminated.
External Power and/or Battery Power lights
illuminated. Audible alert is sounding. Unit
does not operate.
1.Airlterisblocked. 1.Checktheairlter.If thelterisdirty,washitfollowingthecleaning
instructions.
2. Exhaust is blocked. 2. Check the exhaust area and make sure there is nothing restricting the unit
exhaust.
3. Unit is overheated. 3a. Allow unit to cool and try again.
3b. Move unit to cooler location.
Power Fail Alert activates (External Power
lightashesandaudiblealertsounds).
1. Battery completely discharged. 1. Recharge battery.
2. Lost external power without battery installed. 2. Install battery or plug into external power.
RedServicerequiredlightisashing.Flow
Indicatorlightisashing.AudibleAlertis
sounding. Unit is operating.
1. Blocked or defective cannula or oxygen tubing 1.Detachcannula.Ifproperowisrestored,cleanorreplaceifnecessary.
Disconnecttheoxygentubingattheoxygenoutlet.Ifproperowisrestored,
check oxygen tubing for obstructions or kinks. Replace if necessary.
Unit does not operate when using with
charged battery. Power Fail alarm activates.
1. Battery is overheating. 1. Allow battery to cool.
DC Adapter is attached. Unit runs from
Battery or does not run. The External Power
Present Light not illuminated.
1. Poor connection to DC power source. 1. Ensure the DC accessory outlet is clean and a good connection can be
made. Insert the other end of the DC Adapter into the vehicle's DC accessory
outlet.
2. Vehicle power source (vehicle accessory connector)
dropped too low for the DC Adapter.
2. If the vehicle power source drops too low for the DC Adapter, the iGo will
revert to Battery operation (if present) or will cease operation until power is
restored.
3. Fuse in vehicle is blown. 3. Check the fuse and replace if necessary.
Lowest Battery Status Light is Yellow. Unit
beeps once.
1. Battery needs to be charged. 1. Plug unit into AC power or replace discharged battery with charged battery.
2. Plug unit into DC accessory outlet to operate unit (battery will not recharge
on DC power).
Battery Status Lights never indicate fully
charged.
1. Battery needs to be conditioned. 1. Fully discharge battery then recharge.
2. Defective battery. 2. Contact your DeVilbiss provider.
YellowBatteryStatuslightisashing. 1. Unit is equipped with built-in battery test, and the
battery pack is being checked.
1.Iflightasheslongerthan5minutes,batteryisdefective.Contactyour
DeVilbiss provider for a replacement.
Audible Alert sounds intermittently when
operating from DC Adapter.
1. Vehicle not running. 1. Start vehicle.
2. Poor connection to DC power source. 2. Ensure the DC accessory power port outlet is clean, and a good connection
can be made. Insert the DC Adapter into the vehicle’s DC accessory outlet.
3. Vehicle electrical system overloaded or defective. 3.HaveaqualiedautotechniciancheckelectricalsystemwhileiGois
attached.
Short Battery Run Time. 1. Battery needs to be reconditioned. 1. Perform a complete discharge and then a 100% charge of the battery.
2.Airlterisblocked. 2.Checktheairlter.Ifthelterisdirty,washitfollowingthecleaning
instructions.
3. Exhaust is blocked. 3. Check the exhaust area and make sure there is nothing restricting the unit
exhaust.
4.Intakeltersilencerisblocked. 4.Replacetheintakesilencer/lter.
If any other problems occur with your iGo. 1. Turn your unit Off and switch to your reserve oxygen system. Contact your
DeVilbiss provider immediately.
CARING FOR YOUR DEVILBISS IGO PORTABLE OXYGEN SYSTEM
WARNING
Before attempting any cleaning procedure, turn the unit Off and disconnect from AC or DC power.
Do not use lubricants, oils or grease.
Air Filter
Theairltershouldbecleanedatleastonceaweek.Toclean,followthesesteps:
1. Removetheairlter.
2. Wash in a solution of warm water and dishwashing detergent.
3. Rinsethoroughlywithwarmtapwaterandtoweldry.Theltershouldbecompletelydrybeforereinstalling.
CAUTION–Topreventproductdamage,donotattempttooperatetheunitwithouttheairlterorwhilethelterisstilldamp.
NOTE–Devicehasaninternalintakelterthatmustbeinspectedbyaqualiedprovider/technicianevery3years.
AC Adapter and Power Cord/DC Adapter
The adapters and power cords should be cleaned as needed. To clean, follow these steps:
1. Disconnect cords from the iGo before cleaning.
2. Clean the cords by using a damp cloth with a mild household cleaner and wipe dry.

EN - 11A-306-1
Cannula/Mask, Tubing and Humidifier Bottle
Cleanandreplacethecannula/mask,tubingandhumidierbottleaccordingtothemanufacturer’sinstructions.
Exterior Covers and DeVilbiss Rechargeable Battery
WARNING
To avoid electric shock, do not remove the iGo covers. The covers should only be removed by a qualied DeVilbiss provider. Do not apply liquid directly to the
covers or utilize any petroleum-based solvents or cleaning agents.
Use of harsh chemicals (including alcohol) is not recommended. If bactericidal cleaning is required, a non-alcohol based product should be used to avoid
inadvertent damage.
The exterior covers and rechargeable battery should be cleaned as needed. To clean, follow these steps:
1. The battery should remain installed and be wiped clean with the covers. If battery is removed, wipe the battery bay and battery with a Dry Cloth only.
2. Clean the iGo exterior covers by using a damp cloth with a mild household cleaner and wipe it dry.
If device has been exposed to contagious pathogens, contact your provider for instructions.
Rolling Carry Case and Detachable Wheeled Cart
The carry case and/or cart should be cleaned as needed. To clean, follow these steps:
1. Remove the iGo from the carry case or cart before cleaning.
2. Clean the case or cart by using a damp cloth with a mild household cleaner and wipe dry.
Battery Storage
Your Battery should be stored in a cool, dry location when not in use.
Battery Disposal / Disposal of Equipment and Accessories
Your Battery is rechargeable and can be recycled. Follow local governing ordinances and recycling plans regarding disposal of device components. Do not dispose of the
rechargeable Battery. Contact your DeVilbiss provider before disposal of battery or any iGo components.
PROVIDER’S NOTES - Cleaning and Disinfection When There is a Patient Change
When medical devices have already been used with a patient, contamination with human pathogenic germs should be assumed (unless there is evidence to the contrary). The
next patient, user or third party should be protected by appropriate handling and preparation. Therefore, when there is a patient change, people must be protected during the
transport and handling of the device, and the device must be fully processed, i.e., cleaned and disinfected, by suitably trained personnel before reuse to protect the next
patient.ThecompleteprocessingmayonlybedonebythemanufacturerorbyaqualiedDeVilbissprovider/servicetechnician.
NOTE–IfthefollowingdescribedcompleteprocessingoftheconcentratorbyaqualiedDeVilbissprovider/technicianisnotpossible,thedevicemustnotbeusedbyanother
patient!
DeVilbissHealthcarerecommendsthatatleastthefollowingproceduresbecarriedoutbythemanufactureroraqualiedthirdpartybetweenusesbydifferentpatients.
NOTE–If preventive maintenance is due at this time, these procedures should be carried out in addition to the servicing procedures.
1. Disposeofallaccessorycomponentsthatarenotsuitableforreuse,particularlytheoxygentubing,nasalcannula/mask,oxygenoutletconnectorandhumidierbottle.
2. CAUTION–the concentrator must be disconnected from the power supply for this step: Open the concentrator and remove all dust deposits inside the cabinet with
an appropriate vacuum cleaner.
3. Clean and disinfect all parts of the cabinet inside and outside, including power cord, with a suitable disinfecting agent, e.g., Microbac Forte, Terralin
®
, Aldahol, Cidex OPA
or Peract.
4. Check the cord, the plug on the back of the device, the power switch, the fuse holder and the indicator light for possible damage.
5. Replace all damaged or worn components.
6. Replacethecabinetairlteronthebackofthedevice.
7. Checktheoxygenconcentration.Ifthedeviceiswithinspecications,theextendedlifeintakebacterialterdoesnotneedtobereplacedbetweenpatients.Ifthe
concentrationisnotwithinspecications,theprovidershouldrefertotheservicemanualsectiononTroubleshooting.
SPECIFICATIONS
Dimensions (H x W x D) ...........................................................................................................................................15 inches x 11 inches x 8 inches (38.0 cm x 28.0 cm x 20.0 cm)
Weight ..............................................................................................................................................................19 pounds (8.6 kg) with Battery; 15.5 pounds (7.0 kg) without Battery
Flow Rate Settings ................................................................................................................................................................................................................1 to 6 in PulseDose Mode
1 to 3 LPM in Continuous Flow Mode
Maximum Recommended Continuous Flow (@ nominal outlet pressures of 0 and 7 kPa) ................................................................................................................................3 LPM
Maximum Breathing Rate (PulseDose mode only) ...................................................................................................................................................................40 BPM @ settings 1-4
37 BPM @ setting 5
31 BPM @ setting 6
Oxygen Concentration ...................................................................................................................................................................................................91% ± 3% for all flow settings
Maximum System Pressure ............................................................................................................................................................................................................15 psig (103.5 kPa)
Oxygen Outlet Pressure ...................................................................................................................................................................................................5.0 ± 1.0 psig (34.5 ± 7 kPa)
Operating Temperature.....................................................................................................................................................................................................41°F to 104°F (5°C to 40°C)
Operating Humidity ...........................................................................................................................................................................................10% - 95% at 82.4°F (28°C) dew point
Transportation and Storage Temperature ................................................................................................................................................................ -4°F to +140°F (-20°C to +60°C)
Transportation and Storage Humidity .............................................................................................................................................................................. 10% to 95% non-condensing
Transportation and Storage Atmospheric Pressure (at nominal temperature and humidity) (Tested at ~933 hPa) ......................................................................640 hPA - 1010 hPA
Altitude (Tested at ~933 hPa) ................................................................................................................................................................................... 0 –13,123 feet (0 – 4,000 meters)
Nominal Sound Level ....................................................................................................................................................................................40 dBA at 3 in PulseDose Delivery Mode
Maximum Sound Level in Battery Mode (from front) @ 3 LPM continuous flow ................................................................................................................................................48 dBA
Maximum Sound Level as test per ISO 8359 .....................................................................................................................................................................................................55 dBA

EN - 12 A-306-1
Pressure Relief Mechanism .......................................................................................................................................................................................... 20 psi ±20% (138 kPa ± 20%)
OSD Set Points ...............................................................................................................................................................................................................≥84%-NormalLight(green)
76-83% - Low O
2
Light (yellow)
≤75%-ServiceRequiredLight(red)andAudibleAlert
Device Classification .......................................................................................................Class 1, Type BF Applied Part, IPX1 (Battery Mode Only), IPX0 (AC and DC Input Mode)
The DeVilbiss iGo Oxygen Concentrator meets RTCA DO-160F Section 21 Class M for battery operation only Airline Use.
Electrical Power:
DeVilbiss Rechargeable Battery (Lithium Ion) ...................................................................................................................................................................................... 8.8 Amp Hrs
AC Adapter Input Voltage Range ......................................................................................................................................................................................... 100-250Vac, 50/60 Hz
DC Adapter ......................................................................................................................................................................................................... 12 Volt Negative Ground Vehicles
Adapter Manufacturer Info:
AC Adapter ..............................................................................................................................................Jerome Industries Model # WSX828M, Autec Model # DT-EM250-2805
DC Adapter .........................................................................................................................................................................................................................EDAC, Model ED1010E
Audible Alerts:
• Power Fail
• Low Battery
• Low Oxygen Output
• High Flow/Low Flow
• No Breath Detected in PulseDose Mode
• High Temperature
• Unit Malfunction
CAUTION–When moving the iGo from an extreme environment, allow time for your iGo to acclimate to the recommended operating environment. Operating your iGo outside
the recommended operating environment may impact performance, cause damage and void the warranty.
Specicationssubjecttochangewithoutnotice.
DeVilbiss will make available on request circuit diagrams, parts lists, etc.
DEVILBISS GUIDANCE AND MANUFACTURER’S DECLARATION
WARNING
Medical Electrical Equipment needs special precautions regarding EMC and needs to be installed and put into service according to the Electromagnetic
Compatibility [EMC] information provided in the accompanying documents.
Portable and Mobile RF Communications Equipment can affect Medical Electrical Equipment.
The equipment or system should not be used adjacent to or stacked with other equipment. If adjacent or stacked use is necessary, the equipment or system
should be observed to verify normal operation in the conguration in which it will be used.
NOTE– The EMC tables and other guidelines provide information to the customer or user that is essential in determining the suitability of the Equipment or System for the
Electromagnetic Environment of use, and in managing the Electromagnetic Environment of use to permit the Equipment or System to perform its intended use without
disturbing other Equipment and Systems or non-medical electrical equipment.
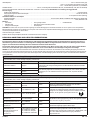
Guidance and Manufacturer’s Declaration – Electromagnetic Emissions
Thisdeviceisintendedforuseintheelectromagneticenvironmentspeciedbelow.Thecustomerortheuserofthisdeviceshouldassurethatitisusedinsuchan
environment.
Emissions Test Compliance Electromagnetic Environment – Guidance
RF Emissions CISPR 11 Group 1
This device uses RF energy only for its internal function. Therefore, its RF emissions are very low and are not
likely to cause any interference in nearby electronic equipment.
RF Emissions CISPR 11 Class B
This device is suitable for use in all establishments including domestic and those directly connected to
the public low-voltage power supply network that supplies buildings used for domestic purposes.
Harmonic emissions IEC 61000-3-2 Class B
Voltageuctuations/icker
emissions
Complies
Guidance and Manufacturer’s Declaration – Electromagnetic Immunity
Thisdeviceisintendedforuseintheelectromagneticenvironmentspeciedbelow.Thecustomerortheuserofthisdeviceshouldassurethatitisusedinsuchanenvironment.
Immunity Test IEC 60601 Test Level Compliance Level Electromagnetic Environment - Guidance
Electrostatic discharge (ESD)
IEC 61000-4-2
±6kV contact
±8kV air
Complies
Floorsshouldbewood,concreteorceramictile.Ifoorsarecoveredwith
synthetic material, the relative humidity should be at least 30%
Radiated RF IEC 61000-4-3 3 V/m 80MHz to 2.7GHz Complies
FieldstrengthsoutsidetheshieldedlocationfromxedRFtransmitters,as
determined by an electromagnetic site survey, should be less than 3 V/m.
Interference may occur in the vicinity of equipment marked with the following
symbol:
Conducted RF IEC 61000-4-6 3 Vrms 150kHz to 80MHz Complies
Electrical fast transient
IEC 61000-4-4
±2kV power line
±1kV I/O lines
Complies
Mains power quality should be that of a typical commercial or hospital
environment.
Surge IEC 61000-4-5
±1kV differential
±2kV common
Complies
Powerfrequencymagneticeld
IEC 61000-4-8
3 A/m Complies
Powerfrequencymagneticeldsshouldbeatlevelscharacteristicofatypical
location in a typical commercial or hospital environment.
Voltage dips, short interrupts and
voltage variations on power supply
input lines IEC 61000-4-11
>95% dip 0.5 cycle
60% dip 5 cycles
70% dip 25 cycles
95% dip 5 secs.
Complies
Mains power quality should be that of a typical commercial or hospital
environment. If the user of this device requires continued operation during
power mains interruptions, it is recommended that the device be powered from
an uninterruptible power supply or battery.
Page is loading ...
Page is loading ...
Page is loading ...
Page is loading ...
Page is loading ...
Page is loading ...
Page is loading ...
Page is loading ...
Page is loading ...
Page is loading ...
Page is loading ...
Page is loading ...
Page is loading ...
Page is loading ...
Page is loading ...
Page is loading ...
Page is loading ...
Page is loading ...
Page is loading ...
Page is loading ...
Page is loading ...
Page is loading ...
Page is loading ...
Page is loading ...
Page is loading ...
Page is loading ...
Page is loading ...
Page is loading ...
Page is loading ...
Page is loading ...
Page is loading ...
Page is loading ...
Page is loading ...
Page is loading ...
Page is loading ...
Page is loading ...
Page is loading ...
Page is loading ...
Page is loading ...
Page is loading ...
Page is loading ...
Page is loading ...
Page is loading ...
Page is loading ...
Page is loading ...
Page is loading ...
Page is loading ...
Page is loading ...
Page is loading ...
Page is loading ...
Page is loading ...
Page is loading ...
Page is loading ...
Page is loading ...
Page is loading ...

A-306-1 Rev H
DeVilbiss Healthcare LLC • 100 DeVilbiss Drive • Somerset, PA 15501 • USA
800-338-1988 • 814-443-4881 • www.DeVilbissHealthcare.com
DeVilbiss Healthcare LLC
100 DeVilbiss Drive
Somerset, PA 15501-2125
USA
800-338-1988 • 814-443-4881
DeVilbiss Healthcare Ltd
Unit 3, Bloomfield Park
Bloomfield Road
Tipton, West Midlands, DY4 9AP
UNITED KINGDOM
+44 (0) 121 521 3140
DeVilbiss Healthcare Pty. Limited
15 Carrington Road, Unit 8
Castle Hill NSW 2154
AUSTRALIA
+61-2-9899-3144
DeVilbiss Healthcare SAS
13/17, Rue Joseph Priestley
37100 Tours
FRANCE
+33 (0) 2 47 42 99 42
DeVilbiss Healthcare GmbH
Kamenzer Straße 3
68309 Mannheim
GERMANY
+49 (0) 621-178-98-0
EC REP
0044
© 2017 DeVilbiss Healthcare LLC. 04.17 All Rights Reserved. A-306-1 Rev. H
DeVilbiss
®
, PulseDose
®
, DeVilbiss iGo
®
and OSD
®
are registered trademarks of DeVilbiss Healthcare.
-
 1
1
-
 2
2
-
 3
3
-
 4
4
-
 5
5
-
 6
6
-
 7
7
-
 8
8
-
 9
9
-
 10
10
-
 11
11
-
 12
12
-
 13
13
-
 14
14
-
 15
15
-
 16
16
-
 17
17
-
 18
18
-
 19
19
-
 20
20
-
 21
21
-
 22
22
-
 23
23
-
 24
24
-
 25
25
-
 26
26
-
 27
27
-
 28
28
-
 29
29
-
 30
30
-
 31
31
-
 32
32
-
 33
33
-
 34
34
-
 35
35
-
 36
36
-
 37
37
-
 38
38
-
 39
39
-
 40
40
-
 41
41
-
 42
42
-
 43
43
-
 44
44
-
 45
45
-
 46
46
-
 47
47
-
 48
48
-
 49
49
-
 50
50
-
 51
51
-
 52
52
-
 53
53
-
 54
54
-
 55
55
-
 56
56
-
 57
57
-
 58
58
-
 59
59
-
 60
60
-
 61
61
-
 62
62
-
 63
63
-
 64
64
-
 65
65
-
 66
66
-
 67
67
-
 68
68


Drive 306DS-C Owner's manual
- Type
- Owner's manual
- This manual is also suitable for
Ask a question and I''ll find the answer in the document
Finding information in a document is now easier with AI
in other languages
- italiano: Drive 306DS-C Manuale del proprietario
- français: Drive 306DS-C Le manuel du propriétaire
- español: Drive 306DS-C El manual del propietario
- Deutsch: Drive 306DS-C Bedienungsanleitung
- Nederlands: Drive 306DS-C de handleiding
Related papers
-
Drive Medical 525DS-EW Owner's manual
-
Drive Medical 1025DS Owner's manual
-
Drive Medical iGO2 Portable Oxygen Concentrator Owner's manual
-
Drive Medical 100NDEM Template
-
Drive Medical Full Face ComfortFit Deluxe CPAP Mask Template
-
-
Drive Medical 535D-E-CF Owner's manual
-
-
-
Other documents
-
 DeVilbiss iGo 306DS User manual
-
iGo PS00264-0008 Datasheet
-
-
-
Precision Medical PM4155 User manual
-
Sunrise Medical 515A User manual
-
 I-GO POWER SPLITTER Owner's manual
-
Inogen InogenOne G4 User manual
-
HQ CAR-START01 User manual
-
 DeVilbiss iFill 535-CF Series User manual


