PEAK FMW-1049 User manual

Type
User manual

This manual is also suitable for

Please consider our environmental responsibility and dispose of this product and
its packaging at a designated recycling point.
In eort to continuously enhance the quality of our services, we welcome your
comments regarding the quality, the functionality and the use of our products
We are committed to responding to your feedback.
www.peak-care.com.au
Phone
2688
4272
(02)
Equipment
Care
Peak
by
Australia
in
distributed
exclusively
is
p
roduct
This
User Manual
WEELY
COMFORT WHEELCHAIR
Model Reference n°
FMW-1044, 44cm seat width
FMW-1039, 39cm seat width
FMW-1049, 49cm seat width
In order to continually improve the quality of our products,
they are subject to modification without notice.
74, avenue du 8 mai 1945 - 69120 Vaulx en Velin - FRANCE
Tel: +33(0)4 37 45 02 54 - Fax +33(0)4 37 45 02 55
Web : www.rupiani.fr - Email : [email protected]
TABLE OF CONTENT
I Basics P. 1-5
A) Wheelchair at a glance P. 1
B) Quick guide to the wheelchair in 5 steps P. 2-3
C) Safety Guidelines P. 4-7
1) Weight Limitations P. 4
2) Wheel locks P. 4
3) Operation P. 4
4) Stability P. 5
5) Maintenance P. 6-7
II List of components P. 8-14
A) Headrest P. 8
B) Push bar P. 8
C) Armrests P. 9
D) Backrest P. 10
E) Seat P. 10
F) Front / Rear casters P. 11
G) Central wheels P. 12
H) Handrims P. 12
I) Wheel locks P. 13
J) Passing kerbs P. 13
K) Footrests P. 14
TABLE OF CONTENT
III Coping with everyday obstacles P. 15-25
A) Handling of wheelchairs P. 15-18
1) A note to the users P. 15
2) A note to wheelchair assistants P. 15
3) Transferring to and from other seats P. 16-17
A) Independent transfer P. 16
B) Transferred by wheelchair assistant P. 17
4) Positioning P. 18
B) Indoor P. 19-22
1) Bedroom P. 19-20
A) Independent transfer P. 19
B) Transferred by wheelchair assistant P. 20
2) Bathroom P. 21
3) W.C P. 22
C) Outdoor P. 23-25
1) Kerbs P. 23
2) Stairways P. 24
3) Vehicles P. 25
IV Warranty P. 26-27
A) Warranty conditions P. 26
B) Warranty certicate P. 27
V Product Parameters P. 28
P. 1
P. 2
I. BASICS
A) WHEELCHAIR AT A GLANCE :
We thank you for purchasing our WEELY Comfort Wheelchair.
The WEELY Comfort Wheelchair is developed and constructed with consideration
for the user, caregivers and others handling or assisting with the wheelchair.
Your wheelchair is marked in accordance with directive 93/42/EEC concerning
medical devices and certied according to ISO13485
For safety reasons, please read the entire user’s manual before using the wheel-
chair. Keep it in order to be able to refer to it later on.
In order to get familiar with the wheelchair, identify the below items:
NOTE:
WEELY Comfort Wheelchair is used to provide mobility to persons in need of assistance. Any
other usage might result in personal injury or property damage.
B) QUICK GUIDE TO THE WHEELCHAIR IN 5 STEPS :
STEP 1 : ASSEMBLY
Note: Before the assembly, engage the wheel
locks properly.
The following components require installation
before the rst use:
1. Backrest
2. Headrest
3. Armrests
4. Seat and backrest cushions
5. Footrests
STEP 2 : SIT IN THE WHEELCHAIR
• Push the footrest assembly inwards until it
locks into place
• Pivot footplates and legrests upwards to
vertical position
• Engage the wheel locks in order to avoid that
the wheelchair moves unintentionally
STEP 3 : PROPULSION
• Use the handrims of the wheelchair
• or ask an attendant to assist you
Ensure the seat is fully open before sitting or
transferring into the wheelchair
P. 4P. 3
STEP 4 : GETTING UP
• Engage the wheel locks
• Pivot footplates and legrests upwards to vertical position
• Position in front of a device to which you can hold to (e.g. A walker)
• Position your legs in parallel
While standing up, bend the elbows slightly when placing the hands onto the
handgrips of the object
STEP 5 :
STORING THE WHEELCHAIR
In order to minimize the storage space required for your chair, you can fold it into
its most compact form.
• Engage the wheel locks
• Pivot footplates and legrests upwards to vertical position
• Remove the cushions of the seat and backrest
• Remove the armrests, headrest, footrest and fold the backrest.
RECOMMENDATION :
• Store the screws properly after disassembly
Two persons are recommended to perform the disassembly.
WARNING:
• Keep your head clear of the backrest while dismantling it.
.
STEP 4 STEP 5
C) SAFETY GUIDELINE :
1) WEIGHT LIMITATION:
Weight limitation : 308 lbs (140 kg)
2) WHEEL LOCKS:
• DO NOT stop a moving wheelchair with wheel
locks, these are not brakes. Use hand rims to stop
the wheelchair
• DO NOT slow down wheelchair with wheel locks
• ALWAYS engage both wheel locks to prevent the
wheelchair from tilting
• DO NOT operate on roads, streets or highways
• DO NOT operate on soft surfaces such as sand, grass ,or gravel
• DO NOT move up or down an incline with a water, ice or oil lm
• Beware of narrow doors, steps, high surfaces, protruding wall tting and everyday
household items such as children ‘toys, electrical appliances etc when using indoor.
Take extra care in kitchen environments
Lean forwards when
moving up on a sloped
ground
Sitting as far back as
possible in the seat when
going down a gradient
DO NOT allow children to
play on or operate
3) OPERATION:
Downward slopeUpward slope
P. 6P. 5
4) STABILITY:
To determine the user’s particular safety limits, PRACTICE bending, reaching
and transferring activities in several combinations in the presence of a qualied
healthcare professional before attempting active use of the wheelchair
• DO NOT move your centre of gravity outside the normal seating position
• DO NOT shift your weight or sitting position towards direction you are reaching
as the wheelchair may tip over
• DO NOT move across the slope, make sharp turns, zigzag movements when
going up and down a slope
• DO NOT take sharp turns while on a sloped surface
• DO NOT go up or down ramps or traverse slopes greater than 9˚
• DO NOT stand on the frame or the footplates of the wheelchair
The seat is intended for one persons use only.
a b c
5) MAINTENANCE :
Take the wheelchair for a thorough inspection and servicing by a qualied tech-
nician every SIX months.
• Prior to use, make sure all nuts and screws are tight. Check all parts for damage
or wear and replace.
• Periodically check hand rims for signs of rough edges or peeling and to ensure
they are securely attached to the central wheels prior to use
• Periodically check front and rear casters and central wheels to make sure they are
clean and free of cracks. They should be replaced if damaged
• Periodically check upholstery for sagging, rips or tears
• All the repairs and component replacements MUST be performed by a quali-
ed technician.
NOTE :
After any adjustments, repair or service and before use, make sure all at-
tached hardware is tightened securely.
DO NOT over tighten hardware attached to the frame. This would cause
damage to the frame tubing.
DO NOT expose the wheelchair to extreme temperature (>100˚F or < 32˚F).
(>38°C or < 0˚C).
WARNING: surfaces of the wheelchair (frame parts,upholstery) can reach
temperatures that hurt skin due to excessive amounts of exposure to sun.
P. 8P. 7
II LIST OF COMPONENTS:
A) HEADREST :
• Headrest is removable
• Adjustable in height, forward/backward, and from side to
side
• A padded cushion is provided
The cloth protection is made of Dartex and has
been tested re-resistant to ensure maximum safety
ADJUSTMENTS:
HEIGHT: Pull the small lever behind the backrest, and adjust to the desired height.
FORWARD/BACKWARD: Unscrew the locking lever behind the headrest’s tube by
turning anti-clockwise, and adjust to the desired position.
REMOVAL:
Pull the small lever behind the backrest while simultaneously lifting the headrest
B) PUSH BAR:
Push bar for Wheelchair assistant to propel the chair
ADJUSTMENT:
HEIGHT:
Unscrew the knobs (A) and adjust it to the de-
sired height
Knob (A)
Knob
Small lever
NOTE :
• Ensure that all the screws are tightened properly before use.
• Regularly check the push bar for wear/ looseness/deterioration
SAFETY INSPECTION CHECKLISTS
Initial adjustments should be made to suit the user’s personal body struc-
ture and preference. Thereafter follow these maintenance procedures:
INSPECT/ADJUST INITIALLY :
• Ensure that the wheelchair rolls straight (no excessive drag or pull to one side)
• Inspect for loose or missing hardware on frame and cross bars
• Inspect for bent frame or cross bars
• Check that the wheel locks do not interfere with tires when rolling
• Check that the wheel lock pivot points are free of wear
• Check that the wheel locks are easy to engage
• Ensure that the wheel locks prevent the wheelchair from moving when engaged
• Inspect seat and back for rips and sagging
• Inspect seat and back for loose or broken hardware
WEEKLY check that:
Wheel locks do not rub tyres when not engaged and secure the wheel when locked
• Casters are automatically locked when braking.
• Caster bolts are tight and all fasteners are secure
The axle assembly is secure
Tyres do not show excessive wear or damage
• Casters for proper tension, i.e. spinning casters should come to gradual stop
MONTHLY check that:
Tyres are not excessively worn
• Handrims are smooth (no edge)
The chair rolls straight (no excessive drag or pull to one side)
• Pivot points are free of wear or looseness
• Seat and backrest upholstery is not ripped or sagging
• Frame is not worn or bent
CLEANING :
• Regular cleaning with a duster or damp cloth and mild soap can enhance the
smooth operation of the wheelchair
• DO NOT use any harsh abrasive cleaners, bleach base uids or solvents.
P.10P. 9
D) BACKREST:
• Removable and reclinable by actuator
• A padded seat cushion is provided
The cloth protection is made of Dartex and has been
tested fire-resistant to ensure maximum safety
• Adjustable in height
ADJUSTMENT:
HEIGHT: Unscrew the 4 small knobs behind the
backrest by turning anti-clockwise, and adjust to the
desired height.
ANGLE OF BACKREST: Squeeze the left-handed han-
dle upwards while pushing the backrest down to the
desired position.
ANGLE OF CHAIR: Squeeze the right-handed handle
upwards while pushing the whole chair down to the
desired position.
DISMANTLE THE BACKREST: Remove the pin, then
the washers and screws
E) SEAT:
• A padded cushion is provided
The cloth protection is made of Dartex and has been
tested re-resistant to ensure maximum safety
Small knob
Recline the backrest
Recline the chair
NOTE :
Ensure that the seat is fully open and seat rails are fully
seated into the side frame before sitting or transferring
into the wheelchair
C) ARMREST :
• Removable
• Adjustable in height and depth
• Side panels with cloth protection
The cloth protection of side panel is made
of Dartex and has been tested re-resistant
to ensure maximum safety
ADJUSTMENTS:
HEIGHT OF ARM PAD:
Press the button located on the side of the
armrest, adjust to the desired height of the
arm pad.
DEPTH OF ARM PAD:
Unscrew the small knob underneath the arm
pad by turning anti-clockwise, and adjust it to
the desired position.
REMOVE THE ARMREST:
Press the button located on the side of the arm-
rest, and lift it upwards for removal
WARNING : DO NOT lift the wheel-
chair by the armrests. Wheelchair should
be lifted by the frame.
Button
Small knob
P.12P.11
G) CENTRAL WHEEL:
REMOVING THE CENTRAL WHEEL: (See Figure 6)
• Central wheels of 22” 1 3/8
With quick release button for easy transportation or storage
• Place the wheelchair frame up on blocks so that the central wheels are o the
ground
With one hand holding up the wheelchair frame, the other hand gripping the cen-
tre of the wheel and pushing in the centre button, pulling the wheel completely
away from the wheelchair
To reinstall the central wheel onto the wheelchair, reverse the procedure.
H) HANDRIMS :
The wheelchair is equipped with handrims
• Push from rear to forward, to go forward
NOTE:
• Before use, ensure that the quick release but-
ton is not pushed down
• Never dismantle the central wheels when a
person is sitting in the wheelchair
NOTE :
• Always ensure that the handrims are securely
attached to the rear wheels prior to use
WARNING : The handrims may become hot due
to friction, which may cause injury to the users
Figure 6
F) FRONT AND REAR CASTERS :
• Bandage front casters of 6” (15.5 cm)
• Always ensure that casters are free of debris prior to use
• Periodically inspect casters for cracks and wear and
replace them if damaged
• Periodically inspect axle assembly for proper tension
by spinning casters. Casters should come to a gradual
stop
NOTE :
The curbs should NOT be higher than radius of the castors, otherwise wheel-
chair MUST be lifted up to traverse kerbs.
Kerbs MUST NOT be
higher than caster’s radius
Lift up the wheelchair
P.14P.13
K) FOOTREST
The legrests are removable and swing-away
• Foot plates are adjustable in angle
• Knee cushion pads are provided
• Pivot footplates and legrests are adjustable
INSTALL :
• Pivot footplates and legrests upwards to vertical position
Turn the swing away footrest assembly to the side
• Install the hinge plates on the footrest onto the hinge pins on the wheelchair frame
• Push the footrest assembly inwards until it locks into place
ADJUSTMENT:
HEIGHT OF LEGREST :
Unscrew the small knob located on the side of legrest and
adjust to the desired height
ANGLE :
• Flip up and down the foot plate until the desired position
is reached
WARNING :
• DO NOT stand on the footplates
• Always make sure that the footplates are in the vertical position when getting
in or out of the wheelchair
• Always ensure the footrest is locked in position before use
Lever
REMOVE :
• Pivot footplates and legrests upwards to vertical position
• Pull up on the footrest release lever to unlock the footrest
• Rotate swing away footrest assembly outwards
• Lift the footrest assembly o the hinge pins
I) WHEEL LOCK :
The wheel locks allow a safe transfer of the user.
OPERATION:
Engage the lock: Push lock handle backwards. The wheels are locked and the wheel-
chair does not move. (FIGURE A)
The wheelchair is equiped with a device for passing kerbs.
Operation : Unlock security (B) and push pedal (A).
J) PASSING KERBS :
Figure A
NOTE :
Wheel locks are not brakes and are not to be used to slow the wheelchair.
• Check that bolts are tight.
• Ensure that the manual brake does not touch the wheel when moving.
A
B
NOTE :
Always pay extra caution when using on wet, soft ground or on gravel surfaces
Always ensure that the locking pin fully protrudes out of the hole on the side of
the wheelchair frame prior to use
P.16P.15
1. Get close to the xed seat
2. Engage the wheel locks
3. Pivot footplates and legrests upwards to vertical position
4. Raise up the armrest nearest to the xed seat
5. Grasp farest armrest with one hand and keep other hand
on the armrest. Shift body weight into seat helping with arms.
NOTE:
When transferring, position yourself as far back as possible in the seat to help
prevent the wheelchair from tipping forwards
Before attempting to transfer in or out of the wheelchair:
• Every precaution should be taken to reduce the gap distance
Turn both casters parallel to the object you are transferring onto
• Engage wheel locks
• Pivot footplates and legrests upwards to vertical position
Pivot footplates and legrests
upwards to vertical position
A) INDEPENDENT TRANSFER :
The transfer can be performed independently provided the
user has adequate mobility and upper body strength
3) TRANSFERRING TO ANOTHER CHAIR:
Engage wheel locks
III COPING WITH EVERYDAY OBSTACLES
A) HANDLING OF WHEELCHAIR :
1) NOTES TO WHEELCHAIR USER :
• Use the handrims attached to the central wheels to propel the wheelchair
• Position the palms on the handrims with the thumbs between the central wheels
and handrims
• Pull back to front to move.
2) NOTES TO WHEELCHAIR ASSISTANT :
• Use the push bars to propel the wheelchair
• Always keep the back straight and bend the knees whenever tilting the
wheelchair or traversing curbs
CAUTION :
DO NOT propel the wheelchair by yourself
on a a wet or sloped ground
P.18P.17
4) POSITIONING :
Proper positioning to maintain stability and balance is essential for safety. Follow
the advice :
REACH OBJECTS:
Forwards :
• Position wheelchair as close as possible to the desired object.
• Engage wheel locks
• Lean your body out of the wheelchair only as far as the length of the armrest with-
out changing your sitting position
Backwards:
• Position wheelchair as close as possible to the desired object.
• Engage wheel locks
• Reach back only as far as your arm will extend without changing your sitting po-
sition.
WARNING
DO NOT slide forwards to the edge of the seat to reach objects or pick
them up from the oor by reaching down between the knees.
WARNING
DO NOT lean over the top of the back upholstery to reach objects behind
you, as this may cause the wheelchair to tip over.
Forwards Backwards
B) TRANSFERRED BY WHEELCHAIR ASSISTANT:
The transfer can also be performed with the help of a caregiver
1) The wheelchair should be maneuvered as close as possible to the transfer seat
with the front casters pointing parallel to it , the caregiver in front of you.
2) Engage wheel locks
3) Pivot footplates and legrests upwards to vertical position
4) Raise up the armrest nearest to the xed seat
5) The attendant pulls you forwards in the wheelchair while criss-crossing the
legs. Put your arms around his neck, his hands are under your armpit (FIGURE a).
6) The attendant lifts you from under the arms and turns you around into the
place where you wish to be transferred (FIGURE b)
7) The attendant should securely position you in the seat (FIGURE c)
Figure a Figure b Figure c
NOTE: (Use a transfer board if necessary)
Individual needs will vary from person to person, but if there are diculties,
please consult your therapeutic advisor who will help you to develop your skills
and to nd an appropriate transfer method that suits you.
P.20P.19
1) The wheelchair is maneuvered as close as possible to the bed
2) Engage wheel locks
3) Pivot footplates and legrests upwards to vertical position
4) Raise up the armrest nearest to the bed
5) The attendant pulls you forwards in the wheelchair by grasping your knees.
6) The attendant transfers you over in a half-standing position
7) Lie down on the bed by supporting yourself rst on your extended arms and
then on your elbows
8) The attendant stands, lifts up your legs in the bed while the attendant moves
your upper body so that you lie straight on the bed
B) TRANSFERRED BY WHEELCHAIR ASSISTANT
The transfer can also be performed with the help of a caregiver
a
c
b
d
B) INDOOR:
1) BEDROOM:
A) INDEPENDENT TRANSFER
The transfer can be performed independently provided the user has ade-
quate mobility and upper body strength.
1) The wheelchair should be maneuvered in parallel to the bed at the headrest
end of the bed
2) Engage wheel locks
3) Pivot footplates and legrests upwards to vertical position
4) Raise up the armrest nearest to the bed
5) Shift body weight onto the edge of the wheelchair.
6) Transfer to the bed by placing the hand that is closest to the bed on top of the
mattress with the other hand poised on the armrest
7) Position yourself as far back as possible on the bed
8) Lift up your legs in the bed so that you can lie straight on the bed
NOTE:
The bed which you are transferring to should be of the same height as the wheelchair
a
c
b
P.22P.21
3) W.C :
The transfer can be performed independently provided the user has adequate
mobility and upper body strength
1) The wheelchair should be maneuvered as close as possible to the toilet
2) Engage wheel locks
3) Pivot footplates and leg rests upwards to vertical position
4) Raise up the armrest nearest to the toilet seat
5) Put your feet at on the oor next to the sides of the raised toilet seat.
6) Spread your knees and ankles wider than the toilet seat
7) Grab the safety bars next to and behind the toilet seat. Facing the wall behind the
toilet, lift yourself up.
8) Holding and using the safety bars, turn your body around and lower yourself
on to the toilet seat
a b c
1) The wheelchair should be maneuvered as
close as possible to the bathtub
2) Engage wheel locks
3) Pivot footplates and leg rests upwards to
vertical position
4) Raise up the armrest nearest to the bathtub
5) Shift body weight onto the edge of bath-
tub by placing one hand that is closest to the
bathtub on bathtub edge with the other hand
poised on the armrest
6) Lift up your legs into the bathtub and
slowly sit in it
2) BATHROOM:
The transfer can be performed independently provided the user has adequate mo-
bility and upper body strength.
WARNING :
The height from the bottom surface to the
top of a side wall of the bathtub MUST NOT
be higher than the height from the bottom
NOTE:
• For easy transfer, a bath board that ts well across the bathtub is recommended
• Always transfer into a dry bathtub to keep from slipping.
• Always put your towel close to the bathtub so that it can be reached easily
• Always empty the water before transferring out of the bathtub
• Always dry feet last to avoid slipping when transferring back to chair
a
b
c
P.24P.23
2) STAIRWAYS:
If moving a wheelchair between oors using a stairway, the wheelchair MUST NOT
be occupied .
It is recommended using two assistants and making thorough preparations.
1. Remove the occupant from the wheelchair
2. Bend your knees and keep your back straight
3. Using non-removable (non-detachable) parts of the wheelchairs for hand-hold
support, lift the wheelchair o of the ground and transfer the wheelchair up and
down the stairs
4. The wheelchair should not be lowered until the last step has been negotiated
and the wheelchair has bee carried away from the stairway.
WARNING:
• DO NOT use an escalator to move a wheelchair between oors. Serious bodily
injury may occur
• DO NOT attempt to lift the wheelchair by any removable parts which may
result in injury to the user and property damage
C) OUTDOOR:
• Remind the occupant to lean back. Make sure the occupant’s feet and hands are
clear of all wheels
1) KERBS :
To mount a kerb: (Figure A)
The attendant positions the wheelchair facing the kerb and presses the rear pedal,
tilts the wheelchair until the front wheels are on the kerb
The attendant moves the wheelchair forward until the central wheels touch the kerb
and pushes the wheelchair on th kerb.
The attendant presses the pedal so that the rear wheels touch the oor.
To go down a kerb: (Figure B)
The attendant positions the wheelchair facing the kerb and tilts it backwards to its
balance point.
The attendant moves the wheelchair forward until the central wheels touch the
pavement and slowly lowers the front wheels.
The attendant presses the pedal so that the rear wheels touch the oor.
NOTE:
Two attendants are recommend-
ed to be utilized for this procedure
Figure A Figure B
P.26P.25
IV. WARRANTY
A) WARRANTY CONDITIONS
Congratulations on your choice of the Rupiani WEELY Comfort Wheelchair.
Rupiani assures that the mechanical components of this product when purchased
new and unused to be free from defects in materials and workmanship within the
quality guarantee period date of purchase from Rupiani or a dealer, with a copy of the
seller’s invoice required for coverage under this warranty.
- The quality guarantee period for the FRAME : 2 Years
- The quality guarantee period for the components: 1 Year
(Components excluding easy-worn-out components)
The foregoing warranty shall not apply to:
- Products damaged by reason of repairs made to any component without the spe-
cic consent of Rupiani or to a product damaged by circumstances beyond Rupiani’s
control, and such evaluation will be solely determined by Rupiani
- Normal wear and tear or failure to adhere to the product instructions
- The product if it is improperly set up
- Serial numbered products if the serial number has been removed or defaced
Rupiani declines any responsibility for damages caused by negligence, accident, im-
proper operation, maintenance or storage products modied or opened without Ru-
piani expressed written consent (including, but not limited to modication through
the use of unauthorized parts or attachments).
The foregoing expressed warranty is exclusive and in lieu of any other warranties
whatsoever, whether expressed or implied, including the implied warranties of mer-
chantability and tness for a particular purpose, shall be limited to repair or replace-
ment of the defective product pursuant to the terms contained herein.
The application of any implied warranty shall not extend beyond the duration of the
express warranty provided herein.
Rupiani shall not be liable for any consequential or incidental damages, or any dis-
crepancy of the products shipped due to cause for which the insurance company,
carrier, shipping company, other transportation organization and /or post oce are
liable.
3. VEHICLE
1) Position wheelchair as close as possible to the desired vehicle seat
2) Engage wheel locks
3) Raise up the armrest nearest to the vehicle
4) Pivot footplates and leg rests upwards to vertical position
5) Shift body weight into seat by placing one hand that is closest to the vehicle on
top of the seat upholstery with another arm poised on the armrest
6) Securely position yourself in the vehicle seat and fasten the seat belt
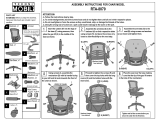
STORING THE WHEELCHAIR FOR TRANSPORTATION :
Remove the following components:
1. Backrest
2. Headrest
3. Armrests
4. Cushions of the seat and backrests
5. Legrests
a b c
CAUTION
DO NOT sit on the wheelchair when in a vehicle
P.28P.27
V. PRODUCT PARAMETERS
Weight limitation 140 kg (308 lbs)
Overall height 137 cm to 143 cm
Overall width 57 to 72 cm
Overall depth 114 cm
Seat width 39 cm, 44 cm, 49 cm
Seat depth 39 to 51 cm
Front/Rear casters 6’, bandage
Central wheel 22’ 1 3/8, PU, removable,24’’, 20’, 12’
Wheel lock Manual
Backrest Reclinable, removable
Chair Reclinable
Armrest Removable, adjustable height and depth
Hangers Swing away, removable
Footrest plates Flip up, adjustable height, depth, angle
Legrests Adjustable height and angle
Upholstery Dartex
Frame Aluminium
Product weight 38 kg
B) WARRANTY CERTIFICATE :
Surname:
First name :
Adress :
ZIP Code :
City :
Date of purchase :
In order to qualify for guarantee, date of rst purchase must be clearly stated.
Model:
Serial number :
Dealer stamp :
  • Page 1 1
  • Page 2 2
  • Page 3 3
  • Page 4 4
  • Page 5 5
  • Page 6 6
  • Page 7 7
  • Page 8 8
  • Page 9 9
  • Page 10 10
  • Page 11 11
  • Page 12 12
  • Page 13 13
  • Page 14 14
  • Page 15 15
  • Page 16 16

PEAK FMW-1049 User manual

Type
User manual
This manual is also suitable for

Ask a question and I''ll find the answer in the document

Finding information in a document is now easier with AI