Abocom Systems MQ4-PLW5Z User manual
- Category
- PowerLine network adapters
- Type
- User manual
This manual is also suitable for

1
500Mbps Powerline
Wireless-N Extender
PLW5Z
User Manual

2
How to Use this User Guide
The user guide to the 500Mbps Powerline Wireless-N Extender has been designed to
make understanding networking with the Powerline Wireless-N Extender easier than ever.
Look for the following items when reading this User Guide:
This checkmark means there is a note of interest and
is something you should pay special attention to while
using the Powerline Wireless-N Extender.
This exclamation point means there is a caution or
warning and is something that could damage your
property on the Powerline Wireless-N Extender.

3
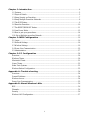
Chapter 1: Introduction........................................................................................................ 4
1.1 Features............................................................................................................................... 5
1.2 Physical Details................................................................................................................... 5
1.3 Setup Security on Powerline............................................................................................... 7
1.4 Setup Multiple Powerline Networks................................................................................... 8
1.5 The WPS Button ................................................................................................................. 9
1.6 Reset the Powerline........................................................................................................... 10
1.7 The RESET/REBOOT Button .......................................................................................... 11
1.8 Low Power Mode.............................................................................................................. 13
1.9 How to pair your powerlines............................................................................................. 14
1.10 Set up Multiple powerline Network................................................................................ 15
Chapter 2: WEB Configuration........................................................................................ 16
2.1 Login................................................................................................................................. 16
2.2 Network Settings............................................................................................................... 18
2.3 Wireless Settings............................................................................................................... 19
2.4 Power Line Communication ............................................................................................. 25
2.5 Administration................................................................................................................... 27
Chapter 3: PC Configuration............................................................................................ 28
Overview................................................................................................................................. 28
Wireless Clients ...................................................................................................................... 28
Macintosh Clients ................................................................................................................... 31
Linux Clients........................................................................................................................... 32
Other Unix Systems................................................................................................................ 32
Wireless Station Configuration............................................................................................... 33
Appendix A: Trouble shooting........................................................................................ 34
Overview................................................................................................................................. 34
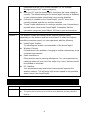
General Problems.................................................................................................................... 34
Wireless Access....................................................................................................................... 34
Power Line Communication ................................................................................................... 35
Appendix B: About Wireless LANs............................................................................... 36
BSS ......................................................................................................................................... 36
Channels.................................................................................................................................. 36
Security ................................................................................................................................... 36
Wireless LAN Configuration.................................................................................................. 37

4
Chapter 1: Introduction
Welcome
AboCom System, INC offers completed Power Line Communocation (PLC) product
selection such as the latest G.hn, HomePlug AV/AV2 and Wi-Fi 11n/b/g integrations and
thank you for choosing the Powerline Wireless-N Extender. The Extender will allow you to
network better than ever. With speeds up to 500Mbps (physical rate) and a powerful
high-speed wireless connection for compatible wireless-enabled devices into the network,
the Powerline Wireless-N Extender provides a better performing networking technology.
How does the Bridge do all of this? The Powerline Wireless-N Extender lets you turn the
existing powerlines in your home or office into a high-speed and wireless network. Now
you don’t have to drill through the walls, and climb through the attic or cellar to install
network cables, just use the wires that already run through the building.
But what does all of this mean?
Networks are useful tools for sharing computer resources. You can access one printer
from different computers and access data located on another computer's hard drive.
Networks are even used for playing multiplayer video games. So, networks are not only
useful in homes and offices, via the fast wireless network speed up to 300Mbps, you can
be very comfortable to have experience of high speed web surfing, files downloading, on
line game playing, and video conference session and streaming high quality multimedia
materials. The Wireless-N Extender provides WPA/WPA2, 64/128 bits WEP REBOOTion
and IEEE802.1x which ensures a high level of security to protect user’s data and privacy
when you are using Wi-Fi connection.
The Powerline Wireless-N Extender follows the HomePlug PowerLine network standard.
Just plug the Powerline Wireless-N Extender into the wall, and connect your devices by
Ethernet or Wi-Fi technology to the Extender, and you’ve turned your whole house into a
network infrastructure. Attach more computers/devices to your home network by simply
connecting them into the wall anywhere in the house, using more Powerline Wireless-N
Extender.
Once your computers are connected to the network, they can share resources like
printers and storage space, and all kinds of files: music, digital pictures, and documents.
With up to 500Mbps data rates, you can play head-to-head network computer games, too.
And if you use a Powerline Wireless-N Extender to interface Broadband Routers from
your cable or DSL Internet connection to your PowerLine network, you’ll be able to get to
the Internet from any computer in the house.

5
Use the instructions in this Guide to help you connect the Powerline Extender, set it up,
and configure it to bridge your different networks. These instructions should be all you
need to get the most out of the Powerline Extender.
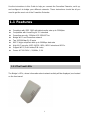
1.1 Features
Compliant with IEEE 1901 with data transfer rate up to 500Mpbs
Compatible with HomePlug AV 2.0 standard
Powerline security: 128-bits AES REBOOTion
Bridge Wi-Fi and Powerline network
Two 10/100Mbps RJ45 ports
802.11 b/g/n compliant with up to 300Mbps data rate
High Wi-Fi security: WEP 64/128, WPA, WPA2 mixed and 802.1x
Support WPS (Push button/PIN code)
Power: AC100-240V~, 50/60Hz, 0.2A
1.2 Physical Details
The Bridge’s LEDs, where information about network activity will be displayed, are located
on the front panel.
1.1 Features
1.2 Physical Details
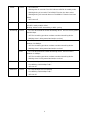
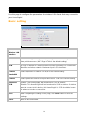
1.2.1 The Front LEDs

6
Power
Green - On: Power on
- Blinking after 60 seconds: The LED indicator will blink in standby mode.
- Blinking during 10 seconds: The REBOOT function has been active.
- Blinking during 120 seconds time out: The REBOOT function has been
failed.
- Off: Power off
Wifi
Green on: WPS is enabled
off: Wifi is ready or WPS failed
blinking: wireless traffic transmitting or WPS syncing
Green - On: The device detects another HomePlug device. The PHY rate is greater
than 80 Mbps.
- Off: The HomePlug port does not detect another HomePlug device.
- Blinking: Data is being transmitted and/or received.
Amber -On: The device detects another HomePlug device. The PHY rate is
between 20~80Mbps.
- Off: The HomePlug port does not detect another HomePlug device.
- Blinking: Data is being transmitted and/or received.
HomePlug
Red - On: The device detects another HomePlug device. The PHY rate is
between 0~20Mbps.
- Off: The HomePlug port does not detect another HomePlug device.
- Blinking: Data is being transmitted and/or received.
Ethernet 1
Green - On: 10/100 Mbps Link successfully
- Fast Blinking: 10/100 Mbps Tx/Rx
- Off: Link off
Ethernet 2
Green - On: 10/100 Mbps Link successfully
- Fast Blinking: 10/100 Mbps Tx/Rx
- Off: Link off

7
1.3 Setup Security on Powerline
The ENCRYPT function will be automatically activated while your power line is up. All you
need to do is to change a Network Name. Although the power line is a plug-and-play
network device, we still recommend users to have secret password (Network Name) to
limit unlicensed powerline to access your private network.
1.3 Setup Security on Powerline

8
1.4 Setup Multiple Powerline Networks
You might need several powerline networks on a single network. Multiple powerline
networks can coexist on a small environment, such as you have two or three separate
Ethernet network in office.
Different Network Name separated different powerline networks. Information is not shared
within different powerline circuits. Powerline traffic can communicate with each other only
with the same Network Name.
Please do the followings to create multiple powerline networks:
Connect a powerline to a switch on your first Ethernet network and assign a Network
Name (for example “HomePlugAV1”) to the powerline. Add additional powerline devices to
this network by assigning the same Network Name (“HomePlugAV1”). We complete the
first powerline network.
Connect another powerline to a switch on your second Ethernet network and assign
different Network Name (for example “HomePlugAV2”) to the powerline, and assign the
same Network Name (“HomePlugAV2”) to additional powerlines. This is the second
powerline network.
Again assign a different Network Name (for example “HomePlugAV3”) for the third one.
Refer to Section 1.7 for more details.
1.4 Setup Multiple Powerline Networks

9
1.5 The WPS Button
It can setup security easily by one clicking (two seconds) on WPS Button. Using this
feature could let your wireless client automatically synchronize its setting and connect to
your powerline in a minute without any hassle.
To activate WPS, you also need to press the WPS button of a wireless client in 120
seconds after you pressed the powerline WPS Button. Then the two devices connect and
create a secure wi-fi network.
You can manually use PIN and PBC from WEB GUI to do WPS, too.
1.5 The WPS Button

10
1.6 Reset the Powerline
Press the RESET/REBOOT Button for 5 seconds to reset your powerline to a factory
default settings. Refer to Section 1.7 for more details.
1.6 Reset the Powerline

11
1.7 The RESET/REBOOT Button
This button allows you to reset/reboot your powerline.
Press the RESET/REBOOT button for 2 seconds. Use this feature to restart your
HomePlug AV.
You can reset your powerline to factory default values using WEB Interface, too.
Press the RESET/REBOOT button for 5 seconds, this reset the HomePlugAV device to a
factory default settings. This means all previously saved configurations will lose and to be
reset to a default value. The login password will be reset to “password” and IP Address will
be reset to “192.168.123.253”.
You can reset your powerline to factory default values using WEB Interface, too.
1.7 The RESET/REBOOT Button
1.7.2 Reset Factory Default
1.7.1 Reboot the device

12
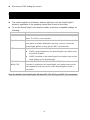
The table summarizes the behaviors of the Power while the RESET/REBOOT button
activated in different time period.
Time
period
Action
Power LED
2 seconds
Reboot the device. The Power LED is
blinking until the device
is ready. It takes about
60 seconds.
5 seconds
Reset previously saved
data to a factory default
value.
The Power LED lights
several times and then
always light on.
1.7.3 Behavior Overview

13
1.8 Low Power Mode
The powerline is a certificated green product, if you un-plug the Ethernet cable over 60
seconds, then this device will enter into the auto power saving mode. After enter into the
power saving mode, the power consumption will less than 0.5 Watt to meet ERP standard.
In power saving mode, the Ethernet and HomePlug LEDs are turned off, the Power LED
will be blinking green at 15 second intervals.
While in low power mode, the Reset/REBOOT button are locked off, you can only wake up
by re-plug the Ethernet cable, and then it will work with normal behavior.
1.8 Low Power Mode (optional)

14
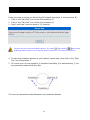
1.9 How to pair your powerlines
Follow the steps to set up you HomePlug AV Network (powerline_A and powerline_B):
1. Click on the “Start Pair” icon of your first powerline_A.
2. Click on the “Start Pair” icon of your first powerline_B.
3. Step 1 and Step 2 must be done in 120 seconds.
Check Power LED on the two powerline devices. The Power
and HomePlug lights should
be blinking while the devices are connecting. Refer to Section 1.2.1 for more LED behaviors
.
4. To add more powerline devices to your network, repeat step 1 and click on the “Start
Pair” icon of powerline_C.
5. Of course user can use powerline_B instead of powerline_A to add powerline_C into
your powerline network with this step.
This sets up a powerline network between your powerline devices.
1.9 How to pair your powerlines

15
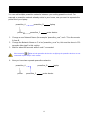
1.10 Set up Multiple powerline Network
You can add multiple powerline networks between your exiting powerline circuit. For
example, a powerline network already exists in your home, now you want to separate the
printer from your laptop.
powerline_A powerline_B laptop
printer powerline_C router device
1. Change a new Network Name (for example “powerline_new”) on A. This disconnects
A from B.
2. Change the Network Name on C to be “powerline_new” too, this must be done in 120
seconds after step1 in this section.
3. Wait for about 60 seconds while A and C connected.
If the HomePlug
lights on both powerline devices do not light up, the powerline devices are not
connected. Repeat step 2 in this section.
4. Now you have two separate powerline networks.
powerline_A powerline_B laptop
printer powerline_C router device
1.10 Set up Multiple powerline Networ
k

16
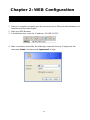
Chapter 2: WEB Configuration
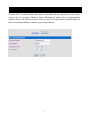
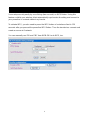
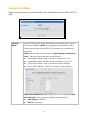
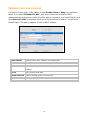
2.1 Login
1. Start your computer and make sure the connection by an Ethernet cable between your
computer and the HomePlugAV.
2. Start your WEB Browser.
3. In the Address box, enter the IP address: 192.168.123.253.
4. After connected successfully, the following screen will show up. Simply enter the
username “admin” and password ”apassword” to login.
2.1 Login

17
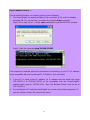
If you cannot connect……
If the HomePlugAV does not respond, please check following:
The HomePlugAV is properly installed, LAN connection is OK, and it is already
powered ON. You can test the connection by using the Ping command:
Step1. Go to start > Run…> Enter cmd command to open the MS-DOS window.
Step2. Enter the command ping 192.168.123.253
If no response is received, either the connection is not working, or your PC’s IP address
is not compatible with the HomePlugAV’s IP Address. (See next item)
If your PC is using a fixed IP address, its IP address must be within the range
192.168.123.1 to 192.168.123.252 to be compatible with the HomePlugAV’s
subnet mask range of 192.168.123.x. Also, the Network Mask must be set to
255.255.255.0.
Ensure that your PC and the HomePlugAV are on the same network segment. (If
you don’t have a router, this must be the case.)

18
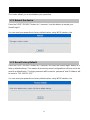
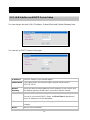
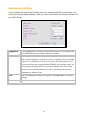
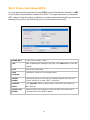
2.2 Network Settings
You can change the local LAN IP Address, Subnet Mask and Default Gateway here.
You can set up DHCP Server in this page.
IP Address
Show IP address of the
HomePlugAV.
Subnet Mask
The subnet mask of the HomePlugAV (Default subnet mask is
255.255.255.0).
Default
Gateway
Enter the Internet default gateway LAN IP address in this column. And,
the default gateway should have a connection with the Internet.
DHCP Mode
Select to enable this HomePlugAV to distribute IP addresses (DHCP
Server) to connected (DHCP) clients. And Pool Size will decide how
many IP Addresses can be distributed.
Save
After completing the setting on this page, click Save button to save the
settings.
Reset
Back to last saved data.
2.2 Network Settings
2.2.1 LAN Interface and DHCP Server Setup

19
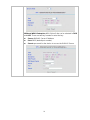
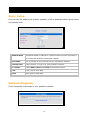
2.3 Wireless Settings
Use this page to configure the parameters for wireless LAN clients that may connect to
your HomePlugAV.
Basic setting
Enable
Wireless LAN
Interface
Check to turn on/off the radio function.
Mode
Select WiFi 11g, WiFi 11gn HT20, WiFi 11gn HT40+ or WiFi 11gn HT40-
from pull-down menu. (WiFi 11gn HT40+ is the default setting.)
SSID
A SSID is referred to a network name because essentially it is a name that
identifies a wireless network. Maximum input is 32 characters.
Channel
Bandwidth
Select 40/20MHz or 20MHz. HT20/40 is the Default setting.
Channel
Select preferred channel from pull-down menu. CH6 is the Default setting.
Broadcast
SSID
Enable: This HomePlugAV will broadcast its SSID to stations.
Disable: This HomePlugAV will not broadcast its SSID to stations. If stations
want to connect to this device, this HomePlugAV ’s SSID should be known
in advance to make a connection.
Save
After completing the setting on this page, click Save button to save the
settings.
Reset
Back to last saved data.
2.3
W
ireless Settings

20
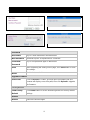
Advanced setting
These settings are only for technically users who experienced WiFi specification. You
should not change these settings unless you know what effect the changes will take on
your WiFi device.
Aggregation
Packet Aggregation, fine tune wireless performance by changing packet
transmitting mechanism. Default setting is enabled.
WMM
Wi-Fi Multimedia Power Save is s set of features for Wi-Fi networks that
help conserve battery in small devices such as phones, PDA, and audio
players. The certification for both access point and client devices uses
mechanisms from the recently ratified IEEE802.11e standard, and is an
enhancement of legacy 802.11 power-save. WMM Power Save helps
pave the way for rapid proliferation of Wi-Fi technology into devices
dependent on battery power.
Save
After completing the setting on this page, click Save button to save the
settings.
Reset
Back to last saved data.
Page is loading ...
Page is loading ...
Page is loading ...
Page is loading ...
Page is loading ...
Page is loading ...
Page is loading ...
Page is loading ...
Page is loading ...
Page is loading ...
Page is loading ...
Page is loading ...
Page is loading ...
Page is loading ...
Page is loading ...
Page is loading ...
Page is loading ...
Page is loading ...
-
 1
1
-
 2
2
-
 3
3
-
 4
4
-
 5
5
-
 6
6
-
 7
7
-
 8
8
-
 9
9
-
 10
10
-
 11
11
-
 12
12
-
 13
13
-
 14
14
-
 15
15
-
 16
16
-
 17
17
-
 18
18
-
 19
19
-
 20
20
-
 21
21
-
 22
22
-
 23
23
-
 24
24
-
 25
25
-
 26
26
-
 27
27
-
 28
28
-
 29
29
-
 30
30
-
 31
31
-
 32
32
-
 33
33
-
 34
34
-
 35
35
-
 36
36
-
 37
37
-
 38
38


Abocom Systems MQ4-PLW5Z User manual
- Category
- PowerLine network adapters
- Type
- User manual
- This manual is also suitable for
Ask a question and I''ll find the answer in the document
Finding information in a document is now easier with AI
Other documents
-
atomi 702403 User manual
-
 JOOWIN WiFi Extender Wireless Signal Booster Operating instructions
-
Sitecom LN-515 Datasheet
-
Digitus DN-15018-1 Datasheet
-
Sitecom LN-516 Datasheet
-
Allnet ALL168555 User guide
-
TP-LINK TL-WPA8630P KIT Quick Installation Guide
-
DeWalt PLEBR10 User manual
-
Trendnet RB-TPL-310AP User manual
-
TP-LINK TL-WPA8730 Quick start guide
