
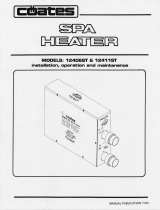
SPA HEATER
USER MANUAL

BEFORE YOU BEGIN
CHECK ALL ELECTRICAL CONNECTIONS TO ALL COMPONENTS
WITHIN THE HEATER FOR TIGHTNESS. CONNECTIONS CAN
BECOME LOOSE DURING SHIPMENT AND HANDLING.
WARNING
Only qualified personnel should install and maintain this equipment.
Unauthorized alteration or improper maintenance of this unit may release the
manufacturer from any warranty claims. The installation must be in accordance
with the instructions in this manual and applicable local plumbing and electrical
codes.

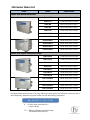
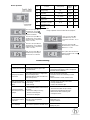
Photo Model Specification
Hidro-H5.5
5.5KW/220V/50Hz or 60Hz
Hidro-H7.5
7.5KW/220V/50Hz or 60Hz
Hidro-H8
8KW/220V/50Hz or 60Hz
Hidro-H9
9KW/220V/50Hz or 60Hz
Hidro-H11
11KW/380V/50Hz or 60Hz
Hidro-H15
15KW/380V/50Hz or 60Hz
Hidro-H18
18KW/380V/50Hz or 60Hz
Hidro-H18Pro
18KW/380V/50Hz or 60Hz
Hidro-H24Pro
24KW/380V/50Hz or 60Hz
Hidro-H32Pro
32KW/380V/50Hz or 60Hz
Hidro-H36Pro
36KW/380V/50Hz or 60Hz
Hidro-HS5.5
5.5KW/220V/50Hz or 60Hz
Hidro-HS7.5
7.5KW/220V/50Hz or 60Hz
Hidro-HS8
8KW/220V/50Hz or 60Hz
Hidro-HS9
9KW/220V/50Hz or 60Hz
Hidro-HS11
11KW/380V/50Hz or 60Hz
Hidro-HS15
15KW/380V/50Hz or 60Hz
Hidro-HS18
18KW/380V/50Hz or 60Hz
Hidro-HS18Pro
18KW/380V/50Hz or 60Hz
Hidro-HS24Pro
24KW/380V/50Hz or 60Hz
Hidro-HS32Pro
32KW/380V/50Hz or 60Hz
Hidro-HS36Pro
36KW/380V/50Hz or 60Hz
Heaters with manual thermostat
Heaters with Digital Thermostat Control
SPA Heater Model List
SPA Water Heater-when the rate of recovery and the spa heat-up time are important, or when the spa is
used infrequently, determine the proper heater size with the following calculations:
A : = Surface area of pool/spa (m
2
)
Length x Width
T
diff
: = Difference between average air temp
and desired water temp (Cº)
kw = 0.05678 * A * (T
diff
+17.78)

SAFETY INSTRUCTIONS
When using this electrical equipment, basic safety precautions should
always be followed, including the following.
1. READ AND FOLLOW ALL INSTRUCTIONS.
2. To reduce the risk of injury.
A. The water in a pool or tub should never exceed 104℉(40℃
). A water temperature in
excess of 104℉ is considered unsafe for all persons. Lower water temperatures are
recommended for extended use (exceeding 10-15 minutes) and for young children.
B. Since excessive water temperatures have a high potential for causing fetal damage
during the early months of pregnancy, pregnant or possibly pregnant women should
limit pool or tub water temperatures to 100°F (38℃).
C. Before entering a pool or tub, the user should measure the water temperature at
several occupant locations using an accurate thermometer since the tolerance of
water temperature-regulating devices may vary as much as ± 5℉ (± 3℃).
D. Alcohol, drugs or medications should not be used before or during pool or tub use
since their use may lead to unconsciousness with the possibility of drowning.
E. Obese persons and persons with a medical history of heart disease, low or high
blood pressure, circulatory system problems, or diabetes should consult a physician
before using a pool or tub.
F. Persons using medication should consult a physician before using a pool or tub
since some medication may induce drowsiness while other medication may affect
heart rate, blood pressure, and circulation.
---WARNING---
DANGER OF HYPERTHERMIA
Hyperthermia occurs when the internal temperature of the body reaches a level
several degrees above the normal body temperature of 98.6℉(36℃). The
symptoms of hyperthermia include dizziness, fainting, drowsiness, lethargy and an
increase in the internal temperature of the body. The effects of hyperthermia
include:
a) Unawareness of impending hazard;
b) Failure to perceive heat;
c) Failure to recognize the need to exit pool or tub;.
d) Physical inability to exit pool or tub;
e) Fetal damage in pregnant women;
f ) Unconsciousness resulting in a danger of drowning.
WARNING--- The use of alcohol, drugs or medications can greatly
increase the risk of fatal hyperthermia in pools and tubs.

1. Description
The Swimming Pool SPA Heater consists of a heating tank with external enclosure, and the
electrical heating and control system. In order to help maintain the heater in a satisfactory
manner, a brief description of its components and their operation is included for the
customer’s convenience.
The pressure vessel and its enclosure comprise the main mechanical portion of the pool
heater.
The pressure vessel, in conjunction with the flow switch and heating element are the only
portions of this equipment in contact with the water.
The external enclosure is a sheet steel case totally enclosing the pressure vessel and
electrical components. The enclosure is coated with a rust inhibiting, powder coat finish.
The electrical system, which is the heart of this unit, can be considered as three separate
systems engineered to provide optimum use of energy. They are as follows:
(1) The heating elements; mounted on a four-bolt flange. There are 2, 3 or 4 elements.
(2) The control system; consists of the pilot switch, high limit thermostat, flow switch,
temperature control. These controls are wired into a control circuit designed to control the
temperature of the water leaving the heater. The high-limit thermostat is designed to open
the control circuit and cut off the power in the event of excessive temperature.
A flow switch is built-in to prevent the pool heater from operating without water flow. The flow
switch will activate at flow rates of 76 LPM (20 GPM) or greater.
INSTALLATION
2. Location
Hidrotermal SPA Heaters are quiet, do not expel exhaust fumes, and may be conveniently
located in a shed or basement. It should be securely mounted to a smooth, flat surface.
Normal positioning of the pool heater should be in close proximity to the pool filtration. Select
a location conveniently close to incoming electrical service and where excessively long
piping runs are not required. Leave minimum clearance of 9 inches/ 230mm on the lift, 12
inches /310mm both above and to the front and 6 inches / 153mm on the back for service
entrances and access.
3. Plumbing
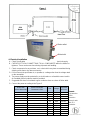
Pipe the heater as shown in Figure 1 to the inlet and outlet openings on the right side.
Connect the heater in line between the filter discharge and pool. The water line coming from
the filter should be connected to the heater inlet, and the discharge line to the pool should be
connected to the outlet. The pool will not heat properly unless it is plumbed correctly. If
plastic pipe is used, it should be suitable for at least 120℉(49 ℃).
A plumbing bypass around the pool heater is not necessary unless flow rate though the
heater exceeds 303 LPM(80 GPM). A minimum flow rate of 76 LPM(20 GPM) is required.
Lack of sufficient flow will not allow the flow switch to activate the heater.
It may be necessary, in larger Olympic-sized or public pools, to use two or more heaters to
obtain sufficient KW capacity. If so, the heaters must be placed in parallel, so that each
heater takes equal flow.
DRAINAGE: A method of draining water away from the heater and other equipment is to be
provided. The heater should be flushed at the end of each swimming season. During
flushing or service, water may be spilled and could cause damage to the floor or other
equipment. A drain valve is to be installed in the INLET plumbing.

KW Voltage
Suggested
Wire Size
5.5 220V 3*6mm²
7.5 220V 3*10mm²
8 220V 3*10mm²
9 220V 3*10mm²
11 380V 5*4mm²
15 380V 5*6mm²
18 380V 5*6mm²
18 380V 5*6mm²
24 380V 5*10mm²
32 380V 5*10mm²
36 380V 5*16mm²
Hidro-HS18Pro
Hidro-HS24Pro
Hidro-HS32Pro
Hidro-HS36Pro
Hidro-H32Pro
Hidro-H36Pro
Hidro-H18Pro
Hidro-H24Pro
Hidro-HS11
Hidro-HS15
Hidro-HS18
Heaters with
manual thermostat
Hidro-H5.5
Hidro-H7.5
Hidro-H8
Hidro-H9
Hidro-H11
Hidro-H15
Hidro-H18
Heaters with Digital
Thermostat Control
Hidro-HS5.5
Hidro-HS7.5
Hidro-HS8
Hidro-HS9
A. Check Specification Plate rating to insure the heater matches your electrical supply.
B. CHECK ELECTRICAL CONNECTIONS TO ALL COMPONENTS within the heater for
tightness. These can become loose during shipment and handling.
C. Check components for any moisture, rust, or dust which may have accumulated during
shipping, and clean or dry where necessary.
D. Do not connect the pool heater to, or operate at, a voltage other than the voltage rated
on the nameplate.
E. The power supply must be protected by a circuit breaker or a fused disconnect switch.
An insulated ground conductor must be provided.
F. Suggested wire sizes for insulated copper conductor wires are shown in follow table.
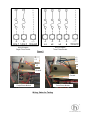
G. Connect the power according to the Figure 2.
Water outlet
Water inlet
4. Electrical Installation
Figure 1
SPA
Heater
Remark:
It is based on
125%
correction
factor for wire
with 75℃
insulation.

Wiring Diagram
Single-Phase Models
Wiring Diagram
Three-Phase Models
Figure 2
L1
L2
Ground
Ground
L1
L2
L3
N
Single-Phase Models
Three-Phase Models
Wiring Status for Testing

1. Startup Procedure
USAGE
A. Make sure that the pump is on and that there is at least 76 LPM(20 GPM) flow through
the pool heater. The heating elements will fail prematurely if allowed to operate with
insufficient water flow.
B. Check temperature control setting, also, examine wiring for loose connections, etc.
C. Turn on power at main disconnect switch.
D. Turn on the water heater by pressing ON/OFF button on the heater.
WARNING:
The thermal protector will shut off the heater when the system water overheates.
If that occures should disconnect the power at the breaker switch and determine the cause
before resetting.
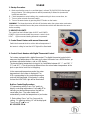
3. Control Panel: Heaters with manual thermostat
2. INDICATOR LIGHTS
The control has two indicator lights of HEAT and POWER.
POWER: Light on means heater has power to control circuit.
HEAT: Light on means Heating elements are powered.
Switch the thermostat knob to set the desired temperature. If
the heater is calling for heat the HEAT light will be illuminated.
For heaters equipped with a digital thermostat. The digital thermostat control which
measures the temperature of the water as it enters the heater has a MENU button, up
and down adjustment buttons, and an LED display.
The desired water temperature (set point) is controllable between 40°F and 100°F
(5℃ and 40 ℃). The set point may different from the actual water temperature at the
pool or spa due to heat loss in the piping.
4. Control Panel: Heaters with Digital Thermostat Control
Brief on Controlling Procedure
1.Temperature setting: Press "Set" gently to
display controlling temperature. Press ▲or ▼ to
indicate your desired temperature, that will be
saved after 6sec. The water heater will
automatically control the temperature of pool water.
2. Data setting: Press "set" for 6 seconds for
setting . On entering setting, HC will be displayed.
Then Press ▼ or▲ to set
HC-L5-H5-PE-CR-d.
In the measured temperature mode, the water
temperature in the heater is displayed. The
LED corresponding to the current temperature
scale will be illuminated. If the heater is calling
for heat the HEATING Light will be illuminated.

Code
Default
Value
Unit
HC H _
L5
No
Function
℃
H5 45
℃
PE 1 Min
CR 00
℃
d 2
℃
1. The sensor should be set up correctly
2. Enlarge the expanded wire size if any.
3. Make sure the wires sealed is good.
4. Change the sensor.
1.Check if the sensor has accurately measured the
temperature or not.
2.Change contactor.
1. Check to see if the connection of sensor and
coupling are good.
1. The sensor is not correctly installed to
detect the correct temperature.
2. Contactor fails.
Solution
1.Check power supply and change fuse.
2.Check if the input voltage is right or change the
thermostat with our distributor.
1.Reset the desired temperature.
2.Check the reasons for overheating and less
pressure.
3.After the trouble is solved, restart to work.
1. Sparate sensor wire with power cables
2. Change shielded lines
3. Check if the terminal is tight.
Causes
1. Check if the power is open or the
thermostat failture.
1.The setting temperature is higher than
the present temperature.
2.The flow switch is open circuit because
of low water pressure.
1. The sensor is interfered;
2. Poor wiring;
3. Wire damage.
1.The sensor is opened or shorted circuit.
1. The installation position of the sensor is
not correct;
2. The sensor's wiring is too long
3. The wire connected poor;
4. The sensor is damaged.
"EI" is displayed
Big tolorance between
current temperature and
displayed.
Machine does not stop
when reach the desired
temperature.
Displaying but machine
doesn't work
Display the temperature
is unstable or there exists
misplay
Temperature Return
Difference
1~15
Failure
No display when power is
on.
Alarm on high limit
Temperature
+1℃ to 80℃
Delayed Time
0~5
Temperature Correction
-15~15
Function
Setting Range
Heating/Cooling
H/C
Alarm on low limit
Temperature
-1 to -45℃
Hold "set", then press ▲or ▼
simultaneously. Choose HC,
H represents Warm Mode, C
represent Cold Mode.
Hold "set", then press ▲or ▼
simultaneously. Choose lowest
temperature limits: Temperature
control +1℃to 80℃
Hold "set", then press ▲or ▼
simultaneously. Choose highest
temperature limits: Temperature
control +1℃to 80℃
Hold "set", then press ▲or ▼
simultaneously to set delayed
star time from 0 to 5 minutes.
Hold "set", then press ▲or
▼simultaneously. Choose
temperature correction: -15℃ to
15℃
Hold "set", then press ▲or
▼simultaneously. Choose return
difference: 1℃ to 15℃
Error symbol: when the sensor in
opened or shorted circuit. Code EI
will be displayed.
Brief on Operation
Trouble Shooting
Note:
Cooling Capabilities are Not Provided with this equipment.

MAINTENANCE
Element Inspection and Replacement:
1. Turn off power at main disconnect switch and turn off pump.
2. Drain pool heater.
3. Remove service access panel opposite inlet/outlet.
4. Disconnect element wires.
5. Remove element flange retaining nuts and extract element.
6. Installation is the reverse of steps 1 through 5.
(Reinstall element with new gasket)
When closing down the pool for any length of time, shut off the power at the main
disconnect switch and drain the water from the system. Water must not be allowed to
freeze in the heater, as this will cause severe damage.
Annual Cleaning:
Yearly, before winter, the pool heater should be drained and cleaned to remove any
scale or sludge. More frequent cleaning may be required if pool water contains
sediment or any amount of foreign matter.
1. Turn off heater at main disconnect switch.
2. Open drain valve.
3. Permit water to run until it is clear.
4. Close valve and restart normally.
-
 1
1
-
 2
2
-
 3
3
-
 4
4
-
 5
5
-
 6
6
-
 7
7
-
 8
8
-
 9
9
-
 10
10


Ask a question and I''ll find the answer in the document
Finding information in a document is now easier with AI
Other documents
-
 iClever HS18 User manual
-
Rheem RTEX-13 User manual
-
EcoSmart Smart POOL 18 User manual
-
Canyon CNR-HS11 Datasheet
-
Craftsman CM-XTEPA0024 User manual
-
Ariston AURES SM 13 240V US Installation guide
-
 Coates ST Series TK04000 – TI11650 Operating instructions
-
Thomas & Betts EPW User manual
-
 Thermalec ZENITH RANGE 120kW User manual
-
 Coates ST Series TA17001 – Current Operating instructions


