Page is loading ...

OneStep
rock anchor
Operating instructions en
Appendix 1–9
Printed: 07.07.2013 | Doc-Nr: PUB / 5140059 / 000 / 00

1
2
Printed: 07.07.2013 | Doc-Nr: PUB / 5140059 / 000 / 00

3
System overview – schematic view (Load Sensing)
System overview – schematic view (Non-Load Sensing)
Printed: 07.07.2013 | Doc-Nr: PUB / 5140059 / 000 / 00

VHF
D E
G H I
J
F
L
K
!EDUSVL
5
4
Printed: 07.07.2013 | Doc-Nr: PUB / 5140059 / 000 / 00

1
en
It is essential that the operating instructions
are read before initiation of the system.
Always keep these operating instructions
with the OneStep system.
OneStep rock anchor
Contents Page
1. General information 1
2. Description 2
3. Technical data and required media 2
4. Safety rules – general 4
5. Installation 5
6. Before Use 7
7. Operation 8
8. Maintenance 10
9. Troubleshooting 12
10. Storage and transportation 14
11. Accessories and spare parts 14
12. Disposal 14
13. Manufacturer's warranty – tools 15
14. Declaration of conformity (original) 15
1.3 Other information
In these operating instructions, the designation “the sys-
tem” always refers to the OneStep rock anchor system.
These numbers refer to the corresponding illustra-
tions. The illustrations can be found on the fold-out cov-
er-pages. Keep these pages open while studying the oper-
ating instructions.
(#1) These numbers refer to the corresponding valves
shown in the flow diagram on illustration on the cov-
er-page.
Warning signs
General
warning
Warning:
avoid hand
injuries
Warning!
Falling
objects
Obligation signs
Wear a hard
hat
Wear ear
protection
Wear
protective
gloves
Wear safety
boots
Wear eye
protection
1. General Information
1.1 Safety notices and their meaning
-CAUTION-
This word draws attention to a potentially dangerous
situation that could lead to minor personal injury or dam-
age to the equipment or other property.
-NOTE-
This word draws attention to instructions and other use-
ful information.
1.2 Pictograms
Approvals of the HOS rock anchor
MSHA
U.S. Department of Labor
Mine Safety and Health Administration
DMT
Bezirksregierung
Arnsberg
Bezirksregierung Arnsberg
MSHA
RMT
Printed: 07.07.2013 | Doc-Nr: PUB / 5140059 / 000 / 00

3. Technical Data and required media
Technical specification of the rock anchor HOS-W
Tubular shaft diameter 38.5 mm (1
1
/
2
inch)
Lengths 120–250 cm (47
1
/
4
– 98
1
/
5
inch) (see appendix 1)
Ultimate load ⱖ 320 kN
Yield strength ⱖ 270 kN
Elongation at break ⱖ 10 %
Chemical mortar 2-component polyester mortar
Drilling method Clockwise rotating, wet
Pretensioning method (only for HOS-W type T) Anticlockwise rotating
Drill head Roof-shaped cutting edge
Diameter at cutting edge 40.5 mm
Technical specification of the rock anchor HOS-C
Tubular shaft diameter 38.0 mm (1½ inch)
Lengths 120–250 cm (47
1
/
4
– 98
1
/
5
inch) (see appendix 1)
2
en
2. Description
2.1 Components
The Hilti OneStep rock anchor system consists of 3 main
components which are necessary for drilling the anchor
and injecting the mortar contained within the anchor:
1. OneStep rock anchor (HOS)
햲 12-pointed nut (Single piece nut with standard
anchor, two piece nut with pretension anchor)
햳 Anchor-tube (HOS-W: steel; HOS-C: fiber)
햴 Drill-head
햵 Flushing-water channel
햶 Mortar
햷 Centre ring
2. Dispenser
햲 12-pointed chuck
햳 Connection end (hydraulic-motor); according to
appendix 8 different designs are available
2. 햴 Water connection (dispensing water)
햵 Inner component
3. Multi Rig Intensifier Unit
햲 Pump
햳 Manifold
햴 Ball valve - ON/OFF switch pump
햵 Filter
햶 Non return valve 5 bar
햷 Pressure gauge (system-pressure water)
햸 Water-distribution T-fitting
햹 Blind / Orifice
햺 Non return valve 0.2 bar
햻 Control valve / Dispensing lever
햽 Pressure gauge (Dispensing-pressure control)
2.2 Use of the product as directed
-CAUTION-
In addition to the safety rules listed in the individual sec-
tions of these operating instructions, the following points
must be strictly observed at all times.
The system is designed for drilling with the Hilti OneStep
rock anchor and for injecting the contained mortar.
When assembling and using the dispensing unit the nation-
al standards are to be followed, the minimum requirements
are as defined in DIN EN ISO 4413.
It is permissible to use in environments where there is a
risk of explosion. The appliance complies with the provi-
sions and requirements of 94/9/EC (ATEX) for: Group I
category M2 → Mining and explosive atmospheres (firedamp)
Changes or modifications to the system are not per-
missible. To avoid the risk of injury, use only genuine
Hilti accessories and ancillary equipment. Observe the
information printed in the operating instructions con-
cerning operation, care and maintenance.
The system and its ancillary equipment may present
hazards when used incorrectly by untrained personnel
or not as directed.
Printed: 07.07.2013 | Doc-Nr: PUB / 5140059 / 000 / 00

3
en
Ultimate load ⱖ 200 kN
Shear load ⱖ 50 kN
Nut pull-off ⱖ 100 kN
Chemical mortar 2-component polyester mortar
Drilling head Roof-shaped cutting edge
Diameter at cutting edge 40.5 mm
Dispenser
Connection ends Different types of
connection ends available → appendix 8
Weight depending on type and
length → appendix 8
Length depending on type and
length → appendix 8
Speed of rotation max. 1000 r.p.m.
Torque transfer max. 800 Nm
Contact pressure during drilling max. 20 kN (HOS-W) ; max. 10 kN (HOS-C)
Pump data
Weight 16.5 kg
Dimensions 250 mm × 150 mm × 165 mm
Pump connections
• Power supply (P, T) 1/2" BSPP female
• Water supply (S) 3/4" BSPP female
• Water outlet (HP) 3/8" BSPP female
Media specifications
Power fluid medium
• Viscosity 10 to 200 cSt
• Temperature < 70 °C
• Filtration ratio < 25 µm
• Pressure (in P-line) 140 to 200 bar* (2030 to 2860 PSI)*
• Flow rate max. 45 L/min (max. 12 US-gal/min)
Cooling capacity 2 kW
Dispensing water
• Temperature < 40 °C
• Filtration ratio < 80 µm
• Pressure inlet 5 to 25 bar (75 to 360 PSI)
• Pressure outlet 120 bar (1740 PSI)
• Flow rate max. 30 L/min (max. 8 US-gal/min)
Flushing water (Measured at the drill motor)
• Pressure 15 to 25 bar (215 to 360 PSI)
• Flow rate > 30 L/min (> 8 US-gal/min)
• Filtration ratio < 200 µm
• Temperature < 40 °C
Printed: 07.07.2013 | Doc-Nr: PUB / 5140059 / 000 / 00

4
en
4. Safety rules – general
4.1 Proper arrangement and organization of the
workplace
• Wear non-slip boots and always work from a secure
stance.
• Wear Personal Protective Equipment (PPE) while work-
ing.
• Do not wear loose clothing, loose long hair and jew-
ellery, which could become caught up in moving parts.
• Avoid unfavourable body positions.
• Ensure that the workplace is well lit.
• Ensure that the workplace is well ventilated.
• Objects which could cause injury should be removed
from the working area.
• Keep other persons outside the area affected while you
are working.
• Take care of your tools. You will work more efficiently
and more safely if tools are clean and sharp.
4.2 Handling and using the appliance with due
care and attention
-CAUTION-
• The hoses are pressurized. Check the hoses at the
beginning of every shift and ensure that all hoses are
well positioned to avoid damage as a result of sur-
rounding influences.
• Don’t touch or hold rotating parts.
• The system is heavy. There is a risk of pinching parts
of the body. Wear a hard hat, protective gloves and
safety boots.
• The system emits noise. Excessive noise may damage
the hearing. Wear ear protection.
• Drilling may cause hazardous splintering of the mate-
rial. Splintering material may injure parts of the body
and the eyes. Wear eye protection and a hard hat.
• Operate the system only as directed and only when it
is in faultless condition.
• Never leave the system unsupervised.
• Use only the genuine Hilti accessories or spare parts
listed in the operating instructions. The use of other
equipment may present a risk of injury.
• Do not overload the system. The system operates more
efficiently and more safely within its given performance
range.
• Ensure that the parameters of the machine where you
want to install the system on can match the technical
requirements of the OneStep system (see chapter 3).
-NOTE-
When assembling and using the system the national
standards are to be followed, the minimum require-
ments are as defined in DIN EN ISO 4413.
-CAUTION-
When connecting the pump and the dispenser, nation-
al standards are to be followed, the minimum require-
ments are as defined in DIN EN ISO 4413.
The pressure-outlet of the dispensing water is limitted
to 120 bar at the pump. Do not change this setting.
• Follow the instructions concerning care and maintenance.
4.3 Requirements to be met by users
• Specified maximum operating-pressure:
– max. power fluid pressure in feed-line to the Hilti sys-
tem: 200 bar / 2900 PSI
-NOTE-
In case the machine power fluid pressure is higher
than 200 bar / 2900 PSI, a pressure reducing valve
must be added in front of the Hilti system.
• The system is intended for professional use.
• The system may only be installed, operated, serviced
and repaired by authorized and trained personnel. These
personnel must be informed of any special hazards
that may be encountered.
• Always concentrate on the job you are doing. Proceed
carefully and do not use the system if your full atten-
tion is not on the job.
• Always follow country specific regulations, processes
and safety standards.
Hoses (min. requirements) Nom. Pressure Nom. Diameter
Power Supply (P, T) 250 bar 3600 PSI 12 mm ½"
Water supply (S) 250 bar 3600 PSI 16 mm ¾"
Water outlet (HP) to Distributor (#7) 250 bar 3600 PSI 10 mm ¾"
Distributor (#7) to control valve (#10) 250 bar 3600 PSI 8 mm 9/16"
Fittings (min. requirements) Nominal pressure > 250 bar / 3600 PSI
Parts (#1) – (#11)
Use only genuine Hilti parts as given in and in appendix 7.
* The given minimum values are valid if the pressure in the tank-line is less than 5 bar / 70 PSI. If the pressure in the tank line exceeds 5 bar / 70 PSI the
minimum pressure in the P-line has to be increased until 120 bar / 1740PSI dispensing water pressure can be ensured for the entire dispensing process.
This must only be done by authorized personnel.
Printed: 07.07.2013 | Doc-Nr: PUB / 5140059 / 000 / 00

5
en
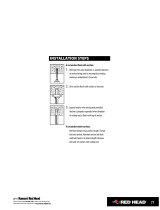
5. Installation
It is essential that safety rules printed in these operat-
ing instructions are read and observed.
Ensure that the parameters of the machine where you
want to install the system on can match the technical
requirements of the OneStep system (see chapter 3).
-NOTE-
When assembling and using the system the national
standards are to be followed, the minimum requirements
are as defined in DIN EN ISO 4413.
The length of the hoses has to be fitted to the required
working radius. All possible movements have to be cov-
ered to avoid tearing off the hoses.
All equipment must be clean, undamaged and fully func-
tional when installed.
-CAUTION-
When connecting the pump and the dispenser, nation-
al standards are to be followed, the minimum require-
ments are as defined in DIN EN ISO 4413.
The pressure-outlet of the dispensing water is limitted
to 120 bar at the pump. Do not change this setting.
Ensure that the required power fluid medium with ade-
quate pressure and flow rate (see chapter 3) is available
at the pump at any time you want to dispense OneStep
anchors.
5.1 Preparation for use
5.1.1 Fitting the Multi Rig Intensifier Unit (MRIU)
-NOTE-
The flow diagrams shown in appendix 7 are to be known
as schematic diagrams. The implementation of the Inten-
sifier Unit into the complete hydraulic system has to be
defined on the basis of the already existing flow diagram
of the machine.
1. Mount the pump assembly (#1 - #6) in a well pro-
tected, easily accessible and visible location. Use four
M8 screws for the assembly and add bolt adhesive
(Loctite or similar). The pump should be mounted on
a sufficiently horizontal surface to enable proper work-
ing of leakage detecting bores (see chapter 6.1.5).
2. Connect the power-fluid feed-line to the ball valve (#3).
The ball valve is already pre-assembled to the P-port.
Connect the power-fluid tank-line to the T-port at the
manifold (#2).
Connect the water supply line to the filter (#4). The
filter is already pre-assembled to the S-port.
Connect the dispensing water line to the WP-port at
the pump (#1)
3. Use adequate hoses (see chapter 3) with steel rein-
forcement and steel fittings.
-NOTE-
The power-fluid tank line pressure must not exceed 5
bar!
4. Mount the control valves (#10) in a well protected and
easily accessible location where the operator can use
them easily and ergonomically convenient.
5. Connect the WP-port at the pump (#1) and the T-fit-
ting (#7) with a 3/4” hose.
6. Connect the T-fitting (#7) and as many control valves
as required with a 9/16” hose.
7. Ensure that all fittings are tight.
-NOTE-
The maximum number of six anchors dispensed in par-
allel must not be exceeded.
8. The pump can be switched ON and OFF at the ball
valve (#3). The pump can be immediately used after
the power fluid has been switched ON.
9. Bleed the power-fluid circuit in accordance with the
manufacturers guidelines.
10. Vent the dispensing water circuit. Turn all dispens-
ing levers at the control valves (#10) into dispens-
ing position (ON) until the dispensing water escapes
continuously and smoothly.
-CAUTION-
Water can exit the dispenser at pressure. Keep out of
the way.
10. Ensure that the required media are available at the
pump with adequate pressure and flow rates (see
chapter 3) at any time you want to dispense OneStep
anchors.
5.1.2 Fitting the dispenser
1. Check the seals at the connection end of the dispenser
(if worn, change seals according to existing connec-
tion end as shown in appendix 8).
2. Grease the connection end.
3. Fit the dispenser, connection end first, into the drilling
motor.
4. Secure the dispenser in the drill-motor with the mount-
4.4 Personal protective equipment
• The user and persons in the immediate vicinity must
wear suitable eye protection, a hard hat, ear protec-
tion, protective gloves and safety boots when the sys-
tem is in use (in accordance with the safety regulations
of the mine).
Printed: 07.07.2013 | Doc-Nr: PUB / 5140059 / 000 / 00

6
en
ꭾꭿ
ꮁꮂ
ꮀ
ing-accessories intended for the existent drill-motor.
5. Connect the dispensing-water hose to the dispenser.
6. Secure the housing to prevent rotation as shown in
appendix 4 and appendix 5 (Caution: No rigid con-
nection to the motor or motor carriage).
7. Use stainless cylinder-head bolts M8 with adequate
length to fix the anti-twist device. Ensure that all screws
of the dispenser are set and mounted with the spec-
ified torque (see appendix 8) after mounting the anti
twist device.
5.1.3 HOS Feed Control (optional)
Description
The HOS Feed Control is an option to support the HOS
drilling process. It controls the feed rate of the drill rig
as a function of flushing water pressure. Therefore, the
feed rate is automatically kept at an optimum without
the need for the operator to adjust it. The HOS Feed Con-
trol System is particularly suitable for drilling strata with
cohesive layers. Hydraulic circuit and part list is locat-
ed in appendix 9. The standard system can be used with
flushing water pressures up to p = 22 bars / 320 PSI.
Installation
During assembly and operation of the HOS Feed Con-
trol System all local regulations on hydraulic systems
are to be considered. The DIN EN ISO 4413 is always to
be taken into account as a minimum requirement.
• Switch off the machine and block the flushing water
line.
• Release the pressure on all hydraulic and water lines.
• Find a suitable position for the feed control valve close
to the HOS anchor. Ask for support from your Hilti Tech-
nical Support.
• Assemble the HOS Feed Control System in accordance
to hydraulic circuit and part list in appendix 9.
Adjustment
The HOS Feed Control system has to be adjusted to the
local flushing water conditions. This guarantees a drilling
performance at its best.
• Block the ball valve in the flushing water line (the valve
actuation now has maximum static pressure).
• Remove protective cap from valve [1.1].
• Release locking screw of valve [1.2 + 2].
• Switch on flushing water supply.
• Vent system air at valve actuation (water cylinder).
• Adjust the drill rig feed rate as follows:
Step 1: Switch on feed
Step 2: In case the drill rig moves, reduced feed by turn-
ing valve adjustment screw clockwise until car-
riage just stops [3].
Step 3: In case the drill rig does not move, increase feed
by turning valve adjustment screw anti clock-
wise until drill rig just moves [3]. With a maxi-
mum flushing water pressure between 20 and
22 bars / 290 and 320 PSI you may skip step 4.
The adjustment is already done here.
Step 4: With a maximum flushing water pressure below
20 bars / 290 PSI and water pressure fluctua-
tions of Δp < 2 bars / 29 PSI turn adjustment
screw [4] clockwise 45°. With water pressure
fluctuations of Δp > 2 bars / 29 PSI turn adjust-
ment screw [4] clockwise 90°. Tighten locking
screw of valve carefully [5.1]. Replace protec-
tive cap [5.2]. Open ball valve in flushing water
line.
Printed: 07.07.2013 | Doc-Nr: PUB / 5140059 / 000 / 00

7
en
6. Before Use
6.1 Before each usage
6.1.1 General overview
• Inner component : Check the contact surface of the
sealing plate for signs of wear (good seal with the rock
anchor). Change sealing plate, if it is worn or broken
(see chapter 8.2). Ensure the inner component is prop-
erly fixed in the dispenser.
• Check 12-pointed chuck for signs of excessive wear.
• Ensure that the required media are available with ade-
quate pressure and flow-rate (see chapter 3).
• Ensure that all used adapters and extensions are in
good and operative condition.
6.1.2 Setting the system
-CAUTION-
Water can exit the dispenser at pressure. Keep out of
the way.
1. Ensure that all hoses and valves are mounted prop-
erly and connected correctly and all fittings are tight.
2. Bleed the system (waterside)
• Turn all dispensing levers at the Control Valves (#10)
into dispensing position (ON). Wait until the water
escapes smoothly and continuously out of the dis-
penser.
3. • Measure at every dispenser the time until 1.5 liters
have been drained
– 15-18 sec. → o.k. .
– if dispensing time differs from 15-18 sec. → trou-
ble shooting chapter 9.
6.1.3 Checking for leakage and gauge functionality
• Close the injection water outlet on all dispensers firm-
ly with an M8 screw (e.g. starknob according to appen-
dix 6).
• Set the system under pressure by turning the dispensing
levers at all Control Valves (#10) into dispensing posi-
tion (ON) and leave the lever in that position.
• Ensure that all fittings and hoses do not leak.
• Observe the gauge that shows the water-pressure in
the dispensing-water line (#11) for proper function
after leakage test. When operating the dispensing lever
(#10) the pressure must increase immediately to ~110
bar / 1600 PSI.
• Ensure at the pressure gauge (#6) that the system pres-
sure is 120 bar.
• Return the dispensing-lever to the drilling position
(OFF).
• Observe the gauge (#11) that shows the pressure in
the dispensing water line and ensure the pressure is
completely released before starting to remove the screw.
6.1.4 Checking HOS Feed Control (if used)
The HOS Feed Control Valve should be adjusted to the
flushing water pressure as needed, but at least once per
day. If there are problems see the troubleshooting chap-
ter 9.3.
6.1.5 Observation of pump leakage detector
The leakage detecting bore is located on the bottom sur-
face of the pump-housing at the zone which separate
oil- and water-chambers from each other.
-CAUTION-
If the draining from leakage detectors exceeds rate of
10 drops per minute, the pump must be replaced and
sent to Hilti. Refer to chapter 8.4.
6.2 Periodical checks
If the system is in constant use, these checks should be
carried as frequently as mine conditions require, but at
least once per week. If the system has been idle for a
long period of time they should be made before the next
usage.
6.2.1 Dirt trap (filter) (#4)
• Check the mesh
– Clean the mesh, if silted/blocked.
– Change the dirt trap (filter), if worn.
6.2.2 Assembly
• Ensure the anti-twist device is secure.
• Ensure the dispenser is securely connected with the
drill motor.
Printed: 07.07.2013 | Doc-Nr: PUB / 5140059 / 000 / 00

8
en
7. Operation
It is essential that the safety rules printed in these oper-
ating instructions are read and observed. Ensure that
the expiry date of the anchor you want to set is not
exceeded.
-NOTE-
Use only anchors that are in a proper condition (anchor
tube, drill bit and 12-pointed nut) as delivered by Hilti.
Ensure that the anchors didn’t become damaged dur-
ing storage or transportation in the mine.
7.1 Operation HOS-W ISL and HOS-C
(pictures a–e)
-NOTE-
Ensure that the pump is switched on at the Ball Valve
(#3) and ensure that the required media (see chapter 3)
are available with adequate pressure and flow-rate at
any time you want to install OneStep anchors.
7.1.1 Drilling HOS-W ISL and HOS-C
-NOTE-
Before drilling: Ensure that the Dispensing Lever at the
Control Valve (#10) was turned into the drilling posi-
tion (OFF). There must be no water escaping at the dis-
pensing water nozzle at the inner component of the dis-
penser during drilling.
1. Remove the protective cap from the 12-pointed nut
of the rock anchor.
2. Ensure that the flushing-water holes at dispenser and
anchor (at 12-pointed-nut and drill bit) are open. Clean
holes and dispenser chuck from debris, if necessary.
3. Insert the 12-pointed-nut of the rock anchor into the
12-pointed chuck of the dispenser, until the seal at
the nut-bottom gets in contact with the sealing plate
of the inner component.
4. Use the anchor guide (or similar equipment) on the
drilling carriage to stabilize the rock anchor whilst
drilling.
5. Ensure that the anchor rotates freely in the anchor
guide.
6. Drilling direction: clockwise
7. Use an extension (see appendix 2) in case of uneven
strata to ensure that the anchor can be drilled to its
complete depth.
8. Brace the drill rig to the strata. Bring the drill bit of the
rock anchor in contact with the rock and press it
to the strata (from now on do not remove the thrust
until the complete setting procedure has been finished).
-NOTE-
9. Do not use excessive drill thrust that bends/breaks
the anchor.
10. Start flushing water.
11. Start drilling.
12. Where required remove the anchor guide in accor-
dance with manufacturer’s guidelines and local work
and safety procedures.
13. Drill anchor to its complete depth.
14. In order to prevent strong friction stop drilling and
applying thrust immediately once anchor reaches
its complete depth.
15. Continue flushing for approx. 2 seconds after drilling
has been finished.
7.1.2 Dispensing (Standard HOS) (pictures f–h)
1. Ensure that the rock anchor is still properly engaged
in the dispenser chuck.
2. Ensure that the anchor is firmly pushed against the
strata.
3. Turn the Dispensing Lever at the Control Valve (#10)
into dispensing position (ON).
4. Keep the lever in the dispensing position (ON) until
the resin escapes from the drilled hole. If no mortar
escapes, end the injection operation when maximum
injection pressure ~110 bar / 1600 PSI is shown at
the gauge in the dispensing-water line (#11).
5. Maintain thrust until the resin has set. The length of
the waiting time depends on the surrounding tem-
perature and the flushing-water temperature, but lasts
at least 15 sec.
6. Push the Dispensing Lever (#10) of the control valve
back into drilling position (OFF) and wait until the pres-
sure in the dispensing water line is released.
7. Retract the drilling motor to its original position.
8. Assure that the dispenser is free of debris every time
before inserting a new anchor.
-NOTE-
Observe also the safety precautions listed in the MSDS
material safety data sheet (see also training documents).
7.2 Operation Pretension HOS
-NOTE-
Ensure that the pump is switched on at the Ball Valve
(#3) and ensure that the required media (see chapter 3)
are available with adequate pressure and flow-rate at
any time you want to install OneStep anchors.
7.2.1 Drilling (Pretension HOS) (pictures a-e)
-NOTE-
Before drilling: Ensure that the Dispensing Lever at the
Control Valve (#10) was turned into the drilling posi-
tion (OFF). There must be no water escaping at the dis-
pensing water nozzle at the inner component of the dis-
penser during drilling.
1. Remove the protective cap from the 12-pointed nut
of the rock anchor.
2. Ensure flushing-water holes at dispenser and anchor
(at 12-pointed-nut and drill bit) are open. Clean holes
and dispenser chuck from debris, if necessary.
3. Insert the 12-pointed-nut of the rock anchor into the
12-pointed chuck of the dispenser, until the seal at
the nut-bottom gets in contact with the sealing plate
of the inner component.
Printed: 07.07.2013 | Doc-Nr: PUB / 5140059 / 000 / 00

9
en
4. Use the anchor guide (or similar equipment) on the
drilling carriage to stabilize the rock anchor whilst
drilling.
5. Ensure the anchor rotates freely in the anchor guide.
6. Drilling direction: clockwise
7. Use an extension (see appendix 2) in case of uneven
strata to ensure the anchor can be drilled to its com-
plete depth.
8. Brace the drilling carriage to the strata. Bring the drill
bit of the rock anchor in contact with the rock and press
it to the strata (from now on do not remove the thrust
until the complete setting procedure has been finished).
-NOTE-
9. Do not use excessive drill thrust that bends the anchor.
10. Start flushing water.
11. Start drilling.
12. Where required remove the anchor guide in accor-
dance with manufacturer’s guidelines and local work
and safety procedures.
13. Drill anchor to its complete depth.
14. In order to prevent strong friction stop drilling and
applying thrust immediately once anchor reaches
its complete depth.
15. Continue flushing for approx. 2 seconds after drilling
has been finished.
7.2.2 Dispensing and tensioning
(Pretension HOS) (pictures f-i)
1. Ensure that the rock anchor is still properly engaged
in the dispenser chuck.
2. Ensure that the anchor is firmly pushed against the
strata.
3. Turn the Dispensing Lever at the Control Valve (#10)
into dispensing position (ON).
4. Continue dispensing until the maximum pressure of
~110 bar / 1600 PSI is shown on the gauge in the
water line (#11).
5. Push the Dispensing Lever (#10) of the control valve
back into drilling position (OFF) and wait until the pres-
sure in the dispensing water line is released.
6. Maintain thrust until the fast resin has set. The length
of the waiting time depends on the surrounding tem-
perature and the flushing-water temperature. Wait 5
to 10 seconds before tensioning the rock anchor.
7. Rotate the drill motor anti-clockwise to tension the
anchor.
-NOTE-
For consistent pretension in the rock anchor, check the
torque level of the drill motor regularly.
-NOTE-
Observe also the safety precautions listed in the MSDS
material safety data sheet (see also training documents).
7.3 Consequences of improper setting
-NOTE-
If one of the following cases occurs during injection or
setting of the resin the full load capacity of the anchor
cannot be ensured:
• Power failure (dispensing incomplete)
• Drill-rig thrust removed (potential move of the anchor
in the underground and hence potential damage of
chemical bond)
• Rotation of the anchor (potential damage of chemical
bond)
• Interruption of dispensing (dispensing incomplete)
-CAUTION-
If the anchor is not properly installed or damaged in any
way:
• Ensure that the anchor can not cause any damage or
harm. If required, remove and dispose the anchor.
• If required set a new anchor.
Do not under any circumstances put any part of your
body between the dispenser and a bolt that has not been
or is suspected of not being dispensed.
Printed: 07.07.2013 | Doc-Nr: PUB / 5140059 / 000 / 00

10
en
• Screw the extractor into the inner component.
• Release the circlip (fig 1)
• Pull out the inner component (fig 2)
• Insert and position a new, lightly greased inner component.
• Secure the inner component with a circlip.
8.2 Maintenance of the inner component
11 2
8. Maintenance
-NOTE-
The following described activities are to be done in case of need.
The required spare parts and repair tools are listed in appendix 6 and concerning to the type of dispenser in appen-
dix 8.
8.1 Replacement of the inner component
8.1.2 Dispenser Type B (short inner component)
• Release the cylinder cap screws and retaining-washers with an Allen key (6 mm)
• Screw the extractor into the inner component.
• Pull out the inner component.
• Insert and position a new, lightly greased inner component.
• Secure the inner component with new cap screws and Nord-Lock® washers.
8.1.3 Dispenser Type B (long inner component)
• Use a hammer and pin punch to drive out both slotted pins (fig 1).
• Remove worn sealing plate / fit new sealing plate (fig 2).
2 3
1
Printed: 07.07.2013 | Doc-Nr: PUB / 5140059 / 000 / 00

11
en
• Drive in slotted pins to secure sealing plate.
• Fit new O-rings (fig 3).
• Ensure the flushing-water holes are open.
• Check the non-return valves for smoothness of operation. Do this by pressing the base of the housing of the non-
return valve with a pin or rod.
8.3 Replacement of the seals at the connection end
The seals at the drilling-motor interface differ between the various types of connection ends. The different work
steps, seal-types and tools are shown in appendix 8 according to the existing type of dispenser.
8.4 Maintenance of the pump
In general, the pump is maintenance free. Only the leakage detector has to be observed (refer chapter 6.1.5). If
the draining from leakage detectors exceeds the rate of 10 drops per minute, the pump must be replaced and sent
to Hilti.
In this case
1. Shut off the machine power supply.
2. Shut off the ball valve (#3) in the power-fluid line of the pump.
3. Open one of the dispensing valves on the machine to de-pressurize the water lines.
4. Replace the pump by changing hydraulic hoses and fittings according to national standards, the minimum
requirements are defined in EN ISO 443.
Printed: 07.07.2013 | Doc-Nr: PUB / 5140059 / 000 / 00

en
12
9.1 Troubleshooting HOS rock anchor (all types) and dispensing system
Problem: No dispensing / bolt encapsulation incomplete (no resin show at the mouth of bore)
→ Turn the Dispensing Lever at the Control Valve (#10) into dispensing position (ON) and observe
the Pressure Gauges (#6)
(P
6
; system-pressure) and (#11) (P
11
; dispensing pressure)
P
6
~ 0 bar / pump not working
→ no water-supply
→ No/insufficient dispensing-water supply?
→ Water-hoses blocked/squeezed?
→ Filter (#4) blocked?
→ Pump-sealings worn? → Check leakage detector (see 6.1.5)
→ no power fluid supply
→ Power fluid hoses installed at the correct port?
→ No/insufficient power fluid supply?
→ Ball valve (#3) blocked/shut?
→ Pump-sealings worn? → Check leakage detector (see 6.1.5)
→ Leakage in power fluid supply / water supply?
→ Pump broken or blocked?
0 < P
6 < 120 bar
→ Insufficient power fluid supply (flow rate/pressure) → see chapter 3
→ Bolter overloaded?
→ Diameter of power-supply hoses (P-line) too small?
→ Pressure setting at pump misaligned?
P
6
~ 120 bar and P
11
~ 110 bar at the end of dispensing process
→ Resin completely dispensed
→ Broken ground?
→ Cavities in the strata?
P
6
~ 120 bar and P
11
~ 110 bar immediately after operating the Control Valve / Dispensing Lever
(#10)
→ Blockage behind P
11
→ Flushing holes at drill-bit blocked?
→ Water-hose blocked/squeezed?
→ Dispensing-water nozzle at inner-component of dispenser blocked?
→ Check-valve in inner-component of dispenser blocked?
P
6
~ 120 bar and P
11
~ 110 bar suddenly during dispensing (dispensing time shorter than usual)
→ dispensing process interrupted
→ Resin cured too quickly? Storage-, flushing water- or underground-temperature too high?
→ Annular gap blocked?
→ Hoses blocked/squeezed?
→ Orifice (#8) broken/worn?
P
6
~ 120 bar and P
11
~ 0 bar after operating the Control Valve / Dispensing Lever (#10)
→ Pressure Gauge (#11) faulty or
→ Blockage between Pressure Gauge (#6) and Pressure Gauge (#11)
→ Water-hose blocked/squeezed?
→ Control Valve (#10) blocked or faulty?
→ Orifice (#8) blocked?
9. Troubleshooting
Printed: 07.07.2013 | Doc-Nr: PUB / 5140059 / 000 / 00

13
en
P
6
~ 120 bar and P
11
< 110 bar after standard dispensing time (depends on anchor-length)
→ Anchor not pressed to the strata? → Draining water between Dispenser and HOS anchor?
→ Leakage in the system/dispenser?
→ Air in system?
→ Control Valve (#10) blocked or faulty?
→ Center-ring at anchor broken?
→ Orifice (#8) blocked?
→ Fittings not tight?
P
6
> 120 bar
→ Call Hilti personnel or trained personnel to readjust pressure limit to 120bar.
9.2 Trouble shooting pretension HOS
Problem: During drilling the nut runs out of the dispenser
Is the direction of rotation correct?
→ Correct rotation direction controls
Problem: During tensioning the nut doesn‘t run out of the dispenser
Is the direction of rotation correct?
→ Correct rotation direction controls
Problem: Anchor doesn‘t rotate during drilling
Pretenison nut run forwards on the anchor?
→ Screw the nut back in position
9.3 Trouble shooting Option HOS Feed Control System
With installation and operation of the HOS Feed Control System the local regulations are to be taken into
account. The guideline DIN EN ISO 4413 is always to be considered as a minimum requirement.
Problem: Clogging of bolt = no function of HOS Feed Control Systems
Air in valve actuation (water line)
→ Vent air at actuation and repeat valve adjustment according chapter 5.1.4
No or not sufficient flushing water to bolt
→ Ref. chapter 9.1 Trouble shooting HOS bolt
Valve adjustment screw out of adjustment
→ Repeat valve adjustment according chapter 5.1.4
Water leakage out of protective cap
→ Replacement of FC valve
Problem: Carriadge feed too slow
Pressure of flushing water above selected control pressure range
→ Repeat valve adjustment according chapter 5.1.4
Problem with hydraulic power supply
→ Check hydraulic power supply by qualified staff
Valve damaged
→ Replacement of FC valve
Printed: 07.07.2013 | Doc-Nr: PUB / 5140059 / 000 / 00

14
en
10. Storage and transportation
See the actual Material Safety Data Sheet concerning
storage and transportation.
11. Accessories, spare parts & repair tools
• Coupling nut → appendix 2
• Extensions → appendix 2
• Drill- and setting-adapters → appendix 3
• Spare parts hydraulic circuit → appendix 7
• Spare parts & repair → appendix 6 and
tools dispenser appendix 8
• Feed control → appendix 9
12. Disposal
See the actual Material Safety Data Sheet concerning
disposal.
-CAUTION-
Improper disposal of the equipment may have serious
consequences: The burning of plastic components gen-
erates toxic fumes which may present a health hazard.
Most of the materials from which Hilti tools or appli-
ances are manufactured can be recycled. The materials
must be correctly separated before they can be recy-
cled. In many countries, Hilti has already made arrange-
ments for taking back old tools and appliances for recy-
cling. Ask Hilti customer service or your Hilti represen-
tative for further information.
Problem: No carriadge feed
Pressure of flushing water above selected control pressure range
→ Repeat valve adjustment according chapter 5.1.4
Hydraulic hoses or system components not properly connected
→ Check hydraulic system by qualified staff
Efficient power supply or problem with hydraulic power supply
→ Check hydraulic system by qualified staff
Valve damaged
→ Replacement of FC valve
Problem: No retraction of carriadge
Check valve inside FC valve blocked
→ Replacement of FC valve
→ Repeat valve adjustment according chapter 5.1.4
Printed: 07.07.2013 | Doc-Nr: PUB / 5140059 / 000 / 00

15
en
We declare on our sole responsibility, that the in appen-
dix 7 named preassembled Pump assemblies and Dis-
pensing assemblies comply with the following direc-
tives and standards: DIN EN ISO 4413, 2006/42/EC.
14. Declaration of conformity (original)
Hilti Corporation, Feldkircherstrasse 100,
FL-9494 Schaan
Helmut Haas Lars Taenzer
Head of Quality Management Natural Resources Head of Natural Resources
Energy & Industry Energy & Industry
03/2013 03/2013
Technical documentation filed at:
Hilti Entwicklungsgesellschaft mbH
Zulassung Elektrowerkzeuge
Hiltistrasse 6
86916 Kaufering
Deutschland
Designation: Multi Rig Intensifier Unit
Year of design: 2011
We declare, on our sole responsibility, that the in appen-
dix 8 named dispenser comply with the following direc-
tives and standards: 94/9/EC, 2006/42/EC, EN 12100,
EN 13463-1.
Designation: Dispenser
Type: HOS I-T xx / HOS I-N xx
Year of design: 2003–2009
13. Manufacturer’s warranty – tools
Hilti warrants that the tool supplied is free of defects in
material and workmanship. This warranty is valid so
long as the tool is operated and handled correctly, cleaned
and serviced properly and in accordance with the Hilti
Operating Instructions, and the technical system is main-
tained. This means that only original Hilti consumables,
components and spare parts may be used.
This warranty provides the free-of-charge repair or
replacement of defective parts only over the entire lifes-
pan of the tool. Parts requiring repair or replacement as
a result of normal wear and tear are not covered by this
warranty.
Additional claims are excluded, unless stringent nation-
al rules prohibit such exclusion. In particular, Hilti is
not obligated for direct, indirect, incidental or conse-
quential damages, losses or expenses in connection
with, or by reason of, the use of, or inability to use the
tool for any purpose. Implied warranties of mer-
chantability or fitness for a particular purpose are
specifically excluded.
For repair or replacement, send tool or related parts
immediately upon discovery of the defect to the address
of the local Hilti marketing organization provided.
This constitutes Hilti’s entire obligation with regard to
warranty and supersedes all prior or contemporaneous
comments and oral or written agreements concerning
warranties.
Printed: 07.07.2013 | Doc-Nr: PUB / 5140059 / 000 / 00

16
1
Appendix 1 Rock anchor (HOS-W 320) for dispenser N
Name (steel-drill bit) Total length Color code in nut Item number
[mm] [inch]
HOS-W 120 /320 N3 30 1245 49" no color 211876
HOS-W 150 /320 N3 30 1545 61" red 211877
HOS-W 180 /320 N3 30 1845 72.6" blue 211878
HOS-W 210 /320 N3 30 2145 84.5" orange 211879
HOS-W 250 /320 N3 30 2565 101" white 211880
Name (carbide-drill bit) Total length Color code in nut tem number
[mm] [inch]
HOS-W 120 /320 N4 30 1245 49" no color 211875
HOS-W 150 /320 N4 30 1545 61" red 236496
HOS-W 180 /320 N4 30 1845 72.6" blue 236497
HOS-W 210 /320 N4 30 2145 84.5" orange 236498
HOS-W 250 /320 N4 30 2565 101" white 283042
Name (steel-drill bit) Total length Color code in nut Item number
[mm] [inch]
HOS-W 120 /320 N3 15 1245 49" no color 421196
HOS-W 150 /320 N3 15 1545 61" red 421197
HOS-W 180 /320 N3 15 1845 72.6" blue 421198
HOS-W 210 /320 N3 15 2145 84.5" orange 421199
HOS-W 250 /320 N3 15 2565 101" white 421200
Name (carbide-drill bit) Total length Color code in nut Item number
[mm] [inch]
HOS-W 120 /320 N4 15 1245 49" no color 421201
HOS-W 150 /320 N4 15 1545 61" red 421202
HOS-W 180 /320 N4 15 1845 72.6" blue 421203
HOS-W 210 /320 N4 15 2145 84.5" orange 421204
HOS-W 250 /320 N4 15 2565 101" white 421205
Printed: 07.07.2013 | Doc-Nr: PUB / 5140059 / 000 / 00
/