Page is loading ...

Frymaster, a member of the Commercial Food Equipment Service Association, recommends using
CFESA Certified Technicians.
24-Hour Service Hotline 1-800-551-8633
8/2017
www.frymaster.com E-mail: [email protected]
*8196985*
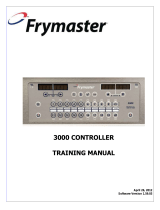
3000/3010
CONTROLLER
Software Versions 3,4,5,6,7
Operation Manual

NOTICE
IF, DURING THE WARRANTY PERIOD, THE CUSTOMER USES A PART FOR THIS FRYMASTER
FOOD SERVICE EQUIPMENT OTHER THAN AN UNMODIFIED NEW OR RECYCLED PART
PURCHASED DIRECTLY FROM FRYMASTER DEAN, OR ANY OF ITS AUTHORIZED SERVICE
CENTERS, AND/OR THE PART BEING USED IS MODIFIED FROM ITS ORIGINAL
CONFIGURATION, THIS WARRANTY WILL BE VOID. FURTHER, FRYMASTER DEAN AND ITS
AFFILIATES WILL NOT BE LIABLE FOR ANY CLAIMS, DAMAGES OR EXPENSES INCURRED BY
THE CUSTOMER WHICH ARISE DIRECTLY OR INDIRECTLY, IN WHOLE OR IN PART, DUE TO
THE INSTALLATION OF ANY MODIFIED PART AND/OR PART RECEIVED FROM AN
UNAUTHORIZED SERVICE CENTER.
NOTICE
This appliance is intended for professional use only and is to be operated by qualified
personnel only. A Frymaster Authorized Servicer (FAS) or other qualified professional should
perform installation, maintenance, and repairs. Installation, maintenance, or repairs by
unqualified personnel may void the manufacturer’s warranty.
NOTICE
This equipment must be installed in accordance with the appropriate national and local codes of
the country and/or region in which the appliance is installed.
NOTICE TO OWNERS OF UNITS EQUIPPED WITH COMPUTERS
U.S.
This device complies with Part 15 of the FCC rules. Operation is subject to the following two
conditions: 1) This device may not cause harmful interference, and 2) This device must accept
any interference received, including interference that may cause undesired operation. While
this device is a verified Class A device, it has been shown to meet the Class B limits.
CANADA
This digital apparatus does not exceed the Class A or B limits for radio noise emissions as set
out by the ICES-003 standard of the Canadian Department of Communications.
Cet appareil numerique n’emet pas de bruits radioelectriques depassany les limites de classe A
et B prescrites dans la norme NMB-003 edictee par le Ministre des Communcations du Canada.
DANGER
Prior to movement, testing, maintenance and any repair on your Frymaster fryer, disconnect
ALL electrical power from the fryer.

iv
3000/3010 Controller
Software Versions 3,4,5,6,7
Operation Manual
TABLE OF CONTENTS
CHAPTER 1: 3000 Version 3 Controller Instructions
1.1 Using the 3000 Version 3 ......................................................................................................... 1-1
1.2 3000 Version 3 Modes ............................................................................................................. 1-2
1.3 3000 Version 3 Menu Summary Tree ...................................................................................... 1-3
1.4 Setup Main Menu ..................................................................................................................... 1-4
1.4 Vat Setup .................................................................................................................................. 1-4
1.6 Info Mode ................................................................................................................................. 1-7
1.7 Product Setup (Single Setpoint) ............................................................................................... 1-9
1.8 Multiple Setpoint Cooking Overview .................................................................................... 1-10
1.9 Product Setup (Multiple Setpoint) ......................................................................................... 1-11
1.10 Filter Menu ............................................................................................................................. 1-13
1.10.1 Filter ......................................................................................................................... 1-14
1.10.2 Clean and Filter ........................................................................................................ 1-15
1.10.3 Dispose ..................................................................................................................... 1-15
1.10.4 Dispose (Bulk) ......................................................................................................... 1-16
1.10.5 Fill Vat from Bulk (Bulk option only) ..................................................................... 1-16
1.10.6 Boil Out .................................................................................................................... 1-17
1.11 Polishing ................................................................................................................................ 1-17
1.12 SCAN Mode ........................................................................................................................... 1-18
1.13 Sensitivity Setting Chart ........................................................................................................ 1-19
CHAPTER 2: Operator Troubleshooting
2.1 Introduction .............................................................................................................................. 2-1
2.2 Troubleshooting ....................................................................................................................... 2-2
2.2.1 Error Message and Display Problems ........................................................................... 2-2
2.2.2 Filtration Problems ........................................................................................................ 2-3
2.2.3 Using Tech Modes ......................................................................................................... 2-4
2.2.4 Error Log Codes ............................................................................................................ 2-5

1-1
CHAPTER 1: 3000/3010 CONTROLLER INSTRUCTIONS
1.1 Using the 3000/3010
ON/OFF
Press ON/OFF button. If configured, “IS VAT FULL? YES NO” is displayed. Check oil level and press YES if vat
is full or NO if oil level is low. Fryer begins melt cycle to slowly heat solid shortening to programmed temperature
before switching to full temperature and heating to setpoint or idle temperature and displays: READY.
Exit melt cycle, when using liquid oil, by pressing and releasing the Exit Cool button or any programmed product
button. Displays show Exit Melt? on left and YES NO on the right. Press to exit.
Cooking
COOL displayed: Press product button or Exit Cool; fryer heats to setpoint and displays READY.
READY displayed: Press product button and drop product.
----- displayed: The vat temperature is out of the Ready zone.
DONE displayed: Press blinking product button to cancel alarm and end a cook.
HOLD displayed: Press blinking product button to cancel hold alarm.
Cancel a Cook: Press and hold blinking product button to cancel cook cycle.
Change setpoint: Press a product button with the desired temperature. Press the product button again and a cook
starts. NOTE: When a product button with a setpoint different than a currently cooking product is pressed, a low tone
is heard and the new cook won’t start until the cook is finished.
Controller Button Navigation
Product: Press to start a cook cycle. Active when adjacent LED is lit. LED flashes during a cook cycle. Press and
hold to cancel a cook cycle. Press at end of cook cycle to cancel an alarm. Press and hold a product with different
setpoint to change setpoint temperature.
Exit/ Scan: Press once; all product buttons are lit. Select Product displayed. Press product button to view product
name. Press to advance through all product parameters. Press Exit Scan again to repeat. Press Exit Scan twice
to escape.
Left/Right Arrows: Navigate options in left display. Press both simultaneously to start a polish cycle.
Up/Down Arrows: Navigate options in right display. Press both simultaneously to change to a second language if
one is selected in setup.
Exit Cool: Exits cool mode, returns fryer to setpoint temperature.
Thermometer: Fryer ON: Press and release for setpoint in left display and vat temperature in right display.
Thermometer, Fryer OFF: Press to display temperature, time, date, system version, controller and circuit board
software versions.
Checkmark: Fryer OFF: Press and hold 3 seconds: Scroll filter usage; Press and hold 10 seconds: Product
setup.
Checkmark: Fryer ON: Enter Codes, Respond to left display prompts.
Filter: Press and release: Cooks remaining to filter cycle. Press and hold: Filter options: Filter, Clean and Filter,
Dispose, Fill Vat from Bulk (Bulk option only) and Boil Out (OFF only).

1-2
1.2 3000/3010 Modes
The 3000/3010 has optional modes. One mode, Cooks, allows products to
be cooked with multiple setpoints, a feature primarily used for bone-in
chicken. Another mode, Filters, allows programmable filtering prompts
(assigning a number of cook cycles before a filter prompt occurs). Prompts
to guide filter steps also appear on the controller. The two modes can be
used together or separately. When either of these modes is turned off,
(Cooks is turned off in the standard set up.), the programming steps
associated with them do not appear on the controller.
When these modes are turned on, or enabled, in the Tech Mode of the computer, their programming steps appear on the
controller.
Steps associated with programming these optional features are in gray type in this manual. If you are using the 3000/3010
with the Cooks and Filters features disabled, you will not see the items shown in gray type in the programming steps. If you
have Cooks and Filters enabled, the items shown in gray in this manual will appear in the programming steps you encounter
on the controller.
Follow these steps to enable or disable the Filters and Cooks options. The default setting of the controller is disabled.
Left Display Right Display Action
OFF OFF
Start with the far LEFT controller. Press until the controller scrolls Info Mode,
changing to Main and then PRODUCT SETUP.
Product Setup Blank Press to scroll to Tech Mode. Press .
Tech Mode Enter Code Enter 3000
Clear E-Log Blank Press to scroll to Enable Filters. Press .
Enable Filters Yes No Press to enable; press to disable.
Enable Filters Blank Press to scroll to Enable Cooks. Press .
Enable Cooks Yes No Press to enable; press to disable.
Enable Cooks Blank Press Exit Scan twice, returning the controller display to OFF.
NOTE:CooksandFiltersareoptional
programmablefeatures.Inthecontroller’s
standardsetup,Filtersisturnedon;Cooks
isturnedoff.
Stepsassociatedwithprogrammingthese
features,whichdonotappearinthe
programmingsequenceifturnedoff,are
showningrayinthismanual.

1-3
1.3 3000/3010 Menu Setup Tree
NOTE:Itemsingrayareassociated
withtheoptionalCOOKSandFILTERS
modesofthecomputer.Ifthese
modesaredisabled,thestepsshown
ingraywillnotappearinthe
programmingsteps.
NOTE:Threealarmtimesare
programmable.Thestepsfor
programmingthe2
nd
alarmarejustlike
thefirst.Athirdalarmpromptfollows
completionofthe2
nd
.
NOTE: If the lane count doesn’t change,
set the basket lift to disabled in Vat Setup.
NOTE: A programming option is available in TECH MODE called “Hold Mode”
that will either allow the product’s hold time to count down in the background or
count down in the fore
g
round.

1-4
1.4 Setup: Main Menu
Pressing and holding the checkmark key for 10 seconds produces the setup mode, which first displays Product Setup. Turn
the controller off and follow the steps below to navigate the options.
Left Display Right Display Action
OFF OFF
Start with the far LEFT controller on an OCF fryer, any controller on a legacy model.
Press until the controller scrolls Info Mode, changing to Main and then PRODUCT
SETUP.
Product Setup
Blank Press to scroll to Product Setup, Vat Setup, Tech Mode, and Exit. With the desired
selection displayed, press .
Product Setup
Blank Used to program menu items and cooking parameters.
vat setup
Blank Vat set up is described below in section 1.5.
Tech Mode
Blank Tech mode is used to enable and disable Cooks and Filters options.
Exit Exit
Press Exit/Scan button to return the controller to OFF.
1.5 Vat Setup
Vat Setup mode allows the controller to be set for language displays, vat sizes, and temperature range displays. With the
controller OFF, follow the steps below. *NOTE: Most of the system choices are only available on the far left controller.
Left Display Right
Display
Action
OFF OFF
Start with the far LEFT controller on an OCF fryer, any controller on a legacy model.
Press until the controller scrolls Info Mode, changing to Main and then PRODUCT
SETUP.
Product Setup
Blank
Press to scroll to Vat setup and press .
Vat setup Enter code
Enter 1656.
System
Blank
Press .
Language English
Press to scroll to choice and press .
2nd language SPANISH
Press to scroll to choice and press . (This option allows another language to be
toggled from the front panel. (ex. Spanish as a second language.) Default is Spanish.
Locale Non-ce
Press to scroll to choices: CE (European Conformity standards), CE Belgium or
Non-CE (non-European standards) and press . This option is available only on the far
left computer on OCF multiple batteries and on any legacy-mounted 3000.
Energy Gas
Press to scroll to choices: Gas or Electric and press . This option is available only
on the far left computer on OCF multiple batteries and on any legacy-mounted 3000.
Type* GL30 Full
Press to scroll choices: Gas- GL30 Full, GL30 Split, Electric- EL30-14 Full, EL30-
14 Split, EL30-17 Full and EL30-17 Split. With the current fryer vat type displayed, press
.
SYSTEM volume 5
Sets sound level for controller. Enter level, 1-9 (1=Lowest/ 9=Loudest). Press .
TempR format F
Press to scroll choices: F for Fahrenheit; C for Celsius. Press .
Exit Melt TempR
180º (82 ºC)
Use numbered keys to change default setting. Press . (This is the temperature for the
fryer to exit the melt cycle.) Range is 100°F (38°C) to 200°F (93°C). Default is 180°F
(82°C).
COOL MODE TEMPR
250F
(121 ºC)
Use numbered keys to change default setting. Press . (This is the temperature during
setback or idle mode.) Default is 250°F (121°C).
COOL MODE
DEFAULT
0
Use numbered keys to change default setting. (This is the amount of minutes the fryers
sits idle before going to cool mode. The default, 0, disables the feature.) Press .
FRESH OIL jib
Press to scroll choices None, JIB or Bulk. Default is none. Press . This option is
available only on the far left computer on OCF multiple batteries and on any legacy-
mounted 3000.
WASTE NONE
Press to scroll choices None or Bulk. Default is none. Press . This option is
available only on the far left computer on OCF multiple batteries and on any legacy-
mounted 3000.
*An expanded list of settings is available, if needed, in Tech Mode.

1-5
1.5 Vat Setup cont.
Left Display Right Display Action
DRAIN SWITCH No
Press to scroll choices YES and NO. Press . (Set to YES if the fryer has a drain
switch installed.)
RECOVERY ALARM DISABLED
Press to scroll choices DISABLED and ENABLED. Press . (This is a
recovery alarm that locks out the fryer if it does not heat properly. Default is disabled.
Basket Lift DISABLED
Press to scroll choices DISABLED and ENABLED. If the fryer has basket lifts,
set to enabled. Press . Default is disabled.
IS VAT FULL? ENABLED
Press to scroll choices ENABLED and DISABLED. Press . (If set to enabled,
this prompts the user during power on “IS VAT FULL? YES NO). Default is enabled.
HOLD TIME AUTO
Press to scroll choices AUTO and MANUAL. Press . (This is the hold timer
cancel alarm.) If set to auto, the alarm will auto cancel. Default is auto.
Exit Exit
Press button once to return the controller to OFF.
Time/date Programming
OFF OFF
Press until the controller scrolls INFO MODE, changing to MAIN and then
PRODUCT SETUP.
Product Setup
Blank
Press to scroll to Vat setup and press .
Vat setup Enter code
Enter 1656.
SYSTEM
Blank
Press to scroll to TIME/DATE.
Time/date
Blank
Press .
Time entry Time
Use numbered keys to change time. Enter the time in 24 hour format. Press .
Date format Mm/dd/yy
Press to scroll choices. With the desired date format displayed, press .
Enter date date
Use numbered keys to change date. Press .
Exit Exit
Press the Exit/Scan button three times to return the controller to OFF.
DST SETUP
This is daylight savings time setup. In the United States, daylight saving time begins at 2:00 A.M. on the
second Sunday in March. Clocks move ahead one hour. Daylight saving time ends at 2:00 A.M. on the
first Sunday in November. Clocks move back one hour. For the two U.S. states and international
locations that do not use DST, set to disabled.
OFF OFF
Press until the controller displays INFO MODE, changing to MAIN and then
PRODUCT SETUP.
Product Setup
Blank
Press to scroll to Vat setup and press .
Vat setup Enter code
Enter 1656.
System
Blank
Press to scroll to DST Setup.
DST Setup
Blank
Press
DST
Enabled
Press to scroll choices DISABLED and ENABLED. Press . (Default is
enabled.) If disabled is chosen, pressing the button, displays exit. Press the exit
scan button three times to exit.
DST START MONTH
3
Enter the daylight savings time starting month using the 1-10 keys. (Default is US
starting month: 3.) Press .
DST START SUNDAY
2
Enter the daylight savings time starting Sunday using the 1-10 keys. (Default is US
starting Sunday 2.) Press .
DST END MONTH
11
Enter the daylight savings time ending month using the 1-10 keys. (Default is US
ending month 11.) Press .
DST END SUNDAY
1
Enter the daylight savings time ending Sunday using the 1-10 keys. (Default is US
ending Sunday 1.) Press .
EXIT Exit
Press the Exit/Scan button three times to return the controller to OFF.
filter
Feature only available if Filters is enabled in Tech Mode
OFF OFF
Press until the controller scrolls INFO MODE, changing to MAIN and then
PRODUCT SETUP.

1-6
1.5 Vat Setup cont.
Left Display Right Display Action
Product Setup
Blank
Press to scroll to Vat setup and press .
Vat setup Enter code
Enter 1656.
SYSTEM
Blank
Press to scroll to FILTER.
filter
Blank
Press .
Cooks til Filter
0
(This is the total number of cooks that occur before a filter prompt. The default is 0.)
Enter the number of cooks before a filter prompt is desired. Press .
FILTER LOCKOUT DISABLED
Press to scroll choices DISABLED and ENABLED. Press . (If set to enabled,
this locks out the fryer when prompted to filter which requires the operator to filter.
Default is disabled.
EOD FILTER TIMER DISABLED
Press to scroll to choice enable or disable and press . Default is DISABLED)
Eod filter time 23:59
Use numbered keys to program end of day filter alert time. Enter time in 24 hour
format. After this time, the controller prompts for filter when user presses the power
button to go to OFF. Enter 23:59 if no end of day filter prompt is desired. Press .
FLUSHING TIMER 5
Use numbered keys to change default setting for the flushing timer. Enter the time in
minutes. Default is five minutes. Press .
Boil out timer 30
Use numbered keys to change default setting for the boil out timer. Enter the time in
minutes. Default is 30 minutes. Press .
1 polish TIMER DISABLED
Press to scroll to choice enable or disable and press . Default is DISABLED).
Press .
1 polish prompt
time
23:59
Use numbered keys to enter polish prompt time. (This is the time the polish prompt
will occur each day.) 23:59 is disabled. Enter time in 24 hour format. Press .
1 polish duration
15
Use numbered keys to change. (This is the duration, in minutes for a polish.) Default
to 15 minutes. Press .
1 polish start
TEMPR
(300F) (149°C)
Use numbered buttons to change temperature. (This is the minimum temperature
required for a polish to begin.) Default is 300F (149C). Press .
Exit Exit
Press the Exit/Scan button once to return the controller to OFF.
E-LOG
OFF OFF
Press until the controller scrolls INFO MODE, changing to MAIN and then
PRODUCT SETUP.
Product Setup
Blank Press to scroll to Vat Setup. Press .
Vat setup Enter code
Enter 1656.
SYSTEM
Blank
Press to scroll to E-LOG.
E-Log
Blank
Press . (This is a log of the ten most recent error codes.)
NOW Time/date
Press . (Current time and date)
A
E#
Time/date
Errors listed A-J. Press to scroll through errors. Error codes are listed on page 2-4.
If no errors exist, pressing will display No errors. Press .
Exit Exit
Press the Exit/Scan button three times to return the controller to OFF.
Change password
OFF OFF
Press until the controller scrolls INFO MODE, changing to MAIN and then
PRODUCT SETUP.
Product Setup
Blank Press to scroll to Vat Setup. Press .
Vat setup Enter code
Enter 1656.
SYSTEM
Blank
Press to scroll to Change Password and press .
Product setup
1650
Use numbered keys to change code. Press .
Vat setup
1656
Use numbered keys to change code. Press .
Exit Exit
Press the Exit/Scan button three times to return the controller to OFF.

1-7
1.6 INFO MODE: Viewing Operational Stats
The 3000/3010 collects and stores information on cook and filter cycles. This data is in the info mode, and is accessed by
pressing the checkmark key with the controller off or on. The steps to view the data are detailed below. NOTE: With the
Filters option disabled, not all data shown below is captured.
Left Display Right Display Action
OFF/ON OFF/ON
Press until INFO MODE is displayed and release.
Last Dispose
Stats
Blank Press to scroll: Last Dispose Stats, Daily Stats, Selected Period Stats, Last Load
Stats. With the desired stats displayed, press .
Total cooks
Number Press . (This is the number of cooks since the last dispose.)
Last dispose date
Press . (This is the date of the last dispose.)
FILTERS—since
dispose
Number Press . (This is the number of filters since oil disposal.)
Filters by-passed
– SINCE DISPOSE
Number Press . (This is the number of by-passed filters since oil disposal.)
Polishes—since
dispose
Number Press . (This is the number of polishes since oil disposal.)
Polishes by-
passed – SINCE
DISPOSE
Number Press . (This is the number of by-passed polishes since oil disposal.)
Oil Life
Number Days Press . (This is the number of days since the last dispose.)
Oil Life- 1 dispose
prior
Number Days Press . (This is the oil life in days 1 dispose prior.)
Oil Life – 2
disposes prior
Number Days Press . (This is the oil life in days 2 disposes prior.)
Avg Oil Life
Number Days Press . (This is the average oil life of past 3 disposes.)
Avg cooks
Number Press . (This is the average cooks over past 3 disposes.)
Reset Last
dispose stats
Yes no
Press to scroll or to reset Last Dispose stats.
Reset Last
dispose stats
Enter code
Enter 1656
complete
Blank
Exit
Exit
Press button once and press to scroll to desired choice. Once desired choice
is displayed, press button or press the Scan button once to return the controller
to OFF.
Daily Stats
Blank
With the desired stats displayed, press .
MON date
Press to scroll a day within the prior week. With the desired date displayed,
press .
Filters Number and day
Press to scroll number of times the vat was filtered on that day of the prior
week. Press .
Filters – prior
week
Number and day
Press to scroll number of daily filter cycles in the prior week. Press .
Press button once to return to Info Mode menu, or Exit/Scan button once to
return the controller to OFF.
Filters bypass Number and day
Press to scroll number of times the filter prompt was bypassed on that day in
the prior week. Press .
Cooks Number and day
Press to scroll number of cook cycles on that day of the prior week occurred.
Press .
Exit Exit
Press button once and press to scroll to desired choice. Once desired choice
is displayed, press button or press the Scan button once to return the controller
to OFF.
Selected Period
Stats
Blank
Press to scroll Info Mode Menu: Last Dispose Stats, Daily Stats, Selected
Period Stats, Last Load Stats with the desired stats displayed, press .

1-8
1.6 INFO MODE: Viewing Operational Stats cont.
Date TIME
Press . (This is the date and time the selected period started.)
COOKS
Number
Press . (This is the total number of cooks since start of selected period.)
QUIT COOKS
Number
Press . (This is the total number of cooks that were cancelled since start of the
selected period.)
On HOURS
Number
Press . (This is the total number of hours the fryer was on since start of the
selected period.)
Reset usage Yes no
Press to scroll or to set start of new selected period stats.
Reset usage Enter code
Enter 1656.
Complete
Blank
Exit Exit
Press button once and press to scroll to desired choice. Once desired choice
is displayed, press button or press the Scan button once to return the controller
to OFF.
Last load stats
Blank
With the desired stats displayed, press .
Product
Product Name
Press .
Started
Number Minutes
Press . (This is the time the last cook started.)
Actual time
Number Minutes
Press . (This is the actual cook time including stretch time.)
Program time
Number Minutes
Press . (This is the programmed cook time.)
Max TEMP
Number
Press . (This is the maximum temperature of the oil during the last cook.)
Min TEMP
Number
Press . (This is the minimum temperature of the oil during the last cook.)
Avg TEMP
Number
Press . (This is the average temperature of the oil during the last cook.)
Heat on
%
Press . (This is the percentage of the cook time the heat source was on during
the last cook.)
Ready for Cook Yes or no
Press . (This displays yes if the fryer was back to set temperature before the
cook cycle was started.)
Exit Exit
Press button once and press to scroll to desired choice. Once desired choice
is displayed, press button or press the Scan button once to return the controller
to OFF.

1-9
1.7 Main Menu: Product Setup (Single Setpoint Cooking)
Programming food items is shown below. Ensure the controller is OFF and follow the steps. The right column has the
action necessary to continue. Exit from a programming step at any time by pressing the Exit/Scan key until the display
returns OFF. Items shown in gray type will not appear if the option that activates them is not enabled. Items shown in a gray
column are unique to programming a controller set to Legacy.
Left Display Right Display Action
OFF OFF
Press until the controller scrolls INFO MODE, changing to MAIN
and then PRODUCT SETUP.
Product Setup
Blank
Press .
Product Setup Enter Code
Enter 1650. If loading a default menu on a legacy fryer, use the steps in
the gray fields below. If not, skip gray fields.
Select Product
LegacyProgramming:Only
seenwiththecontrollerset
toLegacy.
Blank
Press . (DO NOT use this option on an OCF fryer. If encountered
while programming an OCF fryer, see the setup instructions and reset
the controller to OCF.)
Load standard
YES NO
Choose YES if a default menu load is desired. Choose NO to continue
entering products as shown below.
OFF
OFF
NOTE: This option is only available if the controller is set up for
Legacy fryers. DO NOT use this option on an OCF fryer.
Select Product
Blank
Press desired product button.
Long Name Product name or
button number
Enter product name with letter keys. Advance cursor with . Press
to advance to next product set up feature.
Short Name Abbreviated
Product name or
button number
Enter four character product name which alternates with the timer
during a cook. Press .
COOKING MODE SINGLE SETPOINT
Press . If multiple setpoint or segmented cooking is desired press
MULTIPLE SETPOINT and go to 1.8 and follow the instructions.
(Default is SINGLE SETPOINT.) Doesn’t appear if Cooks is disabled.
1 Time 0:00 or
previously
entered time
Enter total cook time with numbered keys. Press .
1 TEMPR TEMPR
Enter cooking temperature. Press .
1 Sensitivity
Number
Enter the level of sensitivity, 0-9, for the product. Press . Refer to the
sensitivity chart on page 1-17.
1 alarm time (Shake
Time)
0:00 or
previously
entered time
Enter time in cook cycle for audible alarm for shaking. Press . If set
to 0:00 skip to FILTER PROMPT.
1 ALARM NAME SHAKE
Press to scroll through the alarm names (ex. Shake, Stir). Press .
1 ALARM MODE (Shake
Alarm Mode)
AUTO
Press . Default is auto. Press to scroll to Manual shake alarm
mode. Press . Alarm (Shake) Mode when set to auto, cancels the
alarm automatically after a few seconds. Manual requires user action.
1 ALARM TONE (Shake
Alarm tone)
Short
Press to scroll choice of shake alarm tones. Press . Default is
SHORT.
2 alarm time 0:00
Press . Leave at 0:00 if a second alarm is not needed. Enter time if
needed and follow steps above for entering other parameters. Repeat for
third alarm time. (If 0:00 is entered for second alarm, the steps for the
third alarm do not appear.)
Filter PROMPT
0 or previously
entered number.
Enter number of cook cycles before a filter prompt and press .
Doesn’t appear if Filters is disabled in Tech Mode.
Instant On
5 or previously
set number
This is the time, in seconds, the fryer heats at 100%, after the product
button is pressed before the controller adjusts the temperature. Enter
value and press . (Default is 5. 0=OFF). NOTE: Instant on time
may need to be adjusted for light cooking loads. Doesn’t appear if

1-10
Left Display Right Display Action
Cooks is disabled.
HOLD TIME
0 or previously
entered time.
Enter time in minutes to hold product before discarding. Press .
Exit Exit
Press the button to save changes.
Select Product
Blank
For additional programming refer back to Product Setup above. To exit
press the EXIT SCAN button twice to OFF.
To access menu strip, remove screws attaching bezel. Lower bezel and remove strip from back of controller. Once the
menu strip is updated, reverse the steps to reassemble. To unassign a product from a button set the cook time to 0:00 and
press EXIT/SCAN.

1-11
1.8 Multiple Setpoint (Segmented) Cooking Overview
When the Cooks feature is enabled in the 3000/3010, segmented cooking is possible.
That means the product can cook at a variety of cooking temperatures with the
temperature changes occurring at user programmable points in the cook cycle.
When programming for segmented cooking, it is easiest to think of the entire cook cycle occurring on a countdown timer.
The cook cycle begins with its full time allotment, say, 13 minutes and it is completed when the countdown timer reaches
zero. The desired temperature changes are entered based on when they are to occur relative to the remaining cooking time.
The time entries for temperature changes are for the time remaining in the cook cycle, not the time elapsed. The graphic
below breaks down a 13-minute cook cycle. It’s best to create a similar table of time/temperature changes before beginning
the programming process.
Step 1 sets total cook time and initial setpoint.
Step 2 sets the duration of the first cooking segment, 2 minutes, and the setpoint of the first
temperature change.
Step 3 sets the duration of the second cooking segment, 4 minutes, and the setpoint of the
second temperature change.
Step 4 sets the duration of the third cooking segment, 3 minutes, and the setpoint of the third
temperature change.
The four remaining minutes in the cook time elapse at the final temperature. No entry is required to
use the final minutes
Enter 13:00, the cumulative time of all cook cycles, and 340°F, initial setpoint.
1:
2 min.
7:00
12:00
4 min.
3 min.
4 min.
No entry is required
for the final 4 minutes
of the cooktime.The
computer simply
counts downs the
remaining minutes at
the final setpoint,
which was
established in step 4.
2:
3:
4:
Remaining cook
time
Minus segment
length
Entered on
computer
13
-2
11
Remaining cook
time
Minus segment
length
Entered on
computer
11
-4
7
Remaining cook
time
Minus segment
length
Entered on
computer
7
-3
4
Enter 320°F,
the first
temperature
change.
Enter 310°F,
the 2nd
temperature
change.
Enter 330°F,
the 3rd
temperature
change.
340°F
320°F
310°F
330°F
5678910111213 4 3 2 1 0
Countdown to End of Cook Cycle
4:00
NOTE:Segmentedcookingisan
optionthatmustbeenabledinthe
computer’sTechModebyenabling
Cooks.Theprogrammingsequence
willnotappearunlessenabled.

1-12
1.9 Main Menu: Product Setup (Multiple Setpoint (Segmented*) Cooking)
*Not available with Cooks option disabled
Left Display Right Display Action
OFF OFF
Press until the controller scrolls INFO MODE, changing
to MAIN and then PRODUCT SETUP.
Product Setup
Blank Press .
Product Setup Enter Code
Enter 1650.
Select Product
Blank Press desired product button.
Long Name Product name or button number
Enter product name with letter keys. Advance cursor with
. Press to advance to next product set up feature.
Short Name Abbreviated Product name or
button number
Enter with letter keys abbreviated 4-character product
name, which alternates with cook time. Press .
COOKING MODE SINGLE SETPOINT
Press . If multiple setpoint or segmented cooking is
desired press Multiple Setpoint (Segmented) and follow
the instructions in the next section. (Default is SINGLE
SETPOINT)
1 Time 0:00 or previously entered time
Enter total cook time for segmented item and press .
1 TEMPR temperature
Enter initial cooking temperature and press .
1 sensitivity
Number
Enter the level of sensitivity, 0-9, for the product. Press .
2 Time 0:00 or previously entered time
Enter time remaining after first temperature change (see
page 1-9) and press .
2 TEMPR 0:00 or previously entered
temperature
Enter first temperature change and press .
2 sensitivity 0 or previously entered value
Enter the flex value, 0-9, for the product and press .
3 Time O:00 or previously programmed
time
Enter time remaining after second temperature change and
press .
3 TEMPR 0:00 or previously programmed
temperature
Enter temperature of the second segment and press .
3 sensitivity 0 or previously entered value
Enter the flex value, 0-9, for the product and press .
4 Time 00 or previously entered time
Enter time remaining after third temperature change and
press .
4 TEMPR 0:00 or previously programmed
temperature
Enter temperature of the third segment and press .
4 sensitivity 0 or previously entered value
Enter the flex value, 0-9, for the product and press .
5 Time :00 or previously entered time
Leave at zero if no more segments are needed and press .
If more segments are needed, continue programming as
shown above. Five is the limit.
1 ALARM time :00 or previously entered time
Enter time in cook cycle for audible alarm for shaking.
Press .
1 alarm name shake
Press to scroll through the alarm names (ex. Shake).
Press .
1 alarm mode auto default
Press to scroll to confirm Auto or Manual shake alarm
mode. Press .
1 Alarm Tone Short
Press to scroll to choice of shake alarm tones. Press
.
2 SHAKE time :00 or previously entered time
Enter time in cook cycle for a second audible alarm for
shaking. Press .
2 Alarm name shake
Press to scroll through the alarm names (ex. Shake).
Press .
2 alarm mode auto default
Press to scroll to confirm Auto or Manual shake alarm
mode. Press .

1-13
1.9 Main Menu: Product Setup (Multiple Setpoint (Segmented) Cooking) cont.
Left Display Right Display Action
2 Alarm Tone Short
Press to scroll to choice of shake alarm tones. Press .
3 time :00 or previously entered time
Enter time for third audible alarm for shaking. Press .
3 Alarm name shake
Press to scroll through the alarm names (ex. Shake). Press
.
3 alarm mode auto default
Press to scroll to confirm Auto or Manual shake alarm
mode. Press .
3 Alarm Tone Short
Press to scroll to choice of alarm tones. Press .
Filter PROMPT
0 or previously entered number.
Enter number of cook cycles before a filter prompt and press .
Instant ON 5
This is the time, in seconds, the fryer heats at 100%, after the
product button is pressed, before the controller adjusts the
temperature. Enter value and press . (Default is 5. 0=OFF).
HOLD TIME
0 or previously entered time.
Enter time to hold product before discarding. Press .
Exit Exit
Press the button to save changes.
Select Product
Blank
For additional programming refer back to Product Setup above.
To exit press the EXIT SCAN button twice to OFF.
To access menu strip, remove screws attaching bezel. Lower bezel and remove strip from back of controller. Once the
menu strip is updated, reverse the steps to reassemble. To unassign a product from a button set the cook time to 0:00 and
press EXIT/SCAN.
1.10 Filter Menu*
*Not available with Filters option disabled.
The filter functions detailed below are only available if the Filters option is enabled in the 3000/3010. If Filters is
disabled, the Filter button has no function. Pressing it with the fryer OFF or ON will have no effect. See Page 1-2 for
an explanation of enabling 3000/3010 options.
WARNING
The on-site supervisor is responsible for ensuring that operators are made aware of the inherent hazards
of operating a hot oil filtering system, particularly the aspects of oil filtration, draining and cleaning
procedures.
DANGER
Draining and filtering of oil must be accomplished with care to avoid the possibility of a serious burn
caused by careless handling. The oil to be filtered is at or near 350°F (177°C). Ensure all hoses are
connected properly and drain handles are in their proper position before operating any switches or
valves. Wear all appropriate safety equipment when draining and filtering oil.
DANGER
Allow oil to cool to 100°F (38°C) before draining into an appropriate container for disposal.
DANGER
Do not drain more than one frypot at a time into the built-in filtration unit to avoid overflow and spillage
of hot oil.
DANGER
When draining oil into a disposal unit or portable filter unit, do not fill above the maximum fill line
located on the container.

1-14
The 3000/3010 has five Filter menu options: Filter, Clean and Filter, Dispose, Fill
Vat from Bulk (Bulk option only) and Boil Out (only in OFF mode). All are accessed
by pressing and holding the Filter button until the display becomes Filter Menu. If
fryer is not at set point, controller displays wait for filter. The controller must be on
and at setpoint for Filter and Filter and Clean.
Entering Filter Menu Mode*
*Not available with Filters option disabled.
Left Display Right
Display
Action
READY READY
Press the filter button until FILTER MENU is displayed for three seconds
changing to Filter.
FILTER
Blank Press to scroll to Clean and Filter, Dispose, Fill Vat from Bulk (Bulk only),
Boil Out (functions only when controller is OFF), or Exit. With the desired
choice displayed press . Follow instructions below to navigate the modes.
1.10.1 Filter*
*Not available with Filters option disabled.
Left Display Right Display Action
FILTER
Blank
Press and hold until FILTER is displayed (or LEFT /RIGHT on
split vats).
LEFT (Split vats only) RIGHT (Split vats only)
Press either button under side to filter.
FILTER
Blank
Press the button.
Filter Now? Yes No
Press (YES) to continue. A no answer bypasses filtration and
cooking continues.
FILTER PAN READY? CONFIRM
Ensure the filter pan is in place and clean. Press or .
OPEN DRAIN VALVE
Blank
Open drain valve.
Draining
:40 sec. countdown
timer
None required. If the drain valve becomes clogged, use the Fryer’s
Friend (poker-like tool) to clear the blockage.
DANGER
NEVER attempt to clear a clogged drain valve from the front of the valve! Hot oil will rush out
creating the potential for severe burns.
DO NOT hammer on the drain valve with the cleanout rod or other objects. Damage to the ball
inside will result in leaks and will void the Frymaster warranty.
Turn Filter On CONFIRM
Turn filter on and press or .
Flushing
:30 sec. countdown
timer
None required.
CLOSE DRAIN VALVE
Blank
Close drain valve.
Filling
:45 sec. countdown
timer
None required.
Turn Filter Off WHEN
FULL
CONFIRM
Turn filter off and press or .
OFF OFF
DANGER
The crumb tray in fryers equipped with a filter system must be emptied into a fireproof container at the
end of frying operations each day. Some food particles can spontaneously combust if left soaking in
certain shortening material.
WARNING
Do not bang fry baskets or other utensils on the fryer’s joiner strip. The strip is present to seal the joint
between the fry vessels. Banging fry baskets on the strip to dislodge shortening will distort the strip,
adversely affecting its fit. It is designed for a tight fit and should only be removed for cleaning.
NOTE:Programmingsequences
showningraydonotappearif
Filtermodeisdisabled.See
page1‐2.

1-15
1.10.2 Clean and Filter*
*Not available with Filters option disabled.
Left Display Right Display Action
Follow steps to Entering Filter Menu Mode on page 1-13.
Clean and filter
Blank Press .
Clean now? Yes NO
Press . A yes answer turns vat off. A no answer bypasses clean
and filter and cooking continues
FILTER PAN READY? CONFIRM
Ensure the filter pan is in place and clean. Press or .
Open drain valve
Blank Open drain valve.
Draining
:40 sec. countdown timer None required.
Scrub vat complete? YES
Clean the vat with a scrub brush. Clean the
sediment from around the ATO sensors with a
screwdriver or similar object to remove any
sediment from around the sensors and press the
button to continue when complete.
Turn Filter On CONFIRM
Turn filter on and press or .
FLUSHING
5:00 countdown timer
None required.
FILL VAT YES
Press .
CLOSE DRAIN VALVE
Blank Close drain valve.
filling
1:30 sec. countdown
timer
None required.
TURN FILTER OFF WHEN
FULL
CONFIRM
Turn filter off and press or .
off off
1.10.3 Dispose* (JIB and None Settings)
*Not available with Filters option disabled.
DANGER
Allow oil to cool to 100°F (38°C) before draining into an appropriate METAL container for disposal.
When draining oil into a disposal unit, do not fill above the maximum fill line located on the container.
For safe, convenient draining and disposal of used oil or shortening, Frymaster recommends using the Frymaster Shortening
Disposal Unit (SDU). The SDU is available through your local distributor.
Left Display Right Display Action
Follow steps to Entering Filter Menu Mode on page 1-12.
dispose
Blank Press .
Dispose now? Yes NO
Press . A yes answer turns fryer off. A no answer delays
dispose and cooking continues
Remove FILTER Pan CONFIRM
Remove filter pan and press or .
INSERT DISPOSAL UNIT CONFIRM
Insert disposal unit under the drain and press or ..
OPEN DRAIN VALVE
Blank Open the drain valve.
disposing
:60 sec. countdown timer None required.
VAT EMPTY? CONFIRM
Press or when empty.
VAT CLEAN? CONFIRM
Press or when clean.
CLOSE DRAIN VALVE
Blank Close the drain valve.
Remove Disposal Unit CONFIRM
Remove disposal unit and press or .
INSERT Filter PAN CONFIRM
Insert the pan and press or .
fill vat Confirm
Fill vat with fresh oil and press or when full.
off off

1-16
DANGER
WHEN USING SOLID SHORTENING, PACK THE SHORTENING DOWN INTO THE BOTTOM OF THE
FRYPOT. DO NOT OPERATE THE FRYER WITH A SOLID BLOCK OF SHORTENING SITTING IN THE
UPPER PORTION OF THE FRYPOT. THIS WILL CAUSE DAMAGE TO THE FRYPOT AND MAY CAUSE A
FLASH FIRE.
1.10.4 Dispose*
(Settings; Fresh Oil: NONE; Waste: BULK)
*Not available with Filters option disabled.
Left Display Right Display Action
Follow steps to Entering Filter Menu Mode on page 1-12.
dispose
Blank Press .
Dispose now? Yes NO
Press . A yes answer turns fryer off. A no
answer delays dispose and cooking continues
FILTER PAN READY? CONFIRM
Ensure the filter pan is prepared and press or
.
OPEN DRAIN VALVE CONFIRM
Open the drain valve.
DRAINING
Countdown timer None required.
TURN FILTER ON CONFIRM
Turn filter on and press or .
WASHING
:60 countdown timer
None required.
TURN filter off CONFIRM
Turn filter off and press or .
VAT EMPTY? CONFIRM
Press or when empty.
SWITCH TO BULK OIL MODE CONFIRM
Using the mode switch, switch to BULK OIL
MODE and press or .
CLOSE DRAIN VALVE CONFIRM
Close the drain valve.
OPEN DISPOSE VALVE CONFIRM
Open dispose valve and press or .
DISPOSING
4:00 countdown timer
None required.
CLOSE DISPOSE VALVE CONFIRM
Close the dispose valve and press or .
REMOVE FILTER PAN
Blank Open the door and pull filter pan out of the cabinet.
IS PAN EMPTY? YES / NO
Ensure the pan is empty and press YES (),
otherwise press NO () and follow the prompts.
INSERT Filter PAN CONFIRM
Insert the pan and press or .
fill vat CONFIRM
Press or .
SWITCH TO fryer MODE CONFIRM
Press or .
off off
1.10.5 Fill Vat from Bulk* (Bulk option only)
*Not available with Filters option disabled.
Left Display Right Display Action
Follow steps to Entering Filter Menu Mode on page 1-1?.
FILL VAT FROM BULK
Blank
Press .
FILL VAT FROM BULK? Yes NO
Press .
Switch to bulk oil mode Confirm
Using the mode switch, switch to BULK OIL
MODE and press or .
OPEN OIL RETURN VALVE CONFIRM
Open the oil return valve and press or .
PRESS AND HOLD FILL POT
BUTTON
Blank
Press and hold the fill pot button to fill the vat.

1-17
Left Display Right Display Action
IS VAT FULL? Yes no
Press YES () when full, otherwise press NO ()
and follow the prompt.
CLOSE OIL RETURN VALVE CONFIRM
Close the oil return valve and press or .
Switch to fryer mode Confirm
Using the mode switch, switch to FRYER MODE
and press or .
off off
1.10.6 Boil Out* (NOTE: To enter boil out mode, the controller must be OFF)
*Not available with Filters option disabled.
DANGER
Never leave the fryer unattended during the boil-out process. If the boil-out solution boils over, turn
the fryer off immediately and let the solution cool for a few minutes before resuming the process.
WARNING
Do not drain boil-out solution into a shortening disposal unit (SDU), a built-in filtration unit, or a
portable filter unit. These units are not intended for this purpose, and will be damaged by the solution.
Left Display Right Display Action
Follow steps to Entering Filter Menu Mode on page 1-14. The controller must be off.
BOIL OUT
Blank
Press .
Boil Out Now? Yes No
Press to continue.
IS VAT PREPARED? Confirm
Ensure vat is empty and drain closed; press or .
REMOVE Filter Pan Confirm
Remove the filter pan and press or .
IS SOLUTION IN THE VAT? CONFIRM
Ensure solution is in the vat and press or .
START BOIL OUT Confirm
Press or .Turns on and heats to 195ºF (91 ºC). The
boil-out timer starts.
BOIL OUT 30:00
The countdown timer begins.
Boil Out Done CONFIRM
Press or to confirm and cancel the alarm.
IS SOLUTION REMOVED? CONFIRM
Once solution is removed press or .
OFF OFF
DANGER
Remove all drops of water from the frypot before filling with oil. Failure to do so will cause spattering
of hot liquid when the oil is heated to cooking temperature.
1.11 Polishing
The 3000/3010 displays a series of prompts when a polish filter cycle is under way. To initiate a polish, press and hold the
arrows simultaneously. The steps are detailed below. A “waiting to polish” message may display until the signal is
received that the vat is ready for polish cycle to begin.
Left Display Right Display Explanation/Action
Polish Now? Yes NO
Respond to prompt with button push. Press under YES or
under NO. Yes starts a polish, detailed below. No delays filter
for 30 minutes and cooking continues. Answering NO after two
prompts cancels polish.
Filter PAN READY? Confirm
Press or when pan is replaced after inspection.
OPEN DRAIN VALVE
Blank Open the drain valve.
Draining
:40 sec. countdown timer None required.
/