ViewSonic NMP580-W User guide
- Category
- Digital media players
- Type
- User guide
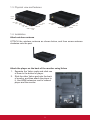
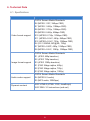
ViewSonic NMP580-W is a powerful media player that supports a wide range of media formats, including HTML5 widgets for dynamic content. With 8GB of onboard storage and a micro SD card slot, you'll have plenty of space for your media. The built-in wireless and Ethernet connectivity makes it easy to connect to your network and stream content from your favorite sources.
ViewSonic NMP580-W is a powerful media player that supports a wide range of media formats, including HTML5 widgets for dynamic content. With 8GB of onboard storage and a micro SD card slot, you'll have plenty of space for your media. The built-in wireless and Ethernet connectivity makes it easy to connect to your network and stream content from your favorite sources.


-
 1
1
-
 2
2
-
 3
3
-
 4
4
-
 5
5
-
 6
6
-
 7
7
-
 8
8
-
 9
9
-
 10
10
-
 11
11
-
 12
12
-
 13
13
-
 14
14
-
 15
15
-
 16
16
-
 17
17
-
 18
18
-
 19
19
-
 20
20
-
 21
21
-
 22
22
-
 23
23
-
 24
24
-
 25
25
-
 26
26
-
 27
27
-
 28
28
-
 29
29
-
 30
30
-
 31
31
-
 32
32
-
 33
33
-
 34
34
-
 35
35
-
 36
36
-
 37
37
-
 38
38
-
 39
39
-
 40
40
-
 41
41
-
 42
42
-
 43
43
-
 44
44


ViewSonic NMP580-W User guide
- Category
- Digital media players
- Type
- User guide
ViewSonic NMP580-W is a powerful media player that supports a wide range of media formats, including HTML5 widgets for dynamic content. With 8GB of onboard storage and a micro SD card slot, you'll have plenty of space for your media. The built-in wireless and Ethernet connectivity makes it easy to connect to your network and stream content from your favorite sources.
Ask a question and I''ll find the answer in the document
Finding information in a document is now easier with AI
Related papers
-
ViewSonic EP1042T-S User guide
-
ViewSonic NMP580-W Quick start guide
-
ViewSonic NMP620-P10 Getting Started
-
-
-
-
-
-
ViewSonic VPD400 User manual
-
ViewSonic LS550WH User guide
Other documents
-
Intenso 3413490 Datasheet
-
Vivitek NE3000US User manual
-
Iadea XMP-6XXX/XMP-7XXX/XDS-107X/XDS-2x70/MBR-1100 Series Firmware User manual
-
-
Iadea XMP-7300 User manual
-
-
yodeck Digital Signage Player 4G User guide
-
-
-