S-X9-V2-2021.11.23
Product Specification
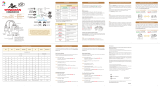
Model PXN-X9
Connection USB Cable
Input
Packing Size Appr. 460*335*152mm
Product Size Appr. 403*296*123mm
Net Weight Appr. 3320g
Application Temperature
Application Humidity
0-40℃
20~80%
5V
80mA
.
27
Product Overview
Thank you for choosing PXN's product and supporting our
brand. Please read the manual carefully before using.
.
15
Joystick
HOME
Use the “D-pad”and “gamepad”
button to toggle between modes
Action Button
Backlight Switch
MACRO Button
Audio
USB Port For Use with original
PS4 and XBOX ONE controller
3. It can go through function self-inspection by unfolding computer
game controller under PC computer use. The specific methods are
as below:
XP system: Open control panel --- game controller, click attribute
testing.
WIN7 and above systems: Open control panel --- device and
printer --- a right mouse click controller icon --- game
controller set, click attribute testing.
4. Open the test interface as below, you can test the axes and buttons.
17
PS : Press “+” and “-” at the same time to take a screenshot.
Switch Connection
Connect With Switch Console
① Connect the TYPE-C OTG with
the USB of Arcade Stick.
② Connect the USB main cable of
the Arcade Stick to Switch
Console.
③ Power on switch console to
play.
Connect With Switch dock
① Place the Switch dock and ensure successful connection.
② Plug the USB of Arcade Stick into Switch dock and power on
Switch console.
.
21
x
B
Y
A
①
②
x
B
Y
A
①
②
③
TYPE-C OTG
Macro buttons include: /A/B、 /B/A、 /X/Y、 /Y/X、R1/RB/R、
R2/RT/ZR、L1/LB/L、L2/LT/ZL、UP、DOWN、LEFT、RIGHT.
To cancel Macro Function
① Press the macro button, the geen LED flashes.
② Press the setup buttons (L1/LB/L,L2/LT/ZL), the green LED
flashes.
The SHARE and OPTIONS buttons are used as separators in MACRO
setting to separate the same action that is performed twice or more.
Troubleshooting
1. If the backlight is on but the Arcade Stick is not working when it is
connected to the console, re-plug it or check that the controller is
working properly.
2. If the Arcade Stick is not working and the console screen freezes,
the console may have crashed unexpectedly. Please restart the
console and connect the Arcade Stick.
3. If the Arcade Stick is not operating properly in the game, unplug
and reconnect the Arcade Stick.
4. When connecting the original controller,a high-quality USB cable
is required.
.
24
Function Features
1. Compatible with both PC/Android/PS3/PS4/XBOX ONE/SWITCH.
2. Vewlix Style 8 Button Arcade Layout ideal for all fighting games.
3. Precise and robust Sanwa Denshi parts, Stick and Buttons.
4. Support MACRO function.
5. Directional input Toggle Switch between D-pad, Left Analog Stick
and Right Analog Stick.
6. Storage space for cable and spare replaceable buttons and tools.
PC Application
1. Plug the USB of Arcade Stick into the computer USB interface.
2. At the first connection, you will be prompted to discover new
hardware and automate the driver installation.
.
.
16
USB TYPE-C Port
OPTIONS/ /+
SHARE/ /
PS3 Application
① Plug the USB of Joystick into the PS3 USB interface, power on
the console.
② After connection on the PS3 console, the console will automatically
assign a channel to the Arcade Stick. You can start to play game or
set function of console.
Android Device Application
Connect with Android cellphone
① Plug the USB cable into Arcade Stick port.
② Connect with OTG adapter (Micro otg or TYPE-C).
③ And then download the fighting games or emulator game.
PS : Some of cellphones need to turn on the OTG function switch in
the phone setting.
Connect with Android TV box or TV
① Plug the USB cable into using device.
② And then download the fighting games or emulator game.
.
.
18
Action Buttons LED Light
TheToggle Switch between “D-pad” and “3D”
Directional input Toggle Switch between D-pad, Left Stick and Right
Stick.
D-pad: Set the switch to ‘DP’ and the joystick function as
the ‘D-pad’of the controller.
Left Stick: Set the switch to‘LS’ and the joystick function as
the‘Left Stick’of the controller.
Right Stick:Set the switch to‘RS’ and the joystick function
as the‘Right Stick’of the controller.
Press the top “ON/OFF” Button to switch backlight on/off.
Audio(Headphone and microphone)
Supports headphone and microphone, voice communication with
headphones and microphone @XBOX ONE& PS4.
DP
LS RS
.
.
.
22
MACRO Function
To setting MACRO Function
① Only ‘L1/LB/L’ and ‘L2/LT/ZL’ can setting the MACRO
function.
② Press the MACRO button the green LED is on.
③ Press the macro button (L1/LB/L,L2/LT/ZL) to setup the macro
function, the green LED flashes.
Press each function button to combine them into the desired
function (up to 15 times can be set for one MACRO, the simultaneous
pressing of multiple buttons is counted once, and it automatically
saves and exits the setting after 15 times ).
Macro buttons include
.
23
(Headphone Connection Diagram)
User Manual
X9
14
1. Don’t let water or other liquid entering inside of the gamepad to
make any damages.
2. Don’t store in places of high humidity, temperature, heavy oil or
smoke.
3. Don’t drop the gamepad into fire or explosion danger may be
caused by built-in battery.
4. Children should be under the custody of adults to use this product.
Attentions
.
25
To replace action buttons
.
XBOX ONE Connection
① Use USB cable to connect original XBOX ONE controller with
Arcade Stick’s USB port (Power OFF XBOX One& controller).
② Plug the USB of Arcade Stick into XBOX ONE USB interface, Power
ON XBOX ONE console.
③ When the LED on controller will turn on, press the‘HOME’
button on the Arcade Stick.
.
①
②
③
20
PS4 Connection
① Plug the original PS4 controller into the USB port of Arcade stick
(Power Off PS4 console& controller).
② Plug the USB of Arcade stick into PS4 USB interface. And Power
ON PS4 console.
③ When the LED on controller will turn on, press the‘HOME’
button on the Arcade Stick.
.
19
③
②
①
Button Layout
.
26
Android
FunctionsAction Buttons Joystick