Page is loading ...

LX-PR-02 Infrared Sensor Instruction
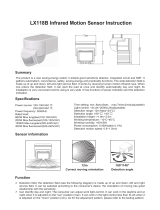
Correct moving orientation Detection Angle
12m 120°
Can identify day and night automatically, the ambient-light can be selected, so it works at night
automatically and stop in the daytime.
Time setting can be adjusted vary to the place.
It mainly be used fitting with halogen lamp, but it also can be used alone.
The product is an energy-saving automatic switch, it adopts integrated circuit and infrared energy detector. It
can be on when someone comes and off when leaves.Its performance is stable. It can identify day and night
automatically. The light can turn on when someone enters detection field and trigger it, it can turn off
automatically when leaves detection field .
Summary
Specifications
Sensor information
Power source: 100-130V/AC
220-240V/AC
Power frequency: 50/60Hz
Rated load:
800W Max.tungsten(100-130V/AC)
200W Max.fluorescent(100-130V/AC)
1200W Max.tungsten(220-240V/AC)
300W Max.fluorescent(220-240V/AC)
Detection range:12m (22°C)
Detection angle:120°
Time setting: min:5sec
max:10min±2min (adjustable)
Light-control: <10~2000LUX (adjustable)
Working temperature: -10°C~+40°C
Working humidity: <93%RH
Installation height: 2~4.5m
Function

I.when installing connect line according
to the right fig.
N – blue
L – brown
Red ( be from infrared sensor)
connect blue and brown with power
connect blue and red with load
1. After installation, please turn anti-clockwise the time
knob(TIME) to the minimum and turn anti-clockwise the
light-control knob(DAYLIGHT) to the end before you switch
on the power.
2. switch on the power, the light can be on after 30sec. After
it turns off, make it to sense after 5~10 sec.
3. If all are under good condition, with time adjustment knob
the light period can be adjusted according to your desire,
with light-control knob ambient-light can be adjusted .
Brown
Blue
Input
Load
Infrared
Sensor
Output
Red
Connection-wire diagramInstallation
Test
Ⅱ. Detailed installation:
1. Please tighten off the screw on the connection-line box, take off the rear lid of the box.
2. According to the connection line figure and the sign on the connection line box,connect the power and load
with the sensor.
3. Install the sensor in the selected position like the right diagram way.
4. Please cover the rear lid and tighten the screw.
Installation figure fitting the lamp Installation figure using alone
Note
Avoid installing it where there are sunshine or air current and temperature alter obviously.
Avoid touching the lens device with sharp things or coarse pollutant.
DAYLIGHT TIME

Some problem and solved way
1. The load do not work:
a: Please check if the connection-wiring of power and load is correct;
b: Please check if the load is good ;
c: Please check if the working light set correspond to light-control.
2. The sensitivity is poor:
a: Please check if there has hinder in front of the detection window to effect to receive the signal;
b: Please check if the ambient temperature is too high;
c: Please check if the induction signal source is in the detection fields;
d: Please check if the installation height corresponds to the height showed in the instruction;
e: Please check if the moving orientation is correct.
3. The sensor can not shut off the load automatically:
a: Please check if there is continual signal in the detection field;
b: Please check if the time setting is the longest;
c: Please check if the power correspond to the instruction;
d: Please check if the temperature near the sensor change obviously, such as air condition or central
heating etc.
Warning!
● Please confirm with prefessional installation.
● Please cut off power supply before installation and removal operations.
● Make sure that you have cut off the power for safety purposes.
● Improper operation caused losses, the manufacturer does not undertake any responsibility.
We are committed to promoting the product quality and reliability, however, all the electronic
components have certain probabilities to become ineffective, which will cause some
troubles.When designing, we have paid attention to redundant designs and adopted safety
quota to avoid any troubles.
This instruction, without our permission, should not be copied for any other purposes.
/