Page is loading ...

Operator's Manual
II:RAFTSMAN°I
nEXTEE
12.0-Volt Lithium-Ion Cordless
Telescoping Hedge Trimmer
Model No. 320. 74905
cQus
LISTED
WARNING: To reduce the risk of
injury, the user must Read and
understand the Operator's manual
before using this product.
• Warranty
• Safety
• Assembly
• Operation
• Maintenance
• Espa_ol
Charge Before first use
Sears Brands Management Corporation, Hoffman Estates, IL 60179 U.S.A.
www.craftsman.com
Warranty Page 2
Safety Symbols Page 3-4
General Safety Instructions Page 5-8
Description Page 9
Assembly Page 10
Operation Page 11-16
Maintenance Page 17
Troubleshooting Page 19
Exploded View and Parts List Page 20-22
Sears Repair Parts Phone Number Back Cover
CRAFTSMAN ONE YEAR FULL WARRANTY
FOR ONE YEAR from the date of purchase, this product is warranted
against any defects in material or workmanship. A defective product will
be replaced free of charge.
For warranty coverage details to obtain free replacement, visit the
web site: www.craftsman.com
This warranty is void if this product is ever used while providing
commercial services or if rented to another person.
The warranty gives you specific legal rights, and you may also have
other rights which vary from state to state.
Sears Brands Management Corporation, Hoffman Estates, IL 60179
SAVE THESE INSTRUCTIONS!
READ ALL INSTRUCIONS!
This hedge trimmer has many features for making its use more pleasant and
enjoyable. Safety, performance, and dependability have been given top priority
in the design of this product, making it easy to maintain and operate.
_, WARNING: Some dust created by using power tools contains chemicals
known to the state of California to cause cancer and birth defects or other
reproductive harm.
The purpose of safety symbols is to attract your attention to possible dangers.
The safety symbols and the explanations with them deserve your careful
attention and understanding. The symbol warnings do not, by themselves,
eliminate any danger. The instructions and warnings they give are no substitutes
for proper accident prevention measures.
_, WARNING: Be sure to read and understand all safety instructions in this
manual, including all safety alert symbols, such as "DANGER," "WARNING,"
and "CAUTION," before using this trimmer. Failure to following all instructions
listed below may result in electric shock, fire and/or serious personal injury.
SYMBOL SIGNAL MEANING
_, DANGER: Indicates an imminently hazardous situation, which, if not
avoided, will result in death or serious injury.
WARNING: Indicates a potentially hazardous situation, which, if not avoided,
could result in death or serious injury.
_, CAUTION: Indicates an imminently hazardous situation, which, if not
avoided, may result in death or serious injury.
Damage Prevention and Information Messages
These inform the user of import information and/or instructions that could lead to
equipment or other property damage if they are not followed. Each message is
preceded by the word "NOTE," as in the example below:
NOTE: Equipment and/or property damage may result if these instructions are
not followed.
_lk WARNING: To ensure safety and reliability, all repairs should be performed
by a qualified service technician at a Sears Parts & Repair Service Center.
_, WARNING: The operation of any power tools can
result in foreign objects being thrown into your eyes,
which can result in severe eye damage. Before beginning
power tool operation, always wear safety goggles or safety
glasses with side shield and a full face shield when needed.
We recommend a Wide Vision Safety Mask for use over
eyeglasses or standard safety glasses with side shields.
Always use eye protection which is marked to comply with ANSI Z87.1
74905 ManuaLRevised_11-0111 Page 2 74905 ManuaLRevised_11-0111 Page 3

SAVE THESE INSTRUCTIONS
Some of these following symbols may be used on this tool. Please study them
and learn their meaning. Proper interpretation of these symbols will allow you to
operate the tool better and more safely.
SYMBOL NAME DESIGNATION/EXPLANATION
V Volts Voltage
A Amperes Current
Hz Hertz Frequency (cycles per second)
W Watt Power
rain Minutes Time
Alternating Current Type of current
---== Direct Current Type or a characteristic of current
n o No Load Speed Rotational speed, at no load
] Class II Construction Double-insulated construction
.../rain Per Minute Revolutions, strokes, surface speed,
orbits, etc., per minute
Wet Conditions Alert Do not expose to rain or use in damplocations.
To reduce the risk of injury, user must
Read The Operator's Manual read and understand operator's manual
before using this product.
O Always wear safety goggles or safety
Eye Protection glasses with side shields and a full face
shield when operating this product.
Alert Precautions that involve
Safety your safety,
Failure to keep your hands away from the
No Hands Symbol blade will result in serious personal injury.
Failure to keep your hands away from the
No Hands Symbol blade will result in serious personal injury.
No Hands Failure to keep your hands away from the
Symbol
blade will result in serious personal injury.
No Hands Symbol Failure to keep your hands away from the
blade will result in serious personal injury.
To reduce the risk of injury or damage,
Hot Surface avoid contact with any hot surface.
74905 ManuaLRevised_11-0111 Page 4
GENERAL POWER TOOL SAFETY WARNINGS
a WARNING: Read all safety warnings and instructions. Failure to follow
the warnings and instructions may result in electric shock, fire and/or serious
personal injury.
Save all warnings and instructions for future reference.
The term "power tool" in all warnings refers to your mains-operated (corded)
power tool or battery-operated (cordless) power tool.
WORK AREA SAFETY
Keep your work area clean and well lit. Cluttered or dark areas invite accidents.
Do not operate power tools in explosive environments, such as in the
presence of flammable liquids, gases, or dust. Power tools create sparks,
which may ignite the dust or fumes.
Keep children and bystanders away while operating a power tool.
Distractions may cause you to lose control.
ELECTRICAL SAFETY
Power tool plugs must match the outlet. Never modify the plug in any
way. Do not use any adapter plugs with earthed (grounded) power tools.
Unmodified plugs and matching outlets will reduce the risk of electric shock.
Avoid body contact with grounded surfaces, such as pipes, radiators,
ranges, and refrigerators. There isan increased risk of electricshock ifyour
body isgrounded.
Do not expose power tools to rain or wet conditions. Water entering a
power tool will increase the risk of electric shock.
Do not abuse the cord. Never usethe cordfor carrying,pulling,or unplugging
the power tool. Keep the cord away from heat, oil,sharp edges, or moving
parts. Damaged or entangled cords increasethe risk of electric shock.
When operating a power tool outdoors, use an extension cord suitable
for outdoor use. Use of a cord suitable for outdoor use reduces the risk of
electricshock.
• If operating a power tool in a damp location is unavoidable, use a ground
fault circuit interrupter (GFCI) protected supply. Use of a GFCI reduces the
risk of electric shock.
• Use onlythe battery and chargerslisted:
BATTERY PACK CHARGER
320.10006
320.11221
320.14300
_905 ManuaLRevised_11-0111 Page 5

PERSONAL SAFETY
Stay alert, watch what you are doing, and use common sense when
operating a power tool. Do not use a power tool while tired or under the
influence of drugs, alcohol, or medication. A moment of inattention while
operating power tools may result in serious personal injury.
Use personal protective equipment. Always wear eye protection. Protective
equipment, such as dust mask, non-skid safety shoes, hard hat, or hearing
protection, used for appropriate conditions, will reduce personal injuries.
Prevent unintentional starting. Ensure that the switch is in the OFF
position before connecting to a power source and/or battery pack,
picking up, or carrying the tool. Carrying power tools with your finger on the
switch or energizing power tools that have the switch on invites accidents.
Remove any adjusting key or wrench before turning the power tool on. A
wrench or a key left attached to a rotating part of the power tool may result in
personal injury.
Do not overreach. Keep proper footing and balance at all times. This
enables better control of the power tool in unexpected situations.
Dress properly. Do not wear loose clothing or jewelry. Keep your hair,
clothing and gloves away from moving parts. Looseclothes, jewelry or
long hair can be caught in moving parts.
If devices are provided for the connection of dust extraction and
collection facilities, ensure that these are connected and properly used.
Use of these devices can reduce dust-related hazards.
POWER TOOL USE AND CARE
• Do not force the power tool. Use the correct power tool for your
application. The correct power tool will do the job better and more safely at
the rate for which it was designated.
• Do not use the power tool if the switch does not turn it on and off. Any
power tool that cannot be controlled with the switch is dangerous and must
be repaired.
Disconnect the plug from the power source and/or the battery pack from
the power tool before making any adjustments, changing accessories,
or storing power tools. Such preventive safety measures reduce the risk of
starting the power tool accidentally.
• Store idle power tools out of the reach of children and do not allow
persons unfamiliar with the power tool or these instructions to operate
the power tool. Power tools are dangerous in the hands of untrained users.
• Maintain power tools. Check for misalignment or binding of moving
parts, breakage of parts and any other condition that may affect the
power tool's operation. If damaged, have the power tool repaired before
use. Many accidents are caused by poorly maintained power tools.
74905 Manual_Revised_11-0111 Page 6
Keep cutting tools sharp and clean. Properly maintained cutting tools with
sharp cutting edges are less likely to bind and are easier to control.
Use the power tool, accessories, blades, etc. in accordance with these
instructions and in the manner intended for the particular type of
power tool, taking into account the working conditions and the work
to be performed. Use of the power tool for operations different from those
intended could result ina hazardous situation.
BATTERY TOOL USE AND CARE
Recharge only with the charger specified by the manufacturer. A charger
that is suitable for one type of battery pack may create a risk of fire when
used with another battery pack.
Use power tools only with specifically designated battery packs. Use of
any other battery packs may create a risk of injury and fire.
When the battery pack is not in use, keep it away from other metal
objects, such as paper clips, coins, keys, nails screws, or other small metal
objects that can make a connection from one terminal to another. Shorting
the battery terminals together may cause burns or a fire.
Under abusive conditions, liquid may be ejected from the battery;
avoid contact. If contact accidentally occurs, flush with water. If liquid
contacts eyes, additionally seek medical help. Liquid ejected from the
battery may cause irritation or burns.
SERVICE
• Have your power tool serviced by a qualified repair person using only
identical replacement parts. This will ensure that the safety of the power
tool is maintained.
• Follow instructions in the Maintenance section of this manual. Use of
unauthorized parts or failure to follow Maintenance instructions may create a
risk of shock or injury.
SPECIFIC SAFETY RULES FOR HEDGE TRIMMER
Keep all parts of the body away from the cutter
material or hold material to be cut when blades
inattention while operating the hedge trimmer may
injury.
blade. Do not remove cut
are moving. A moment of
result in serious personal
Make sure that the switch isoff when clearingjammed material. Do not
remove cut material or hold material to be cut when the bladesare moving.
Make sure the switch isoff when clearingjammed material. A moment of
inattention while operating the hedgetrimmer may result inseriouspersonal injury.
Carry the hedge trimmer by the handle with the cutter blade switch in
the off position.
74905 Manual_Revised_11-0111 Page 7
• When transporting or storing the hedge trimmer, always have the blade
cover in place. Proper handling of the hedge trimmer will reduce possible
personal injury from the cutter blades.
ID]__._
• Keep cables away from cutting area. During operation a cable may be
hidden in shrubs and can be accidentally cut by the blade.
• Check the work area for foreign objects, e.g. wire fences.
• Use a residual current device with a tripping current of 30 mA or less.
_, WARNING: Use both hands when operating the hedge trimmer. Using
one hand could cause loss of control and result in serious personal injury.
A_, WARNING: Only use with the handle and guard properly assembled to on
the hedge trimmer. The use of the hedge trimmer without the proper guard or
handle provided may result in serious personal injury.
A_, DANGER: Keep hands away from blade. Contact with blade will result in
serious personal injury
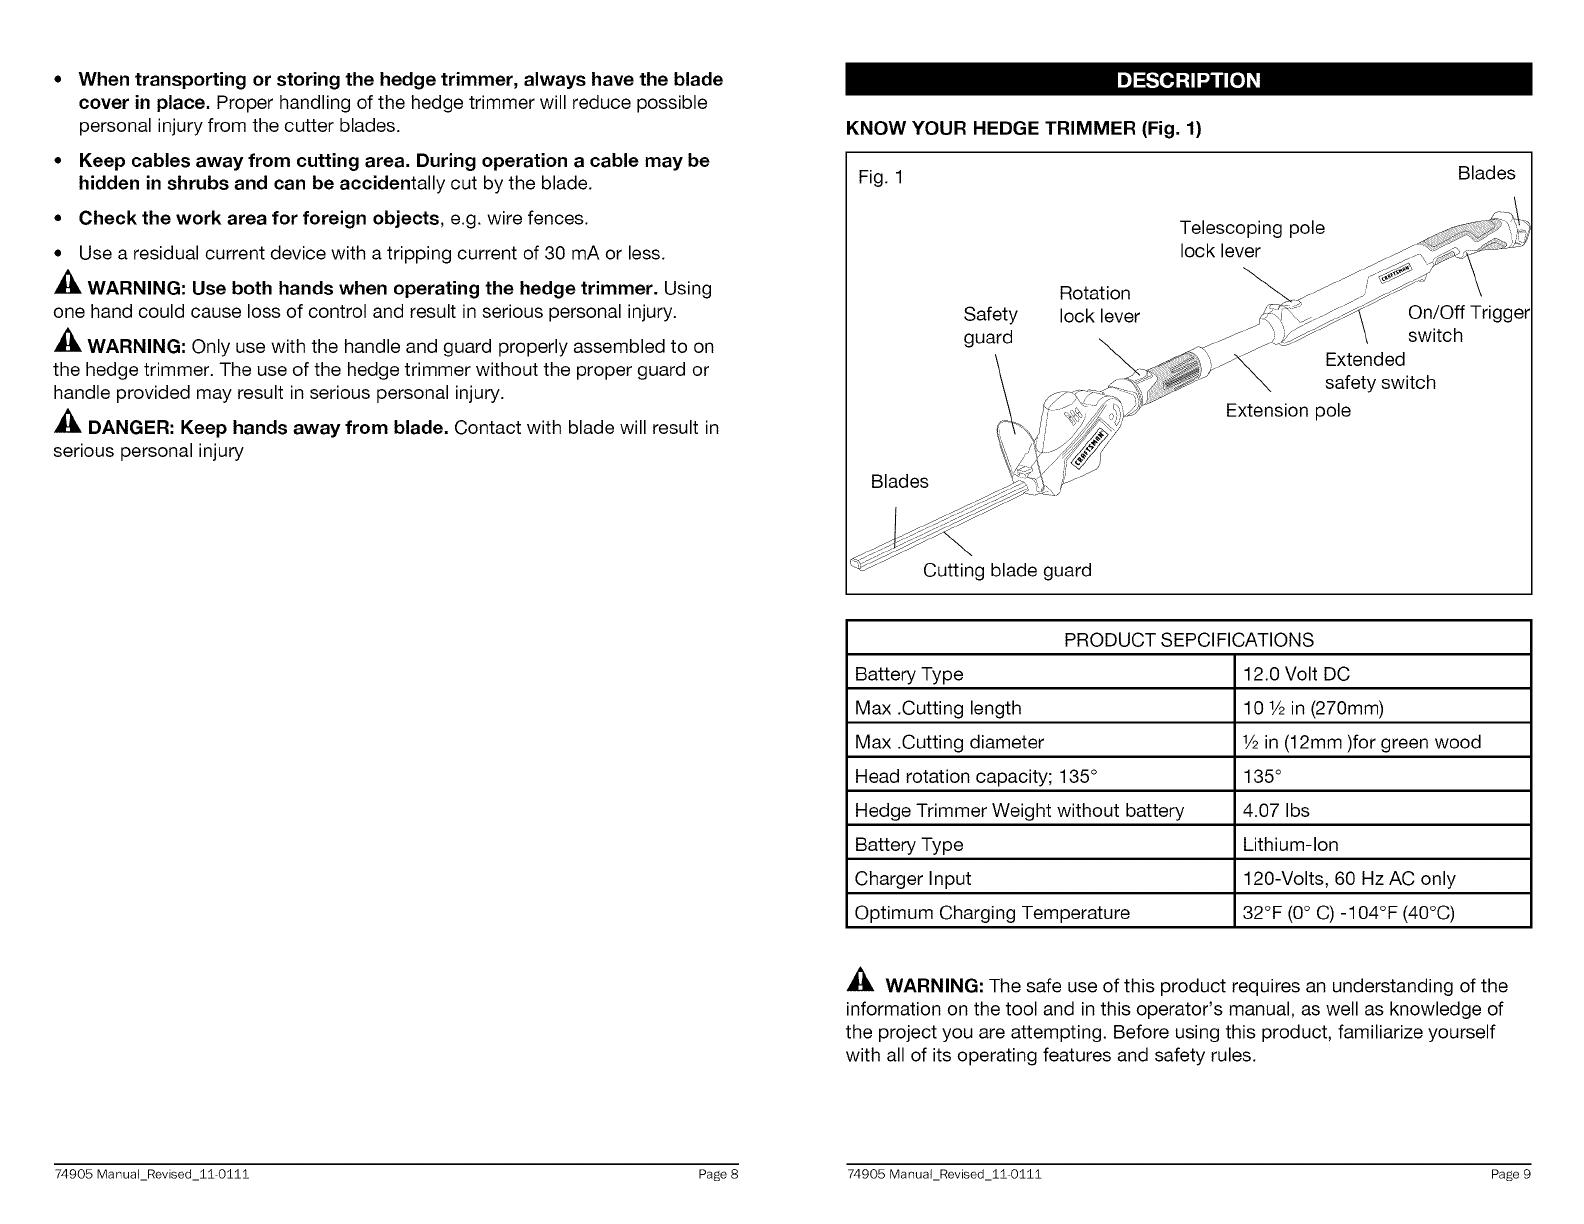
KNOW YOUR HEDGE TRIMMER (Fig. 1)
Fig. 1
Blades
Telescoping pole
lock lever
Safety
guard
Rotation
lock lever
On/Off Trigger
switch
Extended
safety switch
Extension pole
Blades
Cutting blade guard
PRODUCT SEPCIFICATIONS
Battery Type 12.0 Volt DC
Max .Cutting length 10 1/2in (270mm)
Max .Cutting diameter 1/2in (12mm)for green wood
Head rotation capacity; 135 ° 135 °
Hedge Trimmer Weight without battery 4.07 Ibs
Battery Type Lithium-Ion
Charger Input 120-Volts, 60 Hz AC only
Optimum Charging Temperature 32°F (0° C) -104°F (40°C)
_1_ WARNING: The safe use of this product requires an understanding of the
information on the tool and in this operator's manual, as well as knowledge of
the project you are attempting. Before using this product, familiarize yourself
with all of its operating features and safety rules.
74905 ManuaLRevised_11-0111 Page 8 74905 ManuaLRevised_11-0111 Page 9
[e]__ IKe]_I
WARNING: If any parts are broken or missing, do not attempt to plug in the
power cord or operate the hedge trimmer until the broken or missing parts are
replaced. Failure to do so could result in possible serious injury.
WARNING: Do not attempt to modify this hedge trimmer or create
accessories not recommended for use with this hedge trimmer. Any such
alteration or modification is misuse and could result in a hazardous condition
leading to possible serious injury.
UNPACKING
This product has been shipped completely assembled.
• Carefully remove the tool and any accessories from the box. Make sure that
all items listed in the packing list are included.
• Inspect the tool carefully to make sure that no breakage or damage occurred
during shipping.
• Do not discard the packing material until you have carefully inspected and
satisfactorily operated the tool.
• If any parts are damaged or missing, please refer to the numbers listed on the
back page of operator's manual.
PACKING LIST
Hedge trimmer, battery pack, blade guard, charger, safety guard, screws,
hex key, operator's manual
NOTE: Charge the battery before first use.
LOW-BATTERY CAPACITY INDICATOR
Unlike other battery pack types, Lithium-Ion battery packs deliver fade-free
power for their entire run time. The tool will not experience a slow, gradual loss
of power as you work. To signal that the battery pack is at the end of its run time
and needs to be charged, power to the tool will drop quickly.
BATTERY PROTECTION
To protect the battery from damage and prolong its life, the battery pack
circuitry will turn off the battery pack if it becomes overloaded or if the
temperature becomes too high during use. This may happen in extremely high
torque, binding, and stalling situations. This intelligent system will shut down
your battery pack if its operating temperature exceeds 176°F (80°C) and will
begin normal operation when it returns to 32°F (0°C) - 122°F (50°C).The battery
pack will begin normal operation when it cools down.
NOTE: A significantly reduced run time after fully charging the battery pack
indicates that the battery is near the end of its usable life and must be replaced.
COLD WEATHER OPERATION
This Lithium-Ion battery pack will provide optimal performance in temperatures
between 32°F (0°C) and 104°F (40°C). When the battery pack is very cold, it may
"pulse" for the first minute of use to warm itself. Put the battery pack on a tool
and use the tool in a light application. After about a minute, the battery pack will
have warmed itself and will operate normally.
WHEN TO CHARGE THE BATTERY PACK
It is not necessary to run down the battery pack charge before recharging. The
Lithium-Ion battery can be charged at any time and will not develop a "memory"
when charged after only a partial discharge.
Remove the battery pack from the tool when it is convenient for you and your
job. "Top off" the battery pack charge by charging it for a time before starting a
big job or long period of use.
Due to Lithium-Ion fade-free properties, the only time it is necessary to charge
the Lithium-Ion battery pack is when the pack has reached the end of its charge.
To signal the end of charge, power to the tool will drop quickly. Charge the
battery pack as needed.
74905 ManuaLRevised_11-0111 Page 10 74905 ManuaLRevised_11-0111 Page 11
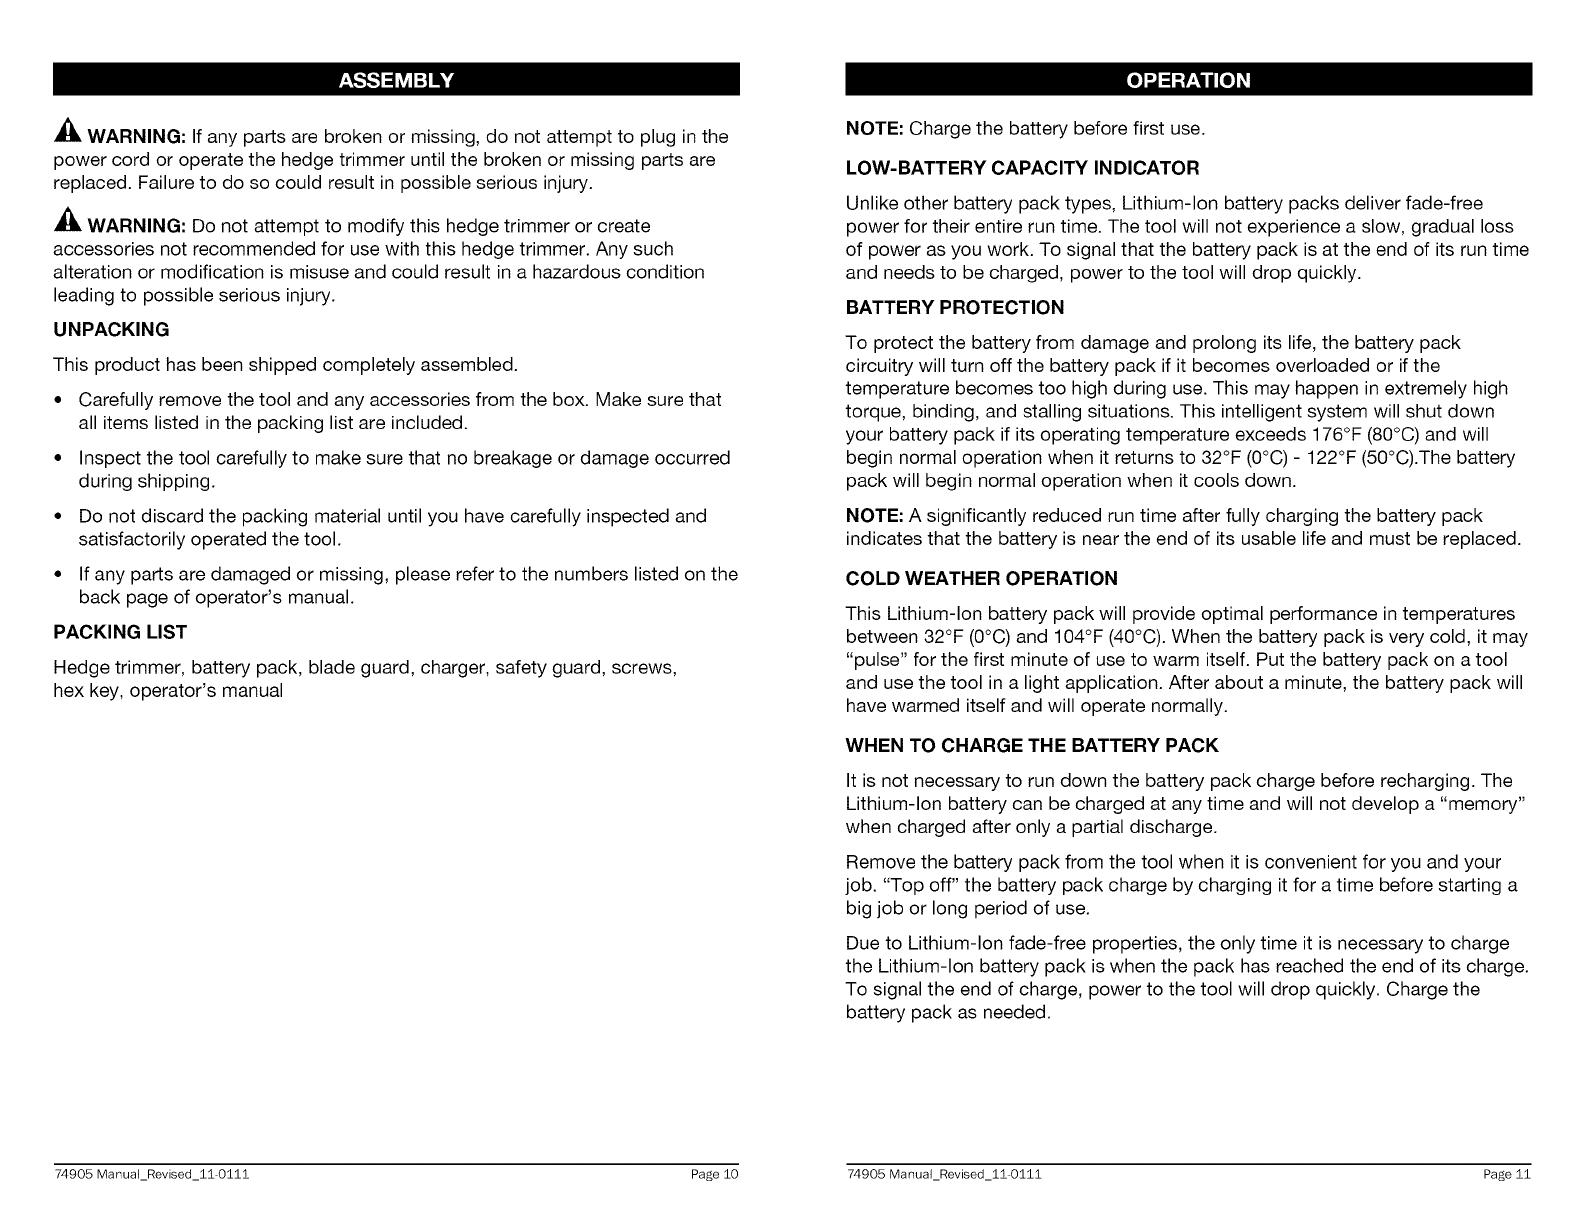
HOW TO CHARGE THE BATTERY PACK
NOTE: This Lithium-Ion battery pack is
shipped partially charged. Before using it the
first time, fully charge the battery pack.
A fully discharged battery pack will charge
in about 30 minutes in a surrounding
temperature between 50°F (10°C) and 104°F
(40°C).
1.
Fig. 2
Charge the Lithium-Ion battery pack with
the correct charger.
2. Connect the charger to a power supply.
3. Align the raised ribs of the battery pack with the slot in the charger.
4. Insert the battery pack into the charger (Fig. 2).
5. The charger will communicate with the battery pack to evaluate the condition
of the battery pack.
6. The green lights will flash while the battery pack is charging. After charging
is complete, the green LED on the charger will be on. The flickering red light
indicates a defective battery or a bad connection between the battery and
the charger.
7. The battery pack will fully charge if left on the charger, but it will not
overcharge.
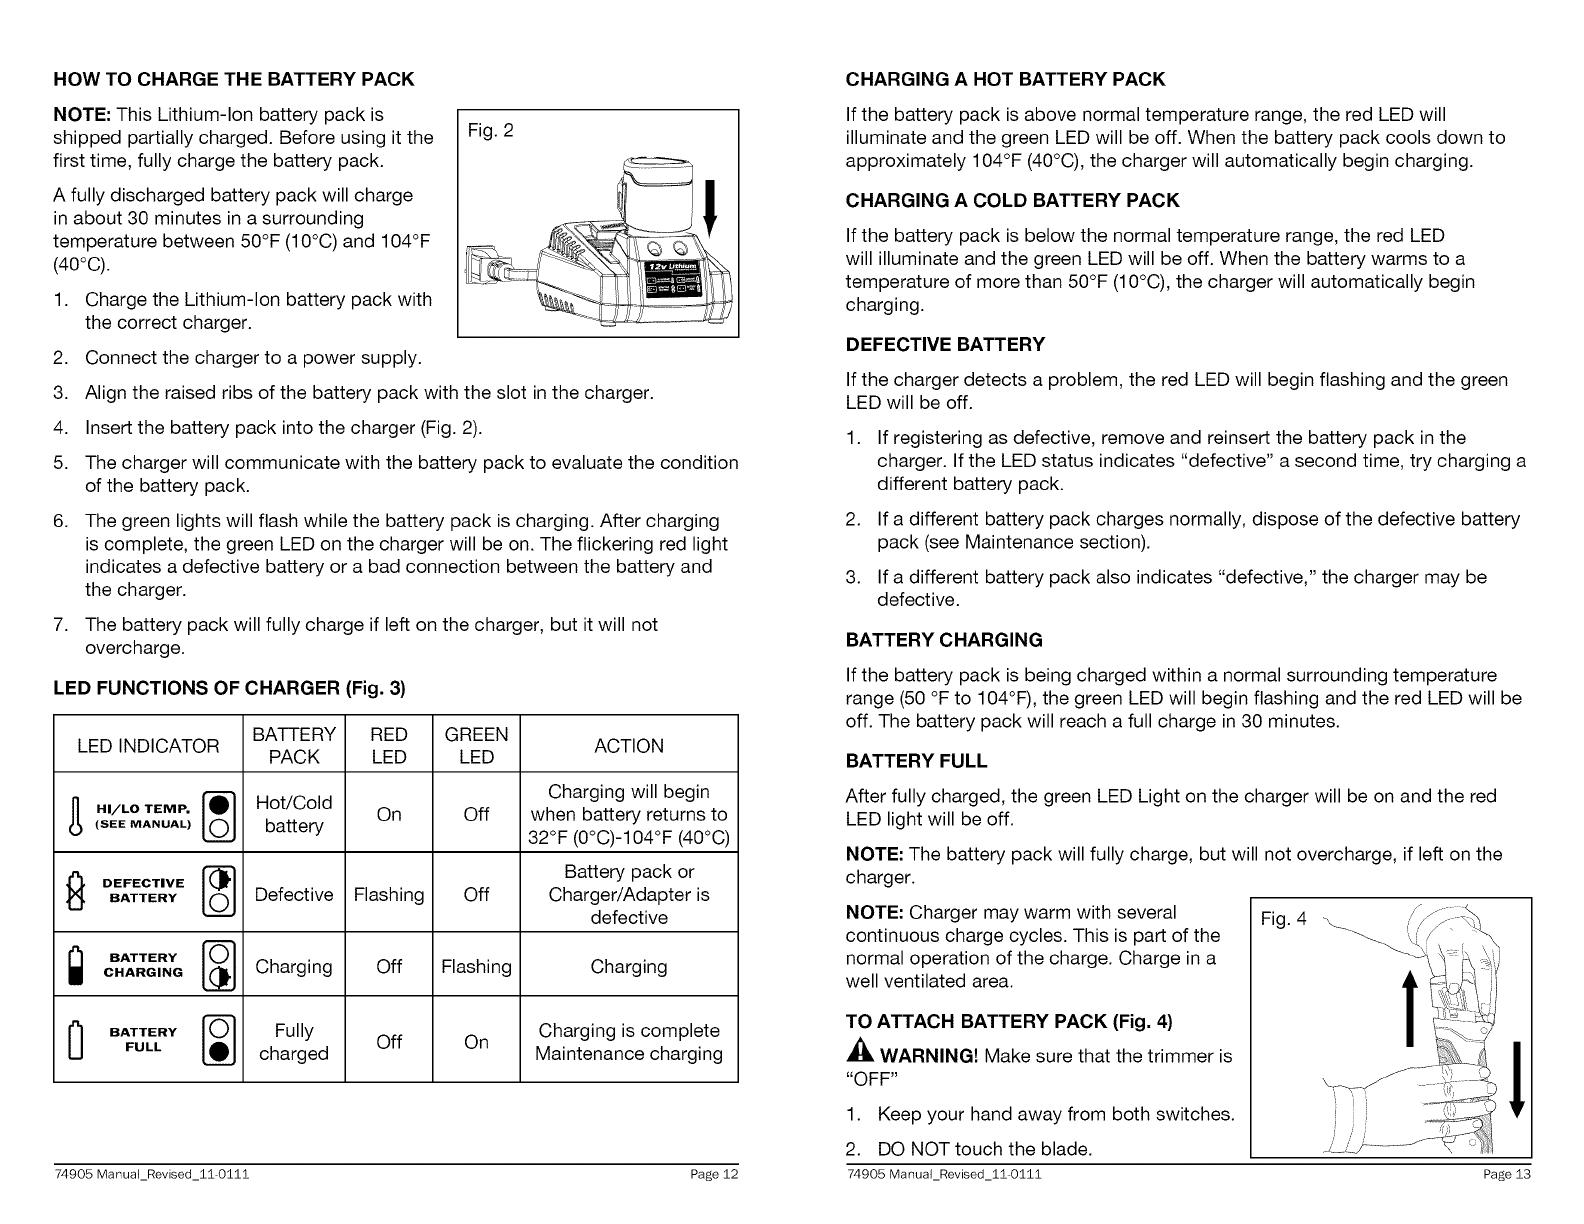
LED FUNCTIONS OF CHARGER (Fig. 3)
LED INDICATOR
HI/LO TEMP.
(SEE MANUAL)
DEFECTIVE
BATTERY
i BATTERY
CHARGING
BATTERY _
FULL
BATTERY
PACK
Hot/Cold
battery
Defective
Charging
Fully
charged
RED
LED
On
Flashing
Off
Off
GREEN
LED
Off
Off
Flashing
On
ACTION
Charging will begin
when battery returns to
32°F (0°C)-104°F (40°C)
Battery pack or
Charger/Adapter is
defective
Charging
Charging is complete
Maintenance charging
CHARGING A HOT BATTERY PACK
If the battery pack is above normal temperature range, the red LED will
illuminate and the green LED will be off. When the battery pack cools down to
approximately 104°F (40°C), the charger will automatically begin charging.
CHARGING A COLD BATTERY PACK
If the battery pack is below the normal temperature range, the red LED
will illuminate and the green LED will be off. When the battery warms to a
temperature of more than 50°F (10°C), the charger will automatically begin
charging.
DEFECTIVE BATTERY
If the charger detects a problem, the red LED will begin flashing and the green
LED will be off.
1.
2.
3.
If registering as defective, remove and reinsert the battery pack in the
charger. If the LED status indicates "defective" a second time, try charging a
different battery pack.
If a different battery pack charges normally, dispose of the defective battery
pack (see Maintenance section).
If a different battery pack also indicates "defective," the charger may be
defective.
BATTERY CHARGING
If the battery pack is being charged within a normal surrounding temperature
range (50 °F to 104°F), the green LED will begin flashing and the red LED will be
off. The battery pack will reach a full charge in 30 minutes.
BATTERY FULL
After fully charged, the green LED Light on the charger will be on and the red
LED light will be off.
NOTE: The battery pack will fully charge, but will not overcharge, if left on the
charger.
NOTE: Charger may warm with several
continuous charge cycles. This is part of the
normal operation of the charge. Charge in a
well ventilated area.
TO ATTACH BATTERY PACK (Fig. 4)
_, WARNING! Make sure that the trimmer is
"OFF"
1. Keep your hand away from both switches.
2. DO NOT touch the blade.
Fig. 4
!
74905 ManuaLRevised_11-0111 Page 12 74905 ManuaLRevised_11-0111 Page 13
3. Align the raised rib on the battery pack with the grooves in the handle of the
trimmer, and then slide the battery pack into the handle to attach the battery
pack to the trimmer.
NOTE: Make sure that the latch on the battery pack snaps into place and that
the battery pack is secured to the tool before beginning operation.
_, CAUTION: When placing the battery pack in the tool, be sure that the raised
rib on battery pack aligns with the groove inside the trimmer and that the latches
snap into place properly. Improper attachment of the battery pack can cause
damage to internal components.
TO DETACH BATTERY PACK (Fig. 4)
_, WARNING! Make sure that the trimmer is "OFF"
1.
2.
3.
4.
Keep your hand away from any switches.
DO NOT touch the blade.
Depress the battery release buttons
located on the both sides of the battery
pack to release the battery pack.
Pull the battery pack out and remove it
from the tool.
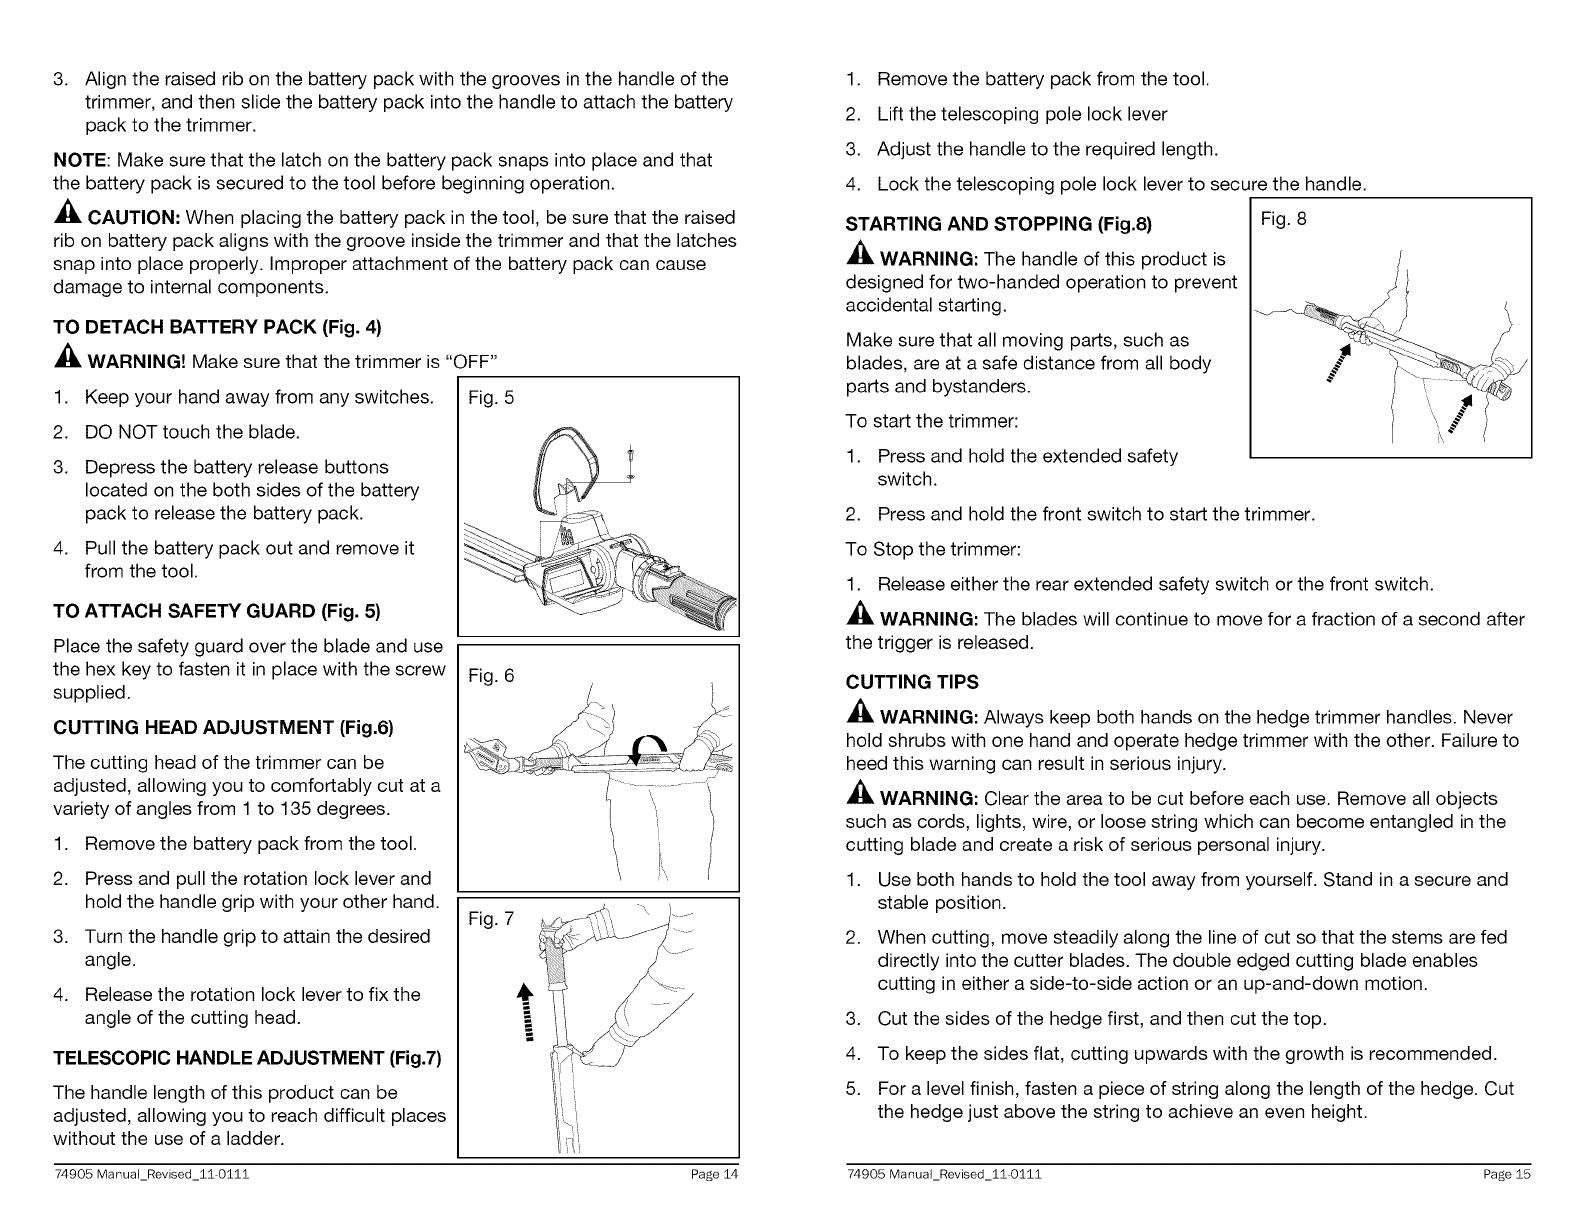
TO ATTACH SAFETY GUARD (Fig. 5)
Place the safety guard over the blade and use
the hex key to fasten it in place with the screw
supplied.
CUTTING HEAD ADJUSTMENT (Fig.6)
The cutting head of the trimmer can be
adjusted, allowing you to comfortably cut at a
variety of angles from 1 to 135 degrees.
1. Remove the battery pack from the tool.
2. Press and pull the rotation lock lever and
hold the handle grip with your other hand.
3. Turn the handle grip to attain the desired
angle.
4. Release the rotation lock lever to fix the
angle of the cutting head.
TELESCOPIC HANDLE ADJUSTMENT (Fig.7)
The handle length of this product can be
adjusted, allowing you to reach difficult places
without the use of a ladder.
Fig. 5
Fig. 6
Fig. 7
1. Remove the battery pack from the tool.
2. Lift the telescoping pole lock lever
3. Adjust the handle to the required length.
4. Lock the telescoping pole lock lever to secure the handle.
Fig. 8
STARTING AND STOPPING (Fig.8)
A_, WARNING: The handle of this product is
designed for two-handed operation to prevent
accidental starting.
Make sure that all moving parts, such as
blades, are at a safe distance from all body
parts and bystanders.
To start the trimmer:
1. Press and hold the extended safety
switch.
2. Press and hold the front switch to start the trimmer.
To Stop the trimmer:
1. Release either the rear extended safety switch or the front switch.
_lk WARNING: The blades will continue to move for a fraction of a second after
the trigger is released.
CUTTING TIPS
A_, WARNING: Always keep both hands on the hedge trimmer handles. Never
hold shrubs with one hand and operate hedge trimmer with the other. Failure to
heed this warning can result in serious injury.
WARNING: Clear the area to be cut before each use. Remove all objects
such as cords, lights, wire, or loose string which can become entangled in the
cutting blade and create a risk of serious personal injury.
1.
2.
3.
4.
5.
Use both hands to hold the tool away from yourself. Stand in a secure and
stable position.
When cutting, move steadily along the line of cut so that the stems are fed
directly into the cutter blades. The double edged cutting blade enables
cutting in either a side-to-side action or an up-and-down motion.
Cut the sides of the hedge first, and then cut the top.
To keep the sides flat, cutting upwards with the growth is recommended.
For a level finish, fasten a piece of string along the length of the hedge. Cut
the hedge just above the string to achieve an even height.
74905 ManuaLRevised_11-0111 Page 14 74905 ManuaLRevised_11-0111 Page 15
6. Always take care to avoid cutting into objects such as wire, which could
cause damage to the cutting blades and drive.
USE THE HEDGE TRIMMER
_, WARNING: Check that the rotation lock lever and telescoping pole lock
lever are securely closed before beginning any trimming operation.
NOTE: Do not overload the hedge trimmer.
If you hear the motor in your hedge trimmer change pitch dramatically while
cutting, it may be overloaded.
Check to see if the hedge is very thick or
dense. A first rough cut to remove one half or
less of the length of the growth to be removed
will help to reduce the load on the motor.
The maximum thickness of the branch that
the tool will cut is approximately 1/2inch; this
may be reduced with certain bush and shrub
types.
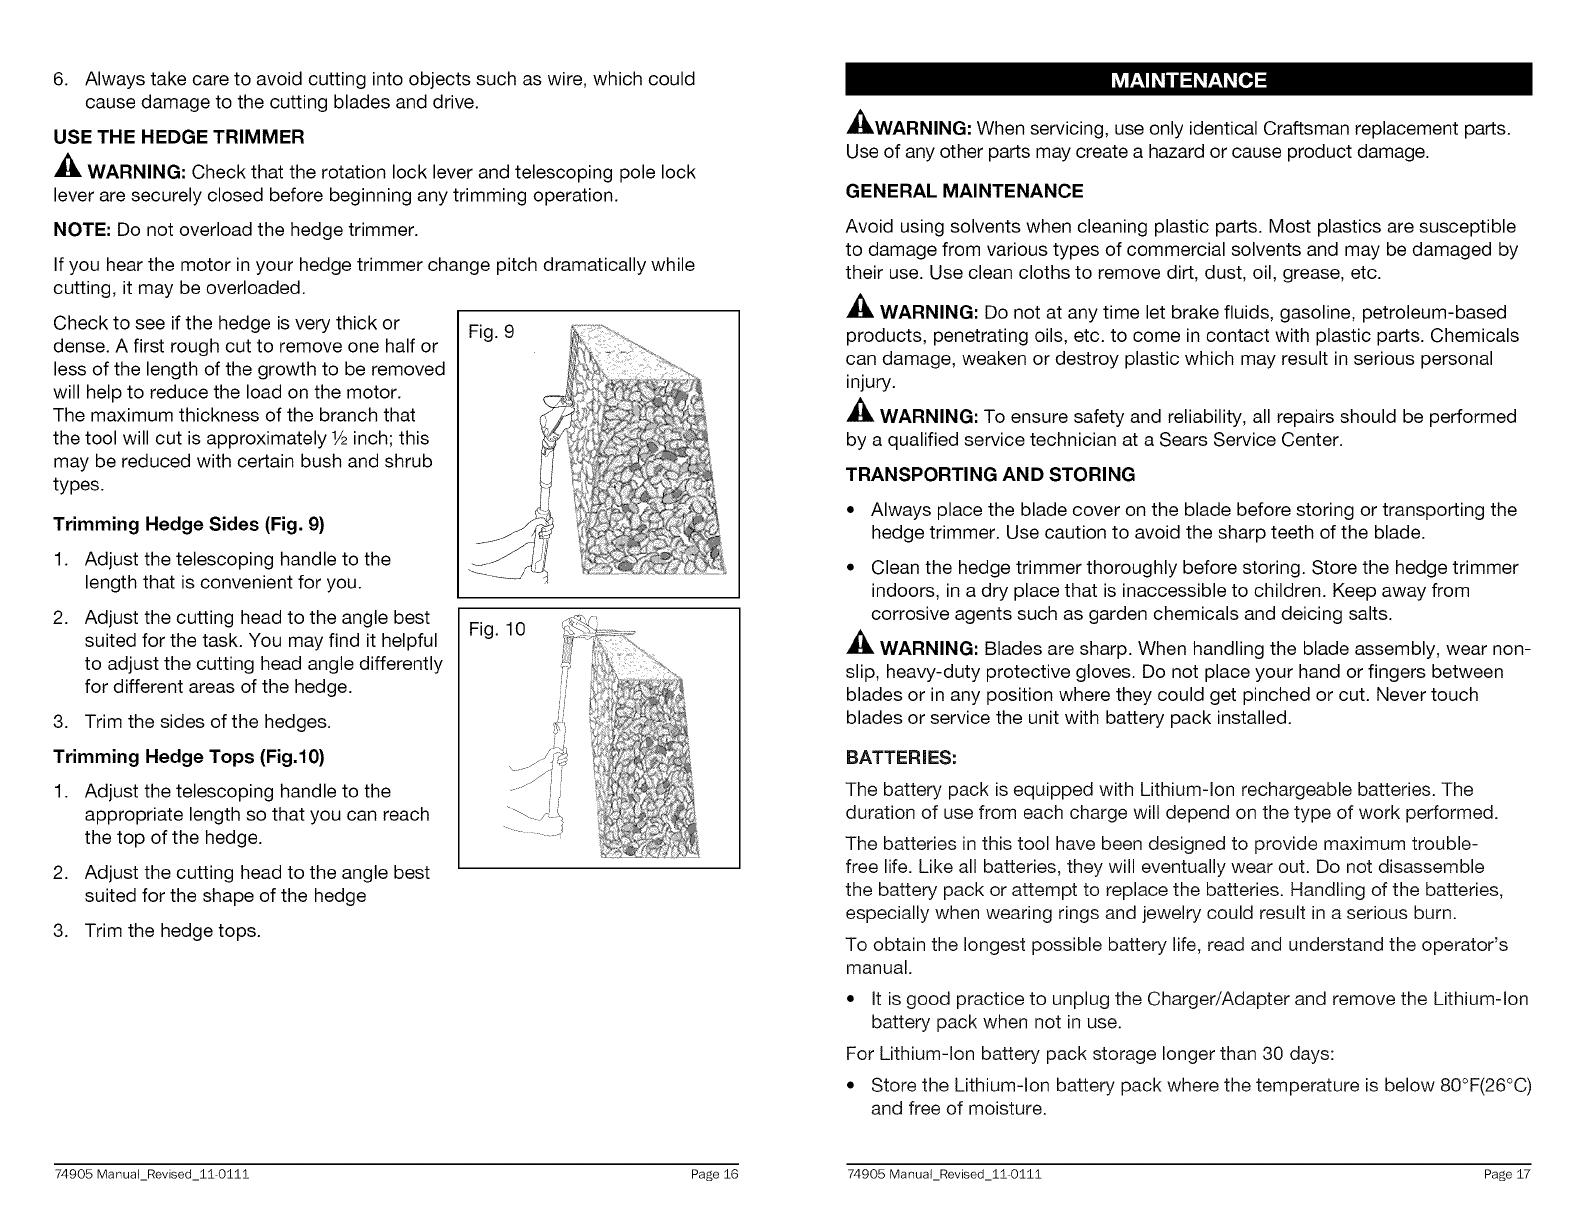
Trimming Hedge Sides (Fig. 9)
1.
2.
Adjust the telescoping handle to the
length that is convenient for you.
Adjust the cutting head to the angle best
suited for the task. You may find it helpful
to adjust the cutting head angle differently
for different areas of the hedge.
3. Trim the sides of the hedges.
Trimming Hedge Tops (Fig.10)
1. Adjust the telescoping handle to the
appropriate length so that you can reach
the top of the hedge.
2. Adjust the cutting head to the angle best
suited for the shape of the hedge
Fig. 9
Fig. 10
3. Trim the hedge tops.
_,WARNING: When servicing, use only identical Craftsman replacement parts.
Use of any other parts may create a hazard or cause product damage.
GENERAL MAINTENANCE
Avoid using solvents when cleaning plastic parts. Most plastics are susceptible
to damage from various types of commercial solvents and may be damaged by
their use. Use clean cloths to remove dirt, dust, oil, grease, etc.
_, WARNING: Do not at any time let brake fluids, gasoline, petroleum-based
products, penetrating oils, etc. to come in contact with plastic parts. Chemicals
can damage, weaken or destroy plastic which may result in serious personal
injury.
_, WARNING: To ensure safety and reliability, all repairs should be performed
by a qualified service technician at a Sears Service Center.
TRANSPORTING AND STORING
• Always place the blade cover on the blade before storing or transporting the
hedge trimmer. Use caution to avoid the sharp teeth of the blade.
• Clean the hedge trimmer thoroughly before storing. Store the hedge trimmer
indoors, in a dry place that is inaccessible to children. Keep away from
corrosive agents such as garden chemicals and deicing salts.
_, WARNING: Blades are sharp. When handling the blade assembly, wear non-
slip, heavy-duty protective gloves. Do not place your hand or fingers between
blades or in any position where they could get pinched or cut. Never touch
blades or service the unit with battery pack installed.
BATTERI ES:
The battery pack is equipped with Lithium-Ion rechargeable batteries. The
duration of use from each charge will depend on the type of work performed.
The batteries in this tool have been designed to provide maximum trouble-
free life. Like all batteries, they will eventually wear out. Do not disassemble
the battery pack or attempt to replace the batteries. Handling of the batteries,
especially when wearing rings and jewelry could result in a serious burn.
To obtain the longest possible battery life, read and understand the operator's
manual.
• It is good practice to unplug the Charger/Adapter and remove the Lithium-Ion
battery pack when not in use.
For Lithium-Ion battery pack storage longer than 30 days:
• Store the Lithium-Ion battery pack where the temperature is below 80°F(26°C)
and free of moisture.
74905 ManuaLRevised_11-0111 Page 16 74905 ManuaLRevised_11-0111 Page 17
• Store Lithium-Ion battery packs in a 30%-50% charged condition.
• Every six months of storage, fully charge the Lithium-Ion battery pack.
• Exterior may be cleaned with a cloth or soft non-metallic brush.
BATTERY PACK REMOVAL AND PREPARATION FOR RECYCLING
To preserve natural resources, please recycle or
dispose of batteries properly. This product contains
lithium-ion batteries. Local, state, or federal laws may
prohibit disposal of lithium-ion batteries in ordinary
trash. Consult your local waste authority for information
regarding available recycling and/or disposal options.
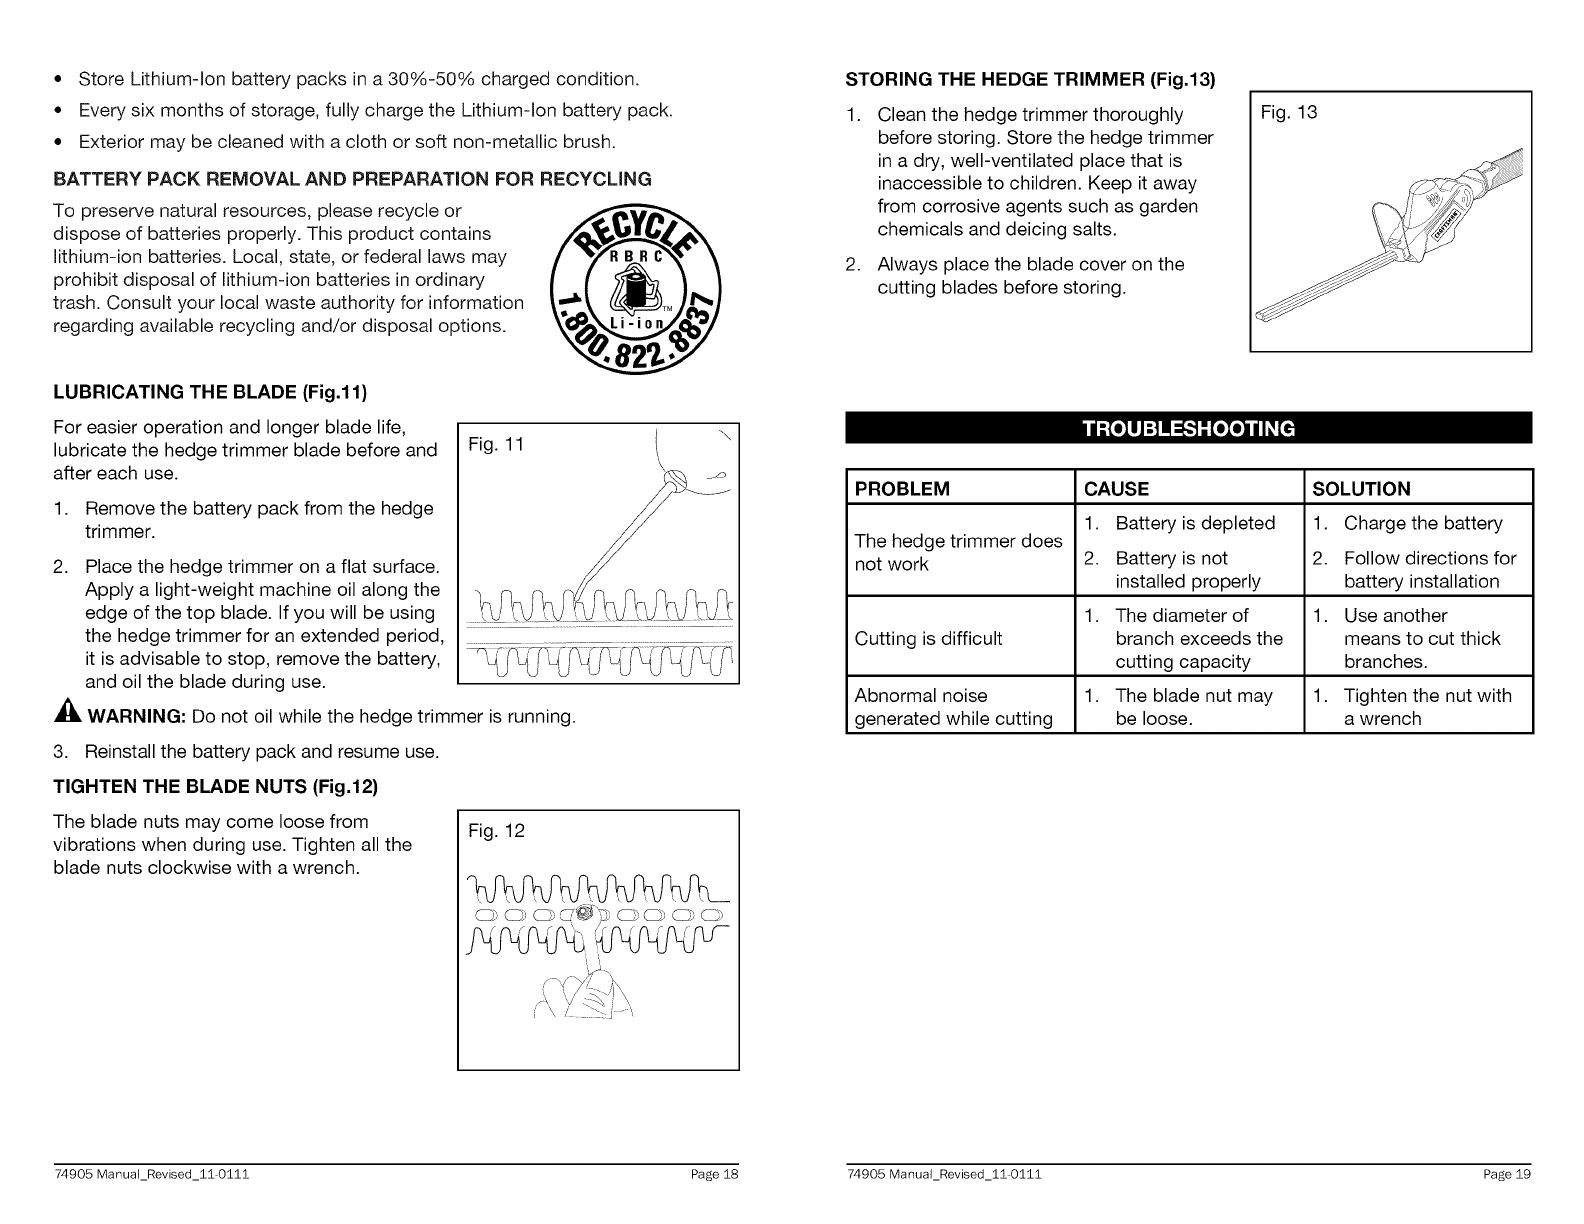
LUBRICATING THE BLADE (Fig.11)
Fig. 11
For easier operation and longer blade life,
lubricate the hedge trimmer blade before and
after each use.
\
1. Remove the battery pack from the hedge
trimmer.
2. Place the hedge trimmer on a flat surface.
Apply a light-weight machine oil along the
edge of the top blade. If you will be using
the hedge trimmer for an extended period ..........................................
it is advisable to stop, remove the battery,
and oil the blade during use.
_1, WARNING: Do not oil while the hedge trimmer is running.
3. Reinstall the battery pack and resume use.
TIGHTEN THE BLADE NUTS (Fig.12)
The blade nuts may come loose from
vibrations when during use. Tighten all the
blade nuts clockwise with a wrench.
Fig. 12
STORING THE HEDGE TRIMMER (Fig.13)
1.
Clean the hedge trimmer thoroughly
before storing. Store the hedge trimmer
in a dry, well-ventilated place that is
inaccessible to children. Keep it away
from corrosive agents such as garden
chemicals and deicing salts.
2. Always place the blade cover on the
cutting blades before storing.
Fig. 13
PROBLEM CAUSE SOLUTION
1. Battery is depleted 1. Charge the battery
The hedge trimmer does
not work 2. Battery is not 2. Follow directions for
installed properly battery installation
1. The diameter of 1. Use another
Cutting is difficult branch exceeds the means to cut thick
cutting capacity branches.
Abnormal noise 1. The blade nut may 1. Tighten the nut with
generated while cutting be loose, a wrench
74905 ManuaLRevised_11-0111 Page 18 74905 ManuaLRevised_11-0111 Page 19

•2Z_I I_11_.1111
12.0VOLTLITHIUM-IONCORDLESSPOLE HEDGETRIMMER MODELNO.320.74905
The Model Number will be found on the Nameplate attached to the handle of the
hedge trimmer. Always mention the Model Number when ordering parts for this tool.
\
\
\
\
\
\
\
\
\
\
1 2730003000 DC Motor 1
2 2822799000 Blade Set 1
3 3124115000 Transmitting Gear 1
4 3124116000 Gear 1
5 3124126000 Clamp Block 1
6 3125926000 Clamp Block 1
3125056000 Left Housing 1
7
3125362000 Left Housing 1
3125057000 Right Housing 1
8
3125363000 Right Housing 1
9 3125058000 Cover Tube Connector 1
10 3125059000 Sheath 1
11 3125060000 Left Cover 1
12 3125061000 Right Cover 1
13 3125062000 Switch Trigger 1
14 3125063000 Knighthead 1
15 3125064000 Switch Actuator 1
16 3125065000 Cover 1
17 3125066000 Wire Clamp 1
18 3125067000 Switch Trigger 1
19 3125068000 Wrench 1
20 3125069000 Scaleboard 1
21 3125070000 Release Button 1
22 3126070000 Guard 1
23 3321231000 Left Handle 1
24 3321232000 Right Handle 1
25 3320964000 Front Handle 1
26 3402298000 Contact Receptacle Assembly 1
27 3402408000 Motor Support 1
74905 Manual_Revised_11-0111 Page 2174905 Manual_Revised_11-0111 Page 20

28 3520508000 Pinion
29 3550037000 Pin
30 3551414000 Inner Tube
31 3660059000 Switch Spring
32 3660348000 Spring
33 3660423000 Torsion Spring
34 3700380000 Washer
35 3704254000 Handle Hoop
36 3704642000 Lock Pin
37 3704648000 Support Plate
38 4890642000 PCB Assembly
39 5610013000 Tapping Screw
40 5620032000 Screw
41 5620011000 Hexagon Socket Screw
42 5650005000 Plain Washer
43 5630001000 Hexagon Nut
44 4860237000 Internal Wire
45 4870037000 Switch
46 3125655000 Sleeve
47 5670288000 Spring Pin
1
1
1
1
1
1
2
1
1
1
1
23
2
1
1
1
1
1
1
1
Your Home
For troubleshooting, product manuals and expert advice:
managemylife
www.managemylife.com
For repair - in your home - of all major brand appliances,
lawn and garden equipment, or heating and cooling systems,
no matter who made it, no matter who sold it!
For the replacement parts, accessories and
owner's manuals that you need to do-it-yourself.
For Sears professional installation of home appliances
and items like garage door openers and water heaters.
1-800-4-MY-HOME ® Call anythne, day or night
(1-800-469-4663) (U.S.A. and Canada)
www.sears.com www.sears.ca
Our Home
For repair of carry-in items like vacuums, lawn equipment,
and electronics, call anytime for the location of the nearest
Sears Parts & Repair Service Center
1-800-488-1222 (U.S.A.) 1-800-469-4663 (Canada)
www .sears .com www .sears .ca
To purchase a protection agreement on a product serviced bySears:
1-800-827-6655 (U.S.A.) 1-800-361-6665 (Canada)
Parapedir serviciode reparaci6n Au Canadapour serviceenfran£;ais:
a domicilio,y paraordenar piezas: 1-800-LE-FOYERMc
1-888-SU-HOGAR® (1-800-533-6937)
(1-888-784-6427) www.sea rs.ca
www.sears.com
Sears
® Registered Trademark / TMTrademark of KCD IP, LLC in the United States, or Sears Brands, LLC h_ other countries
® Marca Registrada / TMMarca de F_brica de KCD IP, LLC en Estados Unidos, o Sears Brands, LLC in otros paises
MCMarque de commerce / MDMarque dCposCe de Sears Brands, LLC
74905 ManuaLRevised_11-0111 Page 22 74905 ManuaLRevised_11-0111 Page 23

Your Home
For troubleshooting, product manuals and expert advice:
managemylife
www.managemylife.com
For repair - in your home - of all major brand appliances,
lawn and garden equipment, or heating and cooling systems,
no matter who made it, no matter who sold it!
For the replacement parts, accessories and
owner's manuals that you need to do-it-yourself.
For Sears professional installation of home appliances
and items like garage door openers and water heaters.
1-800-4-MY-HOME ® Call anytirne, day or night
(1-800-469-4663) (U.S.A. and Canada)
www.sears.com www.sears.ca
ourHome
_:i:i:_ For repair of carry-in items like vacuums, lawn equipment,
and electronics, call anytime for the location of the nearest
Sears Parts & Repair Service Center
1-800-488-1222 (U.S.A.) 1-800-469-4663 (Canada)
www .sears .corn www .sears .ca
TOpurchase a protection agreement on a product serviced bySears:
1-800-827-6655 (U.S.A.) 1-800-361-6665 (Canada)
Parapedir serviciode reparacbn Au Canadapour servce enfran(_as
a domicilio,y paraordenar piezas: 1.800.LE.FOYERMC
1-888-SU-HOGAR® 1-800-5338937
, (1-888-784-6427) www.sears.oa
...... www.sears.com ......
T_
® Registered Trademark / _ Trademark of KCD IP, LLC in the United States, or Sears Brands, LLC in other countries
® Marca Registrada / _ Marca de F_brica de KCD IP, LLC en Estados Unidos, o Sears Brands, LLC in otros paises
MD
Mc Marque de commerce / Marque d_pos_e de Sears Brands, LLC
/