Craftsman 74935 User manual
- Category
- Cordless hedge trimmers
- Type
- User manual
This manual is also suitable for

OPERATOR
′
S MANUAL
MANUAL DEL USUARIO
24V MAX* LITHIUM-ION
CORDLESS HEDGE TRIMMER
CORTASETOS INALÁMBRICO CON BATERÍA
DE IONES DE LITIO DE 24V MÁX.*
3084514
Model No. 151.74935
(INCLUDES battery & charger)
Modelo n
o
151,74935
(INCLUYE batería y cargador)
Model No. 151.74937
(Battery & charger NOT INCLUDED)
Modelo n
o
151,74937
(Batería y cargador NO INCLUÍDOS)
Sears Brands Management Corporation, Hoffman Estates, IL 60179 USA
Visit the Craftsman web page: www.craftsman.com
Visite el sitio Web de Craftsman: www.craftsman.com
Save this manual for future reference
Conserve este manual para futura referencia.
CAUTION:
To reduce the risk of injury, the user must read and understand
the operator's manual before using this product.
PRECAUCIÓN:
Para reducir el riesgo de lesiones, el usuario debe leer y
comprender el manual antes de utilizar este producto.
* Maximum initial battery voltage (measured without workload) is 24 volts.
Nominal working voltage is 21.6 volts.
* La tensión inicial máxima de la batería (medida sin carga) es 24 voltios.
La tensión de trabajo nominal es 21,6 volts.

2 ― English
TABLE OF CONTENTS / TABLA DE CONTENIDOS
INTRODUCTION / INTRODUCCIÓN
This tool has many features for making its use more pleasant and enjoyable. Safety, performance, and
dependability have been given top priority in the design of this product making it easy to maintain and
operate.
* * *
Esta herramienta tiene muchas funciones para hacerla más agradable y cómoda de usar. Se ha dado
máxima prioridad a la seguridad, rendimiento y dependencia en las etapas de diseño de este producto
para que sea fácil de utilizar y mantener.
■ Warranty .................................................................... 2
■ Introduction ................................................................ 2
■ General Safety Warnings ....................................... 3-4
■ Specic Safety Warnings .......................................... 5
■ Symbols .................................................................. 6-7
■ Features ..................................................................... 8
■ Assembly ..............................................................9-10
■ Battery Pack and Charger .................................. 11-12
■ Operation ............................................................13-14
■ Care and Maintenance ....................................... 15-16
■ Environmentally Safe Battery Disposal ................... 17
■ Troubleshooting ....................................................... 17
■ Illustrated Parts List ............................................18-19
■ Figure Numbers (Illustrations) ................................. i-iii
■ Garantía ............................... Sección de Inglés pág. 2
■ Introducción ......................... Sección de Inglés pág. 2
■ Advertencias generales de seguridad ................... 3-5
■ Advertencias especícas de seguridad ................. 5-6
■ Símbolos ................................................................. 7-8
■ Características ........................................................... 9
■ Armado ...............................................................10-11
■ Batería y cargador ..............................................12-14
■ Funcionamiento ..................................................15-16
■ Cuidados y mantenimiento .................................17-18
■ Eliminación ambientalmente segura de la batería.. 19
■ Resolución de problemas ........................................ 20
■ Lista de piezas, ilustrada .................................... 21-22
■ Números de las guras (ilustraciones) .................... i-iii
CRAFTSMAN LIMITED WARRANTY
FOR TWO YEARS from the date of sale, this power tool is warranted against defects in material or
workmanship.
FOR ONE YEAR from the sale date a supplied battery pack or charger is warranted against material or
workmanship defects.
WITH PROOF OF SALE, a defective product will be replaced free of charge.
For warranty coverage details to obtain free replacement, visit the web page:
www.craftsman.com/warranty
This warranty does not cover the scabbard, which is a expendable part that can wear out from normal use
within the warranty period.
This warranty is void if this product is ever used while providing commercial services or if rented to another
person.
This warranty gives you specific legal rights, and you may also have other rights which vary from state to
state.
Sears Brands Management Corporation, Hoffman Estates, IL 60179
* * *
GARANTÍA LIMITADA CRAFTSMAN
DURANTE DOS AÑOS a contar de la fecha de venta, esta herramienta está garantizada contra defectos
en sus materiales o fabricación.
DURANTE UN AÑO a contar de la fecha de venta, la batería o cargador incluidos con la herramienta están
garantizados contra defectos en sus materiales o fabricación.
Un producto defectuoso puede reemplazarse por uno nuevo, de manera gratuita, considerando que se
presente una PRUEBA DE VENTA.
Para conocer la cobertura de la garantía y obtener un reemplazo gratuito, visite el sitio Web
www.craftsman.com/warranty
Esta garantía no cubre la funda, la cual es una pieza desechable que puede desgastarse debido al uso
normal dentro del periodo de garantía.
La garantía de un año se anula si el producto se usa para proporcionar servicios comerciales o si se le
arrienda a otra persona.
Esta garantía le entrega derechos legales específicos que pueden variar según su estado (podría tener
otros derechos adicionales).
Sears Brands Management Corporation, Hoffman Estates, IL 60179
ENGLISH ESPAÑOL

3 ― English
GENERAL SAFETY WARNINGS
WARNING
!
Read all safety warnings and all instructions.
Failure to follow the warnings and instructions
may result in electric shock, re and/or
serious personal injury:
■ Keep work area clean and well lit. Cluttered
or dark areas invite accidents.
■ Do not operate cordless power tools in
explosive atmospheres, such as in the
presence of ammable liquids, gases, or
dust. Cordless power tools create sparks
which may ignite the dust or fumes.
■ Do not operate in poor lighting.
■ Keep all bystanders, children, and pets at
least 50 ft. away while operating the tool.
■ Do not allow to be used as a toy. Close
attention is necessary when used by or near
children.
■ Do not expose cordless power tools to rain
or wet conditions. Do not handle plug or tool
with wet hands. Water entering the tool will
increase the risk of electric shock.
■ Do not charge battery tool in rain, or damp
or wet location. Following this rule will reduce
the risk of electric shock.
■ Do not abuse the charger cord. Never use
the cord for carrying, pulling or unplugging.
Keep cord away from heat, oil, sharp edges
or moving parts. Damaged or entangled
cords increase the risk of electric shock. If
the charger cord is damaged, replace the
charger with an identical model as listed in
the Product Specications in this manual.
■ Stay alert, watch what you are doing
and use common sense when operating
a cordless power tool. Do not use the tool
while you are tired or under the inuence of
drugs, alcohol or medication. A moment of
inattention while operating tools may result in
serious personal injury.
■ Use personal protective equipment. Always
wear eye protection. Protective equipment
such as dusk mask, non-skid safety shoes,
hard hat, or hearing protection used for
appropriate conditions will reduce personal
injuries. Secure long hair above shoulder
level to prevent entanglement in moving
parts.
■ Prevent unintentional starting. Ensure
switch is in the off-position before installing
battery pack, picking up or carrying the tool.
Carrying cordless power tools with your
nger on the switch or energizing cordless
power tools that have the switch on invites
accidents.
■ Do not overreach. Keep proper footing
and balance at all times. This enables better
control of the tool in unexpected situations.
■ Dress properly. Do not wear loose clothing
or jewelry. Keep your hair, clothing, and
gloves away from moving parts. Loose
clothes, jewelry, or long hair can be caught in
moving parts.
■ Keep all parts of your body away from any
moving parts and all hot surfaces of the unit.
■ Do not use on a ladder, rooftop, tree, or
other unstable support. Stable footing on a
solid surface enables better control of the tool
in unexpected situations.
■ Wear heavy, long pants, long sleeves,
boots, and gloves. Do not wear loose tting
clothing, shorts pants, sandals or similar
lightweight footwear or go barefoot.
■ For household use only.
■ Do not force the tool. Use the correct tool
for your application. The power tool will do
the job better and safer at the rate for which it
was designed.
■ Do not use the tool if the switch does not
turn it on and off. Any cordless power tool
that cannot be controlled with the switch is
dangerous and must be repaired.
■ Disconnect the battery pack from the
cordless power tool before making any
adjustment, changing accessories, or storing.
Such preventive safety measures reduce the
risk of starting the power tool accidentally.

4 ― English
■ To reduce the risk of serious personal
injury, do not store outside or in vehicles.
Store idle cordless power tools out of children
■ Do not allow persons unfamiliar with the
cordless power tool or these instructions to
operate the tool. Cordless power tools are
dangerous in the hands of untrained users.
■ Maintain tools. Check for misalignment or
binding of moving parts, breakage of parts
and any other condition that may affect the
tool’s operation. If damaged, have the tool
repaired before use. Many accidents are
caused by poorly maintained tools.
■ Keep cutting tools sharp and clean.
Properly maintained cutting tools with sharp
cutting edges are less likely to bind and are
easier to control.
■ Use the cordless power tool, accessories
and tool bits etc., in accordance with these
instructions, taking into account the working
conditions and the work to be performed.
Use of the tool for operations different from
those intended could result in a hazardous
situation.
■ Recharge only with the charger specied
by the manufacturer and listed in the Parts
List of this manual. A charger that is suitable
for one type of battery pack may create a risk
of re when used with another battery pack.
■ Use cordless power tools only with
specically designated battery packs. Use of
any battery packs may create a risk of injury
and re.
■ When battery pack is not in use, keep it
away from other metal objects, like paper
clips, coins, keys, nails, screws or other small
metal objects that can make a connection
from one terminal to another. Shorting the
battery terminals together may cause burns
or a re.
■ Batteries can explode in the presence of
a source of ignition, such as a pilot light. To
reduce the risk of serious personal injury,
never use any cordless product in the
presence of open ame. An exploded battery
can propel debris and chemicals. If exposed,
ush with water immediately.
■ Do not crush, drop or damage the battery
pack. Do not use a battery pack or charger
that has been dropped or received a sharp
blow.
■ Do not open or mutilate the batteries.
Released electrolyte is corrosive and may
cause damage to the eyes or skin. It may be
toxic if swallowed.
■ Under extreme usage or temperature
conditions, battery leakage may occur;
liquid may be ejected from the battery: avoid
contact. If liquid comes in contact with your
skin, wash immediately with soap and water,
then neutralize with lemon juice or vinegar.
If liquid gets into your eyes, ush them with
clean water for at least 10 minutes, then seek
immediate medical attention. Following this
rule will reduce the risk of serious personal
injury.
■ Do not dispose of battery packs in re.
They will explode or leak and cause injury.
Liquid ejected from the battery may cause
irritation or burns.
■ Have your tool serviced by a qualied
service centre using only identical
replacement parts. This will ensure that the
safety of the power tool is maintained.
GENERAL SAFETY WARNINGS
CALIFORNIA PROPOSITION 65
WARNING
!
This product and substances that may
become airborne from its use may contain
chemicals, including lead, known to the State
of California to cause cancer, birth defects, or
other reproductive harm.
Wash hands after handling.

5 ― English
SAVE THESE INSTRUCTIONS
SPECIFIC SAFETY WARNINGS
■ Keep all parts of the body away from the
cutter blade. Do not remove cut material
or hold material to be cut when blades are
moving. Make sure the switch is off when
clearing jammed material. Blades coast
after turn off. A moment of inattention while
operating the hedge trimmer may result in
serious personal injury.
■ Carry the hedge trimmer by the handle with
the cutter blade stopped. Proper handling
of the hedge trimmer will reduce possible
personal injury from the cutter blades.
■ Hold the power tool by insulated gripping
surfaces only, because the cutter blade may
contact hidden wiring or its own cord. Cutter
blades contacting a “live” wire may make
exposed metal parts of the power tool “live”
and could give the operator an electric shock.
■
DANGER
- Keep hands away from the
blade. Contact with blade will result in serious
personal injury.
■
WARNING
- Only use with handle and
guard properly assembled to hedge trimmer.
The use of the hedge trimmer without the
proper guard or handle provided may result
in serious personal injury.
■ Use both hands when operating the hedge
trimmer. Using one hand could cause loss of
control and result in serous personal injury.
■ Before starting the hedge trimmer, make
sure the blade is not in contact with any
object.
■ Stop the unit, remove the battery pack.
Make sure the blade has stopped before
setting the unit down.
■ Never cut any material with a diameter
larger than 9/16 in.
■ Always stop the motor when cutting is
delayed or when walking from one cutting
location to another.
■ Keep unit clean of grass clippings and
other materials. They may become lodged in
the cutting blades.
■ If hedge trimmer is equipped with a debris
remover, do not use the debris remover as a
gripping surface.
■ Store the unit inside in a dry place, either
locked up or up high to prevent unqualied
use or damage. Keep out of the reach of
children or untrained individuals.
■ Replace blade cover when unit is not in
use.
■ Never douse or squirt the unit with water or
any other liquid. Keep handles dry, clean, and
free from debris. Clean after each use; see
storage instructions.
■ Secure the unit while transporting.
■ Battery operated units do not have to be
plugged into an electrical outlet; therefore,
they are always in operating condition.
Beware of possible hazards even when unit
is not operating.
■ Remove the battery pack before making
any adjustments, cleaning, storing or
removing material from the unit, or when not
in use.
■ When transporting or storing the hedge
trimmer, always t the cutting device cover.
■ Keep cable away from cutting area. During
operation the cable may be hidden in shrubs
and can be accidentally cut by the blade.
■ Use only with charger listed.
■
Save these
instructions.
Refer to them frequently and use them to
instruct others who may use this tool. If you
loan someone this tool, loan them these
instructions also.

6 ― English
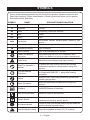
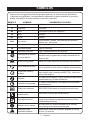
SYMBOL NAME DESIGNATION/EXPLANATION
V
Volts Voltage
A
Amperes Current
Hz
Hertz Frequency (cycles per second)
W
Watt Power
hrs
Hours Time
/min
Per Minute
Revolutions, strokes, surface speed, orbits etc., per
minute
n
o
No Load Speed Rational speed, at no load
Alternating Current Type of current
Direct Current Type or a characteristic of current
Lithium-Ion Battery
Recycling
Designates that this tool is in compliance with
Lithium-Ion battery recycling program requirements
Safety Alert Indicates a potential personal injury hazard.
Read The Operator’s
Manual
To reduce the risk of injury user must read and
understand operator’s manual before using this
product.
Eye and Hearing
Protection
Always wear eye protection with side shields marked
to comply with ANSI Z87.1, along with hearing
protection.
Gloves
Wear non-slip, heavy-duty protective gloves when
handling this product.
Safety Footwear
Wear non-slip safety footwear when using this
product.
Kickback DANGER! Beware of kickback.
Risk of Electrocution DANGER! Risk of electrocution!
Electric Shock
Failure to use in dry conditions and to observe safe
practices can result in electric shock.
No Hands Symbol
Failure to keep your hands away from the blade will
result in serious personal injury.
Keep Bystanders Away Keep all bystanders at least 50' (15 m) away.
SYMBOLS
Some of the following symbols may be used on this product. Please study them and
learn their meaning. Proper interpretation of these symbols will allow you to operate
the product better and safer.

7 ― English
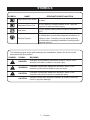
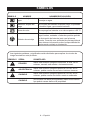
SYMBOLS
SYMBOL NAME DESIGNATION/EXPLANATION
Keep Away From Water
Do not dispose of battery packs in rivers or immerse
in water.
Keep Away From Fire
Do not dispose of battery packs in re. They will
explode or leak and cause injury.
Heat Alert
Do not expose battery packs to heat in excess of
60ºC.
Recycle Symbol
This product uses lithium-ion batteries. Local, state,
or federal laws may prohibit disposal of batteries in
ordinary trash. Consult your local waste authority
for information regarding available recycling and/or
disposal options.
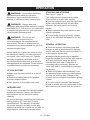
SYMBOL SIGNAL MEANING
DANGER
Indicates an imminently hazardous situation, which, if not
avoided, will result in death or serious injury.
WARNING
Indicates a potentially hazardous situation, which, if not
avoided, could result in death or serious injury.
CAUTION
Indicates a potentially hazardous situation, which, if not
avoided, may result in minor or moderate injury.
CAUTION
(Without Safety Alert Symbol) Indicates a situation that may
result in property damage.
The following signal words and meanings are intended to explain the levels of risk
associated with this product.

8 ― English
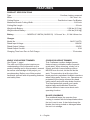
FEATURES
PRODUCT SPECIFICATIONS
Type ................................................................................................ Cordless, battery-powered
Motor .................................................................................................................. 24V max* d.c.
Cutting Device ............................................................................Dual Action Laser Cut Blades
Maximum Branch Cutting Width ................................................................................. 9/16 inch
Cutting Bar Length......................................................................................................... 22 inch
Weight with Battery ........................................................................................ 5.58 lbs (2.53 kg)
Weight without Battery ................................................................................... 4.54 lbs (2.06 kg)
Battery
...........................MODEL #71.98724 (24LB2513) 24V max* d.c., 2.5 Ah Lithium-Ion
Charger
Model No. ........................................................................................................... 24LFC14-ETL
Rated Input Voltage ..................................................................................................... 120VAC
Rated Output Voltage .................................................................................................... 24VDC
Rated Output Current ........................................................................................................ 2.5A
Charging Time from Zero to Full Charge ................................................................. 70 minutes
CORDLESS HEDGE TRIMMER
This Craftsman cordless hedge trimmer
features laser cut blades made of special-
grade steel. When trimming, slowly cut in
a back and forth linear shearing motion.
NEVER force the tool; let the tool do the
work. The protective tip at the top of the
blade prevents unpleasant kickback reactions
when hitting walls, fences, etc. Operators are
protected by the hedge trimmer two-hand
safety switch and quick-stop brake function.
The hand protection guards your hands
against twigs and branches. Read the
sections below to learn more about each
operating function.
BLADE SCABBARD
The scabbard keeps the operator from
coming in contact with the sharp blades when
the tool is not in use. It also helps keep the
blades from being nicked or damaged when
the tool is in storage.
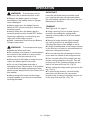
KNOW YOUR HEDGE TRIMMER
See Figure 1, page i
The safe use of this product requires an
understanding of the information on the
product labeling and in this operator’s manual
as well as a knowledge of the project you
are attempting. Before use of this product,
familiarize yourself with all operating features
and safety rules.

9 ― English
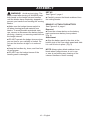
ASSEMBLY
WARNING!
To prevent accidental
starting that could cause serious personal
injury, always remove the battery pack from
the product when assembling parts.
WARNING!
If any parts are damaged
or missing do not operate this product until
the parts are replaced. Use of this product
with damaged or missing parts could result in
serious personal injury.
WARNING!
Do not attempt to modify
this product or create accessories not
recommended for use with this product. Any
such alteration or modication is misuse and
could result in a hazardous condition leading
to possible serious personal injury.
DANGER!
If the hedge trimmer blade
jams or gets caught on an electrical cord or
wires, DO NOT TOUCH THE BLADE FOR
ANY REASON! IT CAN BE ELECTRICALLY
LIVE AND CAUSE SERIOUS OR FATAL
INJURY! Release or drop the trimmer
in the quickest, safest way. If possible,
disconnect the battery from the tool. If
that is not possible, call an electrician,
electrical contractor, or the power company
for assistance. Failure to heed this danger
warning will cause serious personal injury
and possible death.
UNPACKING
This product has been shipped completely
assembled.
■ Carefully remove the product and any
accessories from the box. Make sure that all
items listed in the packing list are included.
WARNING!
Do not use this product
if any parts on the Packing List are already
assembled to your product when you unpack
it. Parts on this list are not assembled to the
product by the manufacturer and require
customer installation. Use of a product that
may have been improperly assembled could
result in serious personal injury.
■ Inspect the product carefully to make sure
no breakage or damage occurred during
shipping.
■ Do not discard the packing material until
you have carefully inspected and satisfactorily
operated the product.
■ If any parts are damaged or missing, do not
operate the product. Return it for replacement
to the retailer from which it was purchased.
151.74935 (KIT) PACKING LIST
24V Cordless Hedge Trimmer
with Blade Scabbard
(1) 24V Max* 2.5 Ah Lithium-Ion Battery
(1) 24V Max* Battery Charger
Operator's Manual
151.74937 (TOOL ONLY) PACKING LIST
24V Cordless Hedge Trimmer
with Blade Scabbard
Operator's Manual

10 ― English
ASSEMBLY
WARNING!
Avoid serious injury: The
blades coast after turning off. ALWAYS keep
both hands on the hedge trimmer handles
until the blades have completely stopped to
prevent your hands from touching the moving
blades.
■ Make sure the hedge trimmer switch is
off when clearing jammed material from
blades. To avoid possible accidental start-
ups, remove or disconnect the battery before
servicing, cleaning, or removing material from
the hedge trimmer.
■ DO NOT operate the hedge trimmer when
you are tired or your visibility is limited. Do
not use the trimmer at night or in reduced
light.
■ Keep the handles dry, clean, and free from
oil and grease.
■ DO NOT use the hedge trimmer if the
handle guard is damaged.
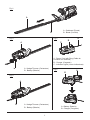
SET UP
See Figure 2, page ii
■
Carefully remove the blade scabbard from
the cutting blades.
REMOVE / ATTACH THE BATTERY
See Figures 3-4, page ii
Removal
■
Press the release button on the battery
pack and remove battery from product.
(Fig. 3)
Attachment
■
Align the battery pack to the slots at the
bottom side of the rear safety guard and slide
it in until it locks in place. (Fig. 4)
NOTE:
Always place blade scabbard over
blade when hedge trimmer is not in use
or user is performing any cleaning of the
trimmer handles or motor housing.

11 ― English
BECOME FAMILIAR WITH THE CHARGER
See Figure 5, page ii
Before attempting to use this charger,
become familiar with all of its operating
features and safety requirements.
CHARGING THE BATTERY PACK
See Figure 6, page ii
BATTERY PACK AND CHARGER
■ Do not use other battery chargers. The
battery charger supplied is specically
designed for the Lithium-Ion battery used in
this garden appliance.
■ Check the main power supply! The voltage
of the power supply must correspond with the
data on the nameplate of the battery charger.
Battery chargers operate on 120V.
■ The battery is equipped with a temperature
monitor that allows charging only within a
temperature range between 23
o
F and 122
o
F.
This ensures an optimum battery service life.
WARNING!
■ If any part of the charger is missing or
damaged, do not operate it! Replace the
charger with a new one. Failure to heed this
warning could result in possible serious injury.
■ Check the voltage! The voltage must
comply with the information on the rating
label.
BATTERY CHARGING PROCEDURE
■ Align the battery pack to the slots on the
charger and slide it in until it locks in place.
■ Connect the charger to the power supply.
■ Allow sufcient charging time (see Product
Specications), and then disconnect the
charger from the power supply.
■ Press the release button on the battery
pack and remove it from the charger.
NOTE:
It is normal for the battery pack and
charger to become warm (but not hot) during
charging process. If the battery does not
charge properly, check to make sure the
electrical outlet is "live".
Always charge the battery before storage!
NOTE:
The battery is supplied partially
charged. To ensure full capacity of the
battery, charge the battery in the battery
charger before using the product for the rst
time. The Lithium-Ion battery can be charged
at any time without reducing its service life.
Interrupting the charging procedure does not
affect the battery.
WARNING!
To reduce risk of re, never
leave the battery connected with the charger
for more than 24 hours!
CHARGER INDICATORS
■
Preparation:
The charging process starts
as soon as the battery charger is plugged
into a power supply socket and the battery is
inserted into the charger.
■ If the battery is not inserted,
a continuous
red light
indicates that the charger is plugged
into a power supply socket and is now ready
to begin charging.
■
Charging: a ashing green LED
on the
charger indicates that the battery is charging
normally.
■
Charged: continuous green LED
on the
charger indicates that the battery is ready for
use.
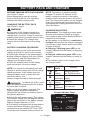
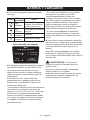
■ The indicator lights on the charger show
the charger status:
SYMBOL
INDICATOR
LIGHTS
STATUS
red,
blinking
charging problem;
see Technical Issue
red,
continuous
connected to power
supply
green,
blinking
charging
green,
continuous
fully charged
Charger Indicator Panel
Connected
To Power
Technical
Issue
(see manual)
Fully
Charged
Charging
24V
Charging Status

12 ― English
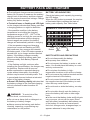
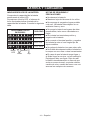
BATTERY LED INDICATORS
Check the battery pack capacity by pressing
the LED button.
When the LED button is pressed, the number
of illuminated lights indicates the state of
battery pack capacity. See Table below.
BATTERY PACK AND CHARGER
SAFETY NOTES AND PRECAUTIONS
■ Do not disassemble the battery.
■ Keep away from children.
■ Do not expose the battery to water or salt
water. You should place the battery in a cool
and dry environment.
■ Do not place the battery in high-
temperature locations, such as re or heater.
■ Do not reverse the positive terminal and the
negative terminal of the battery.
■ Do not connect the positive terminal and
the negative terminal of the battery to each
other with any metal objects.
■ Do not knock or strike the battery, nor step
on it.
■ Do not solder directly onto the battery or
pierce the battery with nails or other edge
tools.
■ In the event that battery leaks and uid gets
into your eyes, do not rub the eyes. Rinse
well with water. Immediately discontinue use
of the battery if it emits an unusual smell,
feels hot, changes color, changes shape, or
appears abnormal in any other way.
■ The intelligent charger ensures maximum
battery life, because it measures the existing
charge level of the battery and then charges
with the required current and voltage. Charge
battery fully before storage.
■
Technical Issue: a flashing red LED light
on the charger indicates that battery pack has
a charging problem or might be defective.
- One possible condition is the battery
temperature is not within the charging
temperature range of 23
o
F - 122
o
F or the
charging current is too high. As soon as the
permitted temperature and the charging
current ranges are reached, the battery
charger will automatically switch to charging.
- If the temperature range and charging
current are correct and flashing red LED
light continues, then remove and reinstall
the battery pack. If the LED status repeats a
second time, try to charge another identical
battery. If the battery charges normally,
dispose of the defective battery pack (see
Environmentally Safe Battery Disposal
section).
- If the flashing red light continues after
installing the second battery, the charger may
be defective. Replace with a new one.
■ After continuous or repeated charging
cycles without interruption, the charger
surface may become noticeably warm. This
is normal and does not indicate a technical
defect of the battery charger.
■
Green LED flashing rapidly
indicates that
the battery voltage is low, and that charging
will only continue for about another 30
minutes.
WARNING!
To avoid risk of re,
electric shock, or electrocution
:
■ Do not use a damp cloth or detergent on
the battery or battery charger.
■ Always remove the battery pack before
cleaning, inspecting, or performing any
maintenance on the product.
NUMBER of LIGHTED LEDs CAPACITY
0%-25%
25%-50%
50%-75%
75%-100%
LED
Button
green
yellow
red

13 ― English
OPERATION
WARNING!
Do not allow familiarity
with products to make you careless.
Remember that a careless fraction of a
second is sufcient to inict serious injury.
WARNING!
Always wear eye
protection with side shields marked to comply
with ANSI Z87.1. Failure to do so could result
in objects being thrown into your eyes and
other possible serious injuries.
WARNING!
Do not use any
attachments or accessories not
recommended by the manufacturer of
this product. The use of attachments or
accessories not recommended can result in
serious personal injury.
STARTING AND STOPPING
See Figure 7, page iii
This hedge trimmer features a two-hand
power switch to ensure safe starting.
■ Hold the hedge trimmer with the right hand
at the rear handle and with the left hand,
squeeze the safety switch on the front
handle.
■ Slowly squeeze the power switch to start
trimmer operation.
■ To turn hedge trimmer off simply release
either of the switches and power to unit will
stop.
GENERAL OPERATION
■ Check the product, its battery pack and
charger as well as accessories for damage
before each use. Do not use the product if it
is damaged or shows wear.
■ Always hold the product by its handles.
Keep the handles dry to ensure safe support.
■ Ensure that the air vents are always
unobstructed and clear. Clean them if
necessary with a soft brush. Blocked air
vents may lead to overheating and damage
the product.
■ Switch the product off immediately if you
are disturbed while working by other people
entering the working area. Always let the
product come to complete stop before putting
it down.
■ Do not overwork yourself. Take regular
breaks to ensure you can concentrate on the
work and have full control over the product.
Before each use, inspect the entire product
for damaged, missing, or loose parts such
as screws, nuts, bolts, caps, etc. Tighten
securely all fasteners and caps and do
not operate this product until all missing or
damaged parts are replaced. Please contact
a qualied service center for assistance.
ATTACH BATTERY
■ Make sure the power switch is in the off
position.
■ Attach the battery pack to the product.
Ensure it snaps in place.
■ Your product is now ready to be used.
INTENDED USE
The product is intended for trimming hedges,
bushes and shrubs. Observe the Product
Specications for the maximum cutting
capacity.
Do not cut branches exceeding the maximum
cutting width of 9/16 inch (see Product
Specications). This product is intended
for private domestic use only, not for any
commercial trade use. It must not be used for
any purposes other than those described.

14 ― English
OPERATION
IMPORTANT!
Lubricate the blade before and after each
use. Ignoring this step will decrease blade
life and hamper operation (See the Care and
Maintenance Section).
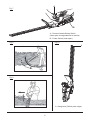
TRIMMING
See Figures 8-10, page iii
■ Using a pruning tool to cut and remove
branches exceeding the cutting width
capacity of this product of 9/16 inch before
operation.
■ Move the hedge trimmer lightly through
the cutting surface in a sweeping motion
following the shape of the hedge or shrub.
■ A slight tilt downwards of the hedge trimmer
in the direction of motion is recommended for
optimum cutting performance.
■ Do not rush and do not attempt to cut too
much with one stroke of the hedge trimmer.
■ First cut both sides of the hedge from the
bottom cutting upwards to the top. This will
prevent any of the trimmings falling into the
path of the area still to be cut. (Fig. 8)
■ After cutting the hedge sides proceed to the
top. (Fig. 9)
■ To store hedge trimmer, remove battery
pack from unit and use the convenient
protective tip to hang your hedge trimmer out
of the way until next use. (Fig. 10)
WARNING!
To avoid injury and to
reduce the risk of electrical shock or re:
■ Replace the battery pack or charger
immediately if the battery case or charger
cord is damaged.
■ Always make sure the hedge trimmer
switch is OFF before inserting or removing
the battery pack.
■ Always make sure the battery pack is
removed and the switch turned OFF, before
inspecting, adjusting, or maintaining any
other part of the hedge trimmer.
■ Read, understand, and follow the Battery
Charger instructions.
WARNING!
To avoid personal injury:
■ Handle the blade with care.
■ Do not place your ngers or hand between
the notches in the blade or in any position
where they could get pinched or cut.
■ Never service the blade or hedge trimmer
unless the battery pack is removed.
■ Do not use if the blade assembly is
damaged or bent. Take trimmer to a qualied
service dealer for blade replacement using
identical parts as specied in the Parts List of
this manual.
■ Always keep both hands on the hedge
trimmer handles to prevent your hand from
touching the blade.

15 ― English
CARE AND MAINTENANCE
WARNING!
Do not at any time let
brake uids, gasoline, petroleum-based
products, penetrating oils, etc., come in
contact with plastic parts. Chemicals can
damage, weaken or destroy plastic which
may result in serious personal injury.
WARNING!
When servicing, use only
identical replacement parts. Use of any other
parts may create a hazard or cause product
damage.
WARNING!
Always wear eye
protection with side shields marked to
comply with ANSI Z87.1, along with hearing
protection. Failure to do so could result in
objects being thrown into your eyes resulting
in possible serious injuries.
WARNING!
To avoid serious personal
injury, always remove the battery pack from
the tool when cleaning or performing any
maintenance.
WARNING!
Wear safety gloves when
working on the cutting device and close to it!
Use appropriate tools to remove debris e.g. a
brush or wooden stick! Never use your bare
hands!
GENERAL MAINTENANCE
Before each use, inspect the entire product
for damaged, missing, or loose parts such
as screws, nuts, bolts, caps, etc. Tighten
securely all fasteners and caps and do
not operate this product until all missing or
damaged parts are replaced. Please contact
a qualied service center for assistance.
Avoid using solvents when cleaning plastic
parts. Most plastics are susceptible to
damage from various types of commercial
solvents and may be damaged by their use.
Use clean cloths to remove dirt, dust, oil,
grease, etc.
CLEANING THE BLADE
■ Keep the cutting blades clean and free of
debris.
NOTE:
Remove battery before performing
any maintenance.
■ Use a brush or high pressure air (max.
3 bar) to remove debris from the blades.
■ With gloves on, clean the blades with a dry
cloth to remove loose material.
■ Apply a small amount of light machine oil
to the edge of the top blade to retain good
cutting performance. See Lubricating The
Blade.
■ Keep the cutting blades sharp. Have
heavily worn or damaged blades replaced
with identical parts by a qualied service
dealer.
■ Adjustment of the distance between blades
is not necessary, as this is predetermined by
the manufacturer.
BATTERY PACK
■ Store the battery pack fully charged.
■ Recharge the battery pack whenever there
is a noticeable reduction in the performance.
Do not allow the battery pack to become
completely discharged.
■ Do not recharge a battery pack that is
already fully charged. Overcharging shortens
battery life.
■ Once the battery pack is fully charged,
remove the battery from the charger and
disconnect the charger from the outlet.
■ Do not store the battery pack on the tool or
in the charger.
■ Recharge the battery at a temperature
between 23
o
F and 122
o
F. If the battery pack
is hot, allow it to cool down before recharging.

16 ― English
CARE AND MAINTENANCE
WARNING!
Always allow the blades
of the hedge trimmer to come to a stop and
remove the battery pack before lubricating.
Failure to do so could result in accidental
starting causing possible serious personal
injury.
For easier operation and longer blade life,
lubricate the hedge trimmer blade before and
after each use.
■ Remove the battery pack from the hedge
trimmer.
■ Lay the hedge trimmer on a at surface.
Apply light weight machine oil along the edge
of the top blade.
NOTE:
If you will be using the hedge trimmer
for an extended time, it is advisable to oil the
blade periodically.
■ Stop the hedge trimmer.
■ Remove the battery pack.
■ Lubricate the hedge trimmer as described
above.
■ Reinstall the battery pack and resume use.
LUBRICATING THE BLADE
CLEAN THE HEDGE TRIMMER
■ Remove the battery pack.
■ Slide the scabbard over the blade.
■ Clean dirt and debris from the body of the
hedge trimmer, using a damp cloth with a
mild detergent.
NOTE:
Do not use any strong detergents on
the plastic housing or the handles. They can
be damaged by certain aromatic oils such
as pine and lemon, and by solvents such as
kerosene.
■ Moisture can cause a shock hazard. Wipe
off any moisture with a soft dry cloth.
■ Use a small brush or the air discharge of
a small vacuum cleaner brush to clear dust
or debris from the air vents on the motor
housing.
TRANSPORTING AND STORING
■ Always place the scabbard on the blade
before storing or transporting the hedge
trimmer. Use caution to avoid the sharp teeth
of the blade.
■ Clean the hedge trimmer thoroughly before
storing. Store the hedge trimmer indoors, in a
dry, well-ventilated place that is inaccessible
to children. Keep away from corrosive agents
such as garden chemicals and de-icing salts.
CHARGER MAINTENANCE
■ Keep the charger clean and clear of
debris. Do not allow foreign material into the
recessed cavity or on the contacts. Wipe with
a dry cloth. Do not use solvents, water, or
place in wet conditions.
■ Always unplug the charger when there is no
battery pack in it.
■ Keep the charger stored in normal room
temperature. Do not store it in excessive
heat. Do not use in direct sunlight.

17 ― English
ENVIRONMENTALLY SAFE BATTERY DISPOSAL
To avoid injury and risk of re, explosion, or
electric shock, and to avoid damage to the
environment:
■ Cover the battery terminals with heavy-duty
adhesive tape.
■ DO NOT attempt to remove or destroy any
of the battery pack components.
■ DO NOT attempt to open the battery pack.
■ If a leak develops, the released electrolytes
are corrosive and toxic. DO NOT get the
solution in the eyes or on skin, and do not
swallow it.
■ DO NOT place these batteries in your
regular household trash.
■ DO NOT incinerate.
■ DO NOT place batteries where they will
become part of any waste landll or municipal
solid waste stream.
■ Take batteries to a certied recycling or
disposal center.
WARNING!
All toxic materials must be
disposed of in a specied manner to prevent
contamination of the environment. Before
disposing of damaged or worn out Lithium-
Ion battery packs, contact your local waste
disposal agency, or the local Environmental
Protection Agency for information and specic
instructions.
WARNING!
If the battery pack cracks
or breaks, with or without leaks, do not
recharge it and do not use. Dispose of it and
replace with a new battery pack.
DO NOT ATTEMPT TO REPAIR IT!
The following toxic and corrosive
materials are in the batteries used in this
battery pack:
Lithium-Ion, a toxic material
.
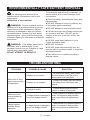
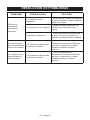
TROUBLESHOOTING
PROBLEM POSSIBLE CAUSE SOLUTION
Motor fails to start
when power switch
is depressed.
1. Battery is not secure.
1. To secure the battery pack, make
sure the latches on the top of the
battery pack snap into place.
2. Battery is not charged.
2. Charge the battery pack according
to the instructions included in this
manual.
3. Defective switch
3. If within warranty period return
product to retailer of purchase.
Motor runs, but
cutting blades do
not move.
1. Hedge trimmer is damaged.
Do not use hedge trimmer.
1. Take trimmer to a qualied service
dealer for inspection and possible
repair using identical replacement
parts.
Hedge trimmer
smokes during
operation.
1. Hedge trimmer is damaged.
Do not use hedge trimmer.
1. Take trimmer to a qualied service
dealer for inspection and possible
repair using identical replacement
parts.

18 ― English
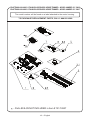
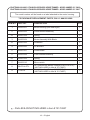
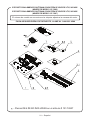
CRAFTSMAN 24V MAX* LITHIUM-ION CORDLESS HEDGE TRIMMER – MODEL NUMBER 151.74935
CRAFTSMAN 24V MAX* LITHIUM-ION CORDLESS HEDGE TRIMMER – MODEL NUMBER 151.74937
*
-
Parts #8 & #9 NOT INCLUDED in item # 151.74937
TO PURCHASE REPLACEMENT PARTS, CALL 1-888-331-4569
The model number will be found on a label attached to the motor housing.

19 ― English
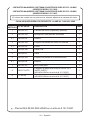
*
-
Parts #8 & #9 NOT INCLUDED in item # 151.74937
ITEM NO. PART NO. DESCRIPTION QTY
1 241003101 Motor Housing (Left And Right) 1
2 241003102 Power Switch Assembly 1
2.1 241001104 Spring 1
3 241003104 Motor Assembly With Blade 1
3.1 241001102 Scabbard 1
4 241003106 PCB Board 1
5 241001107 Press Board 1
6 241003108 Front Handle Assembly 1
6.1 241001104 Spring 1
7 241003110 Micro-switch 1
8 24LFC14-ETL
24V Lithium-Ion Battery Charger (24LFC14-ETL) *
(NOT INCLUDED in item # 151.74937)
1
9 71.98724
24V Lithium-Ion Battery (24LB2513) *
(NOT INCLUDED in item # 151.74937)
1
CRAFTSMAN 24V MAX* LITHIUM-ION CORDLESS HEDGE TRIMMER – MODEL NUMBER 151.74935
CRAFTSMAN 24V MAX* LITHIUM-ION CORDLESS HEDGE TRIMMER – MODEL NUMBER 151.74937
TO PURCHASE REPLACEMENT PARTS, CALL 1-888-331-4569
The model number will be found on a label attached to the motor housing.

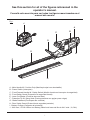
A - Main Handle W / Cushion Grip (Manilla principal con almohadilla)
B - Power Switch (Interruptor)
C - Front Pommel Handle W / Safety Switch (Manilla frontal con interruptor de seguridad)
D - Front Safety Guard (Protección de seguridad frontal)
E - Laser Cut Blades (Cuchillas de corte láser)
F - Protective Tip W / Hang Hole (Punta protectora con agujero para colgar)
G - Blade Scabbard (Funda para las cuchillas)
H - Rear Safety Guard (Protección de seguridad posterior)
I - Battery Charger (Cargador de la batería)
J - 24V max*, 2.5 Ah Lithium-Ion Battery (Batería de iones de litio de 24 V máx.*, 2,5 Ah)
J
I
D
C
B
A
G
H
E
F
Fig. 1
See this section for all of the figures referenced in the
operator’s manual.
Consulte esta sección para ver todas las figuras mencionadas en el
manual del usuario.
i
Page is loading ...
Page is loading ...
Page is loading ...
Page is loading ...
Page is loading ...
Page is loading ...
Page is loading ...
Page is loading ...
Page is loading ...
Page is loading ...
Page is loading ...
Page is loading ...
Page is loading ...
Page is loading ...
Page is loading ...
Page is loading ...
Page is loading ...
Page is loading ...
Page is loading ...
Page is loading ...
Page is loading ...
Page is loading ...
Page is loading ...
-
 1
1
-
 2
2
-
 3
3
-
 4
4
-
 5
5
-
 6
6
-
 7
7
-
 8
8
-
 9
9
-
 10
10
-
 11
11
-
 12
12
-
 13
13
-
 14
14
-
 15
15
-
 16
16
-
 17
17
-
 18
18
-
 19
19
-
 20
20
-
 21
21
-
 22
22
-
 23
23
-
 24
24
-
 25
25
-
 26
26
-
 27
27
-
 28
28
-
 29
29
-
 30
30
-
 31
31
-
 32
32
-
 33
33
-
 34
34
-
 35
35
-
 36
36
-
 37
37
-
 38
38
-
 39
39
-
 40
40
-
 41
41
-
 42
42
-
 43
43


Craftsman 74935 User manual
- Category
- Cordless hedge trimmers
- Type
- User manual
- This manual is also suitable for
Ask a question and I''ll find the answer in the document
Finding information in a document is now easier with AI
in other languages
- español: Craftsman 74935 Manual de usuario
Related papers
-
Craftsman CMCHTS860E1 Operating instructions
-
Craftsman CMCPHT818D1 Owner's manual
-
-
-
-
-
-
-
-
Other documents
-
Ryobi P2680 User manual
-
-
Ryobi RY40601 User manual
-
Alpina Garden H5648Li Operating instructions
-
EGO HTX7500 User manual
-
 Lawnmaster CLHT2422 User guide
-
-
Black & Decker LHT2436 User manual
-
-
