Page is loading ...


2
Contents
Getting Started
Installing the Swann Security App 4
Creating your Swann Security Account 5
Pairing the Device 6
Scanning the QR Code 7
About the App Interface
App Navigation 9
App Menu 10
Modes Tab 11
12
13
14
Live View Tab 15
Single View Mode 16
Single View Mode: Pan and Tilt / Tracker Panel 17
Live View Tab Settings 18
Playback Tab 19
Video Playback Screen 20
Device Management
Managing Your Devices 22
Device Information & Settings Overview 23
Camera Settings 26
Motion Settings 27
Motion Detection Mask 28
Face Recognition 29
Advanced Settings 30
Appendix
32
Changing the Camera's Wi-Fi Network 33
Factory Resetting the Camera 34
Turning Off the Camera 36
FAQs: General 37
FAQs: Wi-Fi Cameras 38
Troubleshooting: Pairing Errors 40

Getting Started

4
INSTALLING THE SWANN SECURITY APP
Search and download the latest version of the Swann Security app
using the Google Play® store app on your phone.
After the Swann Security app is installed on your phone,
the Swann Security app icon appears on the Home or Apps screen.
To open the Swann Security app, tap the app icon.
Swann Security

5
CREATING YOUR SWANN SECURITY ACCOUNT
Open the Swann Security app and tap Not
yet registered? Sign Up.
Review your details, read the Terms of
Service, and select the checkbox to agree
to the Terms of Service.
Tap the Register button to create your
Swann Security account.
the password. This will be the email address
and password you use to sign into the
Swann Security app and on any other phone.
Tap the Next button to continue.
Go to your email inbox and open the link in
checking the Junk/Spam folder.
Tap the Done button to return to the Sign In
screen.
Your address is automatically set based on
your phone's current location.
If the location is not accurate or if your
phone's Location (GPS) setting is not turned
on, tap to enter your address manually.
Your device location helps us personalize
your experience on the Swann Security app
and other Swann services.
Tap the Next button to continue.
sign into the app with your Swann Security
account email address and password.
The Remember Me option allows you to
save your login credentials so you don't have
to sign in every time you open the app.

6
you can add subsequent Swann devices via:
• the Pair Device menu option in the app
menu, or
• the button in the Devices tab.
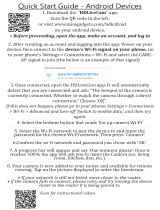
PAIRING THE DEVICE
launched, tap the Pair Device button that is displayed.
Then follow the in-app instructions to connect your device
to your home Wi-Fi network and link it to your Swann
Security account. Once the pairing process is complete,
your device will be displayed on the Live View tab.
Note:
• If you need help with the device's QR code, see
"Scanning the QR Code" on page 7.
• Your phone's Location (GPS) setting should be
switched on as the app requires this permission
temporarily to detect wireless networks during the
pairing process.
•
the device's location, select
the app (older devices, tap Allow) to enable the Wi-Fi
connection from the phone to the Swann camera to
work. If you deny location access, the app will not be
able to detect and display the Wi-Fi access point on
the "Preferred Wi-Fi
•
App Menu Devices tab

7
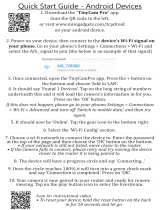
SCANNING THE QR CODE
During the pairing process, you'll need to scan the device's QR code which can be generally found on the top, bottom, or
If your phone can’t scan the QR code
• You can tap the Manual Pair button at the bottom of the QR code scanning screen, select the device you want to
pair from the product menu, and type in the device's ID/MAC (consists of 12 alphanumeric characters) is listed on a
sticker located on the back, bottom or base of the device, as shown below
S/N:89052081900001
ID:990a1af6da5a
ID:990a1af6da5a
S/N:89052081900001
ID:990a1af6da5a
S/N:89052081900001
ID:990a1af6da5a
Note: If the device was previously migrated from the SAFE by Swann app, check your inbox for an email from Swann
Security with the subject "Important - Save this QR Code for your camera". This email will contain the camera's QR code
which you can scan with your phone.

About the App Interface

9
Notications Tab: Tap to get a detailed reporting of the current day and past week's device and system activities.
also manage the Do Not Disturb feature. This is useful when you don't want to be disturbed at certain times. For more
information, see "Notications Tab: Activities" on page 13 and "Notications Tab: Notications" on page 14.
Modes Tab:
"Modes Tab" on page 11.
App Menu:
manual, and more. See "App Menu" on page 10.
Tip: At some point, you'll see a prompt to rate
the app, just follow the prompt, if you want to
rate and review the Swann Security App via the
Google Play Store.
Current Mode: Indicates the mode that your devices are currently operating in. Tap "Change" to display the Modes
panel which will enable you to quickly change the mode. Changing the mode will change how your devices respond
to motion or sound events, depending on the settings that have been applied for that particular mode. You can adjust
settings for each mode by tapping the Edit Modes icon in the Modes panel.
Playback Tab: Tap to access and playback the event recordings from your devices. For more information, see
"Playback Tab" on page 19.
Live View Tab: Tap to view live video feed from all your connected devices in multi-view screen as well as in single-view
where you can operate various camera functions. For more information, see "Live View Tab" on page 15 and "Single
View Mode" on page 16.
Devices Tab: Tap to view and manage settings for your devices as well as check device status and perform general
"Device Management" on page 21.
3
6
1
2
4
5
7
APP NAVIGATION
3
1
2
4 5 6 7
Home mode
The highlighted mode icon with a red
bubble indicates the current active mode
and the number of devices.
Modes panel
Modes panel icons
During mode change, the orange bubble
indicates the number of remaining
devices transitioning from the previous
mode to the activated mode.
Adjust settings for the modes.
For each mode, you can customize
each individual camera's motion/
sound detection settings (device-
dependent) and whether to receive push
Night mode
Away mode

10
APP MENU
Add and manage the Secure+ plan subscriptions for your Swann Security devices.
"Updating Your Swann Security
Account Prole" on page 32.
Pair a new Swann device to your Swann Security account or re-pair an existing Swann device (for example, after the
device has been factory reset).
View and manage camera recordings captured via liveview mode as well as the event clips that were downloaded to
your phone.
Pair a new Swann device to your Swann Security account or re-pair an existing Swann device after factory reset.
(Selected DVR/NVR models only) Link your Dropbox account to your Swann Security account which will enable you
to save recordings using Dropbox as an external cloud storage. Refer to your DVR/NVR's instruction manual for more
information on activating the Dropbox feature.
Swann Security system.
Open the Swann Support Center website to obtain technical support for your Swann Security account and devices.
Sign out of the Swann Security app.
2
3
4
6
7
5
8
9
10
1
1
2
3
4
5
6
7
8
9
10

11
Modes panel. The mode that is currently active is highlighted in blue. You can change the mode by tapping the
icon of the mode you'd like to change to. Changing the mode will change how your devices respond to motion
to accommodate your household security needs. See below for more information about the icons in the Modes
panel.
Tap to display a popup window providing general description about the mode that is currently active which is
the mode icon highlighted in blue.
2
1
1
MODES TAB
Home mode
During mode change, the orange bubble indicates
the number of remaining devices transitioning
from the previous mode to the activated mode.
Tap the pencil icon of the mode for which you
want to adjust settings. For each mode (Home,
Night, Away), you can independently customize
each individual camera's motion/sound detection
settings (device-dependent) and whether to receive
"Modes Tab: Mode Conguration" on page 12.
Night mode
Away mode
The highlighted icon with red bubble indicates
current active mode and the number of devices
2

12
MODES TAB: MODE CONFIGURATION
Note: The settings available depend on the capability of the paired device.
Choose whether to receive "Motion Alert" push
Choose whether to receive "Motion Detection" push
Choose whether to trigger the siren (must have a
paired siren) when activity is detected in this mode.
Choose the device's Sound Detection Sensitivity
level in this mode.
Choose whether to receive "Sound Detection" push
Choose whether to receive "Visitor Alert" push
without saving any changes.
Tap to save changes made to the mode and return
to the Modes screen.
Note: New settings for the mode currently active
will take effect only on the next mode change. For
example, if Swann Security is currently in Home
mode and you make changes to the Home mode
current (Home) mode to a different mode (Night
or Away) and then back to Home mode so the new
Home mode settings can take effect.
The "Trigger all sirens" option is available
only if you have an add-on siren paired to
your Swann Security account.
the mode is highlighted, this indicates it is the
current active mode. Tap to close the Mode
and return to the Modes screen.
Choose the device's Motion Detection Sensitivity
level in this mode.
Choose whether to receive "Contact Opened" push
Choose whether to receive "Contact Closed" push
3
4
5
6
7
11
12
1 9
10
8
2
1
2
5
3
4
6
11 12
7
8
9
10

13
NOTIFICATIONS TAB: ACTIVITIES
• The Today chart shows the hourly number
of detection and system events for the
current day.
• Red bars represent detection events such
as motion, ring, person, pet, vehicle, and
package detection events. Detection
of package, pet, and vehicle requires a
Secure+ plan subscription and is available
only for certain Wi-Fi camera models. For
more details about the Secure+ plans, go
to App Menu > Secure+ Plans.
• Light grey bars represent system events
such as mode change, device battery low,
• The Past Week chart shows the daily
number of detection and system events
for the last 7 days (from current day).
• Red bars represent detection events such
as motion, ring, person, pet, vehicle, and
package detection events. Detection
of package, pet, and vehicle requires a
Secure+ plan subscription and is available
only for certain Wi-Fi camera models. For
more details about the Secure+ plans, go
to App Menu > Secure+ Plans.
• Light grey bars represent system events
such as mode change, device battery low,
• The Today Summary shows the
cumulative number of various detection
and system events and the total activities
(detection and system events combined)
for the current day.
•
number) to view a detailed timeline that
shows when today's events were detected
by your device/system along with a chart
of the hourly number of detections.
• If a recording associated with the event is
available, you can tap to directly open
the Playback tab screen to view the clip.
• The Past Week Summary shows the
cumulative number of various detection
and system events and the total activities
(detection and system events combined)
for the last 7 days (from the current day).
•
number) to view a detailed timeline that
shows when events in the past week were
detected by your device/system along with
a chart of the daily number of detections.
• If a recording associated with the event is
available, you can tap to directly open
the Playback tab screen to view the clip.
the frequency of particular event types, or when mode changes were performed. With this data on hand, it becomes easy to make
adjustments to device-related detection sensitivity and mode settings where they are needed to improve the overall performance of
your Swann Security security system.

14
by date and time with most recent on top.
•
• Conrm on the Clear Event
Note: If "Do Not Disturb
If Do Not Disturb
1
3
2
NOTIFICATIONS TAB: NOTIFICATIONS
1
2
3

15
If you have more than two devices, you can toggle the layout of device tiles in the viewing area between list and
two-column grid views.
according to your preferences. For more information, see "Live View Tab Settings" on page 18.
The device name. You can rename the device via the device's Settings screen.
Tap the tile to display live view of the selected camera in single view mode and access additional camera options
(device-dependent) such as quick snapshots/clips, 2-way talk, pan and tilt controls, spotlight, siren, and more.
For more information, see "Single View Mode" on page 16.
will appear in
the bottom of the camera tile. Tap , then tap Check for updates on the Settings
screen and tap the Update
(Sensor/Siren only) Shows when the last activity occurred. Device tile will also temporarily change
its status (blue to red background) when there has been a recent activity.
(Siren only) You can manually activate the siren. Tap the Siren tile, then slide the Siren toggle to
the ON position and tap the SET button, as shown on the right.
Tap to refresh the live video feed if the Wi-Fi camera has stopped streaming.
If the camera has completely lost connection to the app (due to connection timeout,
device sleeping, Wi-Fi/Network issues, etc), the camera tile will be displayed as shown
on the right. Tap to re-establish the camera connection.
Note:
to the camera off for 10 seconds before turning it back on and then restarting the app.
You might also want to make sure that your internet connection is working properly.
You can try rebooting your Wi-Fi router to resolve any network connectivity issue.
LIVE VIEW TAB
2
3
5
6
7
8
4
1
21
3
6
8
4
5
7

16
SINGLE VIEW MODE
cameras. See table below for descriptions of the available camera functions.
Toggle between different aspect ratios — Match (match the camera's aspect ratio), 16:9, 4:3, Stretch
the entire video window available).
(DVR/NVR only) Tap to select your preferred live video quality. The HD quality setting will display the clearest and
sharpest video possible, but the bandwidth required to stream video will be much higher and you'll need high-speed
internet on both ends of the connection. Lower video quality settings use less bandwidth to stream video and may
result in a smoother experience (recommended for slow cellullar/internet speed, limited data allowance).
The camera's live video window.
•
back to zoom out.
• You can turn your phone sideways to view the video window in landscape (fullscreen) mode.
1
1
1
1
2
3
4
1
1
Icon Description
Display the pan and tilt/tracker panel which will allow you to control the view of the camera. See next page for more details.
Take a snapshot with the camera. The snapshot is saved to your phone. Open your phone's Gallery or Photo app to view
the snapshot.
view your manual video recordings via App Menu > Recordings > Live Recordings.
Activate or deactivate the camera's 2-way talk mode When activated, press and hold the PTT (Push to Talk)button to talk.
Release the PTT button to listen.
Turn on or off the camera's built-in siren.
Tap to go directly to the camera's Settings screen.
2
3 4
The SwannBuddy Video
Doorbell has a smart "Pre-
recorded Messages" feature
available. Tap this icon to
display the list of pre-recorded
messages which you can
quickly choose to play as a
response to visitors when you
can't answer the door.

17
1
2
5
3 4
Drag the grey box in the desired direction within the control area to pan and tilt the camera.
If your camera has the auto-tracking feature, you can drag the grey box around to manually zoom in on a
particular area.
Tap to enable/disable Privacy mode. In Privacy mode, the camera will automatically rotate to a discreet position
which you can set by tapping the Pencil icon, and temporarily turn off the motion sensor (so no recordings
will be captured) to protect your privacy. When enabled, the Privacy mode icon will be highlighted.
Tap to set where the view of the camera should be positioned when Privacy mode is enabled.
Tap to auto-rotate the camera and scan the scene once.
• To create the initial camera preset position, move the camera to the desired position using the 1 grey box,
then tap the button and give the preset a name in the box that pops up, as shown above.
• Additional presets can be created by tapping the Mark icon once the initial preset has been created.
• Existing presets can be managed by tapping the Mark icon.
• You can create a maximum of 5 preset positions for your Pan and Tilt camera.
• You can quickly change the position of the camera by tapping the icon of the saved preset.
2
3
4
5
1
SINGLE VIEW MODE: PAN AND TILT / TRACKER PANEL

18
LIVE VIEW TAB SETTINGS
You can hide camera tiles from being displayed on the Live View tab. For example, if you want live video from
To hide a camera tile, uncheck the "Show live view from this camera" box.
To unhide a camera tile, check the "Show live view from this camera" box.
(DVR/NVR only) Uncheck the "Show live view from DVR" box to hide all DVR/NVR channel tiles from the Live
View tab. To unhide all DVR/NVR channel tiles, check the "Show live view from DVR" box
(DVR/NVR only) Hide
ofine channelsHide ofine channels" box.
Tap to rearrange the order of camera tiles on the Live View tab.
Press and hold the icon of the selected camera, then drag it
to a new position. The camera already in the position will slide
over to the next position.
Camera tile positions in grid and list views on the Live View tab
are arranged in the following order, as shown on the right.
Note: You cannot arrange the order of DVR/NVR channels.
They are always arranged in sequential order according to the
channel number (1, 2, 3, 4, etc).
(Battery-powered cameras only) By default when the app is launched, the camera
will automatically wake up from sleep and stream live video. If you want to save
battery life between charges, you can uncheck the "Automatically wake this camera"
box. You will need to tap on the camera tile to manually wake the camera and
start the live video stream, as shown on the right.
3
4
5
6
2
1
1
2
3
4
6
5
Position 1
Position 2
Position 3
Position 4
Position 5
Position 6
Position 1 Position 1
Position 2
Position 3
Position 4
Position 3
Position 5
Position 7
Grid View
Live View tab Live View tab
List View
Position 2
Position 4
Position 6
Position 8

19
PLAYBACK TAB
By default, the Playback tab displays a list of today's event recordings from all of your devices (except Wi-Fi cameras
that only record to the local microSD storage, see note below). You can manually refresh Today's event history by
pulling down on the screen. To view events that were captured on a different date, either scroll left or right to select a
date or tap the Calendar icon at the bottom right to specify a date.
Note:
• For Wi-Fi cameras that only record to the local microSD storage, tap the Camera button in the bottom right
of the Playback tab (see screenshot above on the right) to go to the camera's local Storage screen to view and
playback event recordings directly from the camera's microSD card.
• For Wi-Fi cameras with cloud storage, event recordings displayed on the Playback tab will be available for the
cloud storage subscription plans available for your cameras, go to App Menu > Secure+ Plans.
Shows the camera name (or channel number) and the start time of the event recording. For Wi-Fi camera events,
a thumbnail of the event is also displayed. Tap the event to open a window where you can view and download the
recording. See "Video Playback Screen" on page 20.
Tap to go to the Live Recordings/Saved Recordings screen. Live recordings are clips that were manually recorded
during Single Camera View Mode. Saved recordings are clips that were downloaded to your phone.
(Wi-Fi cameras with cloud storage only) Tap to delete the event from the event history and the cloud storage.
Displays the length of the recorded event clip.
2
3
6
5
4
1
2
43
1
DVR/NVR EVENT HISTORY (NO THUMBNAILS) WI-FI CAMERA EVENT HISTORY (HAS THUMBNAILS)
type (Mainstream or Substream). If no events were retrieved from your
"Substream" only, select the "Substream" option, as shown on the right.
6
5

20
VIDEO PLAYBACK SCREEN
Tap to go back to the Playback tab.
Tap to capture a snapshot. Open your phone's Gallery or Photo app to view the snapshot.
(DVR/NVR only) Tap to toggle between video quality settings. Default is SD. Using a lower video quality setting
will load the video clip faster and ensure smoother playback.
Tap to download the video clip to your phone. You can view the downloaded video clip via the App Menu >
Recordings > Saved Playbacks
phone's native video player).
Tap to share the video clip of the event with friends and family via popular email/messaging apps installed on
your phone.
Video playback controls. You can pause/play, rewind, forward, and enlarge (fullscreen) the video.
4
5
6
1
3
2
5432
1
6
/