Page is loading ...


Congratulations on your new quality Love N Care product from our exclusive range of baby
products. This exceptional design combines the most unique features that any baby product offers.
We are confident that you will appreciate its many highlights including its reliability and durability.
Your new product has been manufactured to comply with the Highest Quality Standards and comes
with a 12 month warranty.
As you will soon learn there are many more great features about your new Love N Care product.
IMPORTANT:
READ THESE INSTRUCTIONS IN DETAIL & KEEP THEM FOR FUTURE REFERENCE. YOUR
CHILD’S SAFETY MAY BE AFFECTED IF YOU DON’T FOLLOW THESE INSTRUCTIONS.
THE CORRECT USE AND MAINTENANCE OF THIS PRODUCT IS ESSENTIAL. ENSURE YOUR
BASSINET IS CORRECTLY ASSEMBLED BEFORE USE. FAMILIARISE YOURSELF WITH THE
SAFE BABY SLEEPING RULES CONCERNING LOOSE BLANKETS, PILLOWS, TOYS ETC.
NEVER USE ANYTHING OTHER THAN BASSINET MANCHESTER INSIDE THIS BASSINET.
SUDDEN INFANT DEATH SYNDROME HAS BEEN ASSOCIATED WITH SUFFOCATION DUE
TO LOOSE MATERIALS IN THE CRIB.
WARNINGS: - Safety At Home
Do not allow children to stand in the bassinet.
Do not set anything on the hood of the bassinet.
Do not place more than 4kg in the basket.
Do not leave child unattended without locking the castor wheels.
Do not lift this product by the hood, as hood may disengage.
Do not use in a motor vehicle.
Do not use the bassinet if it is damaged in any way. Inspect regularly and report any damages to
the place of purchase or the manufacture immediately.
Do not allow children to use the bassinet as a toy.
Only babies who weigh less than 9Kg, and who aren’t yet capable of rolling on a flat surface are
a suitable size for the bassinet.
When making adjustments to the bassinet, ensure that your child’s body is clear of any moving
parts on the bassinet to avoid any entrapments.
Prevent other children from playing around the bassinet.
Do not allow other children to touch the bassinet while the baby is occupying it.
The mattress should fit snugly and be firm and smooth to avoid suffocation.
Ensure the hinge at the legs are locked and cannot unfold during use.
Place the bassinet out of reach when not in use.
Maximum weight capacity of Deluxe Bassinet should not exceed 9K
Care and Maintenance
To ensure your bassinet lasts a long time you must maintain it. To maintain the bassinet follow the
below steps:
• It is recommended that all fabric is hand washed in warm water with a mild detergent to keep the
fabric looking new.
• We recommend the mattress be wiped down with a damp cloth only and left to dry.
• The stand and castors can be cleaned by wiping over with a damp cloth.
NOTE: The hood must first be removed before the bassinet liner can be removed for washing

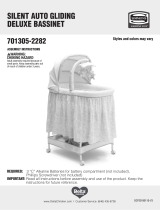
Parts Included:
a) 2 x Bed Tubes
b) 2 x Leg Support Tubes
c) 2 x Accessory Basket Tubes
d) 2 x Cross Tubes
e) 4 x Wheels
f) 8 x 6x20 Bolts
g) 4 x 6x35 Bolts
h) 1 x Basket Support
i) 1 x Mattress Support
j) 4 x Basket knightheads
k) 1 x Mobile Base
l) 1 x Mobile Arm
m) 1 x Mobile Set of Toys
n) 1 x Remote Control
o) 1 x Canopy
p) 1 x Mattress
q) 1 x Accessory Basket
r) 1 x Bassinet Quilt
s) 1 x Bassinet Pillow
t) 1 x Basket Fabric
Assembling the bassinet Stand:
Step1
Put Accessory Basket tubes (C) into Bed Tubes (A). Use bolt 6 x 20 (G) to
fix poles.
Note: Do not tighten until assembly is complete.
Step 2
Slide Accessory Basket Tubes(C) into the side sleeves of Accessory Basket (Q).
Step 3
Repeat step one for opposite side Bed Tubes (A).
Step 4
Put Leg Support Tubes (B) into Bed Tubes (A)
Note: Holes must face inwards.
A
B
C
D
M
E
N
F
O
G
P
H
Q
I
J
R
K
S
L
T

Step 5
Put Cross Tube (D) into Leg Support Tube (B). Tighten with 6x35cm bolts (F)
Attaching the Accessory Basket:
Step 1
Attach Accessory Basket (Q) to Leg Support Tubes (B) and adjust to
desired tension.
Step 2
Attach all 4 basket ties to Leg Support Tubes (B).
Installing the Wheels:
Step1
Insert all 4 Wheels (E) into the base of Bed Tubes (A).
Inserting the Batteries:
Step 1
Insert 2 x “AA” into the vibration mechanism located on the underside of the
Mattress Support (I)
Step 2
Open Mobile Arm (L) battery casing and insert 3 x “AAA” batteries.
Step 3
Open Mobile Remote Control (N) battery casing and insert 3 x “AAA”
batteries.

Bassinet Basket Assembly:
Step 1
Unfold Basket Support (H) legs. Position Mattress Support (I)
underneath. Be sure to align screw holes on Basket Frame legs to the
ones on the Mattress Support.
Step 2
Using 4 x 6x20 bolts (F), screw the Basket Support (H) legs into the
Mattress Support (I), attaching the Knightheads (J) to the bottom of the
screws.
Step 3
Remove pre-installed screws from the Mobile Base (K) and attach it
onto the Basket Support (H) using the pre-installed screws.
Step 4
Align Basket Fabric (T) over the Basket Support (H) frame and the
Mobile Base (K).
Step 5
Attach Basket Fabric (T) elastic over the Mattress Support (I).
Step 6
Secure Basket Fabric (T) by attaching all the press studs located on the
Basket Fabric and Mattress Support (I). There will be 8 press studs on
the top of the Mattress Support and on each side on the bottom of the
Mattress Support.
Step 7
Attach press studs on either side of the Basket Fabric (T) to the under
side of the Mattress Support (I).

Attaching the Canopy:
Step 1
Insert Canopy (O) into the Canopy holes located in sides of Basket
Fabric (T). Canopy Release tabs should face outwards.
Note: Please ensure the Canopy is secured into place.
Step 2
Attach press studs on the sides of the Canopy (O) to the Basket
Fabric (T).
Step 3
Attach press studs on back of Canopy (O) to the back of the Basket
Fabric (T).
Assembling the Mobile:
Step 1
Attach Mobile Arm (L) into the Mobile Base (K). Ensure the
‘triangles’ are pointing towards each other.
Step 2
Attach Mobile Toys (M) onto Mobile Arm (L)

Attaching Basket to the Stand:
Step 1
Align completed bassinet basket onto the bassinet stand.
Note: The Knightheads (J) on the base of the basket, should line up
inside the Leg Support Tubes (B) and the Cross Tubes (D).
Step 2
Attach press stud tabs on the sides of the basket to the press studs on
the side of the Leg Support Tubes (B).
Set-up for the Mobile:
Step 1
Untie wire on the under side of the Mattress Support (I) for the
vibration box, and insert it through the basket buckle and into the
Mobile Arm (L).
Step 2
Connect the vibration box to the Mobile Arm
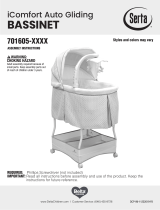
Controls for Mobile:
a) Rotate Mobile Toys
b) Lullaby Music Box
c) Soothing Vibration Motion
d) Night Light
e) On/Off Button for Mobile Functions
A
B
C
D
E
A
B
C
D
MOBILE ARM (L)
REMOTE CONTROL
/