
INSTRUCTION MANUAL
DC-MCR80M
Micro Component System
DC-MCR80M_AU 10/12/05, 5:23 PMPage 1 Adobe PageMaker 6.5C/PPC

PRECAUTIONS
-1-
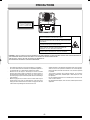
CAUTION – INVISIBLE LASER RADIATION WHEN OPEN AND
INTERLOCKS DEFEATED. AVOID EXPOSURE TO BEAM.
ADVARSEL – USYNLIG LASER STRÅLING VED ÅBNING, NÅR
SIKKERHEDSAFBRYDERE ER UDE AF FUNKTION, UNDGÅ UDS ÆTTELSE
FOR STRÅLING.
VARNING – OSYNLIG LASER STRÅLNING NÄR DENNA DEL ÄR ÖPPNAD
OCH SPÄRR ÄR URKOPPLAD. STRÅLEN ÄR FARLIG.
VORSICHT – UNSICHTBARE LASERSTRAHLUNG TRITT AUS, WENN
DECKEL GEÖFFNET UND WENN SICHERHEITSVERRIEGELUNG
ÜBERBRÜCKT IST. NICHT, DEM STRAHL AUSSETZEN.
VARO – AVATTAESSA JA SUOJALUKITUS OHITETTAESSA OLET ALTTIINA
NÄKYMÄTTÖMÄLLE LASERSÄTEILYLLE. ÄLÄ KATSO SÄTEESEEN.
CAUTION - USE OF CONTROLS OR ADJUSTMENTS OR PERFORMANCE OF PROCEDURES OTHER THAN THOSE SPECIFIED IN
THE OPERATING INSTRUCTIONS MAY RESULT IN HAZARDOUS RADIATION EXPOSURE.
CLASS 1 LASER PRODUCT
LUOKAN 1 LASERLAITE
KLASS 1 LASERAPPARAT
- The apparatus shall not be exposed to dripping or splashing.
- Do not use where there are extremes of temperature (below 5°C
or exceeding 35°C) or where direct sunlight may strike it.
- Because of the CD player’s extremely low noise and wide
dynamic range, there might be a tendency to set the volume on
the amplifier unnecessarily high. Doing so may produce an
excessively large output from the amplifier which could damage
your speakers.
- When carrying the unit, be sure to remove a disc which may be
inside and turn the power off. Wait at least 10 seconds, then
unplug the mains lead from the AC outlet. Carrying the unit with
a disc inside may damage the disc and/or the unit.
- Sudden changes in the ambient temperature may cause conden-
sation to form on the optical lens inside the unit. If this happens,
take out the disc, leave the unit for about 1 hour, and then proceed
to operate.
- The system’s speakers use powerful magnets. Do not place
timepieces, credit cards, cassette tapes or video tapes, etc. near
the speakers.
- Do not install this equipment in a confined space, such as a book
case or built in cabinet.
- No object filled with liquids, such as vases, shall be placed on the
apparatus.
THE PRODUCT SHOULD NOT BE ADJUSTED OR REPAIRED BY
ANYONE EXCEPT PROPERLY QUALIFIED PERSONNEL.
DC-MCR80M_AU 10/12/05, 5:23 PMPage 2 Adobe PageMaker 6.5C/PPC

-2-
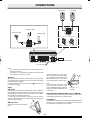
CONNECTIONS
FM outdoor aerial
Note:
- Do not connect the mains lead to an AC outlet until all connec-
tions have been made.
- The system is not completely disconnected from the mains when
the z/ON button is set to the z position.
Speakers
When connecting the speakers, make sure that (+) and (-) potarales
are matched property. Otherwise, the sound may appear to be lacking
in the bass range and stability.
Connect the blue speaker wire to the red terminal + and the other wire
to the black terminal - .
Aerial
FM aerials
In areas close to a transmitter the simple indoor aerial is sufficient to
receive broadcasts. Extend the aerial wire as straight as possible and,
while listening to the sound from the system, secure it in a position
which yields minimal distortion and noise.
In fringe areas or where reception is distorted or noisy an external
aerial (not suppiled) should be connected instead of the simple indoor
aerial. Consult your dealer.
AM loop aerial
Assemble the loop aerial as shown in
figure.
Video/Auxiliary equipment
R ch speaker
L ch speaker
AM loop aerial
To an AC outlet
FM indoor aerial
Unwind the aerial wires, then connect
them to the AM LOOP terminals. Place
the loop aerial in a position which yields
the best AM reception, or attach it to a
wall or other surface as shown in figure.
Note:
To minimize noise, the speaker, mains
and any other leads should not come
close to the FM aerial lead and AM loop
aerial. Do not place the aerial leads close
to the system.
Video/Auxiliary equipment input sockets (AUX IN)
Connect audio leads (not supplied) from the audio output sockets of a
video/auxiliary equipment to the AUX IN sockets.
Headphones
Connect stereo headphones (not supplied) to the PHONES socket for
monitoring or for private listening. The speakers are automatically
disconnected when headphones are connected.
1
2
1
Screws (not
supplied)
DC-MCR80M_AU 10/12/05, 5:23 PMPage 3 Adobe PageMaker 6.5C/PPC

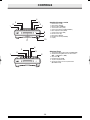
CONTROLS
Amplifier/Common section
1. Power button (z/ON)
2. Sleep button (SLEEP)
3. Memory button (MEMORY)
4. AUX function button (AUX)
5. Sound preset button (SOUND PRESET)
6. Bass expander button (BASS)
7. Volume control (VOLUME)
8. Remote sensor (IR)
9. Reset button (RESET)
10. Headphones socket (PHONES)
11. Display
-3-
CD player/Tuner
1. Tuner function/Band select button (TUNER/BAND)
2. Skip/Search/Tuning/MP3 CD’s file select buttons
(f, - TUNING/FILE +, e)
3. Stop button (n)
4. Play/Pause button (i)
5. Top CD compartment door
6. Open/Close button for CD Compartment lid
(q OPEN/CLOSE)
4
6
5
3
1
2
3
4
1
2
7
8
10
11
6
5
8
9
DC-MCR80M_AU 10/12/05, 5:23 PMPage 4 Adobe PageMaker 6.5C/PPC

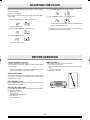
Replacing the battery
1. 2.
CAUTION:
Danger of explosion if battery is incorrectly replaced. Replace only with
the same or equivalent type.
Note:
Always remove battery if the remote control is not to be used for a
month or more. Battery within the unit may leak and cause damages.
Remote control range
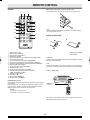
REMOTE CONTROL
-4-
1. Power button (z/ON)
2. Display button (DISPLAY)
3. Volume buttons (VOLUME +, -)
4. Sleep button (SLEEP)
5. Open/Close button for CD Compartment lid (OPEN/CLOSE)
6. Aux function button (AUX)
7. Tuner function/Band select button (TUNER/BAND)
8. Preset tuning up/Repeat play button (PRESET +/ REPEAT)
9. Preset tuning down/Random play button (PRESET -/RANDOM)
10. Bass expander button (BASS)
11. Sound preset button (SOUND PRESET)
12. Number buttons (1~9, 0)
13. MP3 CD’s folder select buttons (FOLDER -, +)
14. Skip/Search/Tuning/MP3 CD’s file select buttons
( f , - TUNING/FILE +, e )
15. Play/Pause button ( i )
16. Stop button ( n )
17. Memory button (MEMORY)
18. FM mode button (FM MODE)
Number buttons (1-9, 0)
These buttons are used to select the track numbers on a disc or preset
radio stations.
If the function is “CD’’, the buttons select the track numbers on a disc.
If the function is “TUNER”, the buttons select preset radio stations.
With any other function, the buttons will not function.
Example:
To select No. 3, press 0, then 3.
To select No. 10, press 1, then press 0.
Please purchase CR2025
Lithium Battery.
Within approx.
7 meters
Controls
The buttons on the remote control perform similar functions to simi-
larly marked buttons on the front panel.
Note:
There is CR2025 Lithium Battery (supplied) in the battery compart-
ment of the remote control.
Remote sensor
When you use the remote control for the first time...
Pull the plastic sheet. The remote control can be used from now.
10
11
9
8
7
6
5
4
321
12
13
14
16
18
17
15
30˚ 30˚
2
1
DC-MCR80M_AU 10/12/05, 5:23 PMPage 5 Adobe PageMaker 6.5C/PPC

-5-
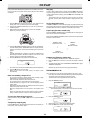
ADJUSTING THE CLOCK
BEFORE OPERATION
When the unit is first connected to the AC power line, the clock display
blinks on the display.
Example: To set “PM6:30”.
First, press the z/ON button to turn the power off. The clock display
appears dimly.
1. Press the MEMORY button for at least 2 seconds.
The hours display blinks.
2. Press the f or e button to set the “hours”.
3. Press the MEMORY button.
The minutes display blinks.
4. Press the f or e button to set the “minutes”.
5. Press the MEMORY button. The clock starts dimly.
- The time can be set accurately by pressing the MEMORY but-
ton when a time signal is heard.
- If a power failure occurs or the mains lead is disconnected, the
clock display blinks. Reset the time again.
Turning the power on and off
Press the z/ON button, the display light.
To turn the power off, press the z/ON button again. The clock display
remains lit dimly.
- When the mains lead is connected to the AC outlet, the unit will
respond to commands from the remote control.
Adjusting the volume
Turn the VOLUME control, or press the VOLUME - or + button on the
remote control. The volume level appears by numbers (VOL MIN ~
VOL MAX) on the display.
Bass expander system
Press the BASS button to enhance the bass sound. “BASS ON”
appears briefly on the display.
Selecting the sound mode
Press the SOUND PRESET button to select the sound mode matching
the music to be listened to.
ROCK: Rock music, etc.
JAZZ: Jazz, etc.
CLASSIC: Classical music, etc.
POP: Pops, etc.
FLAT: Flat music, etc.
WHAT TO DO IF ...
If the operation of the unit or display is not normal,
1. Disconnect the mains lead.
2. Press the RESET button (right side of the unit) for at least 30 sec-
onds
3. Connect the mains lead.
4. Resume the operation.
DC-MCR80M_AU 10/12/05, 5:23 PMPage 6 Adobe PageMaker 6.5C/PPC

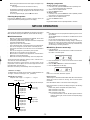
CD PLAY
-6-
Use compact discs bearing the symbol shown. In addition to conven-
tional 12 cm CDs, this system can be used to play 8 cm CDs without
an adapter.
1. Press the i button to select “CD” function. “CD” appears on the
display, then “CD” is replaced by the CD mode display.
2. Press the q OPEN/CLOSE button to open CD compartment,
“OPEN” appears.
3. Place the disc with the label facing up on the disc turntable.
(Place only one disc at a time.)
4. Press the q OPEN/CLOSE button again to close CD compartment,
“CLOSE” display briefly, “READING” blinks for several seconds,
then the total number of tracks and total playing time on the disc
appear.
Note:
If a badly scratched disc is loaded or if the disc is loaded with the
label facing downward, “NO DISC” appears. If this occurs, load
the disc correctly or replace the damaged disc.
5. Press the i button. Play starts from the first track.
The current track number and elapsed playing time are displayed.
6. Press the n button to end disc play.
When the last track has been played, the player stops
automatically.
TRACK
Notes on handling compact discs
- Do not expose the disc to direct sunlight, high humidity or high
temperatures for extended periods of time.
- Discs should be returned to their cases after use.
- Do not apply paper or write anything on the disc surface.
- Handle the disc by its edge. Do not touch the playing surface
(glossy side).
- Fingerprints and dust should be carefully wiped off the playing
surface of the disc with a soft cloth.
Wipe in a straight motion from the centre to the outside of the
disc.
- Never use chemicals such as record cleaning sprays, antistatic
sprays or fluids, benzene or thinner to clean compact discs.
To start play from the desired track
Select the track by using the e or f button, then press the i
button.
Temporarily stopping play
Press the i button, elapsed playing time blinks on the display. To
resume play, press the button again.
Skip play
To skip to track 6 while track 3 is playing, press the e button repeat-
edly until “6” appears (in the track section) on the display. To skip back
to track 3 while track 6 is playing, press the f button repeatedly until
“3” appears.
- The number buttons on the remote control can also be used for
skip play. To skip to track 6 while one track is playing, press 0, then
6.
Search (forward/reverse)
If the e or f button is pressed during play, the player will search at
high speed in the forward or reverse direction while the button is being
pressed. When the button is released, normal play will continue.
Repeat play (Remote control only)
Press the PRESET+/REPEAT button repeatedly before or during play to
select various repeat mode available.
Each time the PRESET+/REPEAT button is pressed, the repeat mode
changes as shown below:
Random play (Remote control only)
1. Press the PRESET-/RANDOM button, “RANDOM” appears.
2. Press the i button. All tracks on the disc are played in random
order.
3. To cancel random play, press the PRESET-/RANDOM button again,
“RANDOM” disappears.
- Random play will not function during programmed play.
PROGRAMMED PLAY
Up to 32 tracks on a disc can be programmed for play in any order.
- First, select “CD” function and load a disc that you want to programme.
- The tracks must be programmed in the stop mode.
- The same track can be programmed more than once.
1. Press the MEMORY button.
2. Select a track by using the e or f button.
- The number buttons on the remote control can also be used.
3. Press the MEMORY button.
4. Repeat steps 2 - 3 to programme additional tracks.
5. Press the i button to start programmed play.
PROGRAM
TRACK
PROGRAM
TRACK
PROGRAM
TRACK
PROGRAM
TRACK
“REPEAT” blinks
(Repeat one track)
“REPEAT”
appears
(Repeat all tracks)
Released
(Normal play mode)
v
v
v
DC-MCR80M_AU 10/12/05, 5:23 PMPage 7 Adobe PageMaker 6.5C/PPC

MP3 CD OPERATION
-7-
When all programmed tracks have been played, the player stops
automatically.
- The programme contents are retained in memory.
- Any attempt to programme more than 32 tracks will result in the first
programmed track being displayed and discontinuation of the
programming.
- To cancel programmed play, press the n button twice.
Checking the programme
Each time the MEMORY button is pressed in the stop mode, the
programmed details sequentially appear on the display.
Changing a programme
To add a new track to a programme:
1. In the stop mode, press the MEMORY button repeatedly until
“- - - -” on the track number part is displayed.
2. Select a track as explained above.
3. Press the MEMORY button.
To change a track:
1. In the stop mode, press the MEMORY button repeatedly until the
track number to be replaced is displayed.
2. Select a track as explained above.
3. Press the MEMORY button.
Note:
Programmed details cannot be partially deleted or inserted.
This unit can play back the CD-R/RW that has recorded music data or
MP3 files. Before playing back MP3 CD, please read the following.
MP3 CD information
- MP3 CD is the disc that standardized by ISO9660, its file name
must include 3-digits extension letters, “.mp3”.
- The directory and file names of the MP3 CD must be corresponded
to the ISO standardized files.
- Single-session disc can be played back.
As for multi-session disc, only the first session can be played back.
- This unit can recognize up to 255 folders or 640 files per disc.
The CD with 256 folders or 641 files and over is not available to
this unit.
- This unit can recognize up to 8 directory trees per disc.
- MP3 CD may not be played in the recorded order.
- Music section in “CD Extra” can be played back, not Data section.
- “Mixed CD” cannot be played back.
- Music files recorded by “Packet Writing” cannot be played back.
There are three basic methods for writing to a CD: “Track-at-Once ”,
“Disc-at-Once”, and “Packet Writing”.
Music files recorded by “Track-at-Once” or “Disc-at-Once” can be
played back on this unit. (Note: The unit cannot play back the music
files added with “Track-at-Once”.)
Music files recorded by “Packet Writing” cannot be played back.
Limitations on display
Available letters for display are the following: capital alphabets of A
through Z, numbers of 0 through 9, and _ (underline).
MP3CD directory sample:
Playback order: song01 v song02 v … song14
Note:
- Some MP3 CDs can not be played back depending on the record-
ing conditions.
- The CD-R/RW that has no music data or non-MP3 files can not be
played back.
- Do not make an empty folder. It may not work correctly.
- In this model, recommendable recording setting is 128 kbps of
fixing bit rate. If files are recorded in other bit rate (for example:
320 kbps) or in variable bit rate, track-jump may sometimes hap-
pen according to recording conditions.
MP3 CD Play (Remote control only)
1. Load the MP3 CD.
“READING” blinks, then the total number of folders and total num-
ber of files on the disc appear.
2. Press the FOLDER + or - button on the remote control to select
the desired folder.
3. Press the f or e button to select the desired file.
4. Press the i button to start play.
Note:
If there is no music data, “NO DISC” appears.
Display selection
The ID3-Tag is an information field for MP3. Music title, artist name and
album name can be stored into the tag. This unit shows these
information.
Press the DISPLAY button on the remote control during play.
Each time the button is pressed, the display changes in the following
sequence.
Folder name (Album name)/File name (Music name)
Music information: music title
Music information: artist name
Music information: album name
- If no music information is stored, “NO ID3” appears. Press the
DISPLAY button again, the file number and elapsed playing
time appear.
FOLDER
MP3
MP3
Folder number F01
There is no MP3 file.The unit skips it.
song01.mp3
song02.mp3
song03.mp3
song04.mp3
song05.mp3
douc01.doc
photo01.jpg
MP3CD F01 albumF01
F02 albumF02
song13.mp3
song14.mp3
F04 albumF04
song06.mp3
song07.mp3
song08.mp3
song09.mp3
song10.mp3
F03 albumF03
song11.mp3
song12.mp3
DC-MCR80M_AU 10/12/05, 5:23 PMPage 8 Adobe PageMaker 6.5C/PPC

LISTENING TO THE RADIO
-8-
Programmed playback
1. In stop mode, press the MEMORY button.
2. Press the FOLDER + or - button on the remote control to select
desired folder.
3. Press the f or e button to select desired file.
MP3
PROGRAM
MP3
PROGRAM
FOLDER
MP3
PROGRAM
FOLDER
MP3
PROGRAM
MP3
PROGRAM
4. Press the MEMORY button.
5. Repeat 2 ~ 4 steps to programme additional tracks.
6. Press the i button to start programmed play.
7. Press the n button at any time to stop the prgorammed play.
- To cancel programmed play, press the n button twice.
Before use
When the unit is shipped from the factory, its AM frequency band is set
as “522 - 1710 kHz (in 9 kHz steps)”.
If your local AM broadcast system is organized in 10 kHz steps, change
the frequency band to “520 - 1710 kHz (in 10 kHz steps)” as follows.
1. Disconnect the mains lead.
2. Connect the mains lead again.
3. Press the z/ON button for at least 2 seconds.
To return the original setting, repeat steps above.
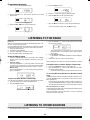
Automatic/Manual tuning
1. Press the TUNER/BAND button to select FM or AM. “TUNER”
appears briefly, then the “TUNER” is replaced by the radio
frequency.
2. Automatic tuning
Press the TUNING/FILE + or - button for at least 1 second to tune
in a station. The unit will scan up or down the band and receive
the next receivable station. Press the button again to continue.
Manual tuning
Press the TUNING/FILE + or - button briefly until the desired fre-
quency is displayed.
To preset stations (Remote control only)
Up to 24 stations for FM band, 16 stations for AM band can be preset.
1. Tune in the station to be preset as described above.
2. Press the MEMORY button.
3. Press the PRESET + or - button on the remote control to select
the channel to be preset.
- The number button(s) on the remote control can be used to
preset the station. In this example, press 0, then 9 after the
step 2 above.
4. Press the MEMORY button.
- In this example, “103.25 MHz” FM station is preset on FM chan-
nel 9.
5. Repeat steps above to add more preset stations.
When presetting a new station, the previous preset station is cleared.
Listening to preset stations (Remote control only)
1. Press the TUNER/BAND button to select FM or AM.
2. Press the PRESET + or - button on the remote control to select
the desired channel number.
- The number button(s) on the remote control can also be used.
To receive FM stereo broadcasts (Remote control
only)
“STEREO” appears when an FM stereo broadcast is received. If not,
press the FM MODE button on the remote control to turn the “STE-
REO” indication on.
- If the signal from an FM stereo station is weak and reception is
poor, press the FM MODE button to change to the monaural mode.
The reception may be improved, but the sound will be monaural.
When beat interference is heard
A high-pitched noise called “beat” is sometimes heard during reception
of radio broadcasts. If this occurs,
Press the FOLDER + button to select “BC-1” or “BC-2”. Select the
setting that gives the best result.
PROGRAM
PROGRAM
1. Press the AUX button to select “AUX”
LISTENING TO OTHER SOURCES
2. Follow the instructions supplied with the video/auxiliary equipment.
DC-MCR80M_AU 10/12/05, 5:23 PMPage 9 Adobe PageMaker 6.5C/PPC

MAINTENANCE
Cleaning the CD player lens
The lens should never be touched. If dust is on the lens, blow it off
using a camera lens blower. (Consult your dealer.)
-9-
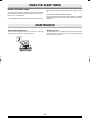
USING THE SLEEP TIMER
The sleep timer automatically switches off the power after a preset
time has elapsed. There are 9 time periods available: 10, 20, 30, 40,
50, 60, 70, 80, and 90 minutes.
Press the SLEEP button repeatedly to select the desired sleep time.
“SLEEP” appears and the selected time appears on the display.
After several seconds, the original display returns, “SLEEP” remains
lit.
To release the sleep timer while in operation
Press the SLEEP button repeatedly to select “SLEEP: 00”, “SLEEP”
disappears from the display. The timer is also released if the power is
switched off.
USING THE SLEEP TIMER
Cleaning the unit
Clean the outside of the unit with a clean soft cloth, moistened with
lukewarm water. Do not use benzene, thinner or alcohol since they will
mar the finish of the surfaces.
DC-MCR80M_AU 10/12/05, 5:23 PMPage 10 Adobe PageMaker 6.5C/PPC

Tuner
Reception frequency:
FM: 87.5 - 108 MHz
AM: 522 - 1710 kHz (9 kHz step)
520 - 1710 kHz (10 kHz step)
CD player
Type:
2-channel stereo
Sampling frequency:
44.1 kHz
Pick-up:
Optical 3-beam semiconductor laser
Laser output:
0.6 mW (Continuous wave max.)
Wave length:
790 nm
Wow/flutter:
Below measurable limits
General
Output power:
10 W x 2 (at 4 ohms, 10% distortion)
Outputs:
SPEAKERS: 4 ohms
PHONES: 8 - 32 ohms
Power requirements:
AC 230 - 240 V, 50 Hz
Power consumption:
30 W
Dimensions:
256(W) x 88(H) x 286(D) mm
Weight:
2.9 kg
Speaker systems
Type:
2 way bass reflex
Unit used:
Woofer: 8cm
Tweeter: 3.5cm
Maximum power-handling capacity:
20 W (peak)
Nominal impedance:
4 ohms
Dimensions:
115(W) x 233(H) x 192(D) mm
Weight:
1.9 kg (per speaker)
Specifications subject to change without notice.
SPECIFICATIONS
-10-
DC-MCR80M_AU 10/12/05, 5:23 PMPage 11 Adobe PageMaker 6.5C/PPC

(AU) 8601CR8000040
SANYO Electric Co., Ltd.
Printed in China
DC-MCR80M_AU 10/12/05, 5:23 PMPage 12 Adobe PageMaker 6.5C/PPC
-
 1
1
-
 2
2
-
 3
3
-
 4
4
-
 5
5
-
 6
6
-
 7
7
-
 8
8
-
 9
9
-
 10
10
-
 11
11
-
 12
12


Ask a question and I''ll find the answer in the document
Finding information in a document is now easier with AI
Related papers
Other documents
-
Sharp XLUH4H User manual
-
Sharp XLMP2H User manual
-
-
-
Sharp XL-UH2080H User manual
-
Sharp XLMP15H User manual
-
Sharp XL-DH10N 20H_Front XL-DH10NH XL-DH20NH User manual
-
-
Sharp XL-DK227NH Specification
-
Sharp XLHF200PHBK User manual