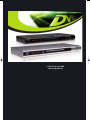
Silvercrest KH 6506 Operating instructions
- Category
- DVD players
- Type
- Operating instructions

DVD-Player KH 6506
Operating Manual
KH6506_V2955_UK 02.04.2007 15:10 Uhr Seite 2

The SilverCrest KH 6506 DVD player contains copyright protection technology, which protects it from process
claims of certain US patents, for example other intellectual property rights of the Macrovision corporation and
other copyright owners.
The use of this technology for copyright protection must be approved by Macrovision Corporation and is inten-
ded exclusively for non-commercial, private use; any other use requires the express approval of Macrovision
Corporation.
Reverse engineering and disassembling are expressly prohibited.
Manufactured under license from Dolby Laboratories, Inc.
Dolby and the double-D-symbols are registered trademarks of Dolby Laboratories,
Inc. Confidential Unpublished Works.
1992-1997 Dolby Laboratories, Inc. All rights reserved.
This appliance is protected by the US patents 4.631.603, 4.577.216, 4.819.098, 4.907.093 and 6.516.132.
The license applies exclusively for private use.
The SilverCrest KH 6506 DVD player is licensed as a DivX Certified Product.
KH6506_V2955_UK 02.04.2007 15:10 Uhr Seite 3

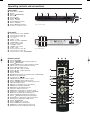
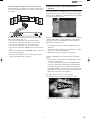
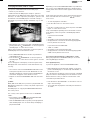
Operating controls and connections
Front panel
q Power button (On/Off)
w Display
e Button (OPEN/CLOSE)
r Disc tray
t Indicator lamp
y Button (STOP)
u Button (PLAY)
i Button (Skip forward)
o Button (PAUSE)
a Button (Skip backwards)
s IR-Sensor for remote control
Rear panel
d Surround cinch socket "CENTER"
f Surround cinch socket "SL"
g Surround cinch socket "FL"
h "Y" socket
j "Pb/Cb" socket
k Digital out socket "COAXIAL"
l "EURO SCART" socket
; Power cord with plug
2) "S-VIDEO" socket
2! "VIDEO" cinch socket
2@ "Pr/Cr" socket
2# Surround cinch socket "FR"
2$ Surround cinch socket "SR"
2% Surround cinch socket "SUBWOOFER"
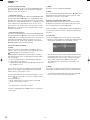
Remote control
q Button STANDBY
w Button DIMMER (Adjust display brightness)
e Button OPEN/CLOSE
r SLOWF+/SLOWR- button (Adjust playback speed)
t VOL +/- button (Increase/decrease volume)
y Button MUTE (Mute sound)
u Button SKIP + (Skip forward)
i Button SKIP - (Skip backwards)
o Button STOP
a Button PLAY
s RETURN button (Return to the main menu on VCDs/SVCDs)
d OK button (Confirm input)
f Control buttons
g VIDEO_OUT button (Set to video output)
h Button SEARCH (Select time position)
j Button ANGLE (Change the camera perspective)
k CLR button (Clear input)
l PRG button (Superimpose program menu)
; REPEAT button (Repeat playback)
2) MARK button (Bookmark function)
2! A-B button (Repeat sequence)
2@ MODE button (Superimpose playback mode)
2# TITLE button (Superimpose contents of DVD/CD)
2$ MENU button (Superimpose DVD menu)
2% Button SUBTITLE (Superimpose sub-titles)
2^ Button AUDIO (Change playback language)
2& DISPLAY button (Superimpose disc information)
2* SETUP button (Superimpose OSD menu)
2( Button PAUSE/STEP
3) Button F.FWD(Scan forward)
3! Button F.RWD(Scan backwards)
3@ ZOOM button (Enlarge/reduce image size)
3# Number buttons 0 to 9 (Number input 0-9)
Fig. 1.1 Front panel
qw e r
yu
i
oas
t
Fig. 1.2 Rear panel
hdfg jk l ;
2)2!2@2#2$2%
Fig. 2 Remote control
e
r
t
y
u
i
o
a
s
d
f
g
h
j
l
2)
2@
k
;
2!
2#
q
3#
3!
2(
2&
2%
3@
3)
2*
2^
2$
w
KH6506_V2955_UK 02.04.2007 15:10 Uhr Seite 4

- 3 -
List of Contents Page
1. Technical Data 4
2. Applications and functions 4
3. Delivery Contents 4
4. Setting up of the DVD player/Safety instructions 4
5. Remote control 5
5.1. Inserting the batteries 5
5.2. Using the remote control 5
5.3. Replacing the batteries 5
6. Connecting the DVD Player to a Television 6
6.1. Connecting to a Television via ScartCable/RGB 6
6.2. Connecting to a Television via S-Video 6
6.3. Connecting to a television via video input (composite video) 7
6.4. Connection via component signal (YPbPr/Progressive Scan und YUV) 7
7. Connecting audio components to the DVD player 8
7.1. Connecting a HiFi system 8
7.2. Connecting digital audio components via digital cables 8
7.3. Connecting audio components via an analogue cable 9
8. Necessary settings to the DVD player before operation 9
8.1. Using the OSD Menu 10
8.2. Language Settings 10
8.3. Video settings 10
8.4. Audio settings 11
8.5. Rating settings 11
8.6. Misc settings 12
9. Initial operation of the DVD player 12
9.1. Inserting the DVD 12
10. Playing back DVDs, VCDs or S-VCDs 13
10.1. Features during playback of a DVD, VCD or S-VCD 13
11. Playback of JPEG-Photo CD/WMA/MP3/MPEG4. 20
12. Cleaning of the DVD player 21
13. Disposal 21
14. Troubleshooting 22
15. Glossary / Key Word Index 23
16. Important warranty notes 25
Read the operating instructions carefully before using the appliance for the first time and preserve this booklet for later
reference. Pass the manual on to whomsoever might acquire the appliance at a later date.
KH6506_V2955_UK 02.04.2007 15:10 Uhr Seite 3

- 4 -
1. Technical Data
Power supply: AC 220 V - 240 V ~50 Hz
Power consumption : 15 Watt
TV standard: PAL/NTSC
Operating temperature: +5 ~ +35°C
Humidity: 5 ~ 90 % (no condensation)
Video Output
Output level: 1 + 0.2/-0.2 Vp-p (75 Ω)
Horizontal resolution: > = 500 Lines
Signal-to-noise ratio: >60 dB
Audio Output
Impedance: 10 kΩ
Output level: 1.8 + 0.2/-0.8 Vrms (1kHz 0 dB)
Harmonic distortion: <0.01 % (JIS-A 1kHz, typical)
Dynamic range: >80 dB (JIS-A 1 KHz, typical)
Signal-to-noise ratio: <95 dB (JIS-A 1 kHz, typical)
Digital audio output
Co-axial output
2. Applications and functions
The SilverCrest KH 6506 DVD player is exclusively intended ...
• as an electronic entertainment device for the playback...
• ...of DVD videos in 12 cm and 8 cm (diameter) formats with
Country/Regional code 2 or , designated by the Logo
.
• ...of the video formats MPEG-4/MPEG-4 ASP and with DivX
3.11, DivX 4.x, DivX 5.x, DivX 6.0, multichannel DivX and
DivX Pro
• ... of video-CDs (VCDs) and Super video-CDs (S-VCDs) in
12 cm and 8 cm (diameter) formats, designated by the
Logo .
• ... of audio-CDs in 12 cm and 8 cm (diameter) formats,
designated by the Logo .
• ... generally the data format CD audio (.cda), MP3 (.mp3),
Windows Media Audio (.wma), DivX (.avi) and JPEG (.jpg)
on the storage mediums CD-R and CD-RW.
• ... for stationary operation in enclosed spaces
• ... for private, non commercial use
For image output with the playback of DVDs, VCDs, S-VCDs,
Audio CDs and the data format MP3, Windows Media Audio
and JPEG you can connect to the SilverCrest KH 6506 DVD
player to …
• Stereo and Mono televisions with the television formats
PAL, SECAM or NTSC and the image format 4:3 / 16:9.
For the output of sound and/or music you can use and/or
connect to the Silvercrest KH 6506 DVD-Player …
• from the speaker of one of the televisions connected to
the DVD player
• from external audio components such as a HiFi system,
receiver or surround sound system (analogue/digital)
IMPORTANT!
No liability/warranty will be assumed for damage resulting
from improper use of the device!
3. Delivery Contents
1. DVD-Player
2. Infra red remote control
3. 2 Batteries for remote control, type AAA/ (Micro cells)
4. RGB-Scart cable
5. Operating manual
4. Setting up of the DVD player/Safety instructions
1 Carefully remove the DVD player and the supplied acces-
sories from the packing
2 Remove the protective foil from the front reflector.
3 Place the DVD player on an even, straight, and non slip-
pery surface
In order to avoid technical glitches, damages, and the risk
of an electric shock do not run the DVD player...
• ... in the immediate vicinity of a heat source such as an
oven, heat fans and similar devices! Heat contact can lead
to the equipment overheating and to melting of plastic
parts, whereby the DVD player could be irreparably damaged!
• Do not place any open sources of fire, like candles, on the
device.
Warning!
In case of overheating there is a risk of fire!
• ... do not play in moist environments, for example in cellars
or in the sauna! Moisure penetrating the applicance can
lead to malfunctions and cause irreparable damage to the
DVD-Player!
• This device was only designed for stationary operation
under normal climatic conditions (temperate climate).
Warning!
Moisture penetrating into the device creates the risk of an
electric shock!
• ... not for use in the immediate vicinity of water, for example
in the bath tub or in the swimming pool. Do not place con-
tainers filled with water, for example flower vases, on the
DVD player.
KH 6506
KH6506_V2955_UK 02.04.2007 15:10 Uhr Seite 4

- 5 -
Warning!
If water runs into the DVD player or if it falls into water it can
be irreparably damaged and the risk of an electric shock
exists!
• ... do not use in cupboards, on shelves or other enclosed
furnishings also do not use on beds and covers because the
ventilation of the DVD player will be impaired and it could
overheat.
For the same reason do not place another piece of equip-
ment (i.e. a television) on the DVD player.
In order to guarantee sufficient ventilation the selected loca-
tion of the DVD player must provide for a clearance of at least
10 cm at the rear, on top, and on either side from walls and
any other object.
• This device must not be placed in the immediate vicinity
of flammable materials, for example curtains, flammable
liquids etc.
Warning!
When overheated the DVD player can be irreparably damaged
and the risk of a fire exists!
IMPORTANT!
For damage to the DVD player that results from...
• The effects of moisture
• water penetrating into the equipment
• Overheating
... no liability/warranty will be assumed!
IMPORTANT!
Do not plug the DVD player into an electrical outlet at this
time. Wait until you have connected the DVD player to a
television set.
In the event that you wish to change the type of video or
audio connection you must first pull the power plug from the
power socket! Otherwise the DVD player and possibly equip-
ment connected to it could become irreparably damaged
through voltage peak strikes!
Warning!
Equipment connected to a power supply can be damaged
during a thunderstorm. You should therefore always pull the
power plug from the power socket when there is a storm.
IMPORTANT!
The Mains switch (POWER) on the front panel is used for dis-
connecting the main voltage. In order to completely discon-
nect the equipment from the mains voltage the power plug
must be pulled from the power socket. The power socket for
the power plug should be situated close to the device and
easily accessible
Danger! Laser radiation!
The DVD player is equipped with a "Class 1 Laser".
• Never open the device.
• Never attempt to repair the device. There is invisible laser
radiation inside the device.
• Avoid all direct optical contact with the laser beam, it
could lead to serious eye injuries.
5. Remote control
5.1. Inserting the batteries
1 Open the battery compartment on the back of the remote
control.
2 Now insert the two batteries type AAA/R 03 (micro cells)
included in the package into the battery compartment.
Make sure that the batteries are inserted in accordance
with the correct polarity.
3 Replace the battery compartment cover.
5.2. Using the remote control
In order to guarantee faultless operation when using the
remote control…
• Always point the remote control, during use, directely at
the DVD player
• Make sure that there are no obstructions between the
remote control and the DVD player that will hinder re-
ception
• When using the remote control place yourself not more
than 5 metres from the DVD player
Otherwise interferences can occur during operation of the
DVD player functions with the remote control.
5.3. Replacing the batteries
If the operation of the DVD player via the remote control
does not function properly or does not function at all the
batteries must be replaced
• Always renew all batteries in order to return the remote
control to its full performance ability.
NOTE:
Used batteries may not be disposed of in household waste.
Hand in used batteries at a collection location or disposal
site or return them to the place where you bought them.
Should you yourself at some time dispose of the DVD player's
remote control then you should beforehand, without fail,
remove the batteries!
Danger!
• Do not throw batteries into a fire.
• Do not recharge batteries unless, of course they are specifi-
cally designated as "rechargable".
• Never open, solder or weld batteries.
The risk of explosions and injuries exist!
• Check the batteries regularly. Leaking batteries can cause
damage to the appliance.
• Always change all batteries at the same time and always
use batteries of the same type.
• Remove the batteries if you do not intend to use the
appliance for an extended period of time.
• In the event of the batteries leaking acids, wear protective
gloves.
• Clean the battery compartment with a dry cloth.
KH 6506
KH6506_V2955_UK 02.04.2007 15:10 Uhr Seite 5

- 6 -
6. Connecting the DVD Player to a Television
After setting up the DVD player, you can now connect it to a
television. The DVD player can be connected to a television
that operates with the PAL, NTSC and SECAM standards.
If you want to use the DVD player on a television with...
• ... NTSC standard you will have to change the video setting
in the DVD's so called "OSD menu". There PAL is set as the
television standard at the factory.
• SECAM standard you do not need to change any settings.
The factory setting for the PAL standard also allows the
DVD player to operate with SECAM televisions in so far as
these can process the signals.
Ô
On this topic see also capital 8.3 "Video settings: Set the
television standard"
Depending on the features of the television, there are various
options for connecting the DVD player to it:
6.1. Connecting to a Television via ScartCable/RGB
NOTE:
Connecting the DVD player to a television with a Scart cable
via the RGB input offers a high quality connection. Select this
connection variation in the case of televisions equipped with
an RGB input. If you are not sure if the television is equipped
with an RGB input then you can check this by consulting the
television's instruction manual.
• Connect the jack inscribed with EURO SCART to a television
Scart socket by using the supplied Scart cable.
• For playback select the matching channel on your tele-
vision Check with the television's instruction manual on
how you can set the AV channel.
• In the OSD menu select the menu Video/Video out/RGB.
Ô
On this topic see also capital 8.3 “Video settings:
Video out“.
6.2. Connecting to a Television via S-Video
NOTE:
For this connections variant the television must be equipped
with an S-video input and two unoccupied audio cinch sockets.
If you are not sure if the television is capable of handling S-video,
for example via cinch sockets, then you can check this by con-
sulting the television's instruction manual.
For this connection variant you will need:
• an audio cinch cable (not supplied)
• an S-video cable (not supplied) These can be obtained
from your dealer.
In order to connect the DVD player to a television via S-video...
• Connect the jack inscribed with S-VIDEO to a television S-video
socket using an S-video cable.
• Insert the white audio cinch cable plug into the cinch socket
inscribed "FL" on the rear panel of the DVD player.
• Then insert the white plug at the other end of the audio
cinch cable into the left channel audio socket on the tele-
vision.
• Insert the red audio cinch cable plug into the cinch socket
inscribed "FR" on the rear panel of the DVD player.
• Then insert the red plug at the other end of the audio
cinch cable into the right channel audio socket on the tele-
vision.
• For playback select the matching channel on your tele-
vision Check with the television's instruction manual on
how you can set the AV channel.
• In the OSD menu select the menu Video/Video out/
S-Video.
Ô
On this topic see also capital 8.3 "Video settings:
Video out“.
KH 6506
KH6506_V2955_UK 02.04.2007 15:10 Uhr Seite 6

- 7 -
6.3. Connecting to a television via video input
(composite video)
For this connection variant the television must be equipped
with Audio/Video cinch sockets (Composite Video).
In order to connect the DVD player to a television via
Composite Video you will need
• an Audio/Video cinch cable (not supplied)
• Connect the yellow plug of the Audio/Video cinch cable to
the television's yellow video socket.
• Insert the white Audio/Video cinch cable plug into the
cinch socket inscribed "FL" on the rear panel of the DVD
player.
• Then insert the white plug at the other end of the
Audio/Video cinch cable into the left channel audio socket
on the television.
• Insert the red Audio/Video cinch cable plug into the cinch
socket inscribed "FR" on the rear panel of the DVD player.
• Then insert the red plug at the other end of the Audio/Video
cinch cable into the right channel audio socket on the tele-
vision.
• For playback select the matching channel on your television Check
with the television's instruction manual on how you can set the AV
channel.
• In the OSD menu select the menu Video/Video out/RGB.
Ô
On this topic see also capital "Video settings".
6.4. Connection via component signal (YPbPr/Progressive
Scan und YUV)
This connection variant is only possible with very high grade
televisions, LCD/Plasma screens or Video projectors
Check with the instruction manual of the corresponding play-
back device to see if this connections variant is available.
It is possible that additional playback device settings must be
implemented.
The so called "Component signal" is put out via the YPbPr
socket of the DVD player. The Component signal is also avail-
able in the form of
• the so called "YUV" signals (Half images)
as well as in the form of
• so called "YPbPr" signal (Full image/Progressive Scan).
Ô
On this topic see also capital "Glossary/Classified index".
NOTE:
For both variants the television, to which you want to con-
nect the DVD player must have two unoccupied Audio cinch
sockets available.
The cable connections are the same in both cases; YPbPr-sig-
nal for Progressive Scan however can only be used if the tele-
vision (or Video projector), to which you want to connect the
DVD player, is capable of Progressive Scan.
If you are not sure whether the television (or Video projec-
tor), to which you want to connect the DVD player is capable
of Progressive Scan and has cinch sockets available then you
can check this by consulting the television's (or Video projec-
tors's) instruction manual.
For both variations – "YPbPr" and "YUV"– you will need
• an audio cinch cable (not supplied)
• an YUV cable (not supplied) These can be obtained from
your dealer.
On the rear panel of the DVD player you will find the three
so called "Component Colour Out" sockets "Y", "Pb/Cb" and
"Pr/Cr".
In order to connect the DVD player via component signal…
• Connect the sockets "Y"(green), "Pb/Cb"(blue), and "Pr/Cr"
(red) with the corresponding sockets on the television.
• Insert the white plug of the Audio cinch cable (not supp-
lied) into the cinch socket inscribed "FL" on the rear panel
of the DVD player.
• Then insert the white plug at the other end of the audio
cinch cable into the left channel audio socket on the tele-
vision.
• Insert the red audio cinch cable plug into the cinch socket
inscribed "FR" on the rear panel of the DVD player.
• Then insert the red plug at the other end of the audio
cinch cable into the right channel audio socket on the
television.
• For playback select the matching channel on your tele-
vision Check with the television's instruction manual on
how you can set the AV channel.
• In the OSD menu under the menu Video/Video
out/Component select respectively P-Scan.
Ô
On this topic see also capital 8.3 "Video settings:
Video out“.
KH 6506
KH6506_V2955_UK 02.04.2007 15:10 Uhr Seite 7

- 8 -
7. Connecting audio components to the DVD player
Besides sound replay of DVDs, VCDs/S-VCDs and from Audio
and MP3-CDs via…
• the loud speaker of the television, to which the DVD player is
connected sound replay can also be produced via external
Audio components such as HiFi systems, Dolby Digital/DTS
receiver or Surround Sound systems.
You have the following options here:
7.1. Connecting a HiFi system
In order to enjoy a full sound experience when playing DVDs
with the DVD player you can connect a HiFi system to the
player. Before connecting check with the HiFi system's instruc-
tion manual to verify...
• if the HiFi system is suitable for connection to a DVD player.
If yes…
• if the HiFi system is equipped with cinch sockets; if yes,
you can connect the HiFi system to the DVD player via
cinch cables.
In order to connect a HiFi system...
• Insert the white cinch cable plug into the cinch socket
inscribed "FL" on the rear panel of the DVD player.
• Then insert the white plug at the other end of the cinch
cable into the left channel cinch socket on the HiFi system.
• Insert the red cinch cable plug into the cinch socket inscribed
"FR" on the rear panel of the DVD player.
• Insert the red plug at the other end of the cinch cable into
the right channel cinch socket of the HiFi system.
• Check with the instruction manual which settings on the
HiFi system may be necessary in order to reproduce sound
via the HiFi system during the playback of a DVD, VCD/
S-VCD, Audio or MP3 CD from the DVD player.
NOTE:
For an optimal sound experience place your HiFi system's loud
speakers to the left and to the right of the television, on
which you connected the DVD player.
If you connected the DVD player to the television via a Scart
cable the Audio signal will be transmitted via the cinch cable
to your HiFi system as well as via the Scart cable to the tele-
vision. In this case, set the volume of the television to the
lowest value.
7.2. Connecting digital audio components via digital cables
In order to enjoy Surround Sound during playback of corres-
pondingly equipped DVDs (recognisable by the Dolby Digital
or DTS-Logo) you can connect the DVD player to
digital Audio components, for example a Dolby Digital or DTS
receiver or a suitable Surround system.
The necessary cable for the following described connection
variant can be purchased from the dealer.
First check, by means of the audio components instruction
manual, if a connection to the DVD player via a co-axial cable
is possible.
Connection via coaxial cable
In order to connect the DVD player to a digital audio compo-
nent with a digital coaxial cable...
• Connect the "COAXIAL" inscribed plug to the correspond-
ing socket on the digital audio component.
KH 6506
KH6506_V2955_UK 02.04.2007 15:10 Uhr Seite 8

- 9 -
7.3. Connecting audio components via an analogue cable
If a digital input is not available on the audio component you
can connect the DVD player to it via conventional analogue
cinch cables.
In order to connect the DVD player with analogue cables...
Insert a cinch cable in each of...
• the sockets inscribed with "FL" (front left channel)
• the sockets inscribed with "FR" (front right channel)
• the sockets inscribed with "SL" (rear left channel)
• the sockets inscribed with "SR" (rear right channel)
• the socket inscribed with "CENTER" (front centre channel)
and
• the socket inscribed with "SUBWOOFER" (Bass) on the rear
panel of the DVD player.
• insert the cinch cables into the corresponding analogue
inputs in the digital audio component.
8. Necessary settings to the DVD player before
operation
All possible settings on the DVD player can be administered
with the remote control via the so called "OnScreen display"
menu (in short "OSD Menu"). The OSD Menu will be superim-
posed on the television screen.
Before you use the DVD player for the first time for playback
of DVDs, VCDs/S-VCDs or Audio-/MP3-CDs you must imple-
ment a few settings via the OSD Menu. These settings are
dependent amongst others on...
• the language, in which you want the OSD Menu to be
displayed
• which TV standard corresponds to the television, to which
you want to connect the DVD player
• Which image format your television can display
In order to implement the necessary settings via the OSD
Menu...
• First insert the connecter plug of the DVD player's power
cord into a power socket.
• To switch on the DVD player press the "POWER" button
on the front panel of the DVD player. If the DVD player
is already switched on but is in standby mode, press the
button "STANDBY" on the remote control to switch the
DVD player on. Standby mode is characterized by the red
LED on the front panel of the appliance.
The device will check to see if a disc is inserted.
The SilverCrest logo appears on the television screen:
• Firstly please familiarize yourself with the OSD Menu's
operation by means of the following brief introduction.
KH 6506
KH6506_V2955_UK 02.04.2007 15:10 Uhr Seite 9

- 10 -
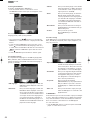
8.1. Using the OSD Menu
To summon the DVD player's OSD Menu...
• Press the "SETUP" button on the remote control.
The OSD Menu with its menu options will appear on the
television screen:
The following menu options can be set:
Language, Video, Audio, Rating and Misc.
• The control buttons will move you through the
OSD Menu. To confirm a selection or input press the "OK"
button.
• To exit the selected OSD Menu option press the control
button , until the left Menu tab (Language, Video etc.)
is active. Select another Menu tab with the control buttons
and activate the OSD Menu option with the control
button .
• To exit the OSD Menu press the button "SETUP" again.
8.2. Language Settings
You can preset the languages for the OSD-language, DVD-
Menu, Subtitles, Audio and DivX Subtitles functions. These
settings are valid for every DVD if the selected language is
present on the DVD.
- OSD language: Here you set the language, in which the
OSD Menu will be displayed on the tele-
vision screen.
- DVD menu: Here you set the language, in which the
DVD Menu will be displayed on the tele-
vision screen. Not all films contain a menu
on the DVD. If a menu is available then it
can only be shown in the language that
you set if this language is available on
the DVD. If the selected language is not
available then the DVD Menu will be dis-
played in another language.
- Subtitle: Here you set the language of the subtitle
when the playback of a DVD is displayed
on the television screen (only if the lang-
uage is present on the DVD).
- Audio: Here you set the language, in which the
DVD should be started. Films can then
only be played back in the language that
you selected if this language is available
on the DVD. If the selected language is
not available the DVD will start with an-
other language.
- DivX subtitle: Here you set the character encoding for
the DivX Subtitle. The standard setting is
Western European.
- Position: Here you set the position
(Bottom/Middle/Top) of the DivX
Subtitles.
8.3. Video settings
In this OSD menu you can implement the settings for Aspect
Ratio, View Mode, TV-System, Video output, brightness, con-
trast, tint, and color.
- Aspect Ratio: Here you set the Image format, in which
the film should be displayed on the tele-
vision screen (4:3 or 16:9). The correct set-
ting depends on the television to which
you would like to connect the DVD player.
- View Mode: Here you can align the height and width
of the image presentation with the play-
back appliance being used, i.e. Pan &
Scan (Alignment of the wide image for-
mat to the 4:3 presentation).
- TV-System: Here you set the TV-Standard
(PAL/NTSC/Multi) of your playback device.
Only set "Multi" if you have connected
the DVD player to a Multi standard tele-
vision.
- Video-out: Here you set the Video output, through
which the DVD player is connected to the
playback device.
IMPORTANT!
In the event that you set an incorrect Video output, for example
"P-Scan", although your television is not capable of Progressive
Scan, then the television screen will suddenly become black.
This is not a defect of the television or the DVD player!
In a case such as this...
• Press the
"STOP" button on the front panel of the DVD
player or on the remote control.
KH 6506
KH6506_V2955_UK 02.04.2007 15:10 Uhr Seite 10

- 11 -
• Then keep pressing the button "VIDEO_OUT" on the
remote control until the Image reappears on the television
screen.
- Smart Picture: In this menu you can set the image para-
meters of the output video signal and
thus align with the playback quality of
the image on the connected picture screen.
Select the preset image parameter
"Standard", "Bright", or "Soft". With the
setting "Dynamic" you can set the follow-
ing image parameters separately:
- Brightness: Here you set the brightness value
(-20...+20) of the DVD player.
- Contrast: Here you set the contrast value
(-16...+16)of the DVD player.
- Tint: Here you set the red-green ratio (-9...+9)
of the DVD player.
- Color: Here you set the colour saturation
(-9...+9) of the DVD player.
8.4. Audio settings
In this OSD-Menu you can administer the settings for Bass
Management, the size of individual loud speakers, Test Sound,
Delays, Digital Audio Outputs, Night Mode and ProLogic.
-Bass Management: Here you can Activate/Deactivate the
Bass-Management. Activation (on) is ne-
cessary if you are not using a 5.1 ampli-
fier with its own speaker management
but rather want the sound output trans-
mitted via a particular amplifier. In this
case the DVD player must be informed
which kind of speaker (Small/Large) is to
be run from the respective sound output.
In this way the sound and the separation
of Highs, Middles and Basses can be opti-
mally conformed.
- Front, Center,
Surround,
Subwoofer
Speakers: Here you can Activate/Deactivate the par-
ticular speaker type and set the size.
Large: Bass activated,
Small: Bass deactivated (selectable only
when Bass-Management is
activated)
None: no loudspeaker connected
- Test tones: Here you can switch on a test tone for
each individual audio output in order to
check your 5.1 surround settings.
- Center, Surround
delay: Here you set the delay for the centre and
rear surround loudspeakers. Each increase
of the distance setting corresponds to a
delay of one millisecond. With optimal
settings the sound reaches your ears si-
multaneously from all directions.
Center: No delay, 0.3, 0.6, 1, 1.4, 1.7 m.
Surround: 1, 2, 3, 4 or 5.1 m
- Digital Output: Here you set the DVD players digital out-
put signal.
OFF: no digital audio component con-
nected
PCM: two channel digital audio compo-
nent connected via co-axial cable
or optical cable.
RAW: multi channel digital audio com-
ponent, i.e. DTS receiver, connec-
ted via co-axial cable or optical
cable.
- Night mode: Here you can activate/deactivate the night
mode. This setting facilitates an optimal
sound playback with reduced volume.
The loud passages are suppressed and
the quieter passages are played back a
little louder. This function is only possible
when using a digital audio component.
- ProLogic: Here you set the Dolby ProLogic compati-
bility.
OFF: no Dolby ProLogic compatible audio
component is connected to the
analogue stereo output (FL/FR).
ON: a Dolby ProLogic compatible audio
component is connected to the
analogue stereo output(FL/FR) of
the DVD player.
8.5. Rating settings
In this menu you can implement the settings for child security
and change the password.
- Parental control: Here you set the child security in three
stages.
G: Only DVDs without age restrictions
can be played back.
PG-13: No DVD with an age release from
13 years can be played back.
Adult: All DVDs, including those with an
age release from 18 years, can be play-
ed back.
KH 6506
KH6506_V2955_UK 02.04.2007 15:10 Uhr Seite 11

- 12 -
In order to activate the age release you must select "Parental
control" in the OSD menu "Rating" and enter the password
(8888). Confirm your entry by pressing the "OK" button.
Select the item "Parental control" again and now you can set
the desired child security position. Confirm your entry by
pressing the "OK" button.
- Set Password: Here you can change the preset password
(8888) and enter your own password.
Only the numbers 0-9 can be used.
To change the password select the item "Set Password" in the
OSD menu. Enter the valid password. Confirm your entry by pres-
sing the "OK" button. Select the item "Set Password" again
and enter the new password. Confirm your entry by pressing the
"OK" button.
NOTE:
In the event that you forget your new password you can use
the factory preset password (8888).
8.6. Misc settings
In this menu you can reset the DVD player to the factory
default settings and set the playback priority of DVDs.
- Default
Settings: Here you reset the DVD players factory
default settings.
9. Initial operation of the DVD player
After you have …
• placed the DVD player in a suitable location
• connected the DVD player to a television by one of the
designated connection options
• connected the DVD player, if desired, to a HiFi or Surround
system (analogue/digital) for example a Dolby Digital or
DTS receiver
• made the remote control ready for operation by inserting
the batteries
• and know how to activate and operate the OSD menu
with the remote control
… the DVD player is ready for operation.
9.1. Inserting the DVD
To play a disc with the DVD player:
• Switch on your television.
• Make sure that the DVD player is ready for operation.
If the television, the DVD player and possibly other connected
devices (i.e. an audio component) are ready for operation and
are switched on and the DVD player is connected correctly to
the television you will now see the SilverCrest logo on the TV
screen
If no disc is inserted into the DVD player's disc tray:
The message "No disc" apears on the TV screen.
• Open the disc tray by pressing the button "OPEN/CLOSE"
on the remote control or on the front panel of the DVD
player. "Open" will appear on the TV screen.
• Insert the disc in the disc tray with the inscribed/labled side
up. For twin-sided discs: The side you would like to play
must face down.
• After you have inserted the disc press the button
"OPEN/CLOSE" on the remote control or on the front pa-
nel of the DVD player again to close the disc tray.
• The contents of the disc will now be loaded; this may take
a few seconds. In the meantime the message "Loading"
appears on the TV screen.
KH 6506
KH6506_V2955_UK 02.04.2007 15:10 Uhr Seite 12

- 13 -
10. Playing back DVDs, VCDs or S-VCDs
To play back a DVD/VCD/S-VCD with the DVD player...
• Switch on your television.
• Make sure that the DVD player is ready for operation.
If the television, the DVD player and possibly other connected
devices (i.e. an audio component) are ready for operation and
are switched on and the DVD player is connected correctly to
the television you will now see the "SilverCrest" logo on the
TV screen
• Open the disc tray on the front panel of the DVD player by
pressing the button "OPEN/CLOSE" on the front panel of
the DVD player or on the remote control.
"Open" will now appear In the display on the front panel of
the DVD player and on the television screen.
• Insert a DVD/VCD/S-VCD disc in the disc tray with the in-
scribed/labled side up.
• Press the button "OPEN/CLOSE" on the front panel of
the DVD player or on the remote control again to close the
disc tray.
"Close" will appear in the display on the front panel of the
DVD player and on the television screen while the disc tray
is closing.
• The contents of the inserted DVD/VCD/S-VCD will now be
loaded; this may take a few seconds. Meanwhile "Load"
will flash in the display on the front panel of the DVD player
and "Read" will appear on the television screen.
• Playback of the inserted DVD/VCD/S-VCD starts automati-
cally.
NOTE:
DVDs, VCDs and S-VCDs, that you want to playback with the
DVD player possibly have a country code, which is printed on
the DVD cover.
The DVD player can only playback DVDs/VCDs/S-VCDs with
the country code 2.
If no country code is printed on the cover of a DVD/VCD/
S-VCD...
• but instead the symbol , then the DVD/VCD/S-VCD
can be played back with the DVD player
• Then the DVD/VCD/S-VCD can possibly not be played back
with the DVD player. You can check this by attempting to
play back the DVD.
Depending on the inserted DVD/VCD/S-VCD it is possible that
the contents of the DVD/VCD/s-VCD will not playback imme-
diately, rather first a selection menu appears on the television
screen.
In this event select the menu option which will start the play-
back of the film with the control button on the re-
mote control.
• To start the playback of the film...
• Press the "OK" button on the remote control.
or
• Press the
"PLAY" button on the front panel of the DVD
player or on the remote control.
"Play" will briefly be superimposed on the television screen.
In the display on the front panel of the DVD player will be
shown...
if you have inserted a DVD:
• "DVD"
• the number of the currently playing title and chapter
• the played back so far time of the currently playing DVD
in hours, minutes and seconds
if you have inserted a VCD/S-VCD:
• "VCD" or "S-VCD"
• the number of the currently playing title
• the played back so far time of the currently playing VCD/
S-VCD in hours,minutes and seconds
10.1. Features during playback of a DVD, VCD or S-VCD
During the playback of a DVD/VCD/S-VCD you can use the
following DVD player features...
Pause playback (Pause)
To pause the playback of the inserted DVD/VCD/S-VCD...
• During playback press the button
"PAUSE" on the front
panel of the DVD player or the button
“PAUSE/STEP" on
the remote control.
"
" will appear in the display on the front panel of the DVD
player and "Pause" will be displayed on the television screen.
On the television screen you will see a freeze frame of the
scene that has just been halted.
• Press the button
"PAUSE/STEP" on the remote control to
skip to the next image.
• To proceed with the playback of the film press the button
"PLAY".
KH 6506
KH6506_V2955_UK 02.04.2007 15:10 Uhr Seite 13

- 14 -
To cancel the playback (STOP)
To cancel playback of a film on an inserted DVD/VCD/S-VCD
press the button
"STOP" on the front panel of the DVD
player or on the remote control.
... with Resume function
If you have cancelled playback of the inserted DVD/VCD/S-VCD
by pressing the button
"STOP" once, the DVD player auto-
matically saves the position where playback was interrupted.
This function is called "Resume function". "Stop[Play to conti-
nue]" is displayed on the television screen. As soon as you
press the button
"PLAY" again on the front panel of the
DVD player or on the remote control playback will continue
from the saved position.
... without Resume function
If you have cancelled playback of the inserted DVD/VCD/S-VCD
by pressing the button
"STOP" once and you press the but-
ton
"STOP" a second time the saved position, at which you
interrupted the playback, will be cleared. As soon as you
press the button
"PLAY" again playback of the inserted
DVD/VCD/S-VCD will start at the beginning.
Activate the DVD menu (Menu)
NOTE:
This function may not be available on all DVDs! If you at-
tempt to carry out a function that is not available the symbol
will be displayed on the television screen.
With many films on DVD there is a main menu on the disc
that apart from the option of playing the main film enables
you, for example...
• to choose the language for subtitles and film dialogue
• to select direct from chapters
• to playback the films bonus material (Background informa-
tion, "Making of" etc.)
If such a menu is present on the DVD inserted in the DVD
player you can activate it during playback by pressing the
"Menu" button on the remote control.
You can select particular menu items by pressing the control
buttons on the remote control; to confirm the selec-
ted menu item press...
• the
"PLAY" button on the front panel of the DVD
player or on the remote control.
or
• the "OK" button on the remote control.
To return to playback press the "MENU" button on the remote
control again.
NOTE:
This function is not available with all DVDs.
NOTE:
If you cancel playback by pressing the button
"STOP" twice
(Playback stop without Resume function) activation of the
main menu on the disc is not possible.
Playback Control (PBC) with VCDs/S-VCDs
Many VCDs/S-VCDs have Playback Control (in short "PBC").
Playback Control indicates a main menu that allows opera-
tion of several functions of the VCD/S-VCD.
If PCB is available on a VCD/S-VCD inserted in the DVD player
you must first activate it in order to be able to superimpose
the menu.
To activate PBC …
• Press the "MODE" button on the remote control during
playback or when playback is cancelled. The "Playback mode"
menu will be superimposed on the television screen.
• The "Mode" menu item is automatically selected first. By
pressing the "OK" button on the remote control you can
select between the options "Off", "Shuffle" and "PBC".
Set for "PBC" and press the "MODE" button again.
The "Playback mode" menu fades out and PBC is now
switched on.
NOTE:
If you switch on PBC during playback it is possible that play-
back will be cancelled and starts again from the beginning.
• To superimpose the PBC main menu press the "RETURN"
button on the remote control during playback.
KH 6506
KH6506_V2955_UK 02.04.2007 15:10 Uhr Seite 14

- 15 -
Skip to start of chapter (SKIP)
NOTE:
This function may not be available on all DVDs/VCDs/S-VCDs!
If you attempt to carry out a function that is not available the
symbol will be displayed on the television screen.
Within the film on the inserted DVD/VCD/S-VCD during play-
back the buttons
"SKIP forward" and "SKIP backward"
on the remote control or on the front panel of the appliance
allows you to skip…
• forward to the beginning of the next chapter or
• backward to the preceeding chapter
The respectively selected chapter will playback immediately
without the necessity of pressing the button
"PLAY". The
number of the respectively selected chapter will be displayed
on the front panel of the DVD player to the left of the played
back so far time.
Title number input via the number buttons
NOTE:
This function may not be available on all DVDs/VCDs/S-VCDs!
If you attempt to carry out a function that is not available the
symbol will be displayed on the television screen.
Instead of using the Skip function you can also access a title
from within the film of an inserted DVD/VCD/S-VCD directly
by entering the title number via the number buttons 0 to 9
on the remote control.
To do this …
• During playback or when playback is cancelled press the
number buttons on the remote control that correspond to
the title number that you want i.e. press the "3" button
for the third title or the buttons "1" followed by "0" for
the tenth title. The entered numbers will be briefly super-
imposed on the television screen.
• Then press the "OK" button on the remote control.
Playback of the entered number title will now start auto-
matically.
Search function (Search)
To select a title or chapter from the inserted DVD/VCD/S-VCD
direct you can also use the search function:
Direct chapter or time selection using the search function
(Search)
NOTE:
This function may not be available on all DVDs/VCDs/S-VCDs!
If you attempt to carry out functions that are not available
the symbol will be displayed on the television screen.
Entry of the time position via the search function
In order to select a chapter by entering its time position …
• During playback press the button "SEARCH" on the re-
mote control. The "Search" Menu will be superimposed on
the television screen.
• The "– – –" marked entry field "Title" is automatically the
first selection. Enter the desired title with the number but-
tons 0 to 9. On DVDs title 01 is most often the main film.
• Press the control button to select the "Chapter" with the
"– – –" marked entry field. Enter the desired chapter with
the number buttons 0 to 9.
• Press the control button to select the "Time" with the
"-- -- : -- -- : – –“ marked entry field. With the number but-
tons 0 to 9 enter the time position in hours, minutes and
seconds.
Example: To begin playback 1 hour, 5 minutes and 30 seconds
from the start of a film press successively the number buttons
…
• "0", "1" for 1 hour;
• "0", "5" for 5 minutes;
• "3", "0" for 30 seconds
Subsequently press the "OK" button to start playback from
the selected position.
If you want to remove a position from the entry field select
the position to be removed with the control buttons and
press the "CLR" button on the remote control.
The display now skips back to "– – –".
To fade out the "Search" menu press the button "SEARCH"
again on the remote control.
Fast scan forward/backward
In order to select specific passages in fast scan mode during
playback of the inserted DVD/VCD/S-VCD …
• For fast scan forward press the button
"F.FWD"...
• once for doubled fast scan speed; "x2" is displayed on the
television screen
• twice for four times fast scan speed; "x4" is displayed on
the television screen
• three times for eight times fast scan speed; "x8" is display-
ed on the television screen
• four times for sixteen times fast scan speed; "x16" is dis-
played on the television screen
KH 6506
KH6506_V2955_UK 02.04.2007 15:10 Uhr Seite 15

- 16 -
• For fast scan backwards press the button "F.RWD"…
• once for doubled fast scan speed; "x2" is displayed on the
television screen
• twice for four times fast scan speed; "x4" is displayed on
the television screen
• three times for eight times fast scan speed; "x8" is display-
ed on the television screen
• four times for sixteen times fast scan speed; "x16" is dis-
played on the television screen
NOTE:
During fast scan no sound will be played back.
• To resume playback of the film at the selected location in
normal speed, during scan press the button
"PLAY" on
the front panel of the DVD player or on the remote con-
trol. "Play" will again be displayed on the television
screen.
Slow motion playback (Slow motion)
To playback the contents of the inserted DVD/VCD/S-VCD in
slow motion …
• For slow motion playback press the "SLOWF" button…
• once for half playback speed (compared to normal play-
back speed); "1/2" is displayed on the television screen
• twice for a quarter playback speed; "1/4" is displayed on
the television screen
• three times for one sixth of the playback speed; "1/6" is
displayed on the television screen
• four times for one eighth of the playback speed; "1/8" is
displayed on the television screen
• For slow motion rewind playback press the "SLOWR"
button…
• five times for half the playback speed; "1/2" is displayed
on the television screen
• six times for one quarter playback speed; "1/4" is displayed
on the television screen
• seven times for one sixth playback speed; "1/6" is displayed
on the television screen
• eight times for one eighth of the playback speed; "1/8" is
displayed on the television screen
NOTE:
During slow motion playback no sound will be played.
• To resume playback at a selected location in normal speed,
during slow motion playback press the button
"PLAY"
on the front panel of the DVD player or on the remote
control. "Play" will again be displayed on the television
screen.
Frame advance (Step)
NOTE:
This function may not be available on all DVDs/VCDs/S-VCDs!
If you attempt to carry out a function that is not available the
symbol will be displayed on the television screen.
To switch the contents of an inserted DVD/VCD/S-VCD for-
ward frame by frame…
• During playback press the button
"PAUSE/STEP" to stop
playback. On the television screen you will see a freeze
frame of the scene that has just been halted.
• With each further press of the
"PAUSE/STEP" button you
will advance the frames forward one at a time.
• To continue playback press the
"PLAY" button on the
front panel of the DVD player or on the remote control.
Image enlargement (Zoom)
NOTE:
This function may not be available on all DVDs/VCDs/S-VCDs!
If you attempt to carry out a function that is not available the
symbol will be displayed on the television screen.
During the playback of an inserted DVD/VCD/S-VCD you can
enlarge the image on the television screen in three levels.
• For this press the "ZOOM" button on the remote control...
• once for the first enlargement level; "1" is displayed on
the television screen
• twice for the second enlargement level; "2" is displayed on
the television screen
• three times for the third enlargement level; "3" is displayed
on the television screen
With the control buttons sections of the enlarge-
ment can be suspended.
To switch off the zoom function and return to the normal
image size press the "ZOOM" button once more; "Off" will
be displayed on the television screen.
Change camera aspect (Angle)
This function may not be available on all DVDs/VCDs/S-VCDs!
If you attempt to carry out a function that is not available the
symbol will be displayed on the television screen.
Many films on DVD/VCD/S-VCD contain chapters, which were
recorded from different camera aspects simultaneously. With
films that have such chapters available you can view the same
chapter from different perspectives.
For this press the "ANGLE" button on the remote control
during playback of an inserted DVD/VCD/S-VCD. Each press
of the "ANGLE" button will switch to one of the available
camera perspectives.
KH 6506
KH6506_V2955_UK 02.04.2007 15:10 Uhr Seite 16

- 17 -
Superimpose/fade out subtitles
NOTE:
This function may not be available on all DVDs/VCDs/S-VCDs!
If you attempt to carry out a function that is not available the
symbol will be displayed on the television screen.
If the film on the inserted DVD/VCD/S-VCD has subtitles avail-
able you can superimpose these on the television screen du-
ring playback by pressing the "SUBTITLE" button on the
remote control.
With the first press of the "SUBTITLE" button the subtitle
of the first available language will be superimposed on the
television screen. With each further press of the "SUBTITLE"
button the subtitles of other available languages will be
superimposed successively on the television screen.
The number of the currently superimposed subtitle language
will be superimposed on the television screen (i.e. "1/10" for
the first of ten available subtitle languages).
When the last of the available subtitle languages is superim-
posed (i.e. "10/10" for the tenth of ten available subtitle
languages) you can switch off the subtitle function by pres-
sing the "SUBTITLE" button again. "Off" will be superim-
posed on the television screen.
Change playback language
NOTE:
This function may not be available on all DVDs/VCDs/S-VCDs!
If you attempt to carry out a function that is not available the
symbol will be displayed on the television screen.
With many films on DVD/VCD/S-VCD you can, during play-
back, select another playback language by pressing the
"AUDIO" button on the remote control.
With the first press of the "AUDIO" button the first available
playback language will be switched on. With each further
press of the "AUDIO" button the other available languages
will be switched on one after the other.
The currently switched on playback language will be superim-
posed on the television screen.
Programmed playback (Program)
NOTE:
This function may not be available on all DVDs/VCDs/S-VCDs!
If you attempt to carry out a function that is not available the
symbol will be displayed on the television screen.
With the "Program" function you can put together your own
film programme in so far as you can select only certain chap-
ters of an inserted DVD/VCD/S-VCD for playback. In this way
you can determine yourself the sequence, in which the chap-
ters are played back. You can compile a maximum of
16 chapters of a film for programmed play.
To use programmed playback…
• Press the "PRG" button on the remote control during
playback or when playback is cancelled.
The Program menu will be displayed on the television screen.
• Use the control buttons on the remote control to
select the desired title.
• Confirm your selection by pressing the "OK" button.
The chapter pertaining to the title appears.
• Use the control buttons on the remote control to
select the desired chapter.
• Confirm your selection by pressing the "OK" button. The
chapter will be filed on the first memory cell. Further chap-
ters will be filed, in sequence, on the memory cells 2-16.
• To clear the last current entry select the entry field "Clear"
with the control buttons or press the "CLR" but-
ton once. By repeat pressing of the "CLR" button always
the current last chapter entry will be cleared.
What are Title and Chapter? On this topic, please refer to
Section 15. "Glossary / KeyWord Index“.
KH 6506
KH6506_V2955_UK 02.04.2007 15:11 Uhr Seite 17

- 18 -
• When you have programmed the desired chapter, with the
control buttons select the option "Play" below the
entry field. Press the "OK" button. The programmed play-
back now starts with the chapter entered in programme
memory cell 1.
• Within the programmed chapter you can skip to the start
of the next and/or previous chapter by pressing the button
"SKIP+" and/or "SKIP-" on the front panel of the DVD
player or on the remote control.
• To cancel the programmed playback press the
"STOP"
button on the front panel of the DVD player or on the
remote control twice during playback.
NOTE:
If you are not sure what the title and/or chapter number is
that you want to programme, during playback select the cor-
responding chapter of the film with the button
"SKIP+"/"SKIP-" and then press the "DISPLAY" button
on the remote control to superimpose all the information
from the inserted DVD/VCD/S-VCD onto the television screen.
Here you will find, amongst others, the current title and
chapter numbers.
Ô
On this topic see also the chapter "Superimpose disc infor-
mation".
Programme example
You want to enter the chapters with the numbers 03 and 10
of a film on a DVD/VCD/S-VCD for programmed playback; in
this example the main film has the title number 01:
• The first title is automatically marked in the programme
menu. Confirm your selection by pressing the "OK" but-
ton.
• The chapter of the first title now appears. With the control
buttons select the third chapter and confirm the
selection by pressing the "OK" button. The chapter will be
filed on the first programme position.
• With the control buttons select the tenth chapter
and confirm the selection by pressing the "OK" button.
The chapter will be filed on the second programme posi-
tion.
• With the control buttons select the option "Play"
below the input field. Press the "OK" button. The pro-
grammed playback now starts with chapter 3.
Superimpose disc information
NOTE:
This function may not be available on all DVDs/VCDs/S-VCDs!
If you attempt to carry out a function that is not available the
symbol will be displayed on the television screen.
With this function you can superimpose all the available
information from a DVD/VCD/S-VCD inserted into the
DVD player onto the television screen during playback.
To do this …
• During playback press the 'DISPLAY" button on the remote
control. On the television screen will be superimposed:
In the case of DVDs:
• the already played back time of the currently playing DVD
in hours, minutes and seconds
• the time to the end of the film in hours, seconds and minutes
• the type of inserted disc (DVD)
• the current title number/the total number of titles
• the current chapter number/the total number of chapters
• the current playback language setting
• the current selected subtitle setting
• the current selected camera aspect/the number of currently
available camera aspects (Angles)
In the case of VCDs/S-VCDs:
• the already played back time of the currently playing
VCD/SVCD in hours, minutes and seconds
• the time to the end of the currently playing film in hours,
seconds and minutes
• the type of inserted disc (VCD/S-VCD)
• the current playback language setting
• To fade out the disc information press the "DISPLAY"
button again.
To switch on miscellaneous playback modes
NOTE:
This function may not be available on all DVDs/VCDs/S-VCDs!
If you attempt to carry out a function that is not available
the symbol will be displayed on the television screen.
During playback of a DVD/VCD/S-VCD you can switch on the
following playback modes:
Random playback
When you switch on the random playback the chapters on
the inserted DVD/VCD/S-VCD will be played back in random
order.
To switch on the random playback …
• During playback press the "MODE" button on the remote
control. The "Play Mode" menu will be superimposed on
the television screen.
• The "Mode" menu item is automatically selected first.
KH 6506
KH6506_V2955_UK 02.04.2007 15:11 Uhr Seite 18

- 19 -
• By pressing the "OK" button on the remote control you
can select between the options "Normal" and "Shuffle"
(on VCDs/S-VCDs the option "PBC" is added). Set for
"Shuffle" and press the "MODE" button again. The "Play
Mode" menu fades out the random function is now swit-
ched on.
• To switch off the random function press the "MODE" button
during playback and select, by pressing the "OK" button,
the option "Normal" from the "Play Mode" menu
under the menu item "Mode".
When you press the "MODE" button again the random
function is switched off.
Repeat playback
With the "Repeat playback" function you can…
... in the case of DVDs, selectively repeat titles or chapters of
the inserted DVD.
... in the case of VCDs/S-VCDs individual titles and/or the en-
tire VCD/S-VCD repeatedly playback.
To switch on the repeat playback …
• During playback press the "MODE" button on the remote
control. The "Playback mode" menu will be superimposed
on the television screen.
• Press the control button to select the menu item
"Repeat".
In the case of DVDs: By pressing the "OK" button select bet-
ween the options "Chapter", "Title" and
"Off".
• Select "Chapter" to continuously repeat the currently play-
ing chapter until repeat playback is switched off or play-
back is cancelled by pressing the
"STOP" button twice.
• Select "Title" to continuously repeat all the chapters one
after the other, thus the entire film, until repeat playback
is switched off or playback is cancelled by pressing the
"STOP" button twice.
In the case of VCDs/S-VCDs: By pressing the "OK" button
select between the options "Chapter", "Title" and "Off".
• Select "Chapter" to continuously repeat the currently play-
ing title of the VCD/S-VCD until repeat playback is swit-
ched off or playback is cancelled by pressing the
"STOP"
button twice.
• Select "Title" to continuously repeat the entire VCD/S-VCD
until repeat playback is switched off or playback is cancel-
led by pressing the
"STOP" button twice.
• To switch off repeat playback press the "MODE" button
during playback. Select the option "Off" from the
"Playback mode" menu under the menu item "Repeat".
When you press the "MODE" button again repeat play-
back is switched off.
Repeat sequence (A – B)
With this function you can repeatedly playback a favourite
sequence from within a chapter of the currently playing
DVD/VCD/S-VCD.
To do this …
• During playback press the "A – B" button on the remote
control as soon as the desired sequence starts to playback.
"Rep A –" will be displayed on the television screen.
• Press the "A – B" button again as soon as the end of the
desired sequence is played back. Pay careful attention to
the fact that the start and finish of the sequence must be
located within a chapter.
Repeat playback of the selected sequence starts immediately,
you do not need to press the
"PLAY" button. The sequence
will continuously repeat until you press the "A – B" button
again in order to switch off the function. Then "Rep AB Off"
will be briefly displayed on the television screen.
Bookmark function
During playback of a DVD/VCD/S-VCD you can place so called
"Bookmarks" in order to view again later selected passages
from a film. You can place up to three bookmarks.
To do this …
• During playback of a film press the 'MARK" button on the
remote control. On the television screen will be superim-
posed:
• As soon as the passage that you want to bookmark is rea-
ched press the "OK" button on the remote control. The
exact time position of this passage within the film will
now be displayed in hours, minutes and seconds under
"Bookmark 1".
KH 6506
KH6506_V2955_UK 02.04.2007 15:11 Uhr Seite 19
Page is loading ...
Page is loading ...
Page is loading ...
Page is loading ...
Page is loading ...
Page is loading ...
Page is loading ...
Page is loading ...
Page is loading ...
-
 1
1
-
 2
2
-
 3
3
-
 4
4
-
 5
5
-
 6
6
-
 7
7
-
 8
8
-
 9
9
-
 10
10
-
 11
11
-
 12
12
-
 13
13
-
 14
14
-
 15
15
-
 16
16
-
 17
17
-
 18
18
-
 19
19
-
 20
20
-
 21
21
-
 22
22
-
 23
23
-
 24
24
-
 25
25
-
 26
26
-
 27
27
-
 28
28
-
 29
29


Silvercrest KH 6506 Operating instructions
- Category
- DVD players
- Type
- Operating instructions
Ask a question and I''ll find the answer in the document
Finding information in a document is now easier with AI
Related papers
-
Kompernass KH 6502 User manual
-
-
Kompernass KH 6515 User manual
-
Kompernass KH 6518 User manual
-
Silvercrest DP5400x Owner's manual
-
-
-
Silvercrest SHDP 5.1 A1 User manual
-
-
Kompernass KH 6521 User manual
Other documents
-
Technicolor - Thomson DTH255E User manual
-
Hama 70048215 Owner's manual
-
EBENCH EBENCH KH 2222 SURROUND SOUND SYSTEM User manual
-
LOEWE 67201T80 Datasheet
-
Grundig gdp 3800 User manual
-
-
EKO EK200DVH User manual
-
Medion 80032 User manual
-
-