George Kovacs P4328-647 User manual

Type
User manual

This manual is also suitable for

INSTALLATION INSTRUCTIONS
Item# P4328 (New.06/06/2013)
READ AND SAVE THESE INSTRUCTIONS
WARNING! S HUT POWER OFF AT FUSE OR CIRCUIT BREAKER.
AVERTISSEMENT! COUPER LE COURANT AU NIVEAU DES FUSIBLES OU DU DISJONCTEUR.
Page 1/2
WARNING
Risk of shock, do not plug in the unit before assembly is
completed.
DO NOT EXCEED THE MAXIMUM WATTAGE RATING!
(Max. 8W). NE PAS DEPASSER LA PUISSANCE
NOMINALE MAXIMALE!
Before you begin assembly of your new fixture, please follow
the instruction manual step by step.
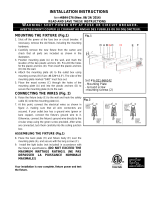
MOUNTING THE LUMINAIRE, PLUG VERSION (Fig. 1).
For hardwire go to fig.2
INSTALLATION
1. Use the “keyholes located on the mounting plate (C) as a
template to mark the location of the drywall anchors (A) and
pre-drill the holes.
2. Install the drywall anchors (A) into the wall.
3. Align the “keyholes” on the mounting plate (C) to the drywall
anchors and secure with wood screws (B).
4. Align the fixture body (D) to mounting plate (C) and secure
with screws (K).
5. To secure the cord cover, install the dry wall anchors (I)
(provide) then secure the cord cover bracket (F) to the wall
using wood screws (J) (provided).
6. Place the cord (H) into the cord cover bracket (F) and snap
the cover (G) over the cord (H).
7. Should the movement of the swivel need to be adjusted,
use an allen wrench (included) to loosen the top screw of
the swivel and then use a screwdriver (not included) to
loosen and/or tighten the bottom screw located inside the
swivel. When the desired movement is reached, re-install
the allen set screw. (Fig. 3)
IMPORTANT SAFETY INSTRUCTIONS
1. This lamp uses a touch switch. Press and release to turn on
and/or off. When in the on position, press and hold the touch
switch to cycle from dim to bright. Release the switch at once
the desired brightness is reached.
2. The LED module can be replaced by a qualified electrician
without cutting of wire and without damage to any decorative
element to which the fixture is attached. See (Fig 2.)
a. Shut off the power and remove the head cover (J)
from the lamp head (D).
b. Use a screw driver to loosen the screws (H) and
remove the module from the white plastic ring (G).
c. Un-plug the wire quick connector with LED module
(F) for re-lamping. (Note: The LED module should
be provided by specified supplier).
d. For better heat dissipation the LED module (F)
should be installed with the heat transfer material
(E) when re-lamping.
Your installation is now complete. Return power to the outlet box
and test the fixture.
Note: Illustration (Fig. 1) on this manual is for installation
purposes only. It may or may not be identical to the fixture
purchased.
IMPORTANT: FIXTURE SHOULD BE INSTALLED
BY A QUALIFIED ELECTRICIAN TO ENSURE
PROPER WIRING AND INSTALLATION.
K
H
E
D
C
B
A
F
G
I
Touch
Switch
LA-2202E
G (L-L-module ring)
E
F (L-L-module)
H (L-L-module screw)
J
D
Fig.2
Fig.1
Fig.3
INSTALLATION INSTRUCTIONS
Item# P4328 (New.06/06/2013)
READ AND SAVE THESE INSTRUCTIONS
WARNING! SHUT POWER OFF AT FUSE OR CIRCUIT BREAKER.
AVERTISSEMENT! COUPER LE COURANT AU NIVEAU DES FUSIBLES OU DU DISJONCTEUR.
Page 2/2
Fig. 4
Fig. 5
Fig. 6
MOUNTING THE FIXTURE, HARDWIRE
VERSION (Fig. 4 & Fig. 6)
1. Shut off power at the circuit breaker and remove the
old fixture including the mounting hardware.
2. Carefully unpack your new fixture and lay out all the
parts on a clear area. Take care not to lose any small
parts necessary for installation.
3. Remove tabs (1, 2, 3, 4, and 5) from mounting plate
(A) with a screwdriver or pliers.
4. Remove screws (F) and metal plate (G) from fixture
body (D) by using screwdriver (not included). (Fig.6)
5. Loosen the wire connecters located inside the fixture
backplate and carefully remove the power cord and
bushing.
6. Secure mounting plate (A) to the outlet box using
mounting screws (C) (Size: #8-32N*L0.5”).
CONNECTING THE WIRES (Fig. 5)
7. Connect the electrical wires as shown in Fig. 5,
making sure that all wire connectors are secured. If
your outlet has a ground wire (green or bare copper),
connect the fixture’s ground wire to it.
FINISHING THE INSTALLATION (Fig. 4)
8. Align fixture body (D) to mounting plate (A) and
secure with screws (B).
9. Insert plug (E) into the hole in fixture body (D).
Your installation is now complete. Return power to the
outlet box and test the fixture.
Note: Illustration (Fig. 4) on this manual is for
installation purposes only. It may or may not be
identical to the fixture purchased.
IMPORTANT: FIXTURE SHOULD BE INSTALLED
BY A QUALIFIED ELECTRICIAN TO ENSURE
PROPER WIRING AND INSTALLATION.
FIXTURE
WIRES
Black or
Smooth
HOUSE
WIRES
Black
(Hot)
FIXTURE
WIRES
White or
Ribbed
HOUSE
WIRES
White
(Neutral)
FIXTURE
WIRES
Bare
Copper
(Ground)
HOUSE
WIRES
Green
(Ground)
LA-2202E
Wire
Connector
Touch Switch
E
C
B
A
D
Busing
TDC Power
1
2
5
3
4
Set# A-021-153120
-Mounting plate
-Mounting Screw*2
D
G
F
  • Page 1 1
  • Page 2 2

George Kovacs P4328-647 User manual

Type
User manual
This manual is also suitable for

Ask a question and I''ll find the answer in the document

Finding information in a document is now easier with AI