
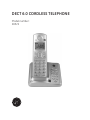
Model number:
28522
DECT 6.0 CORDLESS TELEPHONE

Thank you for choosing GE!
Register your product
Please take a moment to register your product online. Just go
to www.gephones.com and click “register here” from the home
page. Provide your email address and receive product updates,
special oers, or discounts on future purchases.
* It will not diminish your warranty rights if you choose not to register.
Assistance and more information
Retain your sales receipt as proof of purchase in the event
warranty service is necessary.
For product assistance or for more information about
accessories, visit our website at www.gephones.com or call our
customer service center at 1-877-394-9775.
Attach your sales receipt here.

Table of contents
Getting started
Parts checklist ................................................ 1
Telephone base and charger
installation ....................................................2
Telephone jack requirements .................2
Battery installation.......................................3
Battery charging ...........................................4
Telephone base layout ...............................5
Handset layout ..............................................6
Screen display icon ...................................... 7
Settings
Dialing mode...................................................8
Programming your area code
(optional) .......................................................8
Reset ................................................................... 8
Registering a handset ................................9
Deregistering a handset ............................9
Handset options
Handset name ............................................ 10
Ringer volume ............................................. 10
Ringer tone ................................................... 11
Key tone ......................................................... 11
Display language ....................................... 12
Clock and alarm
Date and time ............................................. 13
Date format .................................................. 13
Time format .................................................. 13
Alarm ............................................................... 14
Alarm melody .............................................. 14
Telephone operation
Make a call .................................................... 15
Predial a call .................................................15
Answer a call ............................................... 15
End a call ....................................................... 15
Speakerphone .............................................15
Volume control ...........................................15
Make a call using the redial
memory ...................................................... 16
Save a number from the redial list to
the phonebook ........................................ 16
Delete a number from the redial
list .................................................................. 16
Mute ................................................................. 16
Call waiting or call waiting with
caller ID service ....................................... 17
Voice mail service ...................................... 17
Using multiple handsets .........................17
Handset locator ......................................... 17
Intercom (for systems with multiple
handsets) ................................................... 18
To answer an incoming call during
intercom .....................................................18
To initiate an intercom during a
call ................................................................. 18
Phonebook
Add a phonebook entry .......................... 20
Character table .......................................... 20
To view/call a phonebook entry .........21
To search a phonebook entry
alphabetically .......................................... 21
Chain dialing ................................................ 21
Edit a phonebook entry .......................... 22
Delete phonebook entry ......................... 22
Caller ID
Phonebook Caller-ID matching ...........23
Using Caller ID service ............................ 23
Calling from the call log ..........................23
Save a number to the phonebook .....24
Delete caller ID record .............................24
Call log display screen messages ......24
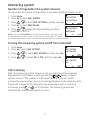
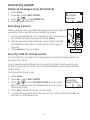
Answering system
Telephone base volume .........................25
Outgoing Announcement (OGA) ......... 25

Record an outgoing announcement
(OGA) ............................................................ 26
Number of rings before the system
answers ...................................................... 27
Turning the answering system
on/o from a handset..........................27
Call screening .............................................27
Message playback using the
telephone base ....................................... 28
Options during playback ........................28
Message playback using the
handset ....................................................... 28
Delete all messages using the
handset ....................................................... 29
Recording a memo ................................... 29
Security code for remote access........29
Access the answering system
remotely ..................................................... 30
Remote access commands .................. 30
Appendix
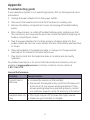
Troubleshooting guide ............................ 31
General Product Care .............................. 33
Important Safety Instructions .............34
FCC Parts 15, 68 and ACTA .................... 38
One Year Limited Warranty .................. 41
Index ................................................................ 43
Remote access operation card ...........45

1
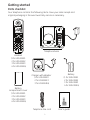
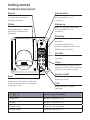
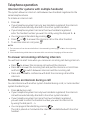
Getting started
Parts checklist
Your telephone contains the following items. Save your sales receipt and
original packaging in the event warranty service is necessary.
Charger with adapter
(1 for 28522XE2
2 for 28522XE3
3 for 28522XE4)
Handset
(1 for 28522XE1
2 for 28522XE2
3 for 28522XE3
4 for 28522XE4)
Battery
compartment cover
(1 for 28522XE1
2 for 28522XE2
3 for 28522XE3
4 for 28522XE4)
Battery
(1 for 28522XE1
2 for 28522XE2
3 for 28522XE3
4 for 28522XE4)
Telephone line cord
Telephone base
User’s guide
digital answering system
Model number:
28522
DECT 6.0 CORDLESS TELEPHONE

Getting started
2
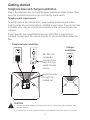
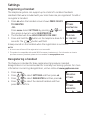
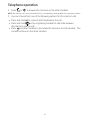
Telephone base and charger installation
Plug in the telephone line cord and the power adapter as shown below. Make
sure that the electrical outlet is not controlled by a wall switch.
Telephone jack requirements
To use this phone, you need a RJ11C type modular telephone jack, which
might look like the one pictured here, installed in your home. If you do not have
a modular jack, call your local phone company to nd out how to have one
installed.
If you have DSL high speed Internet service, a DSL lter is required (not
included). Contact your DSL service provider for more information about DSL
lter.
DSL lter (not
included) is
required if you
have DSL high
speed Internet
service.
Telephone base installation
Charger
installation
CAUTION:
1. Use only the power adaptor that came with this unit. Using other power adaptors may
damage the unit.
2. To prevent re or electrical shock hazard, do not expose this product to rain or moisture.
Route the cords
through the
tabbed slot.

Getting started
3
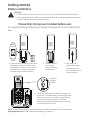
Battery installation
CAUTION:
1. To reduce the risk of re or personal injury, use only the battery supplied with this product.
2. If the handset will not be used for an extended period of time, unplug the battery and remove
it from the handset to prevent possible leakage.
Please fully charge your handset before use!
For optimum battery performance, charge the battery for 16 hours before rst
use.
NOTE: Use only the supplied rechargeable battery or replacement battery. Visit our website at
www.gephones.com to order a replacement battery if necessary.
1. Plug the battery connector securely into
the socket inside the handset battery
compartment. Make sure that red and
black wires on the plug are properly
inserted into the socket as shown.
2. Place the battery
and the wire
inside the battery
compartment.
red
wire
black
wire
4. Place the handset onto the base (or charger) as
shown. An animated battery icon will display after
a few minutes to show that the handset battery
is successfully being charged. For optimum
performance, please allow the battery to charge
for 16 hours before rst use.
3. Align the cover
against the battery
compartment and
slide it upwards until it
clicks into place.
Animated
charging
indicator

Getting started
4
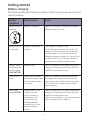
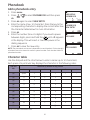
Battery charging
The following table summarizes the battery charge indicators and what actions
need to be taken.
Battery
indicators
Battery status Action
Battery icon is
scrolling.
Battery is charging. Keep the handset in the telephone base or
charger when not in use.
Battery icon is
on steadily.
Battery is completely
charged.
The handset is ready for use.
It will take approximately 2 hours for the
battery icon to indicate a full charge even
if the handset is only removed from the
telephone base or charger for a short time
and replaced. This is a normal operation
and does not indicate a battery issue.
Battery icon is
empty and the
screen shows
LOW BATTERY.
Battery is low. Place the handset in the telephone base or
charger to charge without interruption (at
least 30 minutes) before use.
The screen is
blank.
Battery has no power
while the handset is out
of the telephone base
or charger.
Place the handset in the telephone base
or charger for at least 16 hours without
interruption. See troubleshooting on page
31 for help if the screen remains blank
after charging.
The screen
shows INITIAL.
Battery power is not
enough to power
up the handset, or
the battery is not
connected to the
handset while the
handset is put in the
telephone base or
charger.
Place the handset in the telephone base or
charger to charge without interruption (at
least 30 minutes) before use.
Make sure the battery is securely connected
to the handset (refer to page 3).

Getting started
5
Telephone base layout
Volume down
Press to decrease the volume
during playback or call
screening.
Volume up
Press to increase the volume
during playback or call
screening.
Play/Stop
Press to play messages or stop
playback.
Indicates status of the
answering system. Refer to the
table below for details.
Forward
Press to skip to the next
message.
Memo
Press and hold until you hear a
beep sound, then start recording
a memo, press again to stop.
Answer on/o
Press to turn the answering
system on or o.
Find
Press to page all system
handsets.
Repeat
Press to repeat a message
or press twice to play the
previous message.
Delete
Press to delete the message
during playback, or press
and hold to delete all old
messages.
digital answering system
Answering system status
Glows blue Answering system is ON.
No light Answering system is OFF.
Flashes slowly There are new messages.
Flashes rapidly Message capacity is full.
Annc.
Press and hold until you hear a
beep sound, then start recording an
outgoing announcement message,
press again stop.

Getting started
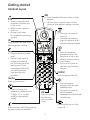
6
Handset layout
• Press to review the call
log when the telephone
is not in use.
• While in menu, press to
scroll up.
• During a call, press
to increase the incoming
volume.
ok
Press to select an item, or to
save an entry or setting.
• Press to make or answer
a call.
• During a call, press to
answer an incoming
call if you receive a call
waiting alert (if you
have subscribed to the
call waiting feature
from your service
provider).
menu
Press to show menu.
• Press to change the
telephone number format
(7 digits, 1+, or 1+ area
code) for appropriate
dialing.
Press to mute a call, press again to
resume normal conversation.
• Press to review the
phonebook when the
telephone is not in use.
• While in menu, press to
scroll down.
• During a call, press to
decrease the incoming
volume.
del
• Press to delete the last number or letter
entered.
• While in menu, press to return to the
previous level without making changes.
• During a call, press to
hang up.
• During programming,
press to cancel and exit
without making changes.
redial
Press to review redial list.
• Press to make or
answer a call using the
speakerphone.
• During a call, press to
switch between
speakerphone and normal
handset use.
Press and hold to turn the
ringer o.
int
Press to initiate
an intercom
call or transfer
a call.

Getting started
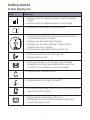
7
Screen display icon
Item Meaning
• Displays when the telephone base is within reception
range.
• Flashes when the telephone base is out of range.
• Displays during review of the phonebook.
• Scrolls to indicate battery charging when handset is in
the telephone base or charger.
• Displays two bars when fully charged.
• Displays one bar when partially charged (out of
telephone base or charger).
• Flashes and empty when battery level is low.
• Flashes when there is an incoming call.
• Displays during a call.
• Flashes when there is a new voice mail message.
(Available only if you have subscribed to voice mail
service from your telephone service provider.)
• Displays when the alarm is set.
• Displays when the ringer is turned o.
• Displays during review of the call log and when there is a
new record in the call log.
• Displays when answering system is on.
• Flashes when there is a new message or when the
answering system is full.

8
Settings
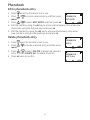
Dialing mode
The default dialing mode is TONE for touch tone dialing. If you have pulse or
rotary service, you can change this setting to accommodate your telephone line
service.
1. Press menu.
2. Press / to select SETTINGS and then
press ok.
3. Press / to select DIALING MODE and then
press ok.
4. Press / to select the desired setting and then
press ok to conrm.
Programming your area code (optional)
If you program your area code, the caller ID history displays only seven digits of
the telephone numbers from your area code.
To set the area code:
1. Press menu.
2. Press / to select SETTINGS and then press ok.
3. Press / to select AREA CODE and then press ok.
4. Enter your 3-digit area code and then press ok to
conrm.
Reset
This feature allows you to restore all system settings, except the phonebook, to
default settings. This feature could be useful, for example, if you have forgotten
the security code to access the answering system remotely.
1. Press menu.
2. Press / to select SETTINGS and then press ok.
3. Press / to select RESET and then press ok.
4. Press ok again to conrm.
NOTE: All settings under the ANS. SYSTEM, CLOCK&ALARM, HANDSET OPTS and
SETTINGS menus in the handset will be restored to default settings; the redial list
and call log will also be cleared.
SETTINGS
RESET
RESET
CONFIRM?
SETTINGS
AREA CODE
AREA CODE
_
DIALING MODE
TONE
SETTINGS
DIALING MODE

Settings
9
Registering a handset
The telephone system can support up to a total of 4 cordless handsets.
Handsets that were included with your main base are pre-registered. To add or
re-register a handset:
1. Press ok when the handset screen shows PRESS OK KEY
TO REGISTER.
-OR-
Press menu. Select SETTINGS by pressing / and
then press ok twice to enter REGISTRATION.
2. The handset will show HOLD FIND KEY FOR 5SEC.
3. Press and hold the button on the telephone base for 5
seconds. The button will ash.
A beep sounds on the handset when the registration is successful.
NOTES:
1. An error tone will sound if the registration is not successful.
2. This product is compatible with model 28502 accessory handsets only. For information on how to
purchase accessory handsets, please visit our website at www.gephones.com
Deregistering a handset
This feature is intended for base replacement procedures. Handset
deregistration is not recommended for normally functioning systems. For more
information concerning deregistration, visit us online at www.gephones.com
1. Press menu.
2. Press / to select SETTINGS and then press ok.
3. Press / to select DEREGISTER and then press ok.
4. Press / to select the desired handset and then
press ok to conrm.
SETTINGS
REGISTRATION
HOLD FIND
KEY FOR 5SEC
MAIN MENU
SETTINGS
SETTINGS
DEREGISTER

10
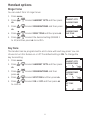
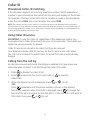
Handset options
Handset name
Your handsets will be automatically numbered from 1 to 4 depending on
the number of handsets registered to your base unit. You can rename your
handsets for easier identication (e.g. “Kitchen”, “Bedroom”, “Pams room”, etc).
To personalize each handset with a name:
1. Press menu.
2. Press / to select HANDSET OPTS and then press
ok.
3. Press ok again to select HANDSET NAME.
4. Press del to erase each letter of the current name.
5. Enter your desired handset name (up to 10 characters).
Press the key to the corresponding character to display
the correct letter. See the character table on page 20
for more information.
6. Press ok to conrm.
Ringer volume
1. Press menu.
2. Press / to select HANDSET OPTS and then press
ok.
3. Press / to select RINGER&TONES and then
press ok.
4. Press ok again to select RING VOLUME.
5. Press / to select the desired setting and then
press ok to conrm.
NOTE: Press and hold the key to switch the ringer between on and o when the
handset is in idle mode. RINGER OFF and the icon display on the screen when
ringer o feature is activated
HANDSET OPTS
HANDSET NAME
HANDSET NAME
_
HANDSET OPTS
RINGER&TONES
RINGER&TONES
RING VOLUME

Handset options
11
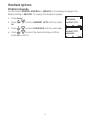
Ringer tone
You can select from 10 ringer tones.
1. Press menu.
2. Press / to select HANDSET OPTS and then press
ok.
3. Press / to select RINGER&TONES and then press
ok.
4. Press / to select RING TONE and then press ok.
5. Press / to select the desired setting (RINGER 1
to 10) and then press ok to conrm.
Key tone
The handset can be programmed to emit a tone with each key press. You can
choose to turn this feature on or o. The default setting is ON. To change the
key tone setting:
1. Press menu.
2. Press / to select HANDSET OPTS and then press
ok.
3. Press / to select RINGER&TONES and then
press ok.
4. Press / to select KEY TONE and then press ok.
5. Press / to select ON or OFF and then press ok
to conrm.
HANDSET OPTS
RINGER&TONES
RINGER&TONES
RING TONE
HANDSET OPTS
RINGER&TONES
RINGER&TONES
KEY TONE
KEY TONE
ON

Handset options
12
Display language
You can select ENGLISH, ESPAÑOL or FRANCIS as the display language. The
default setting is ENGLISH. To change the display language:
1. Press menu.
2. Press / to select HANDSET OPTS and then press
ok.
3. Press / to select LANGUAGE and then press ok.
4. Press / to select the desired setting and then
press ok to conrm.
MAIN MENU
HANDSET OPTS
HANDSET OPTS
LANGUAGE

13
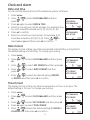
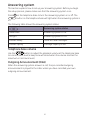
Clock and alarm
Date and time
You can set the date and time of the telephone system as follows.
1. Press menu.
2. Press / to select CLOCK&ALARM and then
press ok.
3. Press ok again to select DATE & TIME.
4. Enter the current year, month and day. For example, May
16, 2010 should be entered as [1], [0], [0], [5], [1], [6].
5. Press ok to conrm.
6. Enter the current hour and minute. For example, 9:30
should be entered as [0], [9], [3], [0]. Press / to
select am or pm and then press ok to conrm.
Date format
The display format of date can either be selected as Month/Day or Day/Month.
The default setting is Month/Day. To change your setting:
1. Press menu.
2. Press / to select CLOCK&ALARM and then press
ok.
3. Press / to select SET FORMAT and then press ok.
4. Press / to select DATE FORMAT and then
press ok.
5. Press / to select the desired setting (MM/DD
or DD/MM) and then press ok to conrm.
Time format
The display format of time can either be selected as 12 hour or 24 hour. The
default setting is 12 hour. To change your setting:
1. Press menu.
2. Press / to select CLOCK&ALARM and then press
ok.
3. Press / to select SET FORMAT and then press ok.
4. Press ok again to select TIME FORMAT.
5. Press / to select the desired setting (12 HOUR or
24 HOUR) and then press ok to conrm.
CLOCK&ALARM
SET FORMAT
SET FORMAT
DATE FORMAT
MAIN MENU
CLOCK&ALARM
CLOCK&ALARM
DATE & TIME
CLOCK&ALARM
SET FORMAT
SET FORMAT
TIME FORMAT

Clock and alarm
14
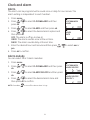
Alarm
The alarm can be programmed to sound once or daily for one minute. The
alarm setting is independent to each handset.
1. Press menu.
2. Press / to select CLOCK&ALARM and then
press ok.
3. Press / to select ALARM and then press ok.
4. Press / to select the desired alarm option and
then press ok.
OFF: The alarm is o (go to step 6).
ONCE: The alarm sounds once at the set time.
DAILY: The alarm sounds daily at the set time.
5. Enter the desired hour and minute and then press / to select am or
pm.
6. Press ok to conrm.
Alarm melody
You can select from 3 alarm melodies
1. Press menu.
2. Press / to select CLOCK&ALARM and then press
ok.
3. Press / to select ALARM MELODY and then press
ok.
4. Press / to select the desired alarm tone and
then press ok to conrm.
NOTE: Press ok or to turn o the alarm when it rings.
CLOCK&ALARM
ALARM
ALARM
ONCE
CLOCK&ALARM
ALARM MELODY
ALARM MELODY
MELODY 1

15
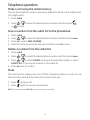
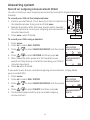
Telephone operation
Make a call
1. Press or .
2. Dial the phone number after you hear the dial tone.
Predial a call
1. Dial the phone number using the dial pad keys. If you make an error while
dialing, you can press del to erase the last digit entered.
2. Press or to dial.
Answer a call
Press or to answer an incoming call.
When there is an incoming call, the screen and dial pad backlight will be on.
NOTE: The screen shows the elapsed time as you talk (in hours, minutes and seconds).
End a call
Press or place the handset in the telephone base or charger to end a call.
Speakerphone
During a call, press to switch between speakerphone and normal handset
use. When the speakerphone is active, the handset screen shows SPKR.
NOTE: Using the speakerphone will drain the battery faster than the normal handset use.
Volume control
You can adjust the volume of the handset or speakerphone anytime during a
call.
On the handset, press to increase or to decrease the volume.
NOTE: Only the listening volume can be adjusted.

Telephone operation
16
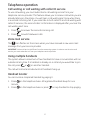
Make a call using the redial memory
The last ve telephone numbers previously dialed are stored in the redial list (up
to 24 digits each).
1. Press redial.
2. Press / to select the desired phone number and then press
or to dial.
Save a number from the redial list to the phonebook
1. Press redial.
2. Press / to select the desired phone number and then press menu.
3. Press ok to select SAVE NUMBER.
4. Enter the name by using the dial pad, and then press ok to save.
Delete a number from the redial list
1. Press redial.
2. Press / to select the desired phone number and then press menu.
3. Press / to select DELETE to remove the selected number, or select
DELETE ALL to remove all numbers in the redial list.
4. Press ok twice to conrm.
Mute
The mute function allows you to turn o the microphone while on a call. You can
hear the other party but the other party cannot hear you.
1. Press during a call.
2. Press again to resume conversation.
NOTE: The screen shows MUTE ON when mute feature is activated.
Page is loading ...
Page is loading ...
Page is loading ...
Page is loading ...
Page is loading ...
Page is loading ...
Page is loading ...
Page is loading ...
Page is loading ...
Page is loading ...
Page is loading ...
Page is loading ...
Page is loading ...
Page is loading ...
Page is loading ...
Page is loading ...
Page is loading ...
Page is loading ...
Page is loading ...
Page is loading ...
Page is loading ...
Page is loading ...
Page is loading ...
Page is loading ...
Page is loading ...
Page is loading ...
Page is loading ...
Page is loading ...
Page is loading ...
Page is loading ...
-
 1
1
-
 2
2
-
 3
3
-
 4
4
-
 5
5
-
 6
6
-
 7
7
-
 8
8
-
 9
9
-
 10
10
-
 11
11
-
 12
12
-
 13
13
-
 14
14
-
 15
15
-
 16
16
-
 17
17
-
 18
18
-
 19
19
-
 20
20
-
 21
21
-
 22
22
-
 23
23
-
 24
24
-
 25
25
-
 26
26
-
 27
27
-
 28
28
-
 29
29
-
 30
30
-
 31
31
-
 32
32
-
 33
33
-
 34
34
-
 35
35
-
 36
36
-
 37
37
-
 38
38
-
 39
39
-
 40
40
-
 41
41
-
 42
42
-
 43
43
-
 44
44
-
 45
45
-
 46
46
-
 47
47
-
 48
48
-
 49
49
-
 50
50


Ask a question and I''ll find the answer in the document
Finding information in a document is now easier with AI
Related papers
Other documents
-
Binatone 2925 User manual
-
VTech ES1210-3 User manual
-
-
AEG Voxtel S110 Combo Owner's manual
-
-
-
 ALCATEL Mobile Phones P170 User manual
-
Binatone Lifestyle 1910 User manual
-
-
