Page is loading ...

DOC P/N 5000778C KIT P/N 5000777B Printed in USA Webasto Thermo & Comfort N.A., Inc.
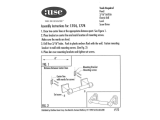
Coolant Heater
Thermo Top Series
Legend
1 Electrical Harness sockets
2 Coolant Outlet
3 Fuel Inlet
4Exhaust
5 Coolant Inlet
6 Coolant Circulation Pump
7 Combustion Air Intake
Special Tools
– Hose Clamping pliers
– Torque Wrench
2
3
4
5
7
1
6
Light Duty Generic Installation
Instructions
Foreword
1.1 Scope and Purpose - - - - - - - - - - - - - - - - - 5
1.2 General Safety / Installation Instructions- - - 5
1.3 Symbol Identification - - - - - - - - - - - - - - - 6
1.4 General References - - - - - - - - - - - - - - - - 7
1.5 Preparation - - - - - - - - - - - - - - - - - - - - - - 7
Installation
2 Electrical Overview - - - - - - - - - - - - - - - - - 8
2.2 Electrical Harness - - - - - - - - - - - - - - - - - - 9
2.3 Fuse Tap Connection - Relay K-1 - - - - - - - 9
2.4 Routing Harnesses Through Bulkhead - - - - 9
2.5 Timer Installation - - - - - - - - - - - - - - - - - 10
2.6 Integration into the Blower System - - - - - 10
3 Heater Mounting - - - - - - - - - - - - - - - - - 12
3.1 Recommended Locations- - - - - - - - - - - 12
4 Fuel System - - - - - - - - - - - - - - - - - - - - - 16
4.1 Fuel Extraction - - - - - - - - - - - - - - - - - - - 16
4.2 Fuel Supply - - - - - - - - - - - - - - - - - - - - - 18
4.3 Fuel Lines - - - - - - - - - - - - - - - - - - - - - 18
4.4 Fuel Pump Installation - - - - - - - - - - - - - - 19
4.5 Integration into the Fuel System - - - - - - -19
5 Combustion Air Supply- - - - - - - - - - - - - -21
5.1 Air Intake Silencer Installation - - - - - - - - -21
6 Exhaust System - - - - - - - - - - - - - - - - - - -22
7 Integration into the Coolant System - - - - -22
7.1 Repositioning the Circulation Pump - - - - -23
8 Power and Ground Connections - - - - - - -24
8.1 GroundConnection - - - - - - - - - - - - - - - -24
8.2 Power Connection - - - - - - - - - - - - - - - -24
9 Final Inspection, Initial Start-up and
Concluding Work - - - - - - - - - - - - - - - -25
9.1 Final Inspection (use installation checklist) -25
9.2 Initial Start-up - - - - - - - - - - - - - - - - - - - -28
9.3 Concluding Work - - - - - - - - - - - - - - - - -28
10 Heater Lockout Reset Procedure - - - - - - -29
Electrical Harness Schematic - Part 1 - - - - - - - -30
Electrical Harness Schematic - Part 2 - - - - - - - -31
Heater Plumbing Schematic - Inline Method - -32
Programming the 24 Hour Digital
Timer- - - - - -33

• Webasto heating and cooling systems require qualified and/or professional instal-
lation and repair technicians. Warranty shall be void if not installed by a certified
or trained installer/repair technician who has successfully completed the factory
training course for installation and repair of Webasto heating and cooling systems,
and has been provided with the technical information, tools and equipment
required to properly complete the necessary installation/repairs.
• Only genuine Webasto parts may be used. See also Webasto air and water heat-
ers accessories catalogue.
• Product produces temperatures high enough to ignite surrounding combustible
materials such as inflammable liquids, gases, vapor, and other combustible matter.
The heater must
be switched off when loading or unloading inflammable materi-
als to prevent the risk of explosion.
• Improper installation or repair of Webasto heating and cooling systems can cause
fire or the leakage of deadly carbon monoxide leading to serious injury or death.
• ALWAYS carefully follow Webasto installation and repair instructions and heed all
WARNINGS.
• Webasto rejects any liability for problems and damage caused by the system being
installed by untrained personnel or by improper installation.
If there are any questions regarding the installation or maintenance of this product,
please call technical support at 1-800-860-7866.

3
Thermo Top C
1 Foreword
Webasto heating and cooling systems require qualified and/or professional installation and repair technicians.
Warranty shall be void if not installed by a certified or trained installer/repair technician who has successfully
completed the factory training course for installation and repair of Webasto heating and cooling systems, and
has been provided with the technical information, tools and equipment required to properly complete the
necessary installation/repairs.
Any use, operation, installation, modification or application of the product not described in Webasto manuals,
or subjecting the product to extreme or unusual conditions beyond the limits of specified performance
characteristics is misuse of the product.
Failure to comply with all installation instructions is a misuse of Webasto products. The same applies for repairs
without using genuine Webasto service parts. This will void the coolant heaters “official Marks of Conformity.”
1.1 Scope and Purpose
These installation instructions are intended to support Webasto trained and authorized distributors and dealers
in the installation of the Thermo Top series Coolant Heaters. These instructions are not intended for use by
untrained or unauthorized personnel.
The directives in the “master reference manual” and “operating manual” for the Thermo Top series heater
must be followed. Acknowledged engineering conventions must be observed for the installation work.
ATTENTION
All relevant state and provincial licensing regulations if any, governing the installation and use of auxiliary
heating devices must be observed!
CAUTION
Location of heater, installation of coolant lines, fuel system and components, wiring and control devices
are important for proper operation. Failure to comply with the installation instructions provided may
result in poor operation or damage to heater and vehicle components.
1.2 General Safety/Installation Instructions
– Webasto heaters must be switched “off” when re-fueling at filling stations and/or while loading or
unloading flammable materials for transport, to prevent the risk of explosion. Please review owner’s
manual for safety and use instructions.
– The heater must not be installed in the passenger compartments of the vehicle.
– Extracting combustion air from the passenger compartment of the vehicle is not permissible under any
circumstance.
– Exhaust pipes must be routed so that exhaust fumes will not penetrate into the vehicle’s interior.
– Do not route exhaust components within 100 mm (4 inches) of flammable materials such as fuel system
components, polyurethane or similar foam insulation, styrene sheet installation, wood and paper
products, carpet, glycol reservoirs, coolant lines, brake lines, electrical wiring, etc.
– The operational state of the heater, i.e. an indication “on” or “off”, must be clearly visible to the operator.
– The coolant heater may only be operated within the specified voltage range designated.
– The coolant heater may only be operated with the specified fuel as recommended by the vehicle
manufacture.
– The following important regulations must be adhered to when routing fuel lines:
• Fuel lines are to be installed in such a way that they remain unaffected by torsional stresses created by
vehicle and engine movement.
• Fuel lines be securely fastened to the vehicle every 12 inches (30 cm) or less along the total length from
heater to fuel tank.
• Fuel-carrying components are to be protected against excessive heat and are to be installed so that any
drippings or evaporating fuel can neither accumulate nor be ignited by hot components or electrical
equipment.
• In buses, fuel lines are not to be located in the passenger area or in the driver’s compartment. Fuel sup-
ply must not be by means of gravity or pressurization of the fuel tank.
• The fuel tank must be equipped with a vent cap or ventilated in another way (vent line)

4
Thermo Top C
1.3 Symbol Identification
1.3.1 Symbols that define sections in manual
Mechanical Preparation
Electrical
Coolant
General Symbol Descriptions
Warning
Caution
Flammable or Combustible
Fuel
Exhaust
Combustion Air Intake
Refer to Webasto or Manufacturer Manual
Attention
Line of Sight/Item Location on Vehicle

Thermo Top C
5
1.4 General References
– Bare body parts, for example around drilled holes, must be treated with anti-corrosive coating.
– Secure hoses, cables and wiring harnesses with cable ties and fit protective hoses around them at chafing
points.
– Fit edge protectors (opened fuel hose) to sharp edges.
1.5 Preparation
1.5.1 Heater Kit
– Verify and identify all contents of kit.
1.5.2 Vehicle
– Verify fuel content in tank.
CAUTION
For reasons of safety due to possible fuel spillage, it is recommended that there be no more than 1/2 tank of fuel
present. If fuel quantity is greater than 1/2 of capacity, make provisions to reduce quantity of fuel.
– Disconnect negative terminal of vehicle battery(s).
– Protect vehicle fenders, panels and interior with covers

6
Thermo Top C
2 Electrical Overview
ATTENTION
Ensure wiring and wiring harnesses are securely fastened to the vehicle. If not described differently, securing of
wiring is done with cable ties to the vehicle’s own wiring harnesses.
2.1 Universal Electrical Harness Description
Legend for Figure 1
Fig. 1
1 2 3
4
5
6
7
8
10
11
9
12
13
14
15
16
17
19
18
20
21
22
23
24
25
26
1 Fuse holder and fuses
2 Resistor - HVAC blower control
3 Relay K1 - HVAC control
4 Relay K2 - HVAC control
5 18 GA green - “ON” signal from relay K1 and K2 to
relay K3, pin 86
6 18 GA blue - Ignition “ON” signal source
7 Main heater harness
8 Blower control harness - Positive side
9 10 GA black - HVAC control switch circuit, splice to
blower motor positive circuit (motor side)
10 10 GA red - HVAC control switch circuit, splice to
blower motor positive circuit (control side)
11 18 GA green - “ON” signal from relay K1 and K2 to
relay K3, pin 86, use when relay K3 is mounted near
HVAC blower motor (same circuit as item 5)
12 Blower control harness - Negative side
Harness is wire tied to main harness for shipping
purposes only, cut wire tie to separate negative
side blower harness from main harness
13 10 GA white - HVAC control switch circuit,
splice to blower motor negative circuit (motor
side)
14 10 GA blue - HVAC control switch circuit, splice
to blower motor negative circuit (control side)
15 10 GA brown - Connect to vehicle ground point
when relay K3 is mounted near HVAC blower motor
16 18 GA green - Relay K3, pin 86 (connects to “ON”
signal 18 GA green from relay K1 and K2). See items
5 and 11.
17 Relay K3 - HVAC control (typically mounted near
HVAC blower motor)
18 18 GA blue and brown - Fuel metering pump
harness
19 20 GA black, red and brown - Timer harness
20 18 GA violet - “Vent Mode” for optional remote
control
21 10 GA red - Battery positive
22 10 GA brown - Battery negative or ground point
23 Main power harness
24 18 GA yellow - Diagnostic connection
25 18 GA orange - Supplemental heating option
26 10 GA brown - Optional ground connection for relay
K3 when K3 is mounted with relay K1 and K2

Thermo Top C
7
2.2 Electrical Harness
ATTENTION
Remove cable tie holding the negative-side blower
control harness from the main harness and set aside.
This harness will be mounted near the vehicle blower
motor.
Mount heater electrical components on supplied
mounting bracket with hardware provided. Secure
mounting bracket to vehicle in an appropriate location
(away from plastic parts), keeping in mind the proximity
of the vehicle battery and bulkhead pass-through
grommet.
– (1) Nut 10-32 used as a spacer
– (2) Bulkhead brace
– (3) Screw M3x10, Nut M3 (2ea.)
– (4) Pan head screw 10-32x5/8”, Nut 10-32 (3ea.)
– (5) Fuse holder
– (6) Relays K1 and K2
– (7) Mounting bracket
2.3 Fuse Tap Connection - Relay K-1
CAUTION
Tap into the “fused” output side of the selected fuse.
Fuse must remain hot with the ignition in the “ON”
position only.
ATTENTION
•The blue fuse tap wire signals the Webasto heater of
an ignition cycle, returning vehicle blower control to
the driver’s discretion.
•You may need to route the fuse tap wire into the inte-
rior of the vehicle. Refer to Routing Harness Through
Bulkhead.
Route blue fuse tap wire from relay K-1, to the
underhood or interior fuse/relay center.
– (1) Underhood or interior fuse/relay center
– (2) Fuse tap
2.4 Routing Harnesses Through Bulkhead
CAUTION
Check behind bulkhead for obstructions before drilling
hole.
ATTENTION
Seal bulkhead grommet with silicone sealant after
routing harnesses.
Cut a 13 mm (1/2 in.) slit in bulkhead grommet.
Route blower and timer control harnesses through
grommet in bulkhead into the interior of the vehicle.
– (1) Vehicle bulkhead grommet
– (2) Blower and timer control harnesses
4
2
1
6
3
5
7
Fig. 2
Fig. 3
1
2
Fig. 4
1 2

8
Thermo Top C
2.5 Timer Installation
CAUTION
Check behind panels for obstructions before drilling
holes.
ATTENTION
Before installing the timer, please confirm the
installation location with the customer.
Affix supplied template to panel. Drill 10 mm (25/64 in.)
and 2.5 mm (3/32 in.) holes where indicated on template.
Figure 5 shows a translated sample of the template
supplied.
ATTENTION
Do not over tighten mounting screw.
Carefully align timer harness plug with socket on rear of
timer and push into socket until seated.
Place the timer into position and secure with screw
provided. Tighten screw until the timer with foam
cushion is firmly seated against panel. Install cover over
screw.
– (1) Timer
2.6 Integration into the blower System
Route positive-side blower harness (black and red wires)
over to blower motor area.
Mount negative-side blower harness (blue and white
wires) and relay in vicinity of HVAC blower.
– (1) Chassis ground wire
– (2) Relay K-3 of negative-side harness)
2.6.1 HVAC Blower Motor Location
ATTENTION
The blower motor is usually located under the dash on
the passenger side of the vehicle or attached to the
bulkhead under the hood.
Disconnect the blower motor connector from the blower
motor. Using a test light or similar tool identify the power
and ground wires.
Cut blower control wires at a point approximately 50 mm
(2 in.) from the connector end and make connections as
described (see para. 2.6.2.).
– (1) HVAC blower motor
– (2) HVAC blower motor connector
Fig. 5
Fig. 6
1
Example of Timer Mounting
Fig. 7
2
1
1
Fig. 8
2

Thermo Top C
9
2.6.2 3-Relay HVAC Harness Connec-
tions
NOTE:
It is permissible to cut excess length from
Webasto HVAC wiring harnesses to fit the
application.
Cut motor wires where indicated by
“
X
”
– (1) Chassis ground
– (2) Splice green wire to green wire
– (3) Strip and crimp red wire to controller
side blower control positive wire
– (4) Strip and crimp black wire to motor
side blower control positive wire
– (5) Strip and crimp white wire to motor
side blower control negative wire
– (6) Strip and crimp blue wire to controller
side blower control negative wire
CAUTION
Check your wiring! Ensure that all
connections have been done in accordance
with the wiring diagram shown (Fig. 9).
Sensitive electronic controls can be
damaged if wired incorrectly!
Secure HVAC blower control wiring to
vehicle structures with nylon wire ties.
(Image not available)
NOTE:
Complete heater harness schematics are
included on page 24 and 25 of this manual.
Legend for Figure 9
A From Webasto Heater X1
B 12 VDC Ignition ‘On’ Fuse Tap
C HVAC Control Module
M HVAC Blower Motor
X Cut wire at 50 mm (2 in.) from motor
F1 Fuse - Blower Circuit 25 Amp.
K1 Relay - Ignition ‘On’ Interrupt
K2 Relay - Positive Side of Blower Motor Circuit
K3 Relay - Negative Side of Blower Motor Circuit
R1 Resistor - Blower Speed Control
30 Battery Positive (Constant Power)
15 Ignition (Switched Power)
31 Battery Negative (Chassis Ground)
2
1
6
5
4
3
Webasto Vehicle
Fig. 9

10
Thermo Top C
3 Heater Mounting
3.1 Recommended Locations
Refer to Figure 10 for the location of heater
connections and dimensions, this will aid in
determining the best mounting site.
CAUTION
The heater must not be installed in the
immediate vicinity of hot vehicle parts or
in the direct splash-water area of the
wheels.
ATTENTION
Ensure to maintain sufficient clearance
between the heater and moving vehicle
components under all driving conditions,
i.e. vehicle suspension, engine, etc.
Consider how exposure to extreme
elements will affect heater operation, i.e.
rocks, mud, snow, etc.
Recommended heater locations: Engine Compartment, Front Fenders (above splash shields), frame rail, etc...
ATTENTION
The coolant pump on the Webasto heater
is not of the self-priming type. To ensure
automatic venting of the heater and
circulation pump mount the heater in the
lowest protected area possible.
CAUTION
The opening of the coolant connection
pipes must never point in a downward
direction in any installation position.
Figure 11 identifies the correct mounting
positions for the proper operation of the
Webasto heater.
3.1.1 Sample Heater Installation (Chrysler 300 C)
CAUTION
Sheet metal screws must never be used to secure
heater mounting brackets to the vehicle.
ATTENTION
• The heater mounting brackets must have a minimum
of three anchor points.
• Remove burs and sharp edges from heater mounting
bracket after modification.
Cut supplied mounting bracket as shown in figure 12.
Bend mounting bracket “ears” inward 90° as shown.
– (1) Heater mounting bracket (Front View)
– (2) Heater mounting bracket (Side View)
Fig. 10
90° 90°
Fig. 11
1
Fig. 12
90° 90°
2

Thermo Top C
11
ATTENTION
Observe torque specifications.
Install heater mounting bracket with three EJOT screws.
Tighten EJOT screws to 10 Nm (88.5 lb.-in.).
– (1) Heater mounting bracket
– (2) EJOT screws
Drill a 7mm (17/64 in.) hole through front bumper
support as shown in Figure 14.
Locate the 7mm (17/64 in.) hole 13mm (0.5 in.) in from
the end and 32mm (1.25 in.) in from the front.
– (1) Washer bottle
– (2) Front bumper support
Mount heater to front bumper support with hardware
provided. See Figure 15.
– (1) Webasto heater
– (2) Front bumper support
– (3) Mounting hardware
Install rear heater support bracket on heater with two
EJOT screws.
ATTENTION.
Use the rear support bracket to locate and drill a 7mm
(17/64 in.) mounting hole for bracket installation.
Secure rear support bracket to vehicle with M6x20 bolt
and nut.
– (1) Washer bottle
– (2) M6x20 bolt and nut
– (3) Rear heater support bracket
– (4) EJOT screws
Fig. 13
1
2
Fig. 14
32mm
13mm
1 2
Fig. 15
3
1
2
Fig. 16
2
1
3
4

12
Thermo Top C
3.1.2 Sample Heater Installation (Ford F-150)
ATTENTION
The Webasto Auxiliary Coolant Heater is to be installed
behind left front head lamp assembly affixed to the
front core support as shown in Figure 17.
– (1) Webasto Coolant Heater and Bracket.
ATTENTION
Bend heater mounting bracket as shown in Figures 18
and 21.
Using three self tapping EJOT screws, install heater
mounting bracket to heater as shown.
– (1) Webasto Auxiliary Heater
– (2) EJOT Screw
– (3) Heater Mounting Bracket
ATTENTION
With head lamp removed, temporarily align heater and
heater bracket in place ensuring clearance from
surrounding vehicle structure. Adjust or bend “ears” on
heater mounting bracket to conform to mounting
location. Mark all four hole locations with marker. See
Figures 19 and 20.
1
Fig. 17
1
2
3
Fig. 18
Fig. 19

Thermo Top C
13
ATTENTION
Remove heater and drill the four previously marked
hole locations using a 6.5 mm (1/4 in.) bit.
ATTENTION
Prior to heater installation, the following components
must be mounted to heater:
– (1) Combustion Air Intake Tube
– (2) Heater Bracket
– (3) Coolant Inlet Hose
– (4) Coolant Outlet Hose
– (5) Straight Fuel Line Connector
– (6) Exhaust Tube
ATTENTION
Top view of heater installed in vehicle.
– (1) Webasto Auxiliary Coolant Heater
Fig. 20
1
4
5
6
3
Fig. 21
2
1
Fig. 22

14
Thermo Top C
4 Fuel system
4.1 Fuel Extraction
4.1.1 Standpipe Installation Position
The installation position of the fuel extractor is
shown in Figure 23 and depends on the
relevant vehicle-specific installation conditions.
General instructions The following details are
supplied in the installation documentation for
the specific vehicle:
- Position of the hole in the tank fitting
- Cut the fuel extractor to length
- Shape and bend the fuel extractor
- Vehicle-specific installation instructions
If you do not have any installation documentation for the specific vehicle, find a suitable position in the tank
fitting. The fuel extractor must end 5 - 8 mm above the base of the tank after it has been shaped and cut to
length. It must not interfere with the function and stability of the tank fitting.
IMPORTANT To ensure that the tank fitting it perfectly sealed, its surface areas at the top and bottom, near the
fuel extractor, must be parallel to each other and completely flat (no embossing, labelling, etc.). The parts must
be clean and must not come into contact with fuel or grease before installation. Do not lose the sealing ring in
the fuel extractor's groove.
NOTE These binding installation instructions apply to the above fuel extractor as long as technical modifications
to the vehicle do not adversely affect the installation. Depending on the version of and equipment in the vehicle
it may be necessary to change these installation instructions. In any event, however, you must comply with the
appropriate technical rules and regulations for the installation work. Failure to follow these installation
instructions and their content will result in the refusal of all liability on the part of Webasto. The same also
applies to repairs not carried out properly or using parts other than genuine spare parts
4.1.2
Preparations
- Drill a hole with a diameter of 6.0
+0.5
mm in the
appropriate position in the tank fitting
- Remove the burr from the hole
- Bend the fuel extractor and cut it to length
- Remove the burr and chips out of the pipe (the
internal pipe diameter must not be constricted)
To install the fuel extractor
- Install the fuel extractor as shown in Figure 23,
the seal must be placed in the groove
- The tightening torque for the lock nut is 5
+1
Nm
To install the fuel hose
- Push the fuel hose as far as possible on to the fuel extractor port as shown in Figure 2 and secure it with a
10 mm clip
- Push the fuel line as far as possible into the fuel hose as shown in Figure 2 and secure it with a 10 mm clip
Fig. 23
Fig. 24

Thermo Top C
15
4.1.2 Vent Line Adapter
This standpipe version utilizes the fuel tank filler vent tube to access the fuel
supply.
The standpipe must extend into the fuel tank far enough to provide an
adequate fuel supply to the heater. Ideally, the end of the standpipe should sit
25-50 mm (1-2 in.) off the bottom of the fuel tank.
Legend for Figure 25
1Fuel Outlet
2Vent Tube Splice Connector
3Standpipe
4.1.3 Fuel line Tee Adapter
There are various sizes and shapes of fuel line adapters available from Webasto
(see Figure 26).
CAUTION
A fuel line adapter should not be installed after the vehicle fuel pump. Fuel line
pressure from the vehicle fuel pump could overcome the Webasto heater
dosing pump, causing excessive fuel delivery to the heater.
If the heater is being installed in a vehicle equipped with a fuel injection system,
determine if the vehicle fuel pump is mounted in the fuel tank. If the fuel pump
is mounted outside of the fuel tank a fuel line adapter can be used in place of
the standpipe. This is only true when the fuel line adapter can be installed prior
to the vehicle fuel pump.
ATTENTION
Fuel should not be extracted from the vicinity of the engine (gasoline only) as
gas bubbles (vapor lock) are likely to form in the fuel line, which could cause
malfunctions in heater operation.
CAUTION
A special Webasto fuel line adapter must be used for
fuel extraction from the vehicle fuel supply or return
line (see figure 27).
The fuel line adapter must be mounted so that any air or
gas bubbles that may form are automatically discharged
toward the fuel tank.
Fig. 25
1
2
3
Fig. 26
from tank
to engine
to metering pump
Fig. 27

16
Thermo Top C
4.2 Fuel Supply
Particulars on pressure values permitted to
prevail at the point of fuel extraction are
contained in the Table below.
Note: 1 bar = 14.5 psi and 1 psi = .069 bar
4.3 Fuel Lines
The special fuel line supplied in the kit is the only fuel line approved by Webasto for heater installation.
Ensure the fuel line from the metering pump to the heater is not routed in a downward pitch and is secured to the
vehicle. Fuel line mounting should be done in such a manner that the lines are protected from flying objects and
heat sources.
TABLE 1. Permitted Pressure Values
permissible fuel
feed height H (m)
at max. permissible
overpressure (bar)
in the fuel line
0.00 0.2
1.00 0.11
permissible fuel
suction height S (m)
at max. permissible
underpressure (bar)
in the fuel tank
0.00 -0.10
0.50 -0.06
1.00 -0.02
l
1
+ l
2
7 m
l
1
1,2 m
l
2
5,8 m
Fig. 28

Thermo Top C
17
ATTENTION
•Ensure the fuel lines are fully seated within the fuel line
couplers and any 90 degree bends are not buckled. Refer
to Figure 29.
•Tighten all fuel line clamps to 1.0 - 1.4 Nm (8.8 - 12.4
lb.-in.)
•Always cut Mecanyl fuel line with a sharp razor knife or
razor edged cutter. Using side cutters, scissors or similar
tools will cause a restriction inside the fuel line.
4.4 Fuel Pump Installation
The fuel metering pump is a combined fuel supply,
metering, and shutoff system and is subject to certain
installation criteria (See Figures 30 and 31).
Prior to installing the metering pump ensure the
maximum pressure prevailing at the fuel extraction point
is below 0.2 bar.
Install the fuel metering pump in accordance with Figures
29 or 30.
ATTENTION
The outlet side of the metering pump is located on the
same end as the electrical connector.
It is recommended that the metering pump be installed in
a location on the vehicle that stays reasonably cool,
excessive heat may cause the pump to vapor lock.
The metering pump should be mounted to the vehicle by
a sound and vibration-damping suspension (rubber
mount provided in kit).
4.5 Integration into the Fuel System
4.5.1 Typical Standpipe Installation (example
only)
ATTENTION
Figure 32 shows a fuel sender accessible from inside
the vehicle.
Remove the fuel sender from the vehicle following the
manufactures service instructions.
– (1) Under rear seat
– (2) Fuel sender
Fig. 29
Fig. 30
Metering Pump DP30 (Diesel)
Fig. 31
Metering Pump DP2 (Gasoline)
Fig. 32
2
1

18
Thermo Top C
ATTENTION
When selecting a location for standpipe installation,
ensure to leave enough room for electrical connections
and float arm operation.
Drill a 5/16 in. hole through the fuel sender where
shown in Figure 32.
– (1) Fuel sender
– (2) 5/16 in. hole drilled for standpipe
4.5.2 Standpipe Assembly
ATTENTION
• The standpipe tube should terminate approxi-
mately 25 mm (1in.) off bottom of tank when
installed.
• Ensure standpipe does not interfere with the
float arm.
Cut standpipe (45° angle cut) to length and bend as
necessary.
– (1) Banjo bolt
– (2) Banjo fitting
– (3) Sealing washer
– (4) Fuel sender
– (5) Flat washer
– (6) Standpipe
– (7) Locknut
Install fuel sender following the manufacturer’s service
instructions.
Position standpipe as desired. Tighten banjo bolt to 9
+/- 0.5 Nm (80 +/- 4.4 lb in.)
Connect fuel line to standpipe with fuel line coupler.
Route Mecanyl fuel line to fuel pump mounting
location.
– (1) Fuel line clamp
– (2) Fuel standpipe - Banjo bolt
– (3) Fuel sender (installed in tank)
– (4) Fuel line coupler
2
Fig. 33
1
Fig. 34
1
2
3
4
6
5
7
4
6
Fig. 35
3
4
1
2
1

Thermo Top C
19
5 Combustion Air Supply
ATTENTION
• The combustion air must never be drawn from the occupant area of the vehicle. If the heater is installed in an
enclosed housing, a vent hole of at least 3 cm (1.2 in.) is required
• Ensure the combustion air intake opening on the heater is positioned to prevent the possibility of clogging due
to contamination.
Locate the combustion air intake silencer in a splash-proof area, if possible.
When the heater is installed in the vicinity of the fuel tank, combustion air intake must be from the outside of the
vehicle and the exhaust gas be discharged into the atmosphere.
5.1 Air Intake Silencer Installation
Install the air intake silencer tube onto the combustion air
intake pipe of the heater and secure with hose clamp
provided.
Screw air intake silencer into combustion air intake tube
as far as possible.
CAUTION
Ensure the air intake silencer does not come into
contact with the exhaust system.
Attach the air intake silencer at a suitable place using the
supplied mounting clip or cable tie.
The mounting clip can be inserted into the top of the
heater after removing knockout or any other suitable
location by drilling a 6.5 mm (1/4 in.) hole.
Position the air intake silencer between 0° and 90° with
the silencer pointing downward.
– (1) Top of heater
– (2) Knockout for air intake silencer clip
Fig. 35
Fig. 36
1
2

20
Thermo Top C
6 Exhaust System
CAUTION
Keep exhaust tube away from heat sensitive vehicle
components.
ATTENTION
Any collection of condensation in the exhaust pipe must
be drained immediately; drill a small drain hole at the
lowest point of the exhaust pipe.
The exhaust gas pipe can have several bends if necessary
(total of 270°, smallest bending radius 50 mm or 2 in.).
The total length of the exhaust pipe should not be less
than 500 mm (20 in.) or more than 1000 mm (39.5 in.).
The exhaust muffler should not be installed within 200
mm (8 in.) of the heater or the intake air silencer.
The discharge opening of the exhaust pipe must not
point in the direction of travel.
Rigid pipes made of alloyed steel with a minimum wall
thickness of 1.0 mm (0.039 in.) or flexible tubes of
alloyed steel can be used for exhaust installation.
ATTENTION
Ensure all exhaust clamps are properly tightened. Check
for exhaust leaks during heater operation.
7 Integration into the Coolant System
ATTENTION
• Torque hose clamps to 2.0 - 2.5 Nm (18 - 22 lb-in.)
• Avoid sharp bends and kinks when installing coolant hoses.
• The hose clamps at the heater must be mounted between the flared neck of the pipe and the heater.
• Position hose clamps in such a way to avoid cutting or damaging adjacent components.
• Ensure coolant hoses are routed at least 100 mm (4 in.) from heat generating components (exhaust, etc.)
• To ensure proper venting, route coolant hoses below coolant filler cap.
As a rule, the coolant hose supplied by Webasto should be used. If any other coolant hose is used it must conform
to DN standard 73411. Ensure coolant hoses are routed in a way that prevent kinks and allow for proper venting.
The coolant hoses should be pitched upward if possible.
ATTENTION
Clamp vehicle coolant hose with hose clamping pliers prior to cutting to prevent coolant spillage.
The coolant heater integration into the vehicle heater circuit is done in an “INLINE” fashion. Refer to Figure 39. The
heaters are to be installed in the cooling system in the flow of the vehicle’s heat exchanger.
ATTENTION
Follow the vehicle manufacture’s specifications for proper coolant mixture and type.
Ensure the coolant circuit is properly vented before operating the heater for the first time or after a coolant
change. The heater should be installed in a way to ensure static venting. Insufficient venting can result in a failure
during heater operation due to overheating.
ATTENTION
Ensure to pressure test the coolant system after heater integration.
Also see the plumbing schematic, page 26, of this manual for a general outline of the coolant circuit arrangement.
Fig. 37
Fig. 38
6.5
/