Page is loading ...

COPY Your kxier
and Serial Numbers Here
ff VW need service, or call with a
information
ready:
WestiOn, have this
1. Complete Model and Serial Numbers (from ‘he Plate
---.----
iust behind the storage compartmer-,t &or). ’
Modes:- -
2. Purchase date from your sates slip.
I_
----.-- .__--_-__
----- -~
COPY this infOrmation in these spaces, Keep this book
San01 Numoer
--
Your WarranfY and the sales slip together in a handy
------w--._
- _ ___~_
place.
’
Purcbose Dare
---~~---.-
See the “Cookbg Wde” for importanf
safety
InformatIon.
%rvlce Company and Phone Number
---
Proper installatlort and sale use of your range are your
PWsonQl
responsibilities. Read this “Use and Care Guide” and the “Cooking
Guide”carefully for important use
and safety informatlon.
Installation
You
musi be sure your
range is...
l
installed and leveled on a floor
that will hold the weight;
@ installed in a well-ventllated
area protected from the
weather;
D properly connected to the cor-
rect electric supply and
grounding. [See “Installation
Instructions.“)
You mud be sure your range is...
l
used only for jobs expected
of home ranges;
0 used only by people who can
operate tt properly;
l
properly maintained.
Contents
?lge
Responsiblllties
2
Installation
‘i
Proper Use
2
Safety
3
Uslng Your Range
4
Surface Unit Contra’s
-I
Setting the Clock
3
Using the Minute nmer
5
Oven Controls
5
The Oven Selector
L
.: The Oven Temperature Co?irt;l
Baking or Roasting
m:,
Ad]c;tlng the Oven Ternpe7:::,ri$
~Control
c-
Broiling
.,
Using the Auromat~c MLALT!iJEP
clock
9
Page
The Over, Vent 9
The Over! Light
9
The Accesscr~~ Canning Kit
9
Cleaning and Caring for Your Range 1 G
C:xt*cl Panel and Krrobs ? 0
S?1~Y:.e
tirlI?_s and Refiector Bowls ? 0
iitt-LpCockZp 11
The Ovei- Door 12
The
r,si-l?ir?UolJS-;=~-C,~l~g OVWl
12
liemovin~ ihe Storage Drawer
14
-.
s’ea~- IPC Chcxt
15
If You Need Service or Assistance 15
! Setore C:II~C; :cr Assrstance 15
2
;I ‘.
-11~1 ?Jee3 Assrstcrnce
16
3. ,i ‘+a~,, “\ic,eci Ser.Jt*:P
16
4 if ‘YOU ricvz cl Proble5-r: 16
T7-h.
Using your range
Oven Selector
tZ&%Z2:n+~Ol,
Surface Unit Controls
/
I
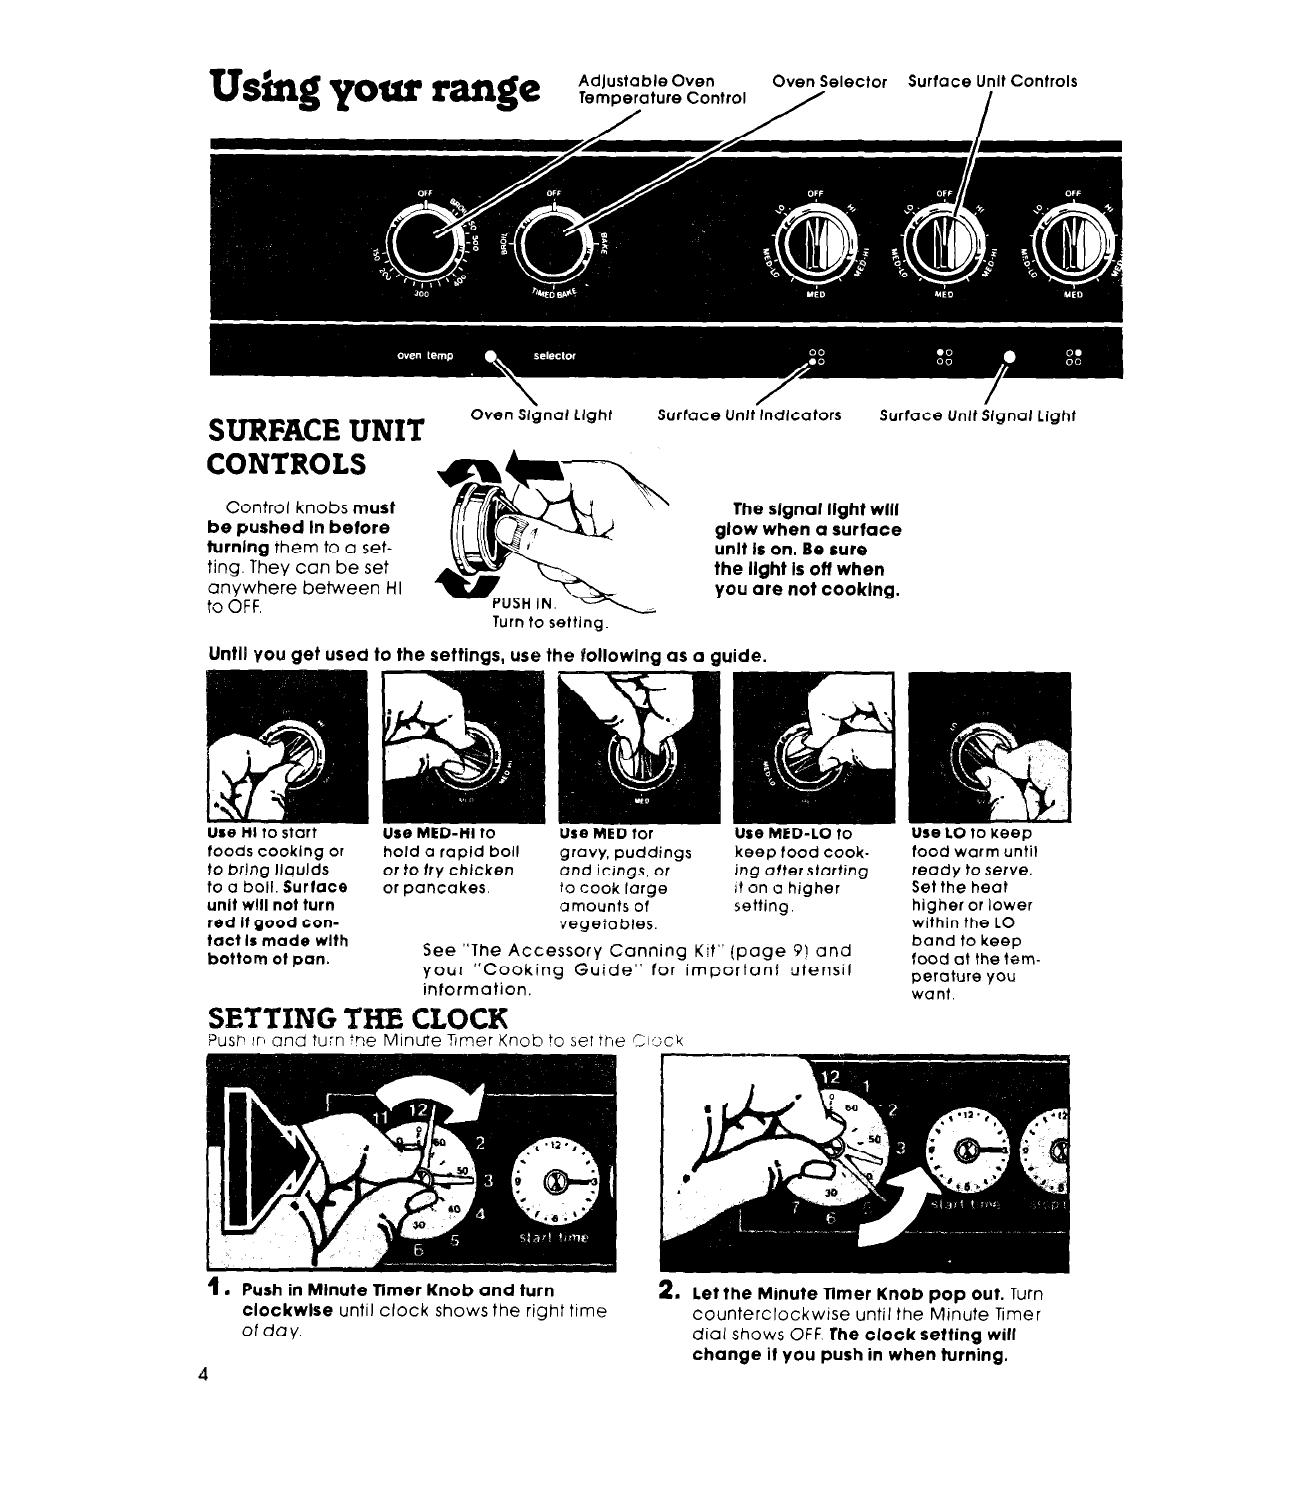
SURFACE UNIT
CONTROLS
Oven Sl;lnal Llghl Surface UnllIndicators Surface LJnlt Sfgnal Light
Control knobs must
be pushed In betore
The slgnal light will
glow when a surface
turnlng them to a set-
ting. They can be set
anywhere between HI
to OFF.
&It Is on. Be sure
Turn to setting.
Until you get used to the settings,
use the tollowlng as a guide.
Use HI to start
foods cooklng or
to br!ng llqulds
to a boll. Surlace
unit will not turn
red If good con-
tact
Is made with
bottom ot pan.
hold a rapid boll
or to fry chlcken
or pancakes.
Use MED for
gravy, puddings
and icings, or
10 cook large
amounts of
vegetables.
See “The Accessory Cunning Kit’
-
Use MED-LO to
keep food cook-
ing after starting
I! on a higher
setting.
(page 9) and
your “Cooking Guide” for important utensil
information.
Use LO to keep
food warm until
ready to serve.
Set the heat
higher or lower
within the LO
band to keep
food at the tam-
perature you
want.
SETTING THE CLOCK
Push !rs and turn +ne Minute 3mer Knob to se! rhe Oi;ck
1.
Push in Mlnute Timer Knob and turn
clockwlse until clock shows the right ttme
of day.
d
2. let the Minute Timer Knob pop out.
Turn
counterclockwise until the Minute Timer
dial shows OFF The clock setting will
change it you push in when turning.
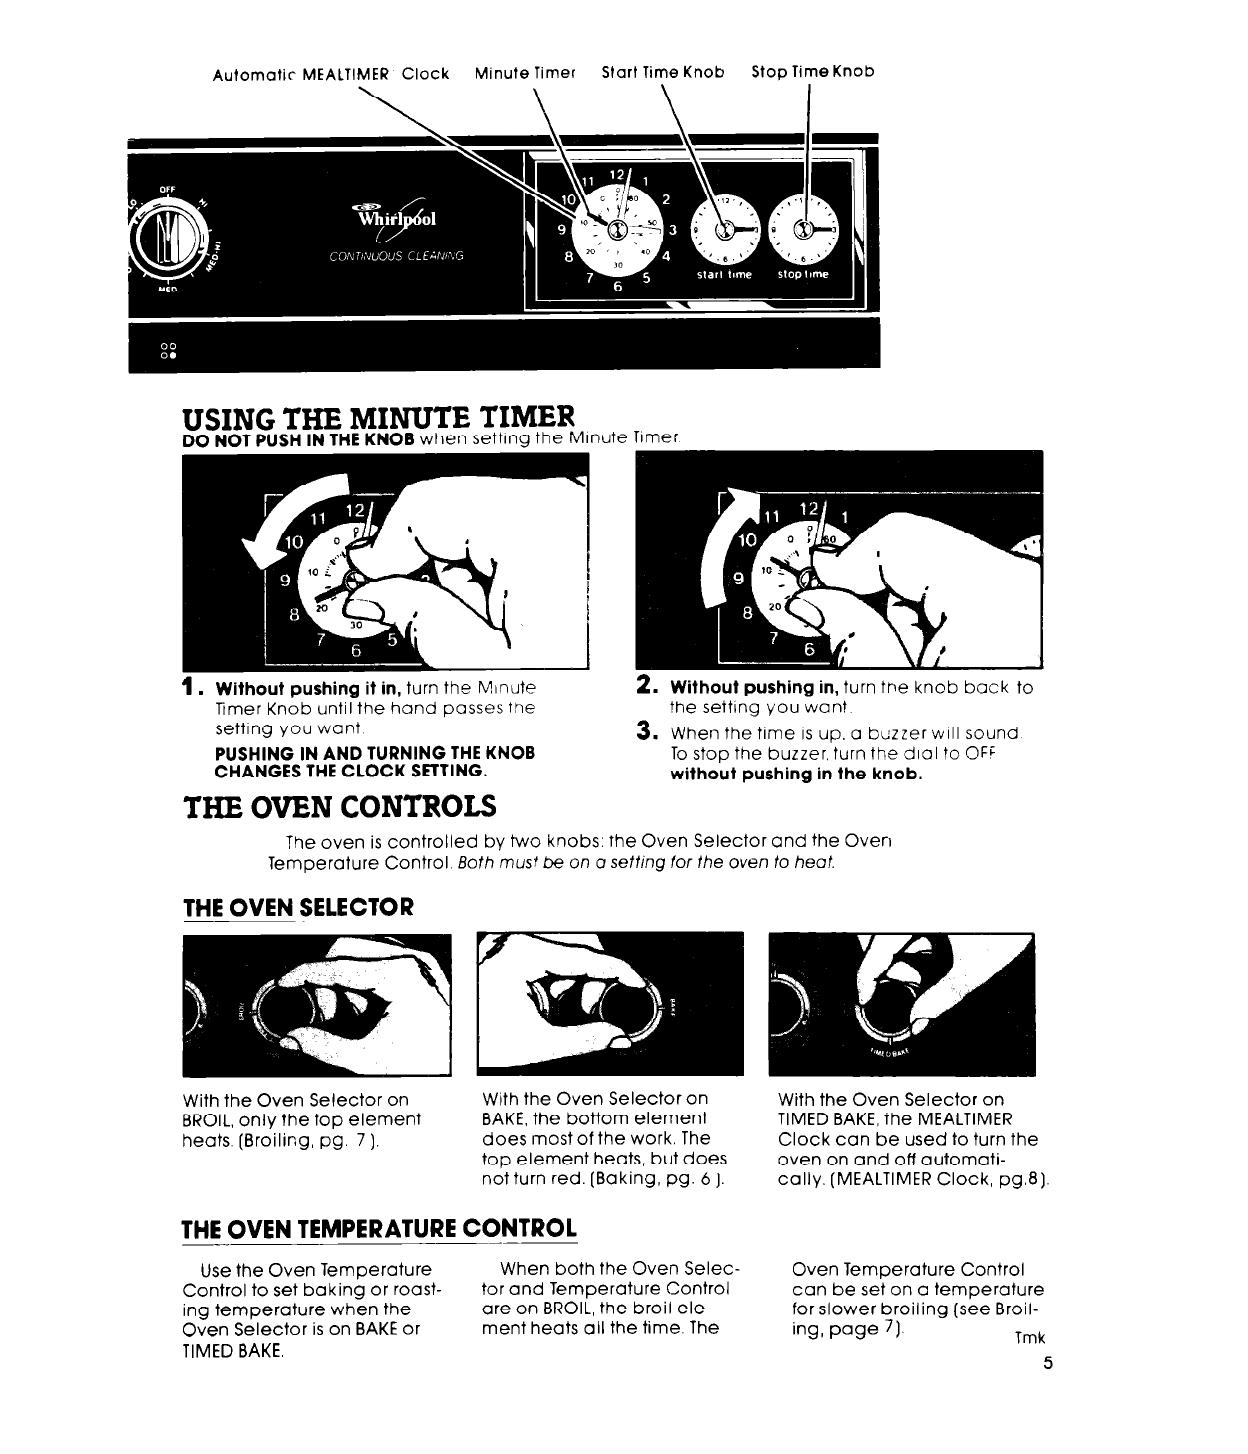
Automatic- MEALTIMER Clock
Minute Timer Start lime Knob
Stop Time Knob
USING THE MINU’rE TIMER
DO NOT PUSH IN THE KNOB when setting the Minute Trmer
4 . Without pushing it in, turn the lvlinute
mmer Knob until the hand passes the
setting you want
PUSHING IN AND TURNING THE KNOB
CHANGES THE CLOCK SETTING.
THE OVEN CONTROLS
2. Without pushing in, turn the knob back to
the setting you want
3. When the time IS up, a buzzer WIII sound
To stop the buzzer. turn the dial to OFi
without pushing in the knob.
The oven is controlled by two knobs: the Oven Selector and the Oven
Temperature Control. Both
must be on o setting
for the oven fo heot.
THE OVEN SELECTOR
With the Oven Selector on
BROIL, only the top element
heats. (Broiling, pg. 7 1.
With the Oven Selector on
With the Oven Selector on
BAKE, the bottom element
TIMED BAKE, the MEALTIMER
does most of the work. The
Clock can be used to turn the
top element heats, but does
oven on and off automati-
not turn red. [Baking, pg. 6 J.
cally. (MEALTIMER Clock, pg.8).
THE OVEN TEMPERATURE CONTROL
Use the Oven Temperature
Control to set baking or roast-
ing temperature when the
Oven
Selector is on BAKE or
TIMED BAKE.
When both the Oven Selec-
tor and Temperature Control
are on BROIL, the broil ele-
ment heats all the time. The
Oven Temperature Control
can be set on a temperature
for slower broiling (see Broil-
ing, page 7).
Tmk
5
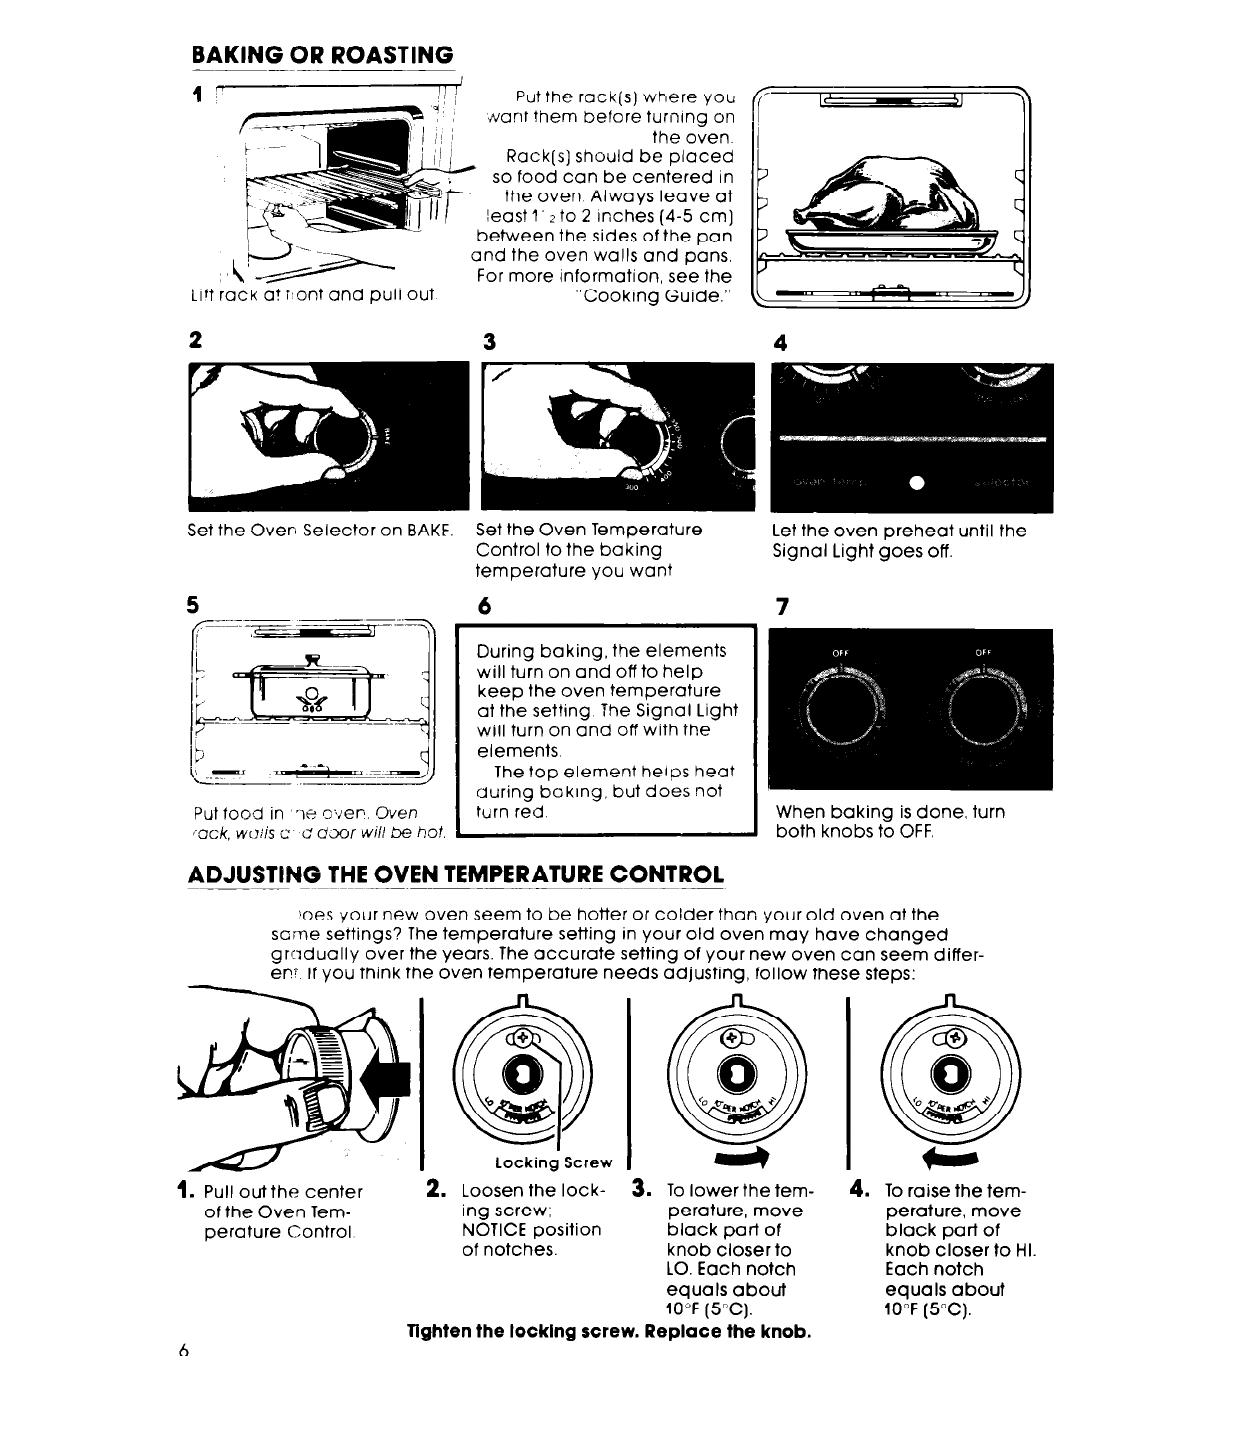
Put the rack(s) where you
tiant them before turnrng on
the oven.
Rack(s) should be placed
so food can be centered in
the oven Always leave at
least 1. z to 2 inches (4-5 cm]
oetween the sides of the pan
and the oven walls and pans.
For more information, see the
Lrrt rack a? :,ont and pull out
“Cooking Guide.”
Set the Oven Selector on BAKE.
Set the Oven Temperature
Control to the baking
temperature you want
The top element helps heat
during baking, but does not
Put food in ne oven. Oven
turn red
‘OCk, wmis c c o’cmr Wiil x ho!.
6
During baking, the elements
will turn on and off to help
keep the oven temperature
at the setting The Signal Light
will turn on and off with the
elements
ADJUSTING THE OVEN TEMPERATURE CONTROL
_____
Let the oven preheat until the
Signal Light goes off.
When baking is done, turn
both knobs to OFF.
oes your new oven seem to be hotter or colder than your old oven at the
scme settings? The temperature setting in your old oven may have changed
gradually over the years. The accurate setting of your new oven can seem differ-
en If you think the oven temperature
needs adjusting,
follow these steps:
1.
Pull out the center
2. Loosen the lock-
3. To lower the tern-
4. To raise the tem-
of the Oven Tem-
ing screw;
perature, move
perature, move
perature Control
NOTICE position
black part of
black part of
of notches.
knob closer to
knob closer to HI.
LO. Each notch
Each notch
equals about equals about
10°F (5°C).
10°F (5°C).
Tighten the locking screw. Replace the knob.
6
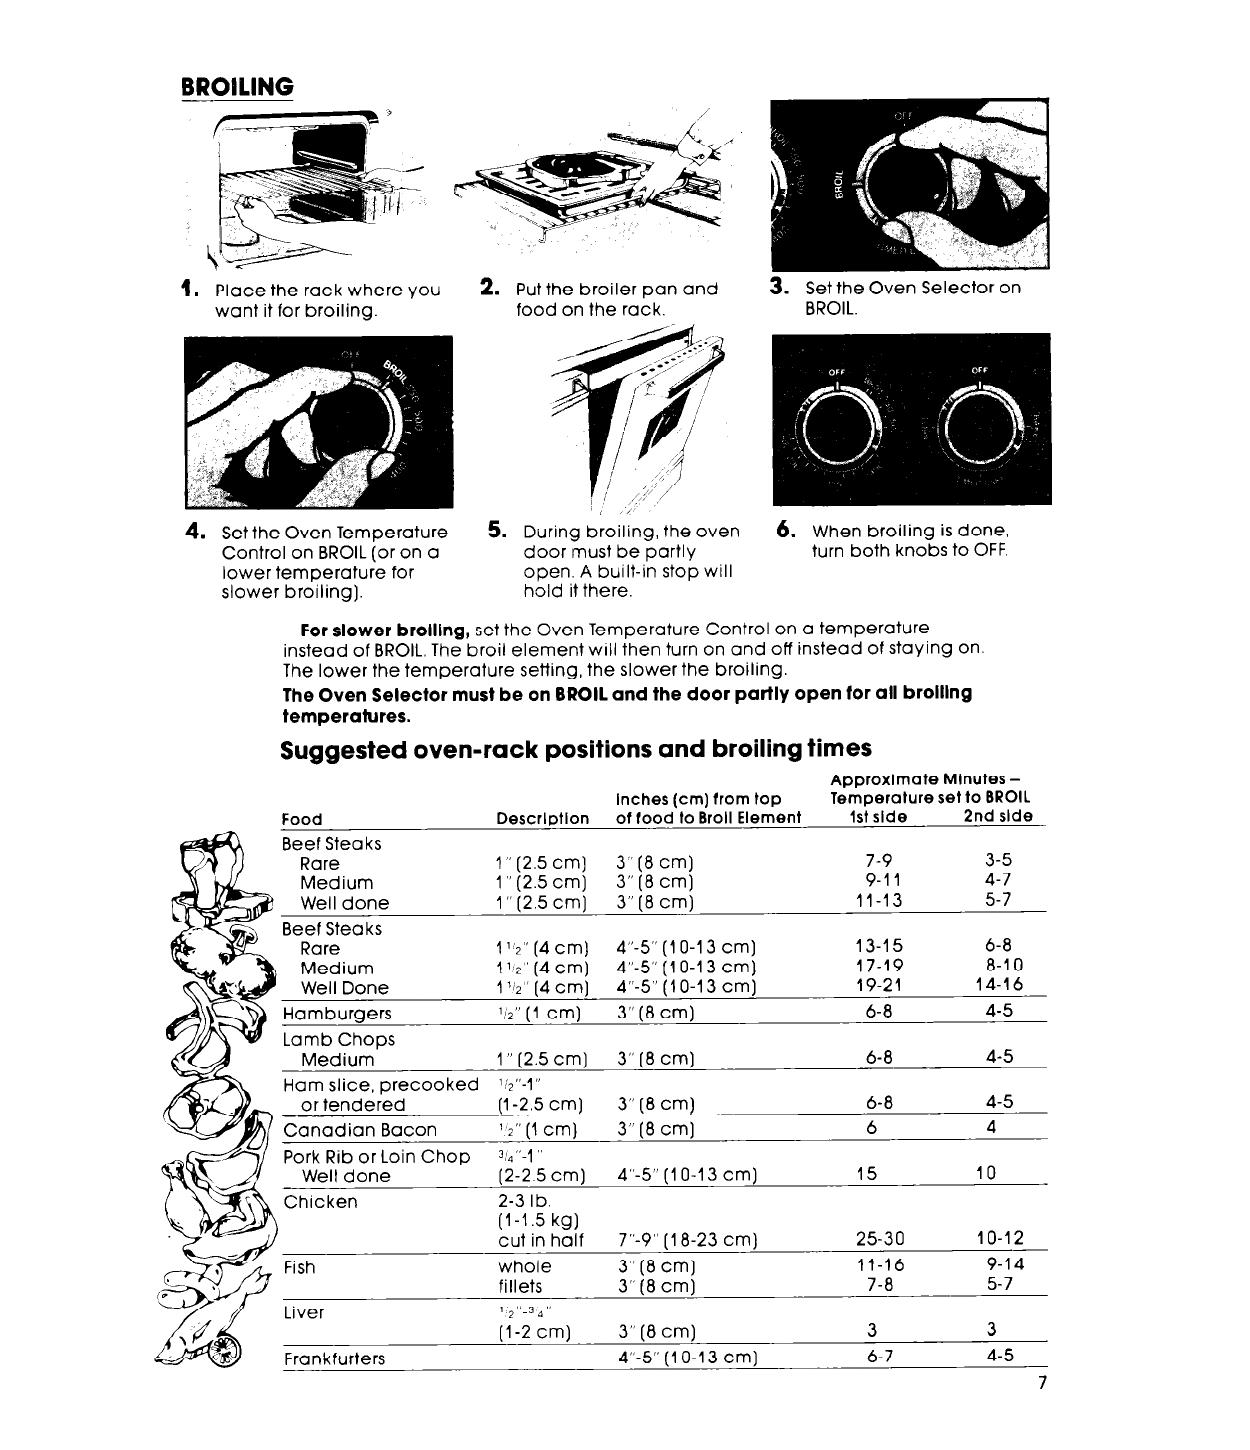
BROILING
1.
Place the rack where you
want it for broiling.
2.
Put the broiler pan and
food on the rack.
4. Set the Oven Temperature
Control on BROIL (or on a
lower temperature for
slower broiling).
5. During broiling, the oven
door must be partly
open. A built-in stop will
hold it there.
3. Set the Oven Selector on
BROIL.
6. When broiling is done,
turn both knobs to OFF.
For slower brolllng, set the Oven Temperature Control on a temperature
instead of BROIL. The broil element WIII then turn on and off instead of staying on.
The lower the temperature setting, the slower the broiling.
The Oven Selector must be on BROIL and the door partly open for all brolllng
temperatures.
Suggested oven-rack positions and broiling times
Approxlmate Minutes -
inches (cm) from top
Temperature set to BROIL
Food Descrlptlon of food to Broil Element 1st side
2nd side
Beef Steaks
Rare 1” (2.5 cm]
3” (8 cm)
7-9 3-5
Medium 1” (2.5 cm) 3” [ 8 cm)
9-l 1 4-7
Well done
1” (2.5 cm] 3” (8 cm)
11-13
5-7
Beef Steaks
Rare
1 1 2” (4 cm)
4”-5” (1 O-l 3 cm]
13-I 5 6-8
Medium
1 1 2” (4 cm)
4”-5” (1 O-l 3 cm) 17-19
8-l 0
Well Done 1 W (4 cm) 4”-5” (1 O-l 3 cm]
19-21
14-16
Hamburgers
72” [ 1 cm)
3” (8 cm)
6-8
4-5
Lamb Chops
Medium 1” (2.5 cm] 3” (8 cm) 6-8
4-5
Ham slice, precooked %“-I”
or tendered
(l-2.5 cm)
3” [ 8 cm)
6-8
4-5
Canadian Bacon
1 2” (1 cm)
3” (8 cm)
6
4
Pork Rib or Loin Chop
3/“-l ”
Well done
(2-2.5 cm)
4”-5” (I O-l 3
cm)
15
10
Chicken 2-3 I b.
(l-l.5 kg)
cut in half
7”-9” [ 18-23 cm) 25-30
1 O-l 2
Fish whole
3” (8 cm)
Ii-16
9-14
fillets 3” (8 cm)
7-8
5-7
Liver
Frankfurters
1 ”
* Jg”
(l-2 cm)
3” (8 cm)
3
3
4”-5” (1 O-l 3 cm] 6-7
P-5
7
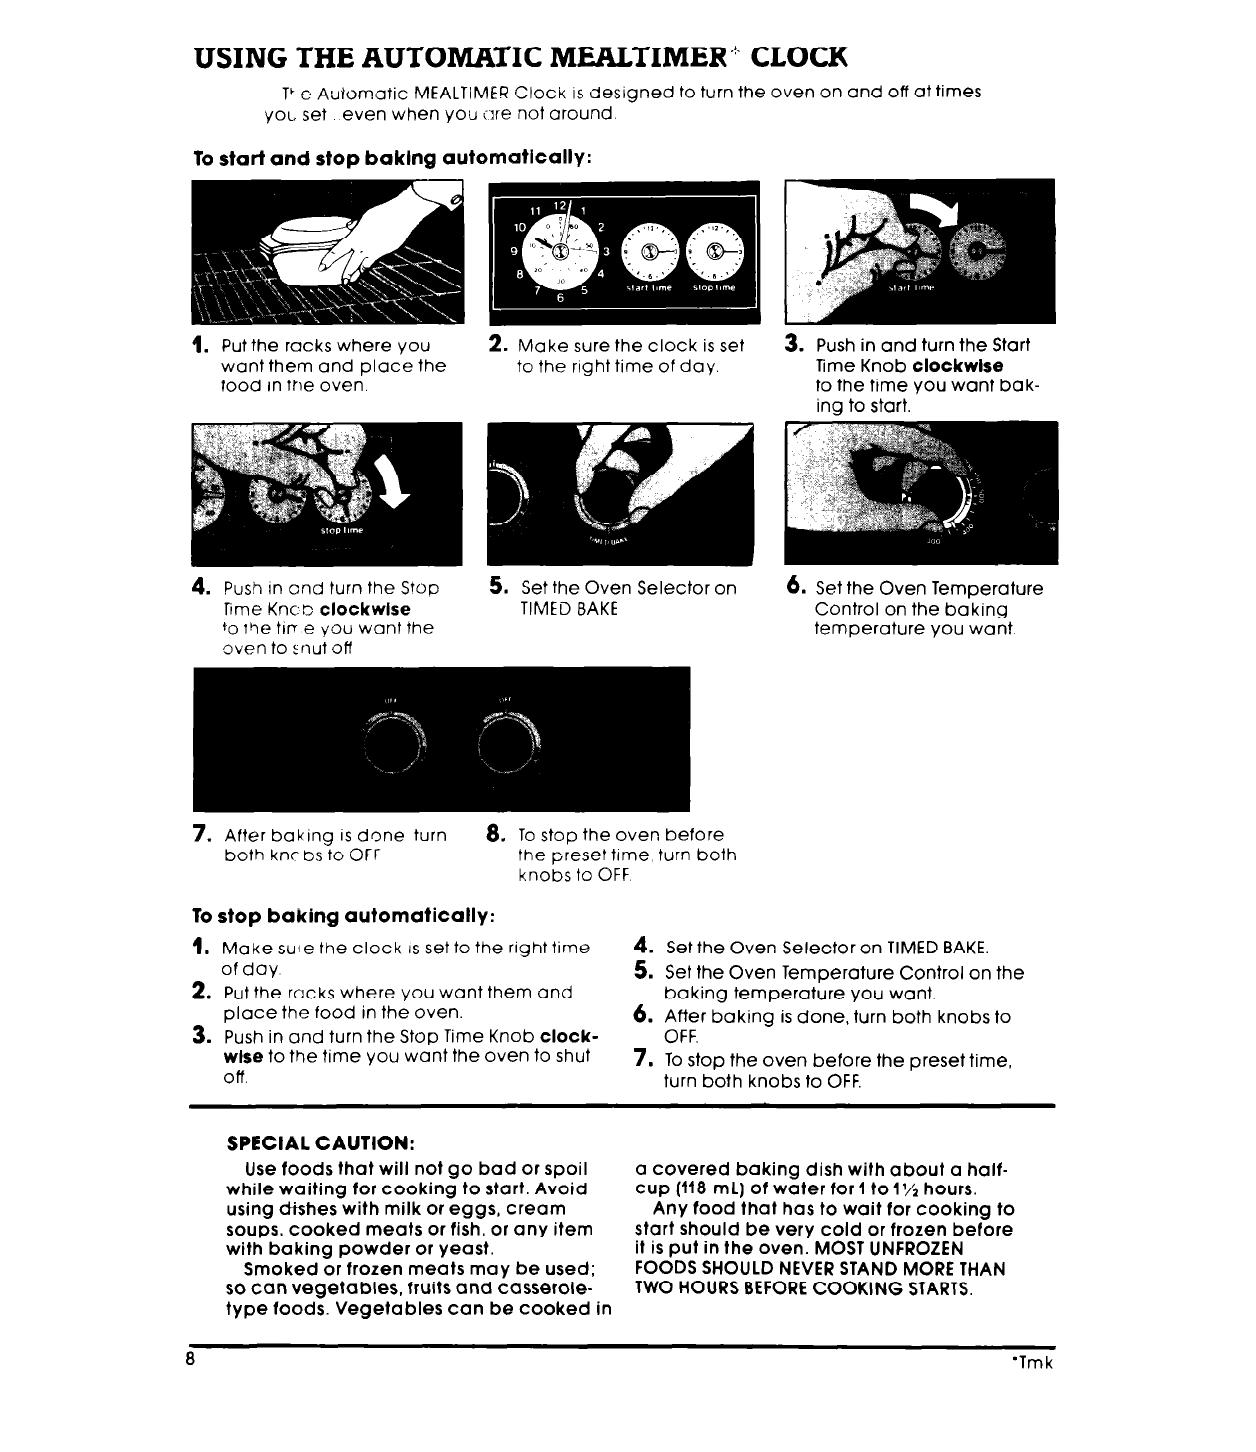
USING THE AUTOMATIC MEALTIMER”: CLOCK
T’ e Automatic MEALTIMER Clock IS designed to turn the oven on and off at times
yoc. set even when yoti are not around
To start and stop baklng automatlcallv:
1.
Put the racks where you
want them and place the
food in the oven.
2. Make sure the clock is set
to the right time of day.
3. Push in and turn the Start
Time Knob clockwlse
to the time you want bak-
ing to start.
4. Push In and turn the Stop
Time Knc t: clockwlse
+o iCle ttv e you want the
oven to :riut of!
5. Set the Oven Selector on
TIMED BAKE
6. Set the Oven Temperature
Control on the baking
temperature you want.
7. After baking IS done turn
8. To stop the oven before
both knc bs to OFF the preset time, turn both
knobs to OFF
To stop baking automatically:
1.
Make suie the clock IS set to the right time
of day
2. Put the racks where you want them and
place the food in the oven.
4. Set the Oven Selector on TIMED BAKE.
5. Set the Oven Temperature Control on the
baking temperature you want.
3. Push in and turn the Stop Time Knob clock-
6. After baking is done, turn both knobs to
OFF.
wise to the time you want the oven to shut
Off
7. To stop the oven before the preset time,
turn both knobs to OFF.
SPECIAL CAUTION:
Use foods that will not go bad or spoil
a covered baking dish with about a half-
while waiting for cooking to start. Avoid cup (118 mL) of water for 1 to 1% hours.
using dishes with milk or eggs, cream Any food that has to wait for cooking to
soups, cooked meats or fish, or any item start should be very cold or frozen before
with baking powder or yeast.
it is put in the oven. MOST UNFROZEN
Smoked or frozen meats may be used; FOODS SHOULD NEVER STAND MORE THAN
so can vegetables, fruits and casserole-
TWO HOURS BEFORE COOKING STARTS.
type foods. Vegetables can be cooked in
8
‘Tmk
l-tot air and moisture escape
from the oven through a vent
under the right rear surface
un! You can cook on the unit,
or qeep food warm on it while
the oven is on. Plastic utensils
left over the vent can melt.
Do not block the vent. Poor
baking can result.
THE OVEN LIGHT
The oven light will come on when you open the oven door or when you
push the manual OVEN LIGHT switch. Close the oven door or push the switch
again to turn off the light.
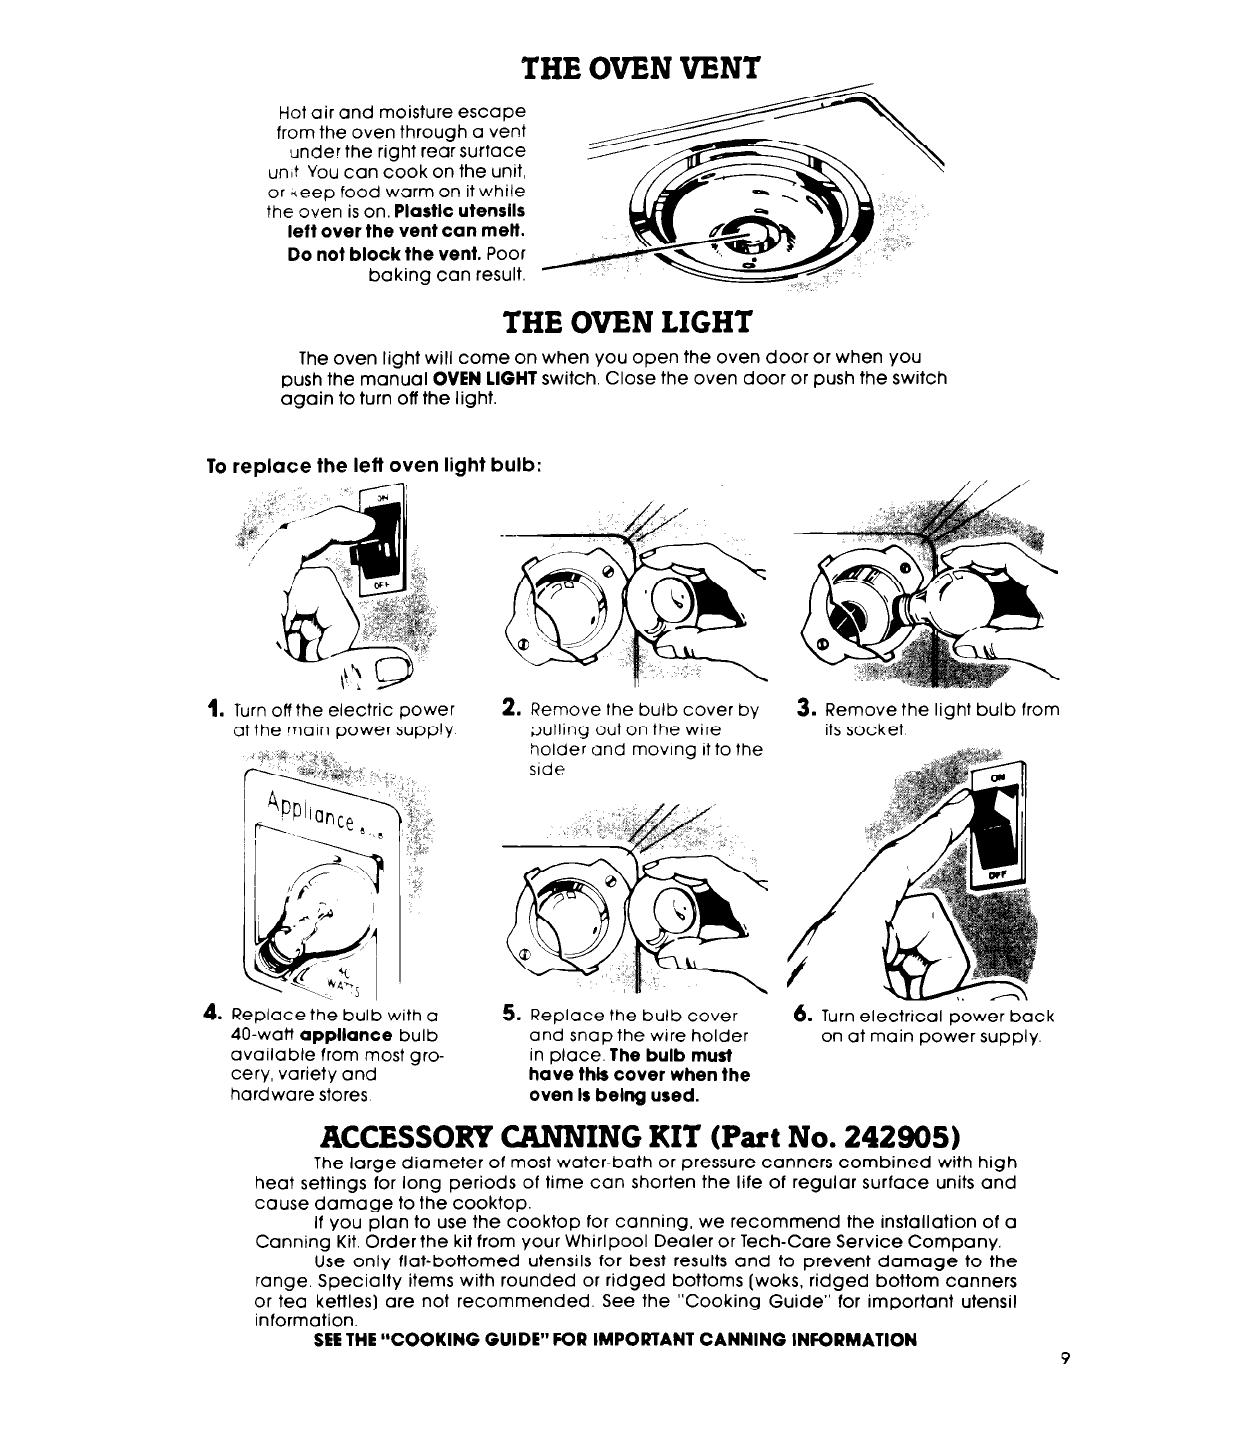
To replace the left oven light bulb:
1.
Turn off the electric power
at the marn power supp!y
4. Replace the bulb with a
40-watt appliance bulb
available from most gro-
cery, variety and
hardware stores
2. Remove the bulb cover by 3. Remove the light bulb from
pullinq out on the wire
its socket
holde; and movrng it to the
srde
5. Replace the bulb cover
and snap the wire holder
in place. The bulb musi
have thk cover when the
oven Is being used.
6.
Turn electrical power back
on at main power supply.
ACCESSOKY CANNING KIT (Part No. 242905)
The large diameter of most water-bath or pressure canners combined with high
heat settings for long periods of time can shorten the life of regular surface units and
cause damage to the cooktop.
If you plan to use the cooktop for canning, we recommend the installation of a
Canning Kit. Order the kit from your Whirlpool Dealer or Tech-Care Service Company.
Use only flat-bottomed utensils for best results and to prevent damage to the
range. Specialty items with rounded or ridged bottoms (woks, ridged bottom canners
or tea kettles) are not recommended. See the “Cooking Guide” for important utensil
information.
SEE THE “COOKING GUIDE” FOR IMPORTANT CANNING INFORMATION
9
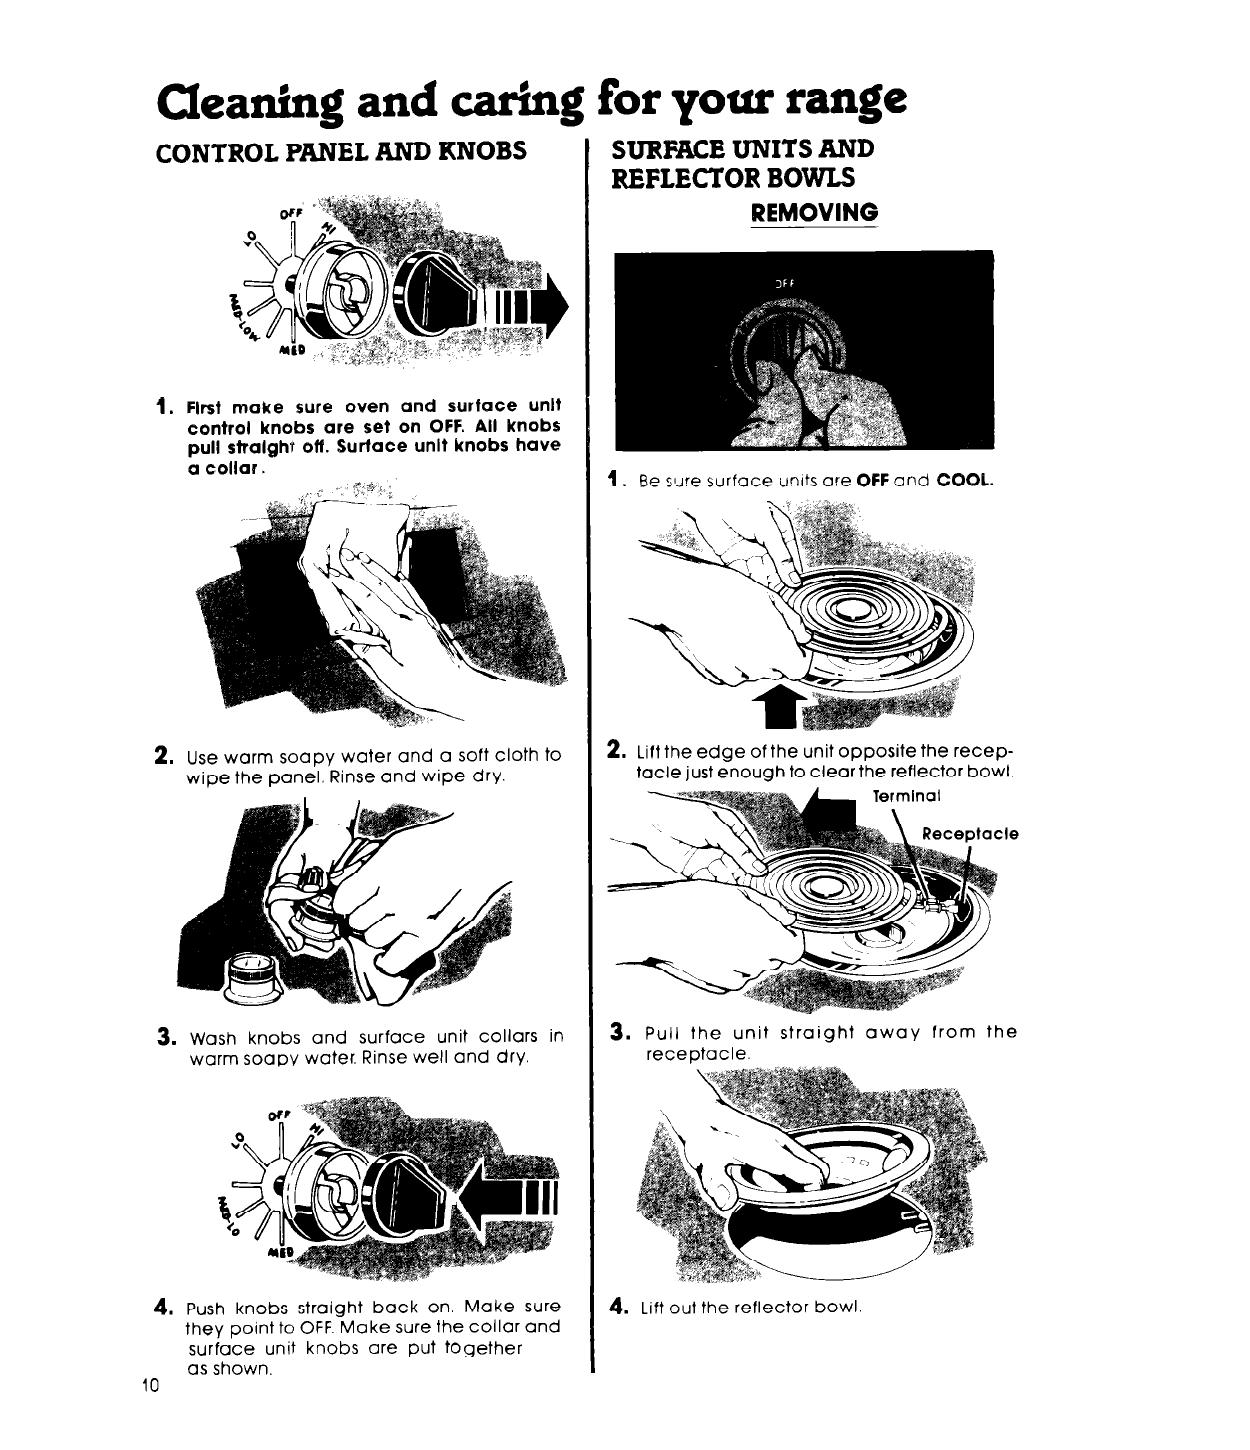
Cleaning and caring for your range
CONTROL PANEL AND KNOBS
1.
First make sure oven and surface unlt
control knobs are set on OFF. All knobs
pull stralghv off. Surface unit knobs have
a collar.
2. Use warm soapy water and a soft cloth to
wipe the panel. Rinse and wipe dry.
3. Wash knobs and surface unit
COllUrS
in
warm soapy water. Rinse well and dry.
4. Push knobs straight back on. Make sure
they point to OFF. Make sure the collar and
surface unit knobs are put together
as shown.
10
SURFACE UNITS AND
REFLECTOR BOWLS
REMOVING
1.
Be sure surface units are OFF and COOL.
2. Lift the edge of the unit opposite the recep-
tacle just enough to clearthe reflector bowl.
3. Pull the unit straight away from the
receDtacle.
4. Lift out the reflector bowl

REPLACING
4. 6e sur.,
s,;;iace unit
controls ore
OFF
\.
Bowl
\ \,
A
Dpenlng
3. Hold :le :,urface unit as level as possible
with ‘?e terminal just started into the
recer’acie
4. While pushing the surface unit terminal into
the receptacle, lift a little on the edge of
the unit nearest the receptacle.
5. When the terminal is pushed into the re-
ceptacle as far as it will go, the surface unit
will fit into the reflector bowl.
Reflectc,r bowls reflect heat back tc the
urenslis cr: rhe surface unrts. They also help
catch spills. When they are kept clean, they
reflect heat better and look new longer.
If a reflector bowl gets discolored, some
of the utensils used may not be flat enough.
Or some may be too large for the surface
unit. In either case, some of the heat that is
meant to go into or around a utensil goes
down ana heats the reflector bowl. This ex-
tra heat can discolor it.
LIFT-UP COOKTOP
Be sure surface units, cooktop and oven are
cool.
1.
Lift the front of the cooktop at the center
and swing the support rod up.
2. Carefully lower the cooktop onto the
support rod. Be sure the tip of the rod fits in
the notch in the cooktop.
3. Wipe with warm soapy water. Use soapy
steel wool pad on stubborn spots.
DO NOT drop the cooktop. Damage can result.
11

THE OVEN DOOR
REMOVING
1.
Open the !oo:?o the
broil stop
REPLACING
1.
Fit the hinge supports intc
the openings at the
bottom ovi’?~ corners
2.
Hold the dcor orI botk,
sides and lift sllghtiy 13
clear the stops In the
2. Lift slightly while slldlng
the hinge supports Into
the openings
3.
3.
Pull the door, with the
hinges, straight away
from the oven
Y
\E\/hen the stops in the
hinge supports slide into
the oven openings, the
door will snap into place
and can be closed.
THE CONTINUOWS-CLEANING OVEN
Fat Spatter
Fal Spatter
Beads Up,
Spreads Out,
Turns Black
Burns Away
Standard porcelain-enamel
Continuous-cleanlng porcelain-enamel

1,
qe c :en w~n:jow ard rccKs do nor have
3. If you do mare broiling than baking, hcnd
+.\e c nlIntioLc,-cre:3nrng surface Ciean
cleaning may be needed.
tnem 3y honc
4. use aluminum foil on the oven bot-
2.
The cq/en r!oo: c;oe. .o! ~‘“1 cs hot as the
tom according to instructions
walls Scme hcrld rirnnrng may
SplllOVers
do
not
burn away and
be needed
may stain the bottom
DO NO2 USE OVEN
CLEANING PRODUCTS.
Some c,an be traooecr
the porcelcin-e:‘arhe;
surface and give ,217
harmfu: fumes
HAND CLEANING
WINDOW-Keep clean
,kv!lPi not cudsv water.
‘20 not use steel wool or
abrasive clecnc3. Use i;
;;lastic scouring 3lJd :or
stubborr spots. Rtnse
vY,ell.
RACKS - Use a soapy
steei-wool pad for best
-esuIts. Rinse well.
1
‘WALLS AND DOOR-Wash with hot soapy
water. Use a soapy steel-wool pcc or
plastic scouring pad for stlubborn spots
Rinse well
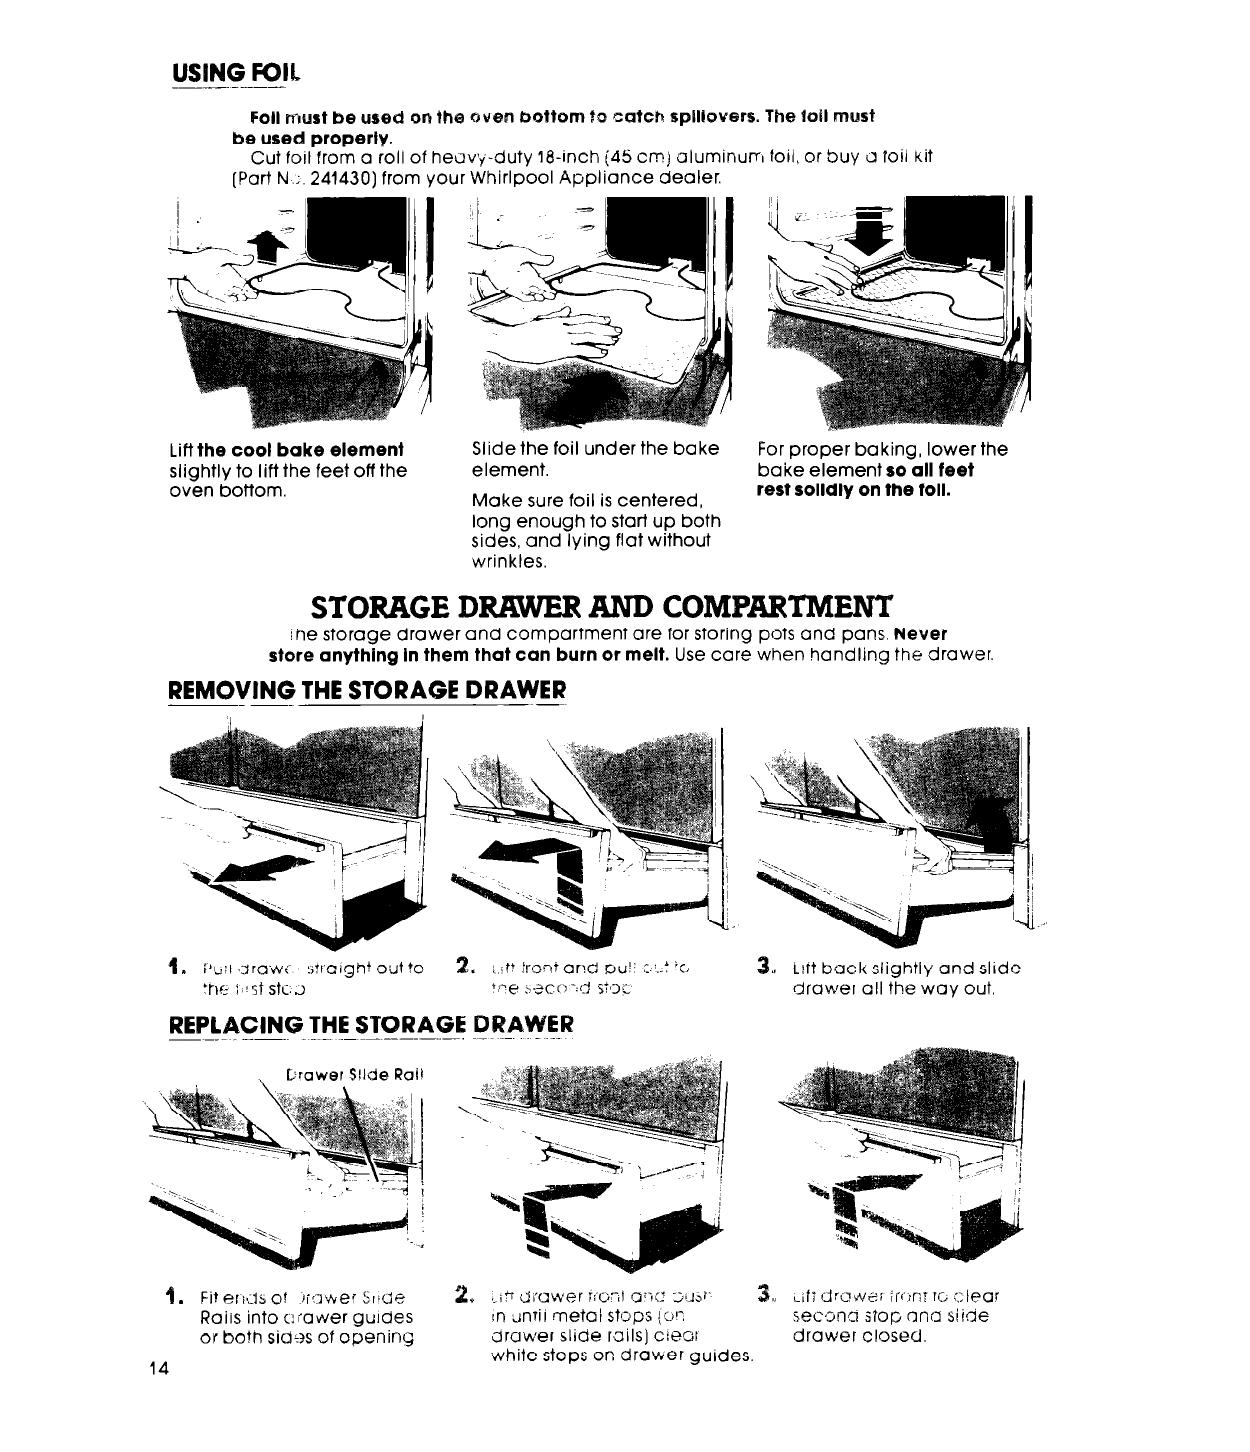
USING FOIL
Foil must be used on the oven bottom to catch splltouers. The toil must
be used properly.
Cut foil from a roll of heavy-duty la-inch (45 cm) aluminum foil, or
Suy il foil Kit
(Part N.;. 241430) from your Whirlpool Appliance dealer.
Lift the cool bake element
slightly to lift the feet off the
oven bottom.
Slide the foil under the bake
element.
Make sure foil is centered,
long enough to start up both
sides, and lying flat without
wrinkles.
For proper baking, lower the
bake element so all feet
rest solldly on the foil.
STORAGE DRAWER AND COMPARIM~
ihe storage drawer and compartment are for storing pots and pans. Never
store anything In them that can burn or melt. Use care when handling the drawer
REMOVING THE STORAGE DRAWER
~- ~-
9. Fit eriils of
iiQVvC?f Slide 2. .-ici 2
i
I’UWef YCO;t ax -j~J,r’
Raiis into ciawer gurdes rn tinrir metal stoos jon
or both
sid+?~
Of Opening
druwer slide rails] creai
3., L!rt back slightly and slide
drawer all the way out
3. .;fT dririuer iri’cr Tc, ::;iear
secma slop ana slide
drawer closed.
14
Yvhite stops on drawer guides
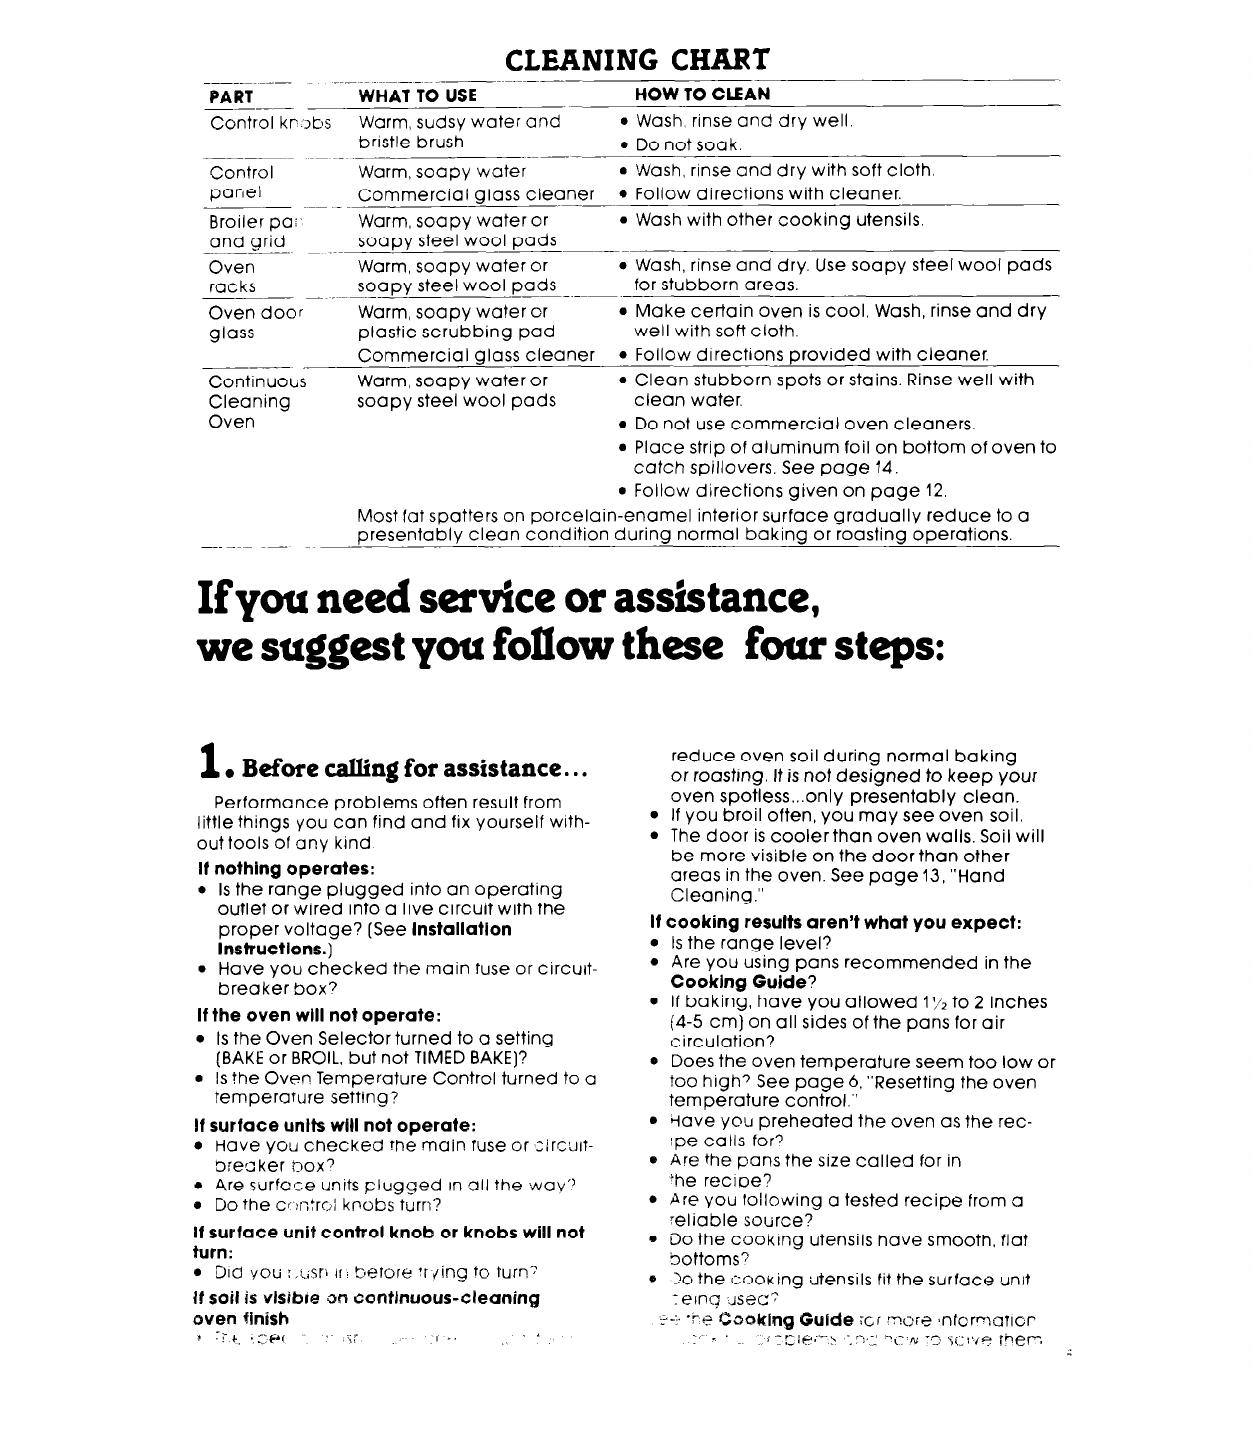
CLEANING CHART
-___~ ~. ----
PART
WHAT TO USE
HOW TO CLEAN
Control kr:lbs
Warm, sudsy water and
l
Wash, rinse and dry well.
brrstle brush
6 Do not soak.
Control
Warm, soapy water
l
‘Nash, rinse and dry with soft cloth.
panel
Commercial glass cleaner
l
Follow directions with cleaner.
~~__~
Broiler pal-
Warm, soapy water or
l
Wash with other cooking utensils.
and arid
-L. ~ .~~
soapy steel wool pads
Oven
Warm, soapy water or
l
Wash, rinse and dry. Use soapy steel wool pads
racks
soapy steel wool pads
for stubborn areas.
Oven door
Warm, soapy water or
l
Make certain oven is cool. Wash, rinse and dry
glass
plastic scrubbing pad
well with soft cloth.
Commercial glass cleaner
l
Follow directions provided with cleaner.
__-__ ._
Continuous
Warm, soapy water or
l
Clean stubborn spots or stains. Rinse well with
Cleaning
soapy steel wool pads
clean water.
Oven
l
Do not use commercial oven cleaners.
l
Place strip of aluminum foil on bottom of oven to
catch spillovers. See page 14.
l
Follow directions given on page 12.
Most fat spatters on porcelain-enamel interior surface gradually reduce to a
presentably clean condition during normal baking or roasting operations.
If you need service or assistance,
we suggest you follow these
four steps:
1
. Before calling for assistance.. .
Performance problems often result from
little things you can find and fix yourself with-
out tools of any kind
If nothlng operates:
l
Is the range plugged into an operating
outlet or wired into a live circuit with the
proper voltage? [See lnstallatlon
Instructlons.)
l
Have you checked the main fuse or circuft-
breaker box7
If the oven will not operate:
l
Is the Oven Selector turned to a setting
[BAKE or BROIL, but not TIMED BAKE]?
l
Is ?he Oven Temperature Control turned to a
temperature setting?
Jf surface unlts will not operate:
l
Have you checked the main fuse or :irc:Jrt-
breaker 00x3
l
Are surfaf:e units plugged In all the wav”
l
Do the c~:n:ro knobs turn?
If surface unit control knob or knobs will not
turn:
l
DIG! you : .usri II, tierore Tiding to turn’
if soil is vlsibre cm conttnuous-cleaning
oven finish
I .+.,p,
:;-
:;;
I ..
‘
reduce oven soil during normal baking
or roastrng. It is not designed to keep your
oven spotless...only presentably clean.
l
If you broil often, you may see oven soil.
l
The door is coolerthan oven walls. Soil will
be more visible on the door than other
areas in the oven. See page 13, “Hand
Cleaning.”
If cooking results aren’t what you expect:
l
Is the range level?
l
Are you using pans recommended in the
Cooklng Guide?
l
If baking, have you allowed I’/2 to 2 inches
(4-5 cm) on all sides of the pans for air
circulation7
* Does the oven temperature seem too low or
too high3 See page 6. “Resetting the oven
temperature control.”
l
tiave you preheated the oven as the rec-
Ipe calls for?
0 Are the pans the size called for in
‘he recrpe?
l
Are YOU following a tested recipe from a
reliable source?
l
Do the cooking utensils have smooth, fiat
oottoms7
6 30 the [Zooking utensils fit the surface unrt
7 E?lnc; JisE?C’

2
. If you ased assistance
Call the Whlrrpool COOL-LINE’ aervlce OS-
slrtance telephone number. Dial tree from:
Continental U.S. ,. . . . . . . (600) 253-1301
Mlchlgan . . . . . . ~ . . . L. . (800) 632-2243
Alaska & Hawall . . . . . . . . (800) 253- 112 1
and talk with one of our trained Consultants
The Consultant can instruct you in how to ob-
tain satisfactory operation from your appll-
ante or, if service is necessary, recommend a
qualified service company In your area
3
. Ifyou need service’ . . .
Whirlpool has a
-/7
nationwide net-
work of franchised
technicians are
trained to fulfill the
FRANCHISED SERVICE
.-__
product warrant\
and provide aftei-
warranty serv ze. anywhere in the United
States. To Iccc’e TECH-CARE service in y%r
area
call our ZOOL-LINE service asslstanct
telephone number (see Step 2j or look in vour
telephone directory Yellow Pages under
APPLIANCES-HOUSEHOLD-
ELECTRICALAPPLIANCES-
MAJOR-SERVICE L SEPAIR
MAJOR--REPAIRING B PAPIE
NHIHlPOOt APPLIANCE'
OR
?iHlRLPOO, APP1:i.h I>
;RANChlSEDTECb-CAL >E+,,:E
:AANLHIStCi iii c :,aiHE ,;*I,.:
4
. If you have a problem . . .
2ui! our COOL-LINE service assistance tele-
pnone number [see Step 2) and talk with one
of
oui
Consultants. or if you prefer, write to:
Mr Guy Turner, Vice President
WhIrlpool Corporation
Admrnistrative Center
2000 US-33 North
Benton Harbor, MI 49022
‘If you must call or write, please provide: model
number, serial number, date of purchase, and
a complete description of the problem. This
information is needed in order to better re-
spond to your request for assistance.
FSP IS a regrstered Iradema*k
of WhIrlpool Corporatrw for
qualrty parts took for thus
symbol 01 qualrty whenever
you need a replacement part
for your Whirlpool applronce
FSP replacement ports
wrll frt r:ght and .vork rrght. because they are
made io the same exacting specrfrcolrons
used to build every new Whrrlpool appirance
llo1m1,1
Benton Harbor, Michrgan. Automatic Washers, Clothes Dryers,
Freezers. Refrigerator-Freezers, Ice Makers, Dishwashers,
Built-in Ovens and Surtace Units, Ranges, Microwave Ovens,
Compactors, Room Air Conditioners, Dehumidifiers, Central
Heating and Air Conditioning Systems.
Printed in U.S.A.
Part No. 1325942 1877791
/