Page is loading ...

© 2016. Uniden America Corporation Issue 1, November 2016
Irving, Texas Printed in China
SET UP GUIDE
Wired Video Security DVR System
This Set Up Guide applies to the following models:
B6440D
G6440D
G6840D1
G6860D2
G6880D2

Uniden surveillance products are not manufactured and/or sold with the intent to be used for
illegal purposes. Uniden expects consumer’s use of these products to be in compliance with all
local, state and federal law. For further information on video surveillance and audio recording legal
requirements, please consult your local, state and federal law.
© 2016 Uniden America Corporation
All rights allowed by law are hereby reserved.
Information in this document is subject to change without notice.

1
ABOUT YOUR VIDEO SECURITY SYSTEM
Thank you for purchasing Uniden's Guardian Video Security DVR. This state of the
art surveillance system provides high quality synchronous audio and video. TCP/IP
network technology lets you monitor and operate your system remotely.
This Setup Guide provides basic setup and operation information so you can quickly
get your system up and running. It also sets up remote viewing access. Download
the Owner’s Manual from www.uniden.com for detailed information about system
operation.
INCLUDED IN THE BOX:
• Cameras (4, 6, or 8) • Receiver (1) • 12V 2A Power Adapter
(2)
• 4-or8-WaySplier
Cable
• 60’ExtenonCable(4,
6, or 8)
• USB Mouse
• Ethernet Cable • HDMI Cable • CameraMounngKit
If any items are missing or damaged, visit www.uniden.com for assistance
SETTING UP YOUR SYSTEM - BASIC
Images in these installation procedures show the front and back panels of the
G6840D1. Other models' back panels will be different, but similar.
Basic setup connects the DVR to all peripheral equipment (cameras, mouse,
monitor, etc) and power. Once connected, your system is ready for use through the
DVR’s menu system.
You can set up your system in 2 stages - installing your system hardware and then
sengupbasicconguraon.Eachstagehasseparatesteps.
STAGE 1 - Install System Hardware
• Connect DVR to Power
• Connect Mouse to DVR
• Connect DVR to Monitor
• Connect Ethernet Cable
• Connect Cameras to DVR and Power
• Install Cameras
STAGE 2 - Basic System Configuration
• Complete Wizard and Log In
• Set Password

2
• Set Screen Resolution
• Set Motion Sensitivity
CONNECT DVR TO POWER
1. Connect the DVR to 12V power using the 12V
2A power adapter (supplied).
2. Connect the power adapter to the surge protector plugged into 120V indoor
power.
CONNECT MOUSE TO DVR
Connect the mouse to the DVR at the labeled USB
port on the back of the DVR.
CONNECT DVR TO MONITOR
There are three different ways to connect the DVR and monitor, depending on
what type of monitor port connection is available.
Monitor with HDMI Port
1. Connect DVR and monitor
using HDMI Cable
(included).
HDMI cable to DVR
HDMI cable to Monitor
(example)
2. Connect monitor to surge protector plugged into 120V indoor power.
3. TheDVRbeepsasitpowersup.AertheUNIDENwelcomescreendisplays,
the Wizard screen displays.
4. Select Exit for now; we will return to the Wizard later in the setup process.

3
Monitor with VGA Port
1. Connect DVR and monitor
using VGA Cable (not
included).
VGA cable to DVR
VGA cable to
Monitor (example)
2. Connect monitor to surge protector plugged into 120V indoor power.
3. TheDVRbeepsasitpowersup.AertheUNIDENwelcomescreendisplays,
the Wizard screen displays.
4. Select Exit for now; we will return to the Wizard later in the setup process.
TV with BNC Port (VIDEO IN)
1. Connect DVR and TV using
BNC-RCACable(notincluded).
BNC-RCAcabletoDVR
BNC-RCAcableto
Monitor (example)
2. Connect TV to surge protector plugged into 120V indoor power.
3. TheDVRbeepsasitpowersup.AertheUNIDENwelcomescreendisplays,
the Wizard screen displays.
4. Select Exit for now; we will return to the Wizard later in the setup process.
CONNECT ETHERNET CABLE
Connect one end of the Ethernet cable to the RJ45 jack on the DVR and the other to
yourethernetconnecondevice(router,cablebox,etc).
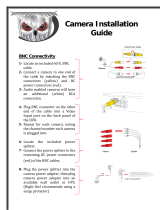
CONNECT CAMERAS TO DVR AND POWER
Eachcameraconnectstooneendofthe60footextenoncable.Theotherendof
thecableconnectstothereceiverandtopower.Theendsoftheextenoncable
are marked for Camera or DVR side
1. Connect camera cable's blue end
(male)tothebluecamera-sideBNCend
(female) of the extension cable.
Male Female
Female Male
2. Connect the camera cable’s RED power
connector (female) to the DVR extension
cable’s RED power connector (male).

4
3. Connect the extention cable's other
blueBNCend(female)toDVR'sVideoIn
connector (male).
The Video In ports on the back of the DVR
are numbered. Do not connect cameras to
ports that your system does not support. If
you have 1 - 4 cameras, use ports labeled
1 - 4, etc.
4. Connecttheextenoncable’sred
(female) power connector to one of the
powerspliercableends(male).
5. Repeat these steps to connect the other cameras to the DVR and to the split-
ter cable.
6. Connectthepowerspliercabletothe
power adaptor.
Female
Male
7. Plug power adaptor into the surge protector. Live video from the cameras
displays on the screen.
Some DVR systems have more than 4 cameras. DVR systems with 6 or 8 cameras
have an 8x splier.
INSTALL CAMERAS
Video surveillance laws vary from state to state. Check local regulations to be
sure you are operating in a legal manner.
Installaon Tips
• When selecting an outside location for your cameras, keep in mind that most
cameras are designed to operate between 14°F to 122°F (-10°C to 50°C) with a
relative humidity of up to 95%. Avoid installing cameras in direct sunlight, and
consider wind chill and other environmental factors, too.
• Mount the camera in an area that is visible, but out of reach. Route the wiring
so it does not interfere with power or telephone/cable lines and it should not
be where it could be easily cut. Create a plan for camera wire routing and for
camera angle.
• Adjust the camera angle so that it covers an area with high traffic as needed.
In “high-risk” locations, have more than one camera cover the same area. This
provides camera redundancy if a vandal attempts to damage a camera.
Male
Female

5
• If you position cameras indoors, avoid pointing the camera at a glass window
to see outside. This may result in a bright white ring in the night vision image
because the light from the night vision LEDs may reflect off the window glass.
Take the following placement suggestions under consideration:
• Cabling Distance From DVR to Camera. The video signal sent from the camera
to the DVR is reduced over distance. The maximum distance allowed is 330
feet (100 meters). A 60 foot cable is included. If you need a cable longer than
60 feet, then use an RG59 cable (with suitable connectors).
• Do not submerge any camera.
• Mounting. Ensure the camera is mounted on a stable surface which is capable
of supporting 5 times the weight of the camera.
• Avoid direct exposure to the weather. Cameras which are weatherproof may
be mounted outside, such as under an eave or other overhang; however, the
image will be affected by rain, etc., landing on the lens. Do not allow direct
sunlight to land on the lens.
1. With the DVR connected to the camera, hold it in the location where you
want it mounted. Check the display on the monitor to verify that the view
from that location is acceptable.
2. Mount the camera(s) to the desired surface using the parts in the supplied
mounting kit. If mounting on drywall, use the drywall anchors supplied in
the kit.
3. Adjust the camera stand to ensure that the camera has a satisfactory view
of the area you would like to monitor. The camera has several adjustment
points to provide maximum flexibility when setting the view angle. Use a
Philip's head screwdriver (not included), to make any adjustments.

6
BASIC CONFIGURATION
Basic configuration lets you use the DVR's internal menu system to access all DVR
features. The easiest way to get started is to go through the Wizard quick setup and
then fine tune specific areas (such as screen resolution, etc.).
Some fields may require keyboard input. Select the field and a pop-up keyboard
displays. This keyboard supports alphanumeric and symbol keys. Shift once to
input a capital letter; shift again to return to lower case. Click
ESC
to close the
keyboard.
POWER ON AND ACCESS WIZARD
1. If your DVR is already connected to power, disconnect it. Reconnect the DVR
to the power supply; the DVR powers up and the POWER and HDD LEDs on
the front light up.
2. AertheDVRpowersupandthe
UNIDENwelcomescreendisplays,the
rstofthreeWizardscreensdisplays.Fill
inthedateandmeinformaon.The
mostcommonlyusedmezonesforthis
system are:
• GMT-05:00 - Eastern Standard (Default)
• GMT-06:00 - Central Standard
• GMT-07:00 - Mountain Standard
• GMT-08:00 - Pacific Standard
• GMT-09:00 - Yukon Standard
• GMT-10:00 - Alaska-Hawaii Standard
3. Select Next.
4. The second Wizard screen sets up
DVR monitoring through the internet.
SettheHpPortto8091andthe
server port to 5000. Click Obtain an IP
address automacally to get network
informaonorllintheeldsmanually.
Refer to the Owner’s Manual at www.
uniden.com for internet access details.
Click Next.
8091

7
5. The last Wizard screen displays storage
status.Reviewtheinformaonandthen
click FinishtosavetheWizardseng.
Live video displays.
LOGIN
You need to log into the system to continue setting it up.
1. Right-click on any Live View screen; a
menu shortcut screen displays.
2. Select Main Menu; the Login dialogue
box displays. The user name, admin, is
already entered. There is no password
required so select Login (set a password
aeryoulogin).
NOTE: Uniden strongly recommends that
you set a password for your system.
3. The Main Menu screen displays.
SET PASSWORD
1. From the Main Menu screen, select
Setup>Users. The User Management
screen displays.

8
2. Select Change Password. (At this point,
there are no other users added to the
system.) In the Change Password screen,
enteranewpasswordandconrmit
usingthepopupkeyboard,selecng
Enter each time. Select OK to save the
new password.
3. The User Management screen displays
again.
4. Click EXIT to return to the Setup screen.
SET MOTION SENSITIVITY
You can set how sensitive the camera should be for movement to trigger recording.
You can also block off (mask) certain areas of the camera's viewing window so
normal movement in those areas (trees, wind chimes, etc.) won't trigger recording.
1. From the menu shortcut screen, select
Main Menu/Setup/Alarm/Moon. The
Moon screen displays.
2. Seteachcamera’smoondeteconspecicaons.
• Select Camera. Select the channel you want to record when motion is
detected.
• Select Holding Time. Set how long the camera continues recording after
motion is no longer detected.
• Select Trigger. Other channels record when one of the cameras detects
motion. The Trigger field sets how that camera notifies that it is recording
(buzzer, email notification, etc).

9
3. The last field, Area, masks parts of the
viewing area from being triggered by
normal motion. Select Setting, and a grid
displays over the camers's live view. Use
the left mouse to select a grid to block
from view. Left-click and drag to select
multiple boxes. Left-click those boxes
again to de-select them. Mask off flags,
trees, or other objects that move in the
wind to avoid false alerts.
4. Right-click to display the control bar. Click
STAR
to make the whole viewing
range a sensitivity area. Click the
TRASH CAN
to remove sensitivity areas.
Click
SD CARD
to save the settings and click to exit.
5. From Live view, test motion detection by moving something or having
someone walk through the camera's view. If the DVR detects movement
within the active grid area, a red person icon displays.
NOTE: Refer to the detailed Owner's Manual for other ways to mask areas from
recording.
BASIC OPERATION
This section covers the most common operations related to recording and viewing
video files. See the detailed Owner's Manual on www.uniden.com for more
information on all operations and specifications for this system.
MANUAL RECORDING
1. From the menu shortcut list, select
Start Record. A green square displays
in the lower left corner of the live view,
indicating that recording has begun.
CAMERA01
09/15/2016 02:30:35 PM
09/15/2016 02:30:35 PM
2. To stop recording, select Stop Record from the menu shortcut list (Start
Record changes to Stop Record
when recording starts
). The green square
goes away.
NOTE: Refer to the detailed Owner's Manual for other ways to manually start
recording.
SET RECORDING SCHEDULE
To set up a recording schedule, you have to enable recording and audio on the
cameras you want to record (Step 1). After that, set up a time schedule for each
channel to automatically begin recording (Step 2).

10
1. Go to Main Menu>Setup>Record, Record
tab. Check the Record and Audio boxes
for each camera you want to be able to
record.
2. Go to Main Menu>Setup>Schedule,
Schedule tab. Select a channel, then
select the blocks of time you want the
camera to record. Select Apply to save
the schedule for that channel.
3. Repeat these steps for each channel or select Apply Sengs To and enter the
channel number to use those same settings.
VIEW RECORDED FILES
1. Go to Main Menu>Search. The Search
screen displays.
2. Set up your search parameters:
• Select a date to search from the right-hand calendar.
• Select the cameras to search.
• Select single channel ( )ormulplechannels( ) to search
• Enterthemeframetostartsearching.
3. Select to play back records for that time. The monitor plays back the files
recorded for the requested channel from the requested time.

11
4. A playback control bar displays across
the bottom of the recorded file playback
screen.
Icon Function Icon Function
Play/Pause Previous
frame
Nextframe Fast forward
Reverse Single-screen
display
Multi-screen
display
The following icons display while the record
is playing:
Play previous
file
Play next file
(1) Playback Control
(2) Channel Audio Switch
(not available on all models)
(3) Function Hidden Key
(4) Operate Playback
09/07/2016 05:30:00
09/07/2016 05:30:00
Refer to the online Detailed Owner's Manual at www.uniden.com for more
system operation details.
REMOTE ACCESS
SMARTPHONE
View live and recorded video remotely using an iOS or Android device and Uniden’s
ProHD App.
iOS screens are similar to the Android screens and are not shown.
1. From the Apple App Store, Google Play, or the Amazon App
store, download the Uniden ProHD app.
2. Open the app. The
Create Account
screen displays.
3. Complete the fields and then select
OK
. The
Device List
screen displays.

12
4. Select the + icon at the top right corner to add your DVR
system to the app. The
Add Device
screen displays.
5. NameyourDVRsystem.SelecttheQRcodeiconandscan
theQRcodelabelontopoftheDVRboxortheapplicable
QRcodefrom
Main Menu/Information/System
screen on the
monitor. This will add the DVR Device ID code to the app.
Select OK.
6. The
Device List
displays again, with your system now listed.
Select your system and live video displays on your device.
Go to www.uniden.com to download the complete User’s Manual for detailed
information.
FCC PART 15/IC COMPLIANCE
FCC PART 15 COMPLIANCE
This device complies with Part 15 of the FCC rules. Operation is subject to the following two conditions: (1) This
device may not cause harmful interference, and (2) this device must accept any interference received, including
interference that may cause undesired operation.
Changes or modifications not expressly approved by the party responsible for compliance could void your authority
to operate the equipment.
Avis de conformité à la FCC : Ce dispositif a été testé et s’avère conforme à l’article 15 des règlements de la
Commission fédérale des communications (FCC). Ce dispositif est soumis aux conditions suivantes: 1) Ce dispositif
ne doit pas causer d’interférences nuisibles et; 2) Il doit pouvoir supporter les parasites qu’il reçoit, incluant les
parasites pouvant nuire à son fonctionnement.
Tout changement ou modification non approuvé expressément par la partie responsable pourrait annuler le droit à
l’utilisateur de faire fonctionner cet équipement.
IC COMPLIANCE
This device complies with Industry Canada license-exempt RSS standard(s). Operation is subject to the following two
conditions: (1) this device may not cause interference, and (2) this device must accept any interference, including
interference that may cause undesired operation of the device.
Changes or modifications not expressly approved by the party responsible for compliance could void your authority
to operate the equipment.

13
Cet appareil est conforme aux normes RSS exemptes de licences d’Industrie Canada. Son fonctionnement est
soumis aux deux conditions suivantes : (1) cet appareil ne doit pas causer d’interférences nuisibles et (2), il doit
pouvoir accepter les interférences, incluant celles pouvant nuire à son fonctionnement normal.
Tout changement ou modification non approuvé expressément par la partie responsable pourrait annuler le droit à
l’utilisateur de faire fonctionner cet équipement.
ONE YEAR LIMITED WARRANTY
WARRANTOR: UNIDEN AMERICA CORPORATION (UNIDEN)
ELEMENTS OF WARRANTY: Uniden warrants, for one year, to the original retail owner, this Uniden Product to be
free from defects in materials and craftsmanship with only the limitations or exclusions set out below.
WARRANTY DURATION: This warranty to the original user shall terminate and be of no further effect 12 months
after the date of original retail sale. The warranty is invalid if the Product is
(A) damaged or not maintained as reasonable or necessary,
(B) modified, altered, or used as part of any conversion kits, subassemblies, or any configurations not sold by
Uniden,
(C) improperly installed,
(D) serviced or repaired by someone other than an authorized Uniden service center for a defect or malfunction
covered by this warranty,
(E) used in any conjunction with equipment or parts or as part of any system not manufactured by Uniden, or
(F) installed or programmed by anyone other than as detailed by the Operating Guide for this product.
STATEMENTOFREMEDY:Intheeventthattheproductdoesnotconformtothiswarrantyatanytimewhilethis
warranty is in effect, warrantor will repair the defect and return it to you without charge for parts, service, or
any other cost (except shipping and handling) incurred by warrantor or its representatives in connection with the
performanceofthiswarranty.THELIMITEDWARRANTYSETFORTHABOVEISTHESOLEANDENTIREWARRANTY
PERTAININGTOTHEPRODUCTANDISINLIEUOFANDEXCLUDESALLOTHERWARRANTIESOFANYNATURE
WHATSOEVER,WHETHEREXPRESS,IMPLIEDORARISINGBYOPERATIONOFLAW,INCLUDING,BUTNOTLIMITEDTO
ANYIMPLIEDWARRANTIESOFMERCHANTABILITYORFITNESSFORAPARTICULARPURPOSE.THISWARRANTYDOES
NOTCOVERORPROVIDEFORTHEREIMBURSEMENTORPAYMENTOFINCIDENTALORCONSEQUENTIALDAMAGES.
Some states do not allow this exclusion or limitation of incidental or consequential damages so the above limitation
or exclusion might not apply to you.
LEGAL REMEDIES: This warranty gives you specific legal rights, and you might also have other rights which vary from
state to state. This warranty is void outside the United States of America.
PROCEDURE FOR OBTAINING PERFORMANCE OF WARRANTY: If, after following the instructions in this Operating
Guide you are certain that the Product is defective, pack the Product carefully (preferably in its original packaging).
Include evidence of original purchase and a note describing the defect that has caused you to return it. The Product
should be shipped freight prepaid, by traceable means, or delivered, to warrantor at:
Uniden America Service
C/O Saddle Creek
743 Henrietta Creek Rd., Suite 100
Roanoke, TX 76262
/