Elkay 98724C Installation guide
- Category
- Kitchen sinks
- Type
- Installation guide

Manual Con Ilustractiones Para Instalar
Su Fregadero De Acero Inoxidable
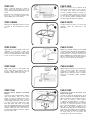
STEP ONE
If countertop must be cut out, locate sink
cutout by turning sink upside down and
position so sink bowls are located directly
over sink cabinet. Position sink, front to rear,
so that sink rim will fit flat on top surface
and that sink bowls will fit into cabinet with-
out interfering with cabinet.
STEP THREE
Check your dimensions. Measure the cut
line you have drawn on the countertop or
check your pre-cut opening to make sure it
conforms to the following sample sizes.
Cutout is 5/8" shorter than overall size of
sink.
SAMPLE CUTOUT SIZES
SINK CUTOUT CUTOUT
SIZE LENGTH WIDTH
25 x 22" 24-3/8" 21-3/8"
33 x 22"
32-3/8" 21-3/8"
37 x 22" 36-3/8" 21-3/8"
STEP TWO
2a) Trace completely around edge of sink.
2b) Draw second line inside sink outline
(cut line).
PASO UNO
Si la cubierta no tiene el corte hecho,
coloque el fregadero boca abajo sobre la
cubierta, para proceder a trazar la linea
de corte. Asegúrese que el fregadero quede
de atras para adelante, de forma que el
borde de éste calce perfectamente y que
los compartimientos no interfieran con el
gabinete.
TRACE COMPLETELY AROUND EDGE OF SINK
MARQUE COMPLETAMENTE TODO
EL CONTORNO DEL FREGADERO
COUNTERTOP
CUBIERTA
CUT LINE
LINEA DE CORTE
1-1/2" RADIUS OF
CUTOUT
RADIO DE CORTE
DE 38.1MM
DRAW SECOND LINE
INSIDE SINK OUTLINE
(CUT LINE)
TRACE UNA SEGUNDA LINEA
DENTRO DE LA PRIMERA
5/16"
7.93MM
1-1/2" RADIUS CORNERS
38.1MM DE RADIO EN LAS
ESQUINAS
5/16"
7.93MM
WIDTH
ANCHO
LENGTH / LARGO
1-1/2" RADIUS CORNERS
38.1MM DE RADIO EN LAS
ESQUINAS
DRILL STARTING
HOLE ON THE INSIDE
OF THE INSIDE LINE
HAGA UNA PERFORMACIÓN
CON EL TALADRO PARA
EMPEZAR EL CORTE EN LA
LINEA INTERIOR
COUNTERTOP
CUBIERTA
CUT ON INSIDE
OF THE INSIDE LINE
CORTE LA PARTE INTERIOR
DE LA LINEA DE CORTE
COUNTERTOP
CUBIERTA
STEP FOUR
Cut hole in countertop.
PASO CUATRO
Haga una perforación con el taladro para
empezar el corte en la linea interior. Con una
sierra de mano corte a todo lo largo de la
linea de corte.
®
Stainless Steel Sinks
Quick-Clip
™
Mounting System
Installation Instructions
Fregaderos De Acero
Inoxidable Elkay Sistema
De Montaje Quick-Clip
™
PASO DOS
2a) Marque completamente todo el con-
torno del fregadero.
2b) Trace una segunda linea dentro de la
primera.
PASO TRES
Verifique las medidas. Asegúrese antes de
empezar a cortar, que la linea de corte sea
15.9mm más pequeña que la medida de su
fregadero.
EJEMPLOS DE LINEA DE CORTE
Medida de Longitud Anchura
Fr
egadero del Corte del Corte
635 x 558mm
619.1mm 542.9mm
838.2 x 558mm 822.3mm 542.9mm
939.8 x 558mm 923.9mm 542.9mm
STEP FIVE
Recheck countertop opening to be sure it is
sized properly.
PASO CINCO
Vuelva a verificar la abertura de la cubierta
para asegurarse de que tiene el tamaño
correcto.
2a
2b
3
4b
4a

7
6
9
10
SHOULDER ON
COUNTERTOP
BRACKET
BORDE EN
SOPORTE
DE LA CUBIERTA
TEETH
DIENTES
COUNTERTOP
BRACKET
SOPORTE DE
LA CUBIERTA
8
14 GAUGE (.080) X 3/4 LG. RING-SHANK
COMMON NAIL CORROSION-RESISTANT STEEL
CALIBRE 14 CLAVO COMÚN LARGO ACER
RESISTENTE A LA CORROSIÓN
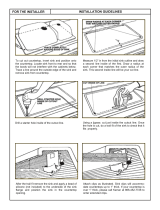
STEP SIX
Attach countertop brackets to inside of
cutout using nails provided. (Note: For
proper attachment all bracket holes must be
used.)
Brackets to be centered along cutout sides.
(Note: On some models brackets may
extend slightly into corner radius.)
STEP SEVEN
Attach faucet, drain fittings and accessories
according to the manufacturer’s instruc-
tions.
STEP EIGHT
Apply a bead of good quality caulk to the
underside of sink flange. Center sink
within countertop opening as shown. (Note:
Properly centered sink will have clips resting
evenly on all four countertop brackets.)
STEP NINE
Apply even pressure to side flanges and
press down firmly snapping sink into
position. Apply additional pressure as
required to insure sink is fully seated.
STEP TEN
Connect Faucet Supplies and Drain
Fittings
Connect the faucet supply fittings and the
drain trap fittings. Turn on the water
supply. Check for possible leaks at these
locations: (1) Supply riser tubes to faucet,
and (2) Supply riser tubes to shut-off valves
(or, lower connections). Next fill the sink
bowl with water and check for possible
leaks around the drain flange(s). (This would
show up as dripping into the cabinet below.)
Release water from sink and check for
possible leaks at drain connections. Tighten
any joints which leak.
BEAD OF CAULK
CAPA DE SELLADOR
PASO SEIS
Instale los soportes de la cubierta hacia
adentro del corte usando los clavos provis-
tos. (Nota: Para lograr una instalación
correcta, se deben usar todos los agujeros.)
Los soportes deben centrarse a lo largo de
los lados del corte. (Nota: En algunos mode-
los, los soportes pueden extenderse ligera-
mente más allá del radio de la esquina.)
PASO SIETE
Coloque la llave, las juntas y accesorios del
desagüe, según las instrucciones del
fabricante.
PASO OCHO
Aplique una capa de sellador de alta calidad
a la parte inferior del reborde del fregadero.
Centre el fregadero dentro de la abertura de
la cubierta como se muestra. (Nota: El fre-
gadero debidamente centrado debe tener los
ganchos descansando de manera uniforme
sobre los cuatr
o soportes de la cubierta.)
PASO NUEVE
Aplique presión uniforme a los rebordes lat-
erales y presione hacia abajo firmemente
encajando el fregadero en su posición.
Aplique presión adicional según se requiera
hasta que el fregadero quede totalmente
asentado.
PASO DIEZ
Conecte los accesorios de la llave y las
juntas del desagüe
Conecte las juntas de abastecimiento de la
llave y las juntas de la trampilla de desagüe.
Abra la corriente de agua. Verifique por posi-
bles fugas de agua en estos lugares:
1) tuberías de abastecimiento a la llave y,
2) tuberías de abastecimiento a las válvulas
de cierre (o conexiones inferiores). Luego
llene la taza del fregadero con agua y veri-
fique que no haya fugas alrededor de los
rebordes del desagüe. (Esto se manifiesta por
goteo dentro del gabinete que está debajo.)
Elimine el agua del fregadero y verifique que
no haya fugas en las conexiones del
desagüe. Ajuste las uniones goteantes.
CLEAN EXCESS CAULK
AFTER INSTALLATION
LIMPIE EL EXCESO DE
SELLADOR DESPUÉS
DE LA INSTALACIÓN
Page is loading ...
Page is loading ...
Page is loading ...

LIMITED LIFETIME SINK WARRANTY
Elkay warrants to the original purchaser of an Elkay stainless steel sink, that Elkay will, at its
option, replace, without charge, such product if it fails due to a manufacturing defect for a
lifetime of normal residential use. Product replacement does not include transportation cost
or labor installation cost. This warranty covers only the stainless steel sink and mounting
hardware when a self-rimming drop-in sink is installed in a conventional countertop surface
or an undermount sink is installed in a conventional solid surface countertop in residential
applications only. Elkay reserves the right to examine product in question and its installation
prior to replacement.
WASTE FITTINGS AND ACCESSORIES ARE NOT WARRANTED
OTHER WARRANTY CONDITIONS ON SINKS AND FAUCETS
Our warranty does not cover product failure or damage caused by abusive treatment,
misuse, environmental factors, improper care and cleaning, or damage due to handling or
faulty installations. This warranty is extended only to the original consumer purchaser of the
product. This warranty does not cover shipping costs, labor costs, or any other charges for
such items as installation or replacement of the sink, diagnosis or replacement of any faucet
or component part, or any other expense or loss.
All incidental or consequential damages are specifically excluded. No additional
warranties, express or implied are given. Any implied warranty, including one of
merchantability or fitness for a particular purpose, is limited to the duration of this
written warranty.
Some states do not allow the exclusion or limitation of incidental or consequential damages
or limitations on how long an implied warranty lasts, so the above limitations or exclusions
may not apply to you.
This warranty gives you specific legal rights, and you may also have other rights which vary
from state to state.
TO OBTAIN SERVICE UNDER WARRANTY
1. Write to: Elkay
Attention: Consumer Services
2222 Camden Court
Oak Brook, IL 60523
2. Include a letter containing the following information:
a. Date of purchase and installation
b. Description of nature of defect
c. Model number or description of model and/or component part if possible.
®
ELKAY
2222 CAMDEN COURT
OAK BROOK, ILLINOIS 60523
(630) 574-8484
PRINTED IN U.S.A.
F-3799 (8/02) PART NO. 74180271
-
 1
1
-
 2
2
-
 3
3
-
 4
4
-
 5
5
-
 6
6


Elkay 98724C Installation guide
- Category
- Kitchen sinks
- Type
- Installation guide
Ask a question and I''ll find the answer in the document
Finding information in a document is now easier with AI
in other languages
- español: Elkay 98724C Guía de instalación
Related papers
-
Elkay EWMA9620SACTMC Installation guide
-
Elkay DRKAD2517554 Installation guide
-
Elkay Arezzo LK7226 User manual
-
Elkay N217324 Installation guide
-
Elkay CR25223 Installation guide
-
Elkay DLR3319104 Installation guide
-
Elkay DLR1517103 Installation guide
-
Elkay DPC12522103 Installation guide
-
Elkay CRS33223 Installation guide
-
Other documents
-
 Karran Karran Laguna - Bisque Installation guide
-
 BOANN URD3220 Installation guide
-
Swan BS-2515 User manual
-
ProFlo PFUC303 Installation guide
-
 Hampton Bay KSBD36-SJM Installation guide
-
Franke BMSK803 Installation guide
-
Signature Hardware 447410 Installation guide
-
 FrankeUSA SSK851NB Installation guide
-
-
 JAG PLUMBING PRODUCTS 18-813-2 User manual


