TP-LINK TL-WA855RE User manual

Type
User manual

TP-LINK TL-WA855RE is a 300Mbps Wi-Fi range extender designed to eliminate Wi-Fi dead zones and boost your wireless coverage. With its easy setup, you can instantly connect it to a router by pressing the router’s WPS button followed by the extender’s RE/WPS button. Alternatively, you can use the TP-Link Tether app for simple and intuitive management. The extender features an intelligent signal light that helps you find the best location for optimal coverage. It also has an Ethernet port to connect Ethernet-only devices like game consoles or smart TVs to your Wi-Fi network.

TP-LINK TL-WA855RE is a 300Mbps Wi-Fi range extender designed to eliminate Wi-Fi dead zones and boost your wireless coverage. With its easy setup, you can instantly connect it to a router by pressing the router’s WPS button followed by the extender’s RE/WPS button. Alternatively, you can use the TP-Link Tether app for simple and intuitive management. The extender features an intelligent signal light that helps you find the best location for optimal coverage. It also has an Ethernet port to connect Ethernet-only devices like game consoles or smart TVs to your Wi-Fi network.

User Guide
300Mbps Wi-Fi Range Extender
TL-WA855RE
REV4.1.0 1910012581
Contents
About This Guide . . . . . . . . . . . . . . . . . . . . . . . . . . . . . . . . . . . . . . . . . . . . . . . . . . . . .1
Chapter 1. Get to Know About Your Extender . . . . . . . . . . . . . . . . . . . . . . . . .2
1. 1. Product Overview. . . . . . . . . . . . . . . . . . . . . . . . . . . . . . . . . . . . . . . . . . . . . . . . . . . . . . . . . . . . 3
1. 2. Appearance . . . . . . . . . . . . . . . . . . . . . . . . . . . . . . . . . . . . . . . . . . . . . . . . . . . . . . . . . . . . . . . . . 3
1. 2. 1. LED Explanation. . . . . . . . . . . . . . . . . . . . . . . . . . . . . . . . . . . . . . . . . . . . . . . . . . . . . . . 4
1. 2. 2. Port and Button Description . . . . . . . . . . . . . . . . . . . . . . . . . . . . . . . . . . . . . . . . . . . 4
Chapter 2. Set Up Internet Connection . . . . . . . . . . . . . . . . . . . . . . . . . . . . . . .5
2. 1. Power On the Extender . . . . . . . . . . . . . . . . . . . . . . . . . . . . . . . . . . . . . . . . . . . . . . . . . . . . . . 6
2. 2. Set Up the Extender . . . . . . . . . . . . . . . . . . . . . . . . . . . . . . . . . . . . . . . . . . . . . . . . . . . . . . . . . 6
Chapter 3. Customize Your Network . . . . . . . . . . . . . . . . . . . . . . . . . . . . . . . . 12
3. 1. Check Internet Status. . . . . . . . . . . . . . . . . . . . . . . . . . . . . . . . . . . . . . . . . . . . . . . . . . . . . . . 13
3. 2. Configure Wireless Network . . . . . . . . . . . . . . . . . . . . . . . . . . . . . . . . . . . . . . . . . . . . . . . . 14
3. 3. Change LAN Settings . . . . . . . . . . . . . . . . . . . . . . . . . . . . . . . . . . . . . . . . . . . . . . . . . . . . . . . 15
3. 4. Adjust Wi-Fi Coverage . . . . . . . . . . . . . . . . . . . . . . . . . . . . . . . . . . . . . . . . . . . . . . . . . . . . . . 16
3. 5. Set Access Control . . . . . . . . . . . . . . . . . . . . . . . . . . . . . . . . . . . . . . . . . . . . . . . . . . . . . . . . . 17
Chapter 4. More Features of Your Extender. . . . . . . . . . . . . . . . . . . . . . . . . 19
4. 1. Use Your Extender as a Wireless Adapter. . . . . . . . . . . . . . . . . . . . . . . . . . . . . . . . . . . . 20
4. 2. Transform Your Existing Wired Network to a Wireless One . . . . . . . . . . . . . . . . . . . 20
4. 2. 1. To Set Up the Extender as an Access Point . . . . . . . . . . . . . . . . . . . . . . . . . . . 20
4. 2. 2. To Connect Your Wireless Devices to the Extender via WPS. . . . . . . . . . . 21
Chapter 5. Manage Your Extender . . . . . . . . . . . . . . . . . . . . . . . . . . . . . . . . . 23
5. 1. Set Up System Time . . . . . . . . . . . . . . . . . . . . . . . . . . . . . . . . . . . . . . . . . . . . . . . . . . . . . . . . 24
5. 2. Control LEDs . . . . . . . . . . . . . . . . . . . . . . . . . . . . . . . . . . . . . . . . . . . . . . . . . . . . . . . . . . . . . . . 24
5. 3. Power Schedule . . . . . . . . . . . . . . . . . . . . . . . . . . . . . . . . . . . . . . . . . . . . . . . . . . . . . . . . . . . . 25
5. 4. Upgrade the Firmware . . . . . . . . . . . . . . . . . . . . . . . . . . . . . . . . . . . . . . . . . . . . . . . . . . . . . . 26
5. 5. Backup and Restore Configuration Settings . . . . . . . . . . . . . . . . . . . . . . . . . . . . . . . . . 26
5. 6. Change Login Password . . . . . . . . . . . . . . . . . . . . . . . . . . . . . . . . . . . . . . . . . . . . . . . . . . . . 27
5. 7. System Log. . . . . . . . . . . . . . . . . . . . . . . . . . . . . . . . . . . . . . . . . . . . . . . . . . . . . . . . . . . . . . . . . 28
FAQ . . . . . . . . . . . . . . . . . . . . . . . . . . . . . . . . . . . . . . . . . . . . . . . . . . . . . . . . . . . . . . . . . 29
1
About This Guide
This guide is a complement to Quick Installation Guide. The Quick Installation Guide
provides instructions for quick internet setup, while this guide contains details of each
function and demonstrates how to configure them.
When using this guide, please notice that features of the extender may vary slightly
depending on the model and software version you have, and on your location, language,
and internet service provider. All screenshots, images, parameters and descriptions
documented in this guide are used for demonstration only.
Conventions
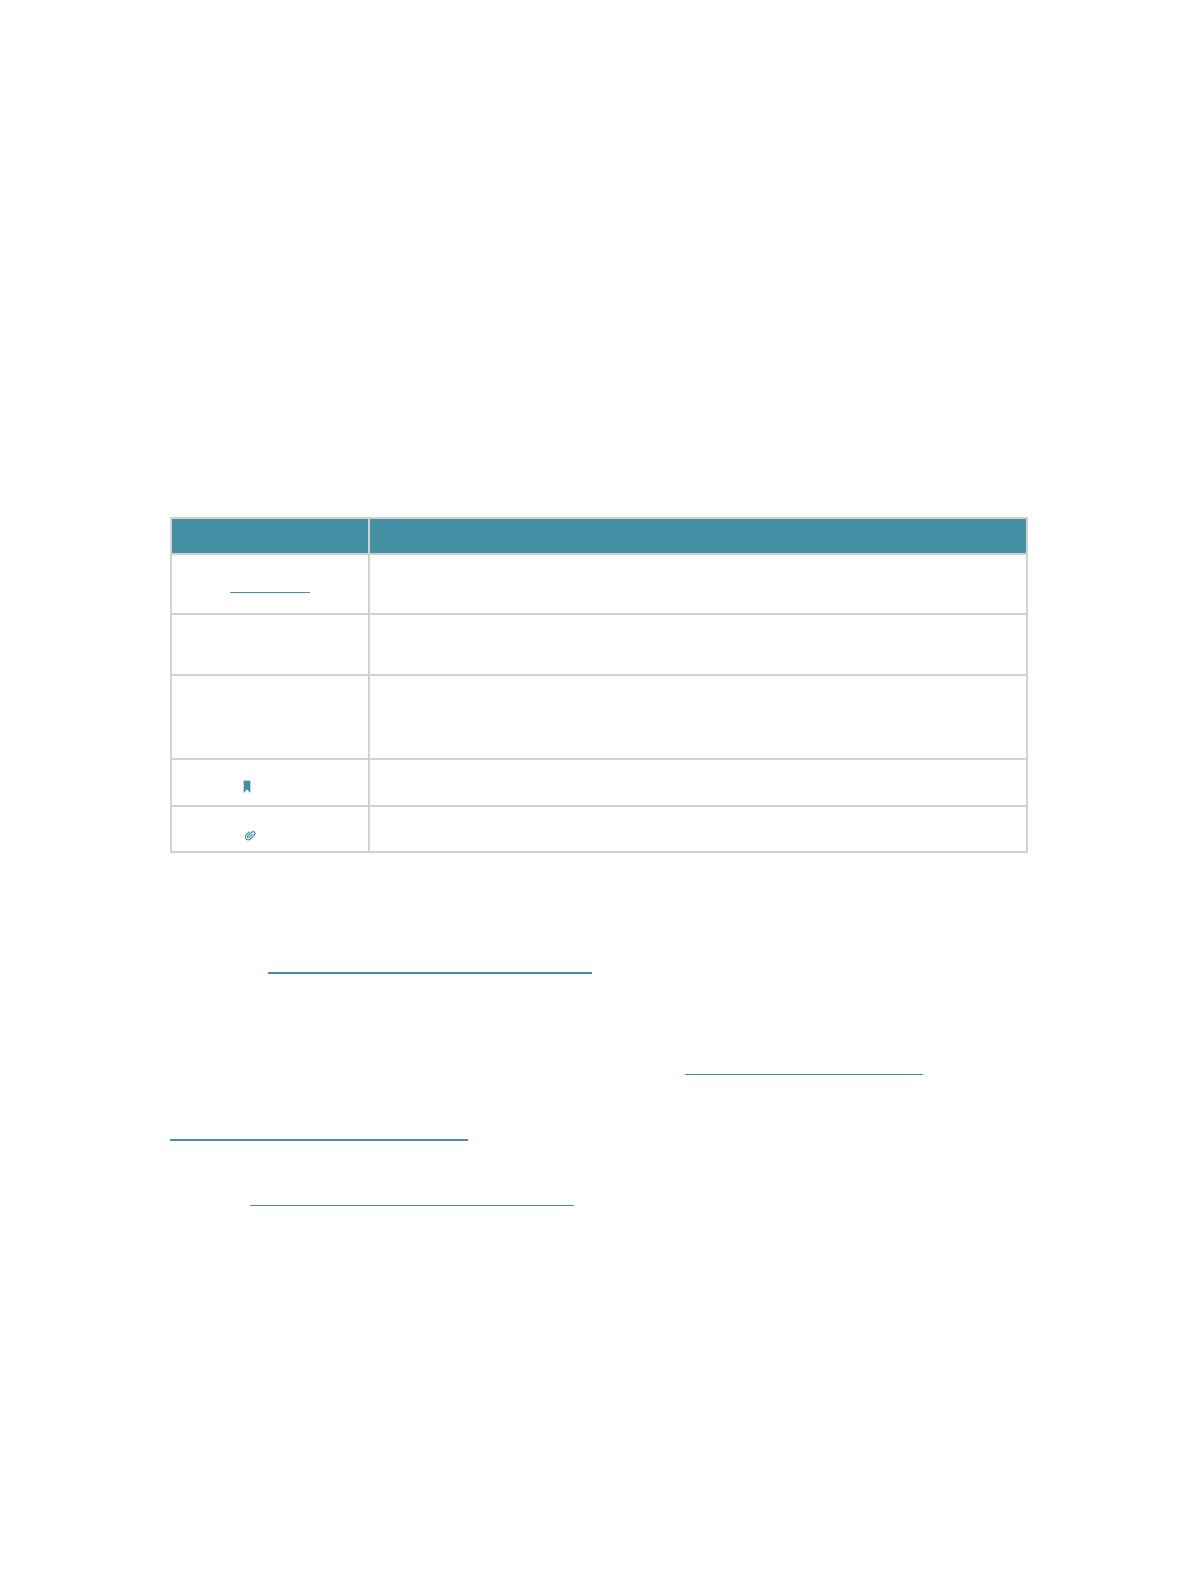
In this guide the following conventions are used:
Convention Description
Underlined
Underlined words or phrases are hyperlinks. You can click to redirect to a website or a
specific section.
Teal
Contents to be emphasized and texts on the web page are in teal, including the menus,
items, buttons, and so on.
>
The menu structures to show the path to load the corresponding page. For example,
Advanced > Wireless > MAC Filtering means the MAC Filtering function page is under the
Wireless menu that is located in the Advanced tab.
Note:
Ignoring this type of note might result in a malfunction or damage to the device.
Tips:
Indicates important information that helps you make better use of your device.
More Info
The latest software, management app and utility are available from the Download
Center at https://www.tp-link.com/support.
The Quick Installation Guide can be found where you find this guide or inside the
package of the range extender.
Specifications can be found on the product page at https://www.tp-link.com.
A community is provided for you to discuss our products at
https://community.tp-link.com.
Our Technical Support contact information can be found at Contact Technical Support
page at https://www.tp-link.com/support.
Speed/Coverage Disclaimer
Maximum wireless signal rates are the physical rates derived from IEEE Standard
802.11 specifications. Actual wireless data throughput and wireless coverage per
ft2 are not guaranteed and will vary as a result of 1) environmental factors, including
building materials, physical objects, and obstacles, 2) network conditions, including
local interference, volume and density of traffic, product location, network complexity,
and network overhead, and 3) client limitations, including rated performance, location,
connection quality, and client condition.
Chapter 1
Get to Know About Your
Extender
This chapter introduces what the extender can do and its appearance.
It contains the following sections:
Product Overview
Appearance
3
Chapter 1
Get to Know About Your Extender
1. 1. Product Overview
Bring Dead Zones Back to Life
Tired of Wi-Fi “dead zones”? The TP-Link extender is connected to your router
wirelessly, strengthening its signal and expanding its coverage into areas that could not
otherwise be reached. The device also reduces signal interference to ensure reliable
Wi-Fi coverage throughout your home or office.
Easy Installation & Quick Position
The extender works with any standard wireless router. Instantly connect the extender
to a router by pressing the router’s WPS button (if available) followed by the extender’s
RE/WPS button. Alternatively, follow the Quick Setup instructions on the extender’s
web management page.
Once the extender is connected to a router, you can relocate it to your preferred location
with no further configuration required. The intelligent signal light can help to find the
best location.
Easy Management with the TP-Link Tether App
Tether provides a simple, intuitive way to access and manage your extender with your
smart devices.
1. 2. Appearance
Note: The provided plug may differ from the picture due to different regional power specifications.
4
Chapter 1
Get to Know About Your Extender
1. 2. 1. LED Explanation
You can check the extender’s working status by following the LED Explanation table.
LED Status Indication
Signal
Solid blue
The extender is connected to your router’s wireless network
and is in a suitable location.
Solid red
The extender is experiencing poor signal strength. Try
relocating it closer to your router.
Blinking WPS connection is in progress.
Off No wireless connection is established.
Power
On/Off The extender is on or off.
Blinking The system is starting up or firmware is being upgraded.
1. 2. 2. Port and Button Description
Ports or Buttons Description
WPS Button
Press the WPS button on your host router, and immediately press the WPS
button on the extender for 1 second. The Signal LED of the extender should
change to solid blue, indicating successful WPS connection.
RESET Button (Hole) Use a pin to press the button for 1 second to reset the extender.
Ethernet Port
Connect your Ethernet-only device to the Ethernet port of the extender to join
the Wi-Fi network.
Chapter 2
Set Up Internet Connection
This chapter introduces how to boost your host wireless coverage. Please follow the
step-by-step instructions to set up the internet connection.
It contains the following sections:
Power On the Extender
Set Up the Extender
6
Chapter 2
Set Up Internet Connection
2. 1. Power On the Extender
Plug the extender into an electrical outlet near your host router, and then wait until the
Power LED is solid on.
Note: For safety, only plug the extender in upright direction as shown below.
Solid On
2. 2. Set Up the Extender
There are three ways to set up the extender: via the TP-Link Tether app, via a web
browser, or via the WPS button.
2. 2. 1. Method 1: Via the WPS Button
Use this way if your router has a WPS button. The button might look like one of these:
.
1. Press the WPS button on your host router, and then press the WPS button on the
extender for 1 second within 2 minutes.
Note:
For more information about using WPS button on your host router, please refer to the router manufacturer’s user
guide.
2. Wait until the Signal LED changes to solid on, which indicates that the WPS connection
is successful.
Note:
If the LED does not turn solid on, try again or refer to Method 2: Via the TP-Link Tether App or Method 3: Via a Web
Browser.
7
Chapter 2
Set Up Internet Connection
3. The extender uses your router’s network name with _EXT at the end, and shares the
same password as your router.
Extended Network Name:
Router’s network name with
_EXT
at the end
Password:
Same as your router
Solid On
Note:
For some early firmware versions, the extender share the same network name as your router.
If you want to customize the extended network name, refer to Configure Wireless Network.
4. Relocate your extender for optimal Wi-Fi coverage and performance.
1 ) Plug in the extender about halfway between your router and the Wi-Fi dead zone.
The location you choose must be within the range of your router.
2 ) Wait for about 2 minutes until the Signal LED turns solid blue. If it doesn’t, relocate
the extender closer to the router to achieve better signal quality.
Router Devices
Halfway
Suitable location
Too far from router
No connection
Tips:
To minimize signal interference, please choose a location which is far away from Bluetooth devices and other
household electronic devices, such as cordless phones, microwave ovens and baby monitors.
5. Enjoy! Connect to the extended network and enjoy the internet.
2. 2. 2. Method 2: Via the TP-Link Tether App
1. Launch the Apple App Store or Google Play Store and search TP-Link Tether or simply
scan the QR code to download and install the app.
OR
2. Go to Wi-Fi Settings and connect your device to the extender’s wireless network:
TP-Link_Extender.
8
Chapter 2
Set Up Internet Connection
Wi-Fi
Wi-Fi
TP-Link_Extender
CHOOSE A NETWORK...
Other...
< Settings
3. Launch Tether and select your extender from the Local Devices list.
4. Create a password to log in.
5. Follow app instructions to set up and relocate your extender.
Tips:
For more intuitive location assistant, access extender settings via Tether and go to Tools > Location Assistant. You
can also manage your extender via Tether, such as controlling LEDs, sharing passwords of your networks and blocking
devices.
2. 2. 3. Method 3: Via a Web Browser
Note:
Features of the extender may vary slightly depending on the firmware version you have.
9
Chapter 2
Set Up Internet Connection
1. Connect your computer to the extender via your Ethernet cable, or connect wirelessly
as follows:
For Windows Users
3 ) Unplug the Ethernet cable from your computer (if any).
4 ) Click the Wi-Fi icon on the taskbar and connect to the extender’s wireless
network: TP-Link_Extender.
C
onnections are available
Wireless Network
C
onnection
TP-Link_Extender
Connect automatically
Connect
For Mac OS X Users
1 ) Unplug the Ethernet cable from your computer (if any).
2 ) Click the Wi-Fi icon in the top right corner of the screen, and connect to the
extender’s network: TP-Link_Extender.
Wi-Fi: On
Tu rn Wi-Fi O
Join Other Network...
Create Network...
Open Network Preferences...
TP-Link_Extender
2. Follow the instructions of the Quick Setup Wizard to connect the extender to your
host router.
1 ) Launch a web browser, enter http://tplinkrepeater.net or http://192.168.0.254
in the address bar, and then create a password to log in.
Tips: If the login window does not appear, please refer to FAQ.
10
Chapter 2
Set Up Internet Connection
2 ) Select your host router’s 2.4GHz SSID (network name), enter its password (NOT
the password you just created for management), and click Next.
3 ) Confirm your host network password.
4 ) Either keep the default SSIDs (network names) or customize them for the
extended networks, and then click Next.
5 ) Follow web instructions to relocate your extender for optimal Wi-Fi coverage
and performance, then click Done.
11
Chapter 2
Set Up Internet Connection
6 ) Enjoy! Connect to the extended network and enjoy the internet.
Chapter 3
Customize Your Network
This chapter guides you on how to configure network settings that are available for this
extender.
It contains the following sections:
Check Internet Status
Configure Wireless Network
Change LAN Settings
Adjust Wi-Fi Coverage
Set Access Control
13
Chapter 3 Customize Your Network
3. 1. Check Internet Status
You can view the internet status of your extender to check whether you have successfully
set up the extended network(s).
1. Visit http://tplinkrepeater.net, and log in with the password you set for the extender.
2. Go to Settings > Status to view the internet status of your extender.
The extender is functioning normally.
The extender is not connected to the host network. Please go to Settings >
Wireless > Connect to Network to check whether the host network passwords
are correct. If the problem still exists, relocate the extender closer to the router to
achieve better signal quality.
The extender is connected to the host network, but is not transmitting data. Please
check your router’s internet connection.
The extender is connected to the router abnormally. Please go to Settings >
Network and try setting your extender to obtain an IP address automatically.
Click the Internet/Router/Range Extender/Clients icon to view corresponding
information.
14
Chapter 3 Customize Your Network
3. 2. Configure Wireless Network
If you want to extend another host network after Quick Setup, you can refer to this
section. Moreover, you can change the wireless settings for your extended network.
Visit http://tplinkrepeater.net, and log in with the password you set for the extender.
To extend another host network:
1. Go to Settings > Wireless > Connect to Network.
2. Click Wireless Scanner to find all available networks.
3. Select the 2.4GHz host network you want to extend.
Note:
If the network you want to extend is on but not listed, please try the following steps.
1. Move the extender closer to your router, and click Rescan in the top-right corner of the list.
2. You can manually enter the SSID (network name) and password of the network you want to extend, and
click Save.
4. Once a host network is selected, the SSID and security type will be automatically
filled in. If the selected network is encrypted, enter the password in the Password
field.
5. Click Save.
To change the wireless network name (SSID):
1. Go to Settings > Wireless > Extended Network.
15
Chapter 3 Customize Your Network
2. Create a new SSID in Extended 2.4GHz SSID or click Copy Host SSID. The value is
case-sensitive.
3. Click Save.
Note:
If you have changed the wireless settings via a wireless device, you will be disconnected after the settings
are applied. Please write down the new SSID for future use.
To hide the SSID of the extended network:
1. Go to Settings > Wireless > Extended Network.
2. Select Hide SSID broadcast, and the corresponding SSID will not be displayed when
wireless devices scan for local wireless networks. Devices must join the network
manually in order to connect.
3. Click Save.
3. 3. Change LAN Settings
The extender is preset with a default LAN IP 192.168.0.254, with which you can log in to
the web management page. The LAN IP address, together with the Subnet Mask, also
defines the subnet that the connected devices are on. If the IP address conflicts with
another device on your local network or your network requires a specific IP subnet, you
can change it.
1. Visit http://tplinkrepeater.net, and log in with the password you set for the extender.
2. Go to Settings > Network.
3. Select Use the following IP address.
16
Chapter 3 Customize Your Network
4. Enter a new IP Address as needed, and leave the subnet mask as the default settings.
5. Enter the gateway that is in the same subnet as the IP Address. The gateway is usually
the LAN IP address of your extender.
6. Leave the primary and secondary DNS addresses as the default settings.
7. Click Save.
3. 4. Adjust Wi-Fi Coverage
You can set the extender’s Wi-Fi coverage depending on how large you want your Wi-Fi
area to be.
1. Visit http://tplinkrepeater.net and log in with the password you set for the extender.
2. Go to Settings > Advanced Settings > Wi-Fi Coverage.
3. Select Min, Mid or Max to adjust your Wi-Fi coverage of the extender.
17
Chapter 3 Customize Your Network
4. Click Save.
3. 5. Set Access Control
Access Control allows you to permit or block specific devices from accessing internet
for a specific period.
1. Visit http://tplinkrepeater.net and log in with the password you set for the extender.
2. Go to Settings > Advanced Settings > Access Control.
3. Enable Access Control.
To block specific device(s):
Note:
Devices connected to the extender via an Ethernet cable cannot be blocked.
1. Select Blacklist and click Save.
2. Select the device to be blocked in the Online Devices table by ticking the
corresponding checkbox.
3. Click Block and the selected device(s) will be added to the Devices in Blacklist table.
4. Click in the Devices in Blacklist table to set the Effective Time for a certain entry
as needed.
18
Chapter 3 Customize Your Network
5. Click OK.
To permit specific device(s):
1. Select Whitelist and click Save.
2. Click Add in the Devices in Whitelist table. Enter the Device Name and MAC Address.
And you can set the Effective Time for a certain entry as needed.
3. Click OK.
  • Page 1 1
  • Page 2 2
  • Page 3 3
  • Page 4 4
  • Page 5 5
  • Page 6 6
  • Page 7 7
  • Page 8 8
  • Page 9 9
  • Page 10 10
  • Page 11 11
  • Page 12 12
  • Page 13 13
  • Page 14 14
  • Page 15 15
  • Page 16 16
  • Page 17 17
  • Page 18 18
  • Page 19 19
  • Page 20 20
  • Page 21 21
  • Page 22 22
  • Page 23 23
  • Page 24 24
  • Page 25 25
  • Page 26 26
  • Page 27 27
  • Page 28 28
  • Page 29 29
  • Page 30 30
  • Page 31 31
  • Page 32 32
  • Page 33 33
  • Page 34 34
  • Page 35 35
  • Page 36 36
  • Page 37 37
  • Page 38 38

TP-LINK TL-WA855RE User manual

Type
User manual

TP-LINK TL-WA855RE is a 300Mbps Wi-Fi range extender designed to eliminate Wi-Fi dead zones and boost your wireless coverage. With its easy setup, you can instantly connect it to a router by pressing the router’s WPS button followed by the extender’s RE/WPS button. Alternatively, you can use the TP-Link Tether app for simple and intuitive management. The extender features an intelligent signal light that helps you find the best location for optimal coverage. It also has an Ethernet port to connect Ethernet-only devices like game consoles or smart TVs to your Wi-Fi network.

Ask a question and I''ll find the answer in the document

Finding information in a document is now easier with AI