Your television stations are now stored in your television’s memory.
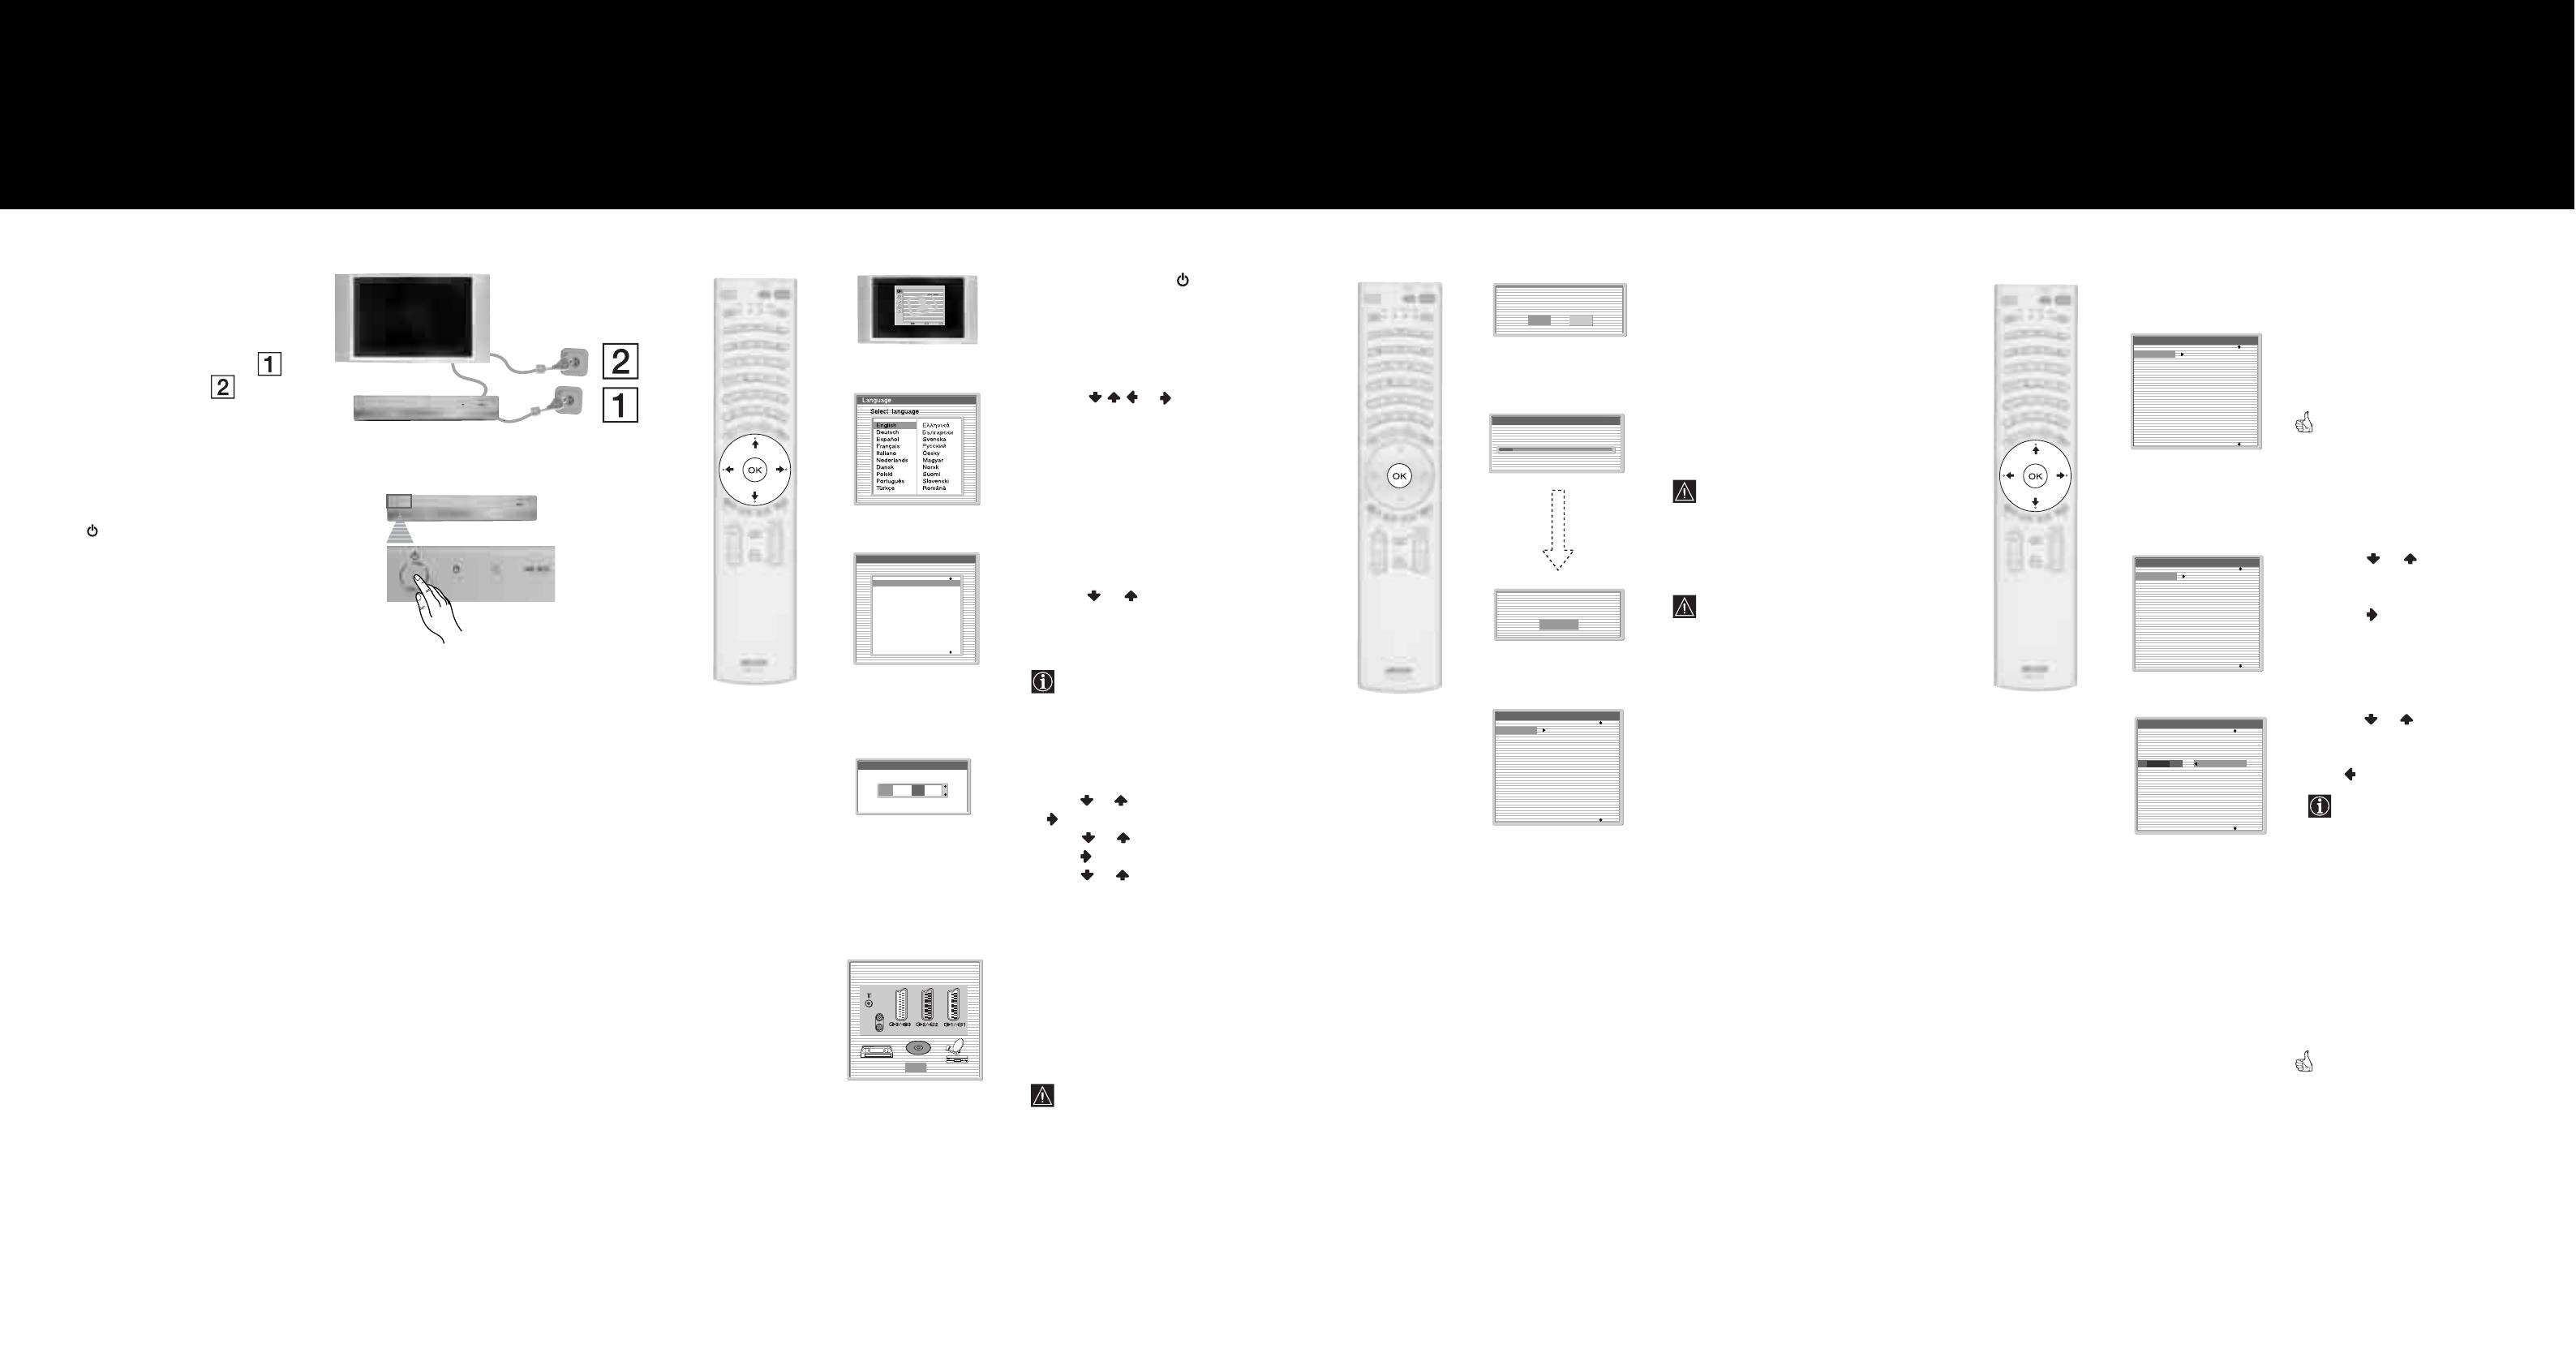
1 It is important that you connect the Media
Receiver Unit and the Display Unit to the
mains socket (220-240V AC, 50/60Hz) in
the following order:
First:
Media Receiver Unit
Second:
Display Unit
2 The first time that the TV set is connected, it
is usually turned on. If the TV is off, press
the Power switch on the media receiver
unit to turn on the TV.
The first time you press the Power switch,
a Language menu displays automatically on
the TV screen.
1 Press the // or button on the
remote control to select the language, then
press the OK button to confirm your
selection.
From now on all the menus will appear in
the selected language.
2 The Country menu appears automatically
on the TV screen.
Press the or button to select the
country in which you will operate the TV
set, then press the OK button to confirm
your selection.
• If the country in which you want to
use the TVset does not appear in the
list, select “off” instead of a country.
3 The Clock Set menu appears on the TV
screen.
a) Press or to set the hour, then press
.
b) Press or to set the minutes, then
press .
c) Press or to set the day of a week,
then press OK at the time signal.
The clock starts.
A diagram showing you how to connect
equipment to your TV set appears on the
TV screen. Follow the instructions and
finally press the OK button to remove the
picture and continue the automatic tuning
process.
The connection diagram should be
used as a guide only as most
equipment can be connected to more
than one type of TV socket. Once the
TV has completed the automatic
tuning process, refer to the
‘Connection Guide’ section on page
27 of the instruction manual for
further information on getting the
best set up for your equipment.
m
m
m
Country
Select country
Off
Ireland
Nederland
België/Belgique
Luxembourg
France
Italia
Schweiz/Suisse/Svizzera
Clock Set
0 0 : 0 0 : 0 0 Mon
OK
Please connect your equipment
according to this chart
DVD
Picture Adjustment
Select: Enter:
OK
Exit:
MENU
Picture Mode: Live
Contrast:
Reset:
Noise Reduction: Auto
Colour Tone: Normal
Film Mode: Auto
m
1 Press the OK button on the remote control
to select Yes.
2 The TV starts to automatically search and
store all available broadcast channels for
you.
This procedure could take some
minutes.
Please be patient and do not press
any buttons while the auto tuning is
in progress, otherwise the auto tuning
will not be completed.
If no channels were found during the
auto tuning process then a new menu
appears automatically on the screen
asking you to connect the aerial.
Please connect the aerial (refer to the
step 4) and press OK. The auto
tuning process will start again.
When the auto tuning is finished, the
Programme Sorting menu appears on the
screen.
m
m
Do you want to start
automatic tuning?
Yes No
Auto Tuning
Programmes found: 4
No channel found.
Please connect aerial
Confirm
Programme Sorting
01
02
03
04
05
06
07
08
TVE
TVE2
TV3
C33
C27
C58
S02
S06
Automatically Tune the
TV
You need to tune the TV to receive channels (TV Broadcast). By
following the instructions below, this set automatically searches
and stores all available channels for you.
65
Selecting the language of the menu
screens, the country and setting
the current time
This TV set works with menu screens. By following the
instructions below, you can select the desired language
of the menu screens, the country in which you wish to
operate the TV set and set the current time.
Switching on the set
7
Changing the Programme Order
of the broadcast channels
By following the instrutions below, you can rearrange the
order in which the broadcast channels appear on the screen.
8
a) If you wish to keep the broadcast
channels in the tuned order:
Press the MENU button on the remote
control to exit and return to the normal TV
screen.
Your set is now ready for use.
b) If you wish to store the broadcast
channels in a different order:
1 Press the or button to select the
programme number with the channel (TV
Broadcast) you wish to rearrange, then
press the button.
2 Press the or button to select the new
programme number position for your
selected channel (TV Broadcast), then
press .
The selected broadcast channel now
moves to its new programme position
and the other broadcast channels
move accordingly.
3 Repeat steps 1) and 2) if you wish to
change the order of the other channels.
4 Press the MENU button on the remote
control to exit and return to the normal TV
screen.
The TV set is now ready for use.
Programme Sorting
01
02
03
04
05
06
07
08
TVE
TVE2
TV3
C33
C27
C58
S02
S06
m
Programme Sorting
01
02
03
04
05
06
07
08
TVE
TVE2
TV3
C33
C27
C58
S02
S06
Programme Sorting
01 TVE
01
02
03
04
05
06
07
08
TVE
TVE2
TV3
C33
C27
C58
S02
S06

