Page is loading ...

Owners Manual
GS10, GS20 & GS60

Page
Introduction 1
Safety Instructions 2
Gold GS10 3
Gold GS20 4
Gold GS60 5
Plinth Fixing (GS20, GS60 only) 6
Spike Foot Fixing 7
Levelling Your loudspeakers 8
Connecting Your Loudspeakers 9/10
Guarantee and Service 11
Data Protection 12
Owner Information 13
Warranty Card – Fold out section in back cover
Contents
© Monitor Audio Ltd 2005
V1

Introduction
Thank you for purchasing Monitor Audio Gold Signature loudspeakers.
The new Gold Signature series has been designed with improvements in every area,
building on the strength and ethos of the original award winning Gold Reference.
Although there are some visual similarities, major improvements have been made
in the construction and quality of materials used with a ‘no expense spared’
approach. All metal parts are made from die-cast alloys and in the case of the
driver chassis and chassis clamp system, a combination of cast aluminium and Zinc are
used alternately to provide a structure that has different resonance properties, thus
providing a high degree of resonance cancellation and damping. The cabinet is more
rigid with traditional tongue and groove construction and better internal bracing. New
die-cast alloy terminal panels are now located low down on the GS20 and GS60 to
provide neat access and avoid unsightly trailing cables. The plinth is also now made
from a rigid cast alloy with a discreet aerofoil profile. New alloy composite feet and
spikes round off this highly accomplished package.
The new RST
®
2 cone profile has been refined to provide better control of break up.
A new C-CAM
®
gold dome tweeter has been developed to propel high frequency
performance to beyond 40KHz. Extensive development has also resulted in another
unique feature; the HiVe2 port design. This new port technology uses a straight rifled
construction to aid air flow and reduce turbulence.
Your Gold GS loudspeakers come complete with grilles, port bungs (all products),
plinths, spikes, and tool box (GS20 and GS60 only). The tool box contains; hex keys
for adjusting the spikes and attaching the plinth, a cleaning cloth, and the spikes for
the spike assembly.
The GS10 is a rear ported cabinet design. Because of this design, we recommend
that when fixing the loudspeakers to a wall the port bungs are used. This may also
apply when any of the ported loudspeakers are positioned very close to a rear/side
wall.
The GS20 and GS60 are both designed with two port tubes (per loudspeaker). One is
on the front of the cabinet; the other is on the rear. These ports should not need to be
blocked if you are using your loudspeaker in a room greater than about 9m
2
. However,
if you cannot implement the ‘ideal’ speaker positioning, then experiment using the
port bungs. First start by fitting them in the rear port, then the front, and then both to
see which configuration is best suited to your personal tastes and room constraints.
The port bungs are another way of fine-tuning the loudspeaker to fit in sonically with
your home environment.
WARNING: Care must be taken not to insert the port bungs too far into the
port as this may result in the foam bung being lost inside the cabinet.
1.
© Monitor Audio Ltd 2005
V1

Please retain this manual for future reference. Safety Instructions
1. Read Instructions
Please read and follow all of the instructions in this manual before enjoying
your loudspeakers.
Any instructions preceded by this warning triangle MUST be followed.
Failure to do so may cause personal injury or damage to the speakers
2. Water & Moisture
The loudspeakers should not be used near water - for example, bathtub,
washbowl, kitchen sink, washing machine, in a wet basement or near a
swimming pool. Under no circumstance should plants or fish bowls be placed
on the products.
3. Heat
The speaker/s should not be placed near any heat source such as radiators,
open fires, stoves, direct sunlight and any other appliance that produces heat.
These speakers are designed for use within the home environment.
Exposure to extreme temperatures & humidity when placed on patios or open
conditions could adversely affect the wooden cabinet.
4. Cleaning
Great care and attention has gone into the materials chosen to
produce the Gold GS loudspeakers. It is our intention that they should provide
a lifetime of musical pleasure. A gentle wipe with a dry, clean cloth is all that is
required to remove any dust. On high lacquer finishes please ensure the duster
is free of any foreign objects to avoid scratching the surface. Treat them as you
would a fine piece of furniture because that is how they have been designed.
Avoid touching the loudspeaker’s drive units whilst cleaning, as any damage
will impair their performance.
5. Re-cycling
When it is time to replace this product please help us protect the environment
by disposing of it in an appropriate and responsible manner. Further details
are available from www.monitoraudio.co.uk
6. Natural wood veneers
Monitor Audio takes great pride in providing a high quality product.
We use only hand selected natural wood veneers, which are
carefully matched and hand finished to the highest standard possible.
The unique nature of each veneer may result in natural colour variation
and grain from samples you may have seen in photos or at the dealer’s
show room. This is what makes the product a special piece of furniture.
If your speaker is finished in a Cherry veneer please be aware that it will
naturally darken with age, more so than other types of wood veneer.
© Monitor Audio Ltd 2005
V1
2.

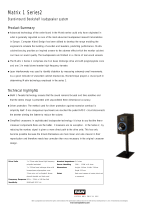
Your Gold GS10
With its advanced, low-resonance drivers, rigid build and contoured cabinet
edges, GS10 redefines accurate, low-colouration sound in a compact, stylish
stand-mount speaker. Using the new, low distortion 6-inch RST
®
2 bass-mid driver
and gold C-CAM
®
tweeter developed specially for the GS series, the GS10 is capable
of true 3-D imaging and tonal accuracy to rival the best reference studio monitors.
Frequency
Response
Sensitivity
(1W@1m)
Nominal
Impedance
(ohms)
Power
Handling
(W) RMS
Recommended
Amplifier
power output.
(W) RMS
40Hz –
43kHz
88dB 100 40 – 100
Drive Unit
Complement
External
Dimensions -
Excluding plinth
H x W x D
mm (inch)
Weight Kg (lb)
1 x 6” RST
®
2
Bass/
mid-range.
1 x 25mm Gold
Dome
C-CAM
®
tweeter.
360 x 206
x 270
(14 3/16 x
8 1/8
x 11)
8.5 / (18.7)
8
Maximum
SPL (Per pair in
room). dBA
108
External
Dimensions -
Including plinth
mm (inch)
N/A
Bass
Crossover
Frequency
Hz
N/A
Bass
Alignment
Rear ported,
bass reflex
Tweeter
crossover
frequency
KHz
2.7
Tweeter
crossover
frequency
KHz
To remove the grilles, carefully prize it away from the cabinet using your fingers. The grille
locates in the elongated holes around the outside of the driver chassis clamp plate.
To replace it, line the peg fixings (in the grille) up with the elongated holes and gently
press into place.
3.
© Monitor Audio Ltd 2005
V1

Your Gold GS20
Over its nearest rivals the GS20, pulls decisively ahead in performance,
value, good looks and shear desirability. Its two and a half way, three-driver
configuration is built around unique dual-cavity cabinet design: 6-inch RST
®
2 bass
and mid-bass drivers work into separate enclosures, tuned to differential frequency
points and different impedances to increase power handling and virtually eliminate
distortion. The gold C-CAM
®
tweeter ensures a smooth, detailed response all the way
up to 40 KHz and beyond, exploiting the full potential of the latest wide-bandwidth
digital formats.
To remove the grilles, carefully prize it away from the cabinet using your fingers. The grille
locates in the elongated holes around the outside of the driver chassis clamp plate.
To replace it, line the peg fixings (in the grille) up with the elongated holes and gently
press into place.
Frequency
Response
Sensitivity
(1W@1m)
Nominal
Impedance
(ohms)
Power
Handling
(W) RMS
Recommended
Amplifier
power output.
(W) RMS
32Hz –
43KHz
89dB 150 40 – 150
Drive Unit
Complement
External
Dimensions -
Excluding plinth
H x W x D
mm (inch)
Weight Kg (lb)
1 x 6” RST
®
2
Bass driver
1 x 6”RST
®
2 bass
/mid driver 1x
Gold Dome
C-CAM
®
tweeter.
924 x 206
x 280
(36 3/8 x
8 1/8
x 11)
20.6 / (45.3)
6
Maximum
SPL (Per pair in
room). dBA
111
External
Dimensions -
Including plinth
H x W x D
mm (inch)
Bass
Crossover
Frequency
Hz
100
Bass
Alignment
Dual Chamber
Bass Reflex
with Diffrential
Tuning (HiVe2
Technology)
Tweeter
crossover
frequency
KHz
2.7
934 x 322
x 363 D
(36 3/4 x
12 11/16 x
14 5/16 )
4.
© Monitor Audio Ltd 2005
V1

Your Gold GS60
The elegantly proportioned, three-way GS60 currently represents the state of
Monitor Audio’s art. Its performance really is “as close as it gets” to the master recording.
Developing the discrete cavity technology of the GS20, the four-driver GS60
recreates the deep bass and authentic scale of a performance, bringing lifelike power,
dynamics and realism to music and film. Yet its tall, slender appearance is anything but
overpowering. Like all models in the Gold Signature range, the flagship GS60 is a
monument to the cabinet-maker’s art: immaculate real wood or piano gloss
finishes are blended with modern industrial design and superb attention to detail.
To remove the grilles, carefully prize it away from the cabinet using your fingers. The grille
locates in the elongated holes around the outside of the driver chassis clamp plate.
To replace it, line the peg fixings (in the grille) up with the elongated holes and gently
press into place.
Frequency
Response
Sensitivity
(1W@1m)
Nominal
Impedance
(ohms)
Power
Handling
RMS (W)
Recommended
Amplifier
power output.
(W) RMS
28Hz –
43KHz
90dB 200 60 – 200
Drive Unit
Complement
External
Dimensions -
Excluding plinth
H x W x D
mm (inch)
Weight kg (lb)
2 x 6” RST
®
2
Bass driver
1 x 6”RST
®
2 bass
/mid driver 1x
Gold Dome
C-CAM
®
tweeter.
1060 x 206
x 330
(41 3/4 x
8 1/8
x 11)
27.1 / (59.7)
6
Maximum
SPL (Per pair in
room). dBA
112.5
External
Dimensions -
Including plinth
H x W x D
mm (inch)
Bass
Crossover
Frequency
Hz
200
Bass
Alignment
Sealed Mid-
Range
Enclosure.
Dual Chamber
with Diffrential
Tuning (HiVe2
Technology)
Tweeter
crossover
frequency
kHz
2.7
1070 x 322
x 403
(42 1/8 x
12 11/16 x
15 7/8)
5.
© Monitor Audio Ltd 2005
V1

Plinth Fixing.
(
GS20 & 60 only)
With the cabinet upside-down (it will be this way straight out of the box), carefully
place the plinth on the cabinet. The plinth is clearly marked with directions as to the
orentation of the plinth - please see the illustration below.
The ‘Monitor Audio’ text should be at the back of the plinth. The ‘M’ logo at the front.
Use the bolts and hex key provided in the tool box to secure the plinth in place.
Please refer to page 7 for spike fixing.
6.
© Monitor Audio Ltd 2005
V1

Spiked Foot Fixing
(Gold GS20, GS60 only)
The composite Gold GS spiked foot incorporates a spike for use on carpeted floors and
also, a soft polymer pad for use on wooden or tiled floors. The foot assembly is found
in the packing end cap, and the spike in the Monitor Audio Tool Box. Fig. 1. For more
technical information regarding the acoustic benefits of the spikes please go to:
www.monitoraudio.co.uk/gettingthebestfromyourspeakers
Please ensure there are no hidden wires under the carpet that could be
damaged by the spikes.
The foot assemblies come ready for use on solid floors or where spikes are
inappropriate. With the cabinet upside-down, rotate the spikes clockwise into the
outer most holes until they reach a stop. Fig. 2.
If you are using your loudspeakers where you can use spikes, follow the instructions
above and then take the spikes out of you Monitor Audio Tool Box, and screw them into
the threaded hole in the centre of the foot assembly. Fig. 3.
Fig. 1.
Fig. 2.
Fig. 3.
7.
© Monitor Audio Ltd 2005
V1

Levelling your Loudspeakers
Carefully turn your loudspeakers over and position them in your desired locations.
Take the nylon washer and large locking nut (found in the packing end cap) (Fig. 4) and
place the washer over the threaded body of the foot assembly, followed by the locking
nut. Fig. 5. Do not tighten it all the way up just yet.
Place the spirit level (found in the Monitor Audio Tool Box) on top of your loudspeaker
to see if it is level. Adjustment (if required) is achieved using the Allen (hex) key to
change the height of the foot assembly until the loudspeakers are level. When you are
satisfied, tighten the locking nut.
Fig. 4.
Fig. 5.
8.
© Monitor Audio Ltd 2005
V1

Connecting Your Gold GS Loudspeakers
You will notice that when you unpack your loudspeakers, there are plastic terminal caps
in the terminals where the speaker cable connectors should go. These can be simply
removed by placing a thin, flat object underneath them and carefully levering them
free.
All of the Gold GS Series loudspeakers (except the GS FX) can be either single or
bi-wired/bi-amped. Monitor Audio always recommends bi-wiring your loudspeakers
for improved sound quality. (see page 10 for further information)
Please see for further information:
www.monitoraudio.co.uk/gettingthebestfromyourspeakers
If you are connecting your speakers in a bi-wire, or bi amp format, please
remove the terminal links. Do this by unscrewing the red and black
terminals slightly and removing the link. Connect the speaker as illustrated
on the opposite page.
You can also bi-amp your loudspeakers. This is carried out in the same way as
bi-wiring except instead of using one amplifier to power all of the drive units/tweeter
in the speaker; you are using one amplifier to drive the treble (tweeter) and the other
amplifier to drive the mid/bass sections. If you are intending to do this, please consult
your local hi-fi dealer for their recommendations for amplifier rating.
9.
© Monitor Audio Ltd 2005
V1

Connecting Your Gold GS Loudspeakers
10.
© Monitor Audio Ltd 2005
V1

Guarantee and Service
Valid upon completion of the incorporated warranty card and its return within 30 days
of purchase.
This equipment has been fully tested prior to dispatch from the factory. Both the
craftsmanship and the performance of this product are guaranteed against
manufacturing defects for the period of three years from the date of purchase
(see conditions below), provided that the product was supplied by an authorised
Monitor Audio retailer under the consumer sale agreement. (The words
‘consumer sale’ shall be construed in accordance with section 15 of the supply of
goods act 1973). Monitor Audio accepts no responsibility for defects arising from
accident, misuse, abuse, wear and tear, modification or operation outside of that
specified within this instruction manual. Neither will responsibility be
accepted for damage or loss occurring during transit to or from the parties
claiming under this guarantee.
This guarantee covers both labour and parts. The liability of Monitor Audio is limited
to the cost of repair or replacement of the defective parts (at the discretion of Monitor
Audio) and under no circumstances extends to consequential losses or damage.
Claims under this Guarantee
The equipment should be returned in its original packaging to the original supplier
where possible, or to any other authorised Monitor Audio dealer. If it is not possible to
return the equipment by hand, then it should be sent carriage prepaid via a reputable
carrier. If the original packing is not available replacement packaging can be purchased
from Monitor Audio. If you have any difficulties complying with these requirements
please contact us at the following address:
Customer Service Tel: 44 (0) 1268 740580
Monitor Audio Ltd. Fax: 44 (0) 1268 740589
Unit 2, 24 Brook Road Internet: www.monitoraudio.co.uk
Rayleigh Email: info@monitoraudio.co.uk
Essex
SS6 7XL
England
This guarantee does not affect the statutory rights of the consumer under UK law.
11.
© Monitor Audio Ltd 2005
V1

Perferated edge
Data Protection
Monitor Audio is committed to respecting the wishes and privacy of its
customers. Any information you provide will be held in the strictest confidence and
only used within the Monitor Audio organisation for the provision of services such as
warranty claims or spare parts.
We may wish to contact you in the future to ensure you are happy with the products and
standards of service we provide and to keep you up-to-date with the latest products
and promotions we have to offer.
Should you wish not to be contacted by us either by post, e-mail or phone, please
tick the box on the warranty card. Alternatively you can request not to be contacted in
future by writing to Customer Service, at the address on the previous page.
Owner Information
Product Details
Model Serial No
Date of Purchase
Dealer Details
Dealer Name
Address
Town, Post code, Country
e-mail address
12.
© Monitor Audio Ltd 2005
V1

Limited Warrenty/Registration Card
To validate your warrenty please fill in this card (using block capitals) where
applicable. Alternatively, you can register online at www.monitoraudio.co.uk
Should you wish not to be contacted by us either by post, e-mail or telephone, please tick
this box.
Personal Details
Title Mr Mrs Ms Other
First Name Last Name
Address
Town State/County
Zip/Post Code Country
Product Details
Model Serial Number
Date Of Purchase Shop where Purchased
Which related magaiznes do you read?
What is the intended use of the speakers? Music Movies Both
Is the purchase - Replacement/additional purchase? Your first purchase
What made you purchase Monitor Audio? Existing Owner Magazine Review
Dealer Recommedation Other please specify
What music do you listen to? Jazz Country Classical Rock/Pop
Your age is? 16- 25 26-35 36-55 55+
Your amp/reciever is?
Your CD/DVD player is?
Moisten here
Moisten here
Moisten here
Email

MONITOR AUDIO
24 BROOK ROAD
RAYEIGH
ESSEX, SS6 7XL
ENGLAND
Affix stamp
here
/