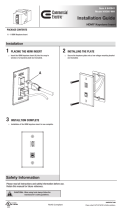
NEC NEC UM383WL User manual

Category
Data projectors
Type
User manual

This manual is also suitable for

Projector
UM383WL
User’s Manual
Please visit our web site for User’s Manual in the latest version:
https://www.nec-display.com/dl/en/pj_manual/lineup.html
Model No.
NP-UM383WL
Ver. 1 11/19
Apple,Mac,MacOS,OSX,MacBook,andiMacaretrademarksofAppleInc.registeredintheU.S.andother
countries.
iOSisatrademarkorregisteredtrademarkofCiscointheU.S.andothercountriesandisusedunderlicense.
APPStoreisaservicemarkofAppleInc.
Microsoft,Windows,WindowsVista,InternetExplorer,.NETFrameworkandPowerPointareeitheraregistered
trademarkortrademarkofMicrosoftCorporationintheUnitedStatesand/orothercountries.
MicroSaverisaregisteredtrademarkofKensingtonComputerProductsGroup,adivisionofACCOBrandsinthe
U.S.andothercountries.
AccuBlend,NaViSet,MultiPresenter,andVirtualRemotearetrademarksorregisteredtrademarksofNECDispolay
Solutions,Ltd.inJapan,intheUnitedStateandothercountries.
ThetermsHDMIandHDMIHigh-Definitio MultimediaInterface,andtheHDMILogoaretrademarksorregistered
trademarksofHDMILicensingAdministrator,Inc.intheUnitedStatesandothercountries.
TrademarkPJLinkisatrademarkappliedfortrademarkrightsinJapan,theUnitedStatesofAmericaandother
countries and areas.
Blu-rayisatrademarkofBlu-rayDiscAssociation.
EthernetiseitheraregisteredtrademarkortrademarkofFujiXeroxCo.,Ltd.
AndroidandGooglePlayaretrademarksofGoogleInc.
Otherproductnamesandlogosmentionedinthisuser’smanualmaybethetrademarksorregisteredtrademarks
of their respective holders.
VirtualRemoteToolusesWinI2C/DDClibrary,©NicomsoftLtd.
GPL/LGPLSoftwareLicenses
TheproductincludessoftwarelicensedunderGNUGeneralPublicLicense(GPL),GNULesserGeneralPublic
License(LGPL),andothers.
Formoreinformationoneachsoftware,see“readme.pdf”inthe“aboutGPL&LGPL”folderonthesuppliedCD-
ROM.
NOTES
(1) Thecontentsofthisuser’smanualmaynotbereprintedinpartorwholewithoutpermission.
(2) Thecontentsofthisuser’smanualaresubjecttochangewithoutnotice.
(3) Greatcarehasbeentakeninthepreparationofthisuser’smanual;however,shouldyounoticeanyquestionable
points,errorsoromissions,pleasecontactus.
(4) Notwithstandingarticle(3),NECwillnotberesponsibleforanyclaimsonlossofprofi orothermattersdeemed
toresultfromusingtheProjector.
i
Important Information
Safety Cautions
Precautions
PleasereadthismanualcarefullybeforeusingyourNECprojectorandkeepthemanualhandyforfuturereference.
CAUTION
Toturnoffmainpower,besuretoremovetheplugfrompoweroutlet.
Thepoweroutletsocketshouldbeinstalledasneartotheequipmentaspossible,andshouldbeeasily
accessible.
CAUTION
TOPREVENTSHOCK,DONOTOPENTHECABINET.
THEREAREHIGH-VOLTAGECOMPONENTSINSIDE.
REFERSERVICINGTOQUALIFIEDSERVICEPERSONNEL.
Thissymbolwarnstheuserthatuninsulatedvoltagewithintheunitmaybesufficien tocauseelectrical
shock.Therefore,itisdangeroustomakeanykindofcontactwithanypartinsideoftheunit.
Thissymbolalertstheuserthatimportantinformationconcerningtheoperationandmaintenanceofthis
unit has been provided.
The information should be read carefully to avoid problems.
WARNING:TOPREVENTFIREORSHOCK,DONOTEXPOSETHISUNITTORAINORMOISTURE.
DONOTUSETHISUNIT’SPLUGWITHANEXTENSIONCORDORINANOUTLETUNLESSALLTHEPRONGS
CANBEFULLYINSERTED.
CAUTION
Avoiddisplayingstationaryimagesforaprolongedperiodoftime.
DoingsocanresultintheseimagesbeingtemporarilysustainedonthesurfaceoftheLCDpanel.
Ifthisshouldhappen,continuetouseyourprojector.Thestaticbackgroundfrompreviousimageswill
disappear.
WARNING TO CALIFORNIA RESIDENTS:
Handlingthecablessuppliedwiththisproductwillexposeyoutolead,achemicalknowntotheStateofCalifornia
tocausebirthdefectsorotherreproductiveharm.WASHHANDSAFTERHANDLING.
FCC In
formation (for USA only)
WARNING
The Federal Communications Commission does not allow any modications or changes to the unit EXCEPT
thosespeciedbyNECDisplaySolutionsofAmerica,Inc.inthismanual.Failuretocomplywiththisgovernment
regulationcouldvoidyourrighttooperatethisequipment.Thisequipmenthasbeentestedandfoundtocomply
withthelimitsforaClassBdigitaldevice,pursuanttoPart15oftheFCCRules.Theselimitsaredesignedto
providereasonableprotectionagainstharmfulinterferenceinaresidentialinstallation.Thisequipmentgenerates,
uses,andcanradiateradiofrequencyenergyand,ifnotinstalledandusedinaccordancewiththeinstructions,
maycauseharmfulinterferencetoradiocommunications.However,thereisnoguaranteethatinterferencewill
not occur in a particular installation.
Ifthisequipmentdoescauseharmfulinterferencetoradioortelevisionreception,whichcanbedeterminedby
turningtheequipmentoffandon,theuserisencouragedtotrytocorrecttheinterferencebyoneormoreofthe
followingmeasures:
Reorientorrelocatethereceivingantenna.
Increasetheseparationbetweentheequipmentandreceiver.
Connecttheequipmentintoanoutletonacircuitdifferentfromthattowhichthereceiverisconnected.
Consultthedealeroranexperiencedradio/TVtechnicianforhelp.
ii
Important Information
Important Safeguards
Thesesafetyinstructionsaretoensurethelonglifeofyourprojectorandtopreventfir andshock.Pleaseread
themcarefullyandheedallwarnings.
Installation
Donotplacetheprojectorinthefollowingconditions:
- onanunstablecart,stand,ortable.
- nearwater,baths,ordamprooms.
- indirectsunlight,nearheaters,orheatradiatingappliances.
- inadusty,smokyorsteamyenvironment.
- onasheetofpaperorcloth,rugsorcarpets.
Ifyouwishtohavetheprojectorinstalledontheceiling:
- Donotattempttoinstalltheprojectoryourself.
- Theprojectormustbeinstalledbyqualifie techniciansinordertoensureproperoperationandreducetherisk
of bodily injury.
- Inaddition,theceilingmustbestrongenoughtosupporttheprojectorandtheinstallationmustbeinaccordance
withanylocalbuildingcodes.
- Please consult your dealer for more information.
Donotinstallandstoretheprojectorinthebelowcircumstances.Failuretodosomaycauseofmalfunction.
- Inpowerfulmagneticfield
- Incorrosivegasenvironment
- Outdoors
WARNING
Donotplaceanyobjects,whichareeasilyaffectedbyheat,infrontoftheprojectionwindow.Doingsocould
leadtotheobjectmeltingfromtheheatthatisemittedfromthelightoutput.
Donotuseaspraycontainingflammable gastogetridofaccumulateddustanddirtonthefilters andthe
projectionwindow.Itmaycauseofre.
Place the projector in a horizontal position
Theprojectorshould not beinstalledinanywayotherthanthedesktop, ceilingmount,and ways described in this
manual, otherwiselightlifecoulddecreasedramatically.
Disposing of your used product
Ifyou wish todispose of used electricaland electronic products,pleasecontactyourlocalauthority
andaskforthecorrectmethodofdisposal.
iii
Important Information
Fire and Shock Precautions
Ensurethatthereissufficien ventilationandthatventsareunobstructedtopreventthebuild-upofheatinside
yourprojector.Allowatleast4inches(10cm)ofspacebetweenyourprojectorandawall.
Donottrytotouchtheexhaustventasitcanbecomeheatedwhiletheprojectoristurnedonandimmediately
after the projector is turned off. Parts of the projector may become temporarily heated if the projector is turned off
withthePOWERbuttonoriftheACpowersupplyisdisconnectedduringnormalprojectoroperation.
Usecautionwhenpickinguptheprojector.
Preventforeignobjectssuchaspaperclipsandbitsofpaperfromfallingintoyourprojector.Donotattemptto
retrieveanyobjectsthatmightfallintoyourprojector.Donotinsertanymetalobjectssuchasawireorscrewdriver
intoyourprojector.Ifsomethingshouldfallintoyourprojector,disconnectitimmediatelyandhavetheobject
removedbyaqualifie servicepersonnel.
Donotplaceanyobjectsontopoftheprojector.
Donottouchthepowerplugduringathunderstorm.Doingsocancauseelectricalshockorfire
Theprojectorisdesignedtooperateonapowersupplyof100-240VAC50/60Hz.Ensurethatyourpowersupply
fit thisrequirementbeforeattemptingtouseyourprojector.
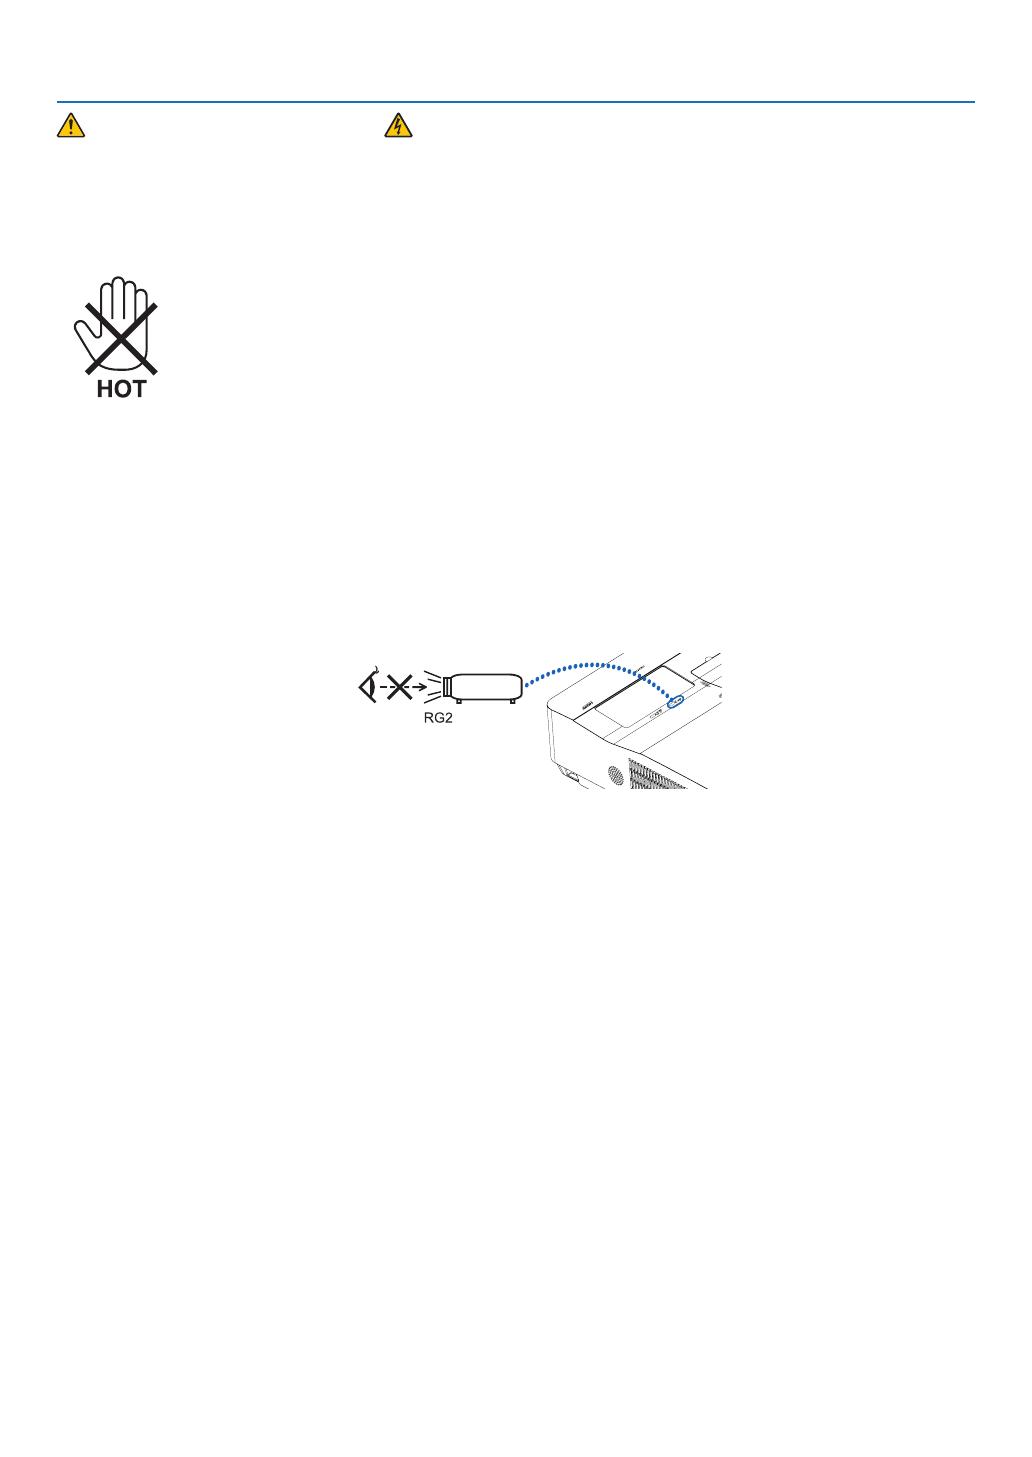
Donotlookthelenswhiletheprojectorison.Seriousdamagetoyoureyescouldresult.Thefollowinglabel,that
isindicatednearthelens-mounting-sectionontheprojectorcabinet,describesthisprojectoriscategorizedinthe
riskgroup2ofIEC62471-5:2015.Aswithanybrightsource,donotstareintothebeam,RG2IEC62471-5:2015.
Keepanyitemssuchasmagnifyingglassoutofthelightpathoftheprojector.Thelightbeingprojectedfromthe
lensisextensive,thereforeanykindofabnormalobjectsthatcanredirectlightcomingoutofthelens,cancause
unpredictableoutcomesuchasreorinjurytotheeyes.
Donotplaceanyobjects,whichareeasilyaffectedbyheat,infrontofaprojectorexhaustvent.
Doingsocouldleadtotheobjectmeltingorgettingyourhandsburnedfromtheheatthatisemittedfromthe
exhaust.
Donotsplashwaterovertheprojector.Doingsocancauseelectricalshockorfire. Iftheprojectorgetswet,turn
offtheprojector,unplugthepowercordandhavetheprojectorservicedbyaqualiedservicepersonnel.
Handlethepowercordcarefully.Adamagedorfrayedpowercordcancauseelectricshockorre.
- Donotuseanypowercordotherthantheonesuppliedwiththeprojector.
- Donotbendortugthepowercordexcessively.
- Donotplacethepowercordundertheprojector,oranyheavyobject.
- Donotcoverthepowercordwithothersoftmaterialssuchasrugs.
- Donotheatthepowercord.
- Donothandlethepowerplugwithwethands.
Turnofftheprojector,unplugthepowercordandhavetheprojectorservicedbyaqualified servicepersonnel
underthefollowingconditions:
- Whenthepowercordorplugisdamagedorfrayed.
- Ifliquidhasbeenspilledintotheprojector,orifithasbeenexposedtorainorwater.
- Iftheprojectordoesnotoperatenormallywhenyoufollowtheinstructionsdescribedinthisuser’smanual.
- Iftheprojectorhasbeendroppedorthecabinethasbeendamaged.
- Iftheprojectorexhibitsadistinctchangeinperformance,indicatinganeedforservice.
Disconnectthepowercordandanyothercablesbeforecarryingtheprojector.
Turnofftheprojectorandunplugthepowercordbeforecleaningthecabinetorreplacingthelight.
Turnofftheprojectorandunplugthepowercordiftheprojectorisnottobeusedforanextendedperiodoftime.
WhenusingaLANcable:
Forsafety,donotconnecttotheterminalforperipheraldevicewiringthatmighthaveexcessivevoltage.
iv
Important Information
CAUTION
Donotusetheadjustabletiltfootforpurposesotherthanoriginallyintended.Misusessuchasgrippingthe
tilt-footorhangingonthewallcancausedamagetotheprojector.
Select[HIGH]inFanmodeifyoucontinuetousetheprojectorforconsecutivedays.(Fromthemenu,select
[SETUP][OPTIONS(1)][FANMODE][HIGH].)
This projector has a "click" sound at power on or during some switching, which is not a malfunction.
Remote Control Precautions
Handletheremotecontrolcarefully.
Iftheremotecontrolgetswet,wipeitdryimmediately.
Avoidexcessiveheatandhumidity.
Donotshort,heat,ortakeapartbatteries.
Donotthrowbatteriesintofire
Ifyouwillnotbeusingtheremotecontrolforalongtime,removethebatteries.
Ensurethatyouhavethebatteries’polarity(+/−)alignedcorrectly.
Donotusenewandoldbatteriestogether,orusedifferenttypesofbatteriestogether.
Disposeofusedbatteriesaccordingtoyourlocalregulations.
About High Altitude mode
Set[FANMODE]to[HIGHALTITUDE]whenusingtheprojectorataltitudesapproximately5500feet/1700meters
orhigher.
Usingtheprojectorataltitudesapproximately5500feet/1700metersorhigherwithoutsettingto[HIGHALTITUDE]
cancausetheprojectortooverheatandtheprotectorcouldshutdown.Ifthishappens,waitacoupleminutes
and turn on the projector.
Usingtheprojectorataltitudesapproximately5500feet/1700metersor
highercanshortenthelifeofoptical
components such as the light.
About Copyright of original projected pictures:
Pleasenotethatusingthisprojectorforthepurposeofcommercialgainortheattractionofpublicattentioninavenue
suchasacoffeeshoporhotelandemployingcompressionorexpansionofthescreenimagewiththefollowing
functionsmayraiseconcernabouttheinfringementofcopyrightswhichareprotectedbycopyrightlaw.
[ASPECTRATIO],[KEYSTONE],Magnifyingfeatureandothersimilarfeatures.
Cable Information
Use shielded cables or cables attached ferrite cores so as not to interfere with radio and television reception.
For details, please refer to "6.2. Making Connections" in this user's manual.
Important Information
Power management function
Theprojectorhaspowermanagementfunctions.Toreducepowerconsumption,thepowermanagementfunctions
(1and2)arefactorypresetasshownbelow.TocontroltheprojectorfromanexternaldeviceviaaLANorserial
cableconnection,usetheon-screenmenutochangethesettingsfor1and2.
1.
STANDBY MODE (Factory preset: NORMAL)
To control the projector from an external device, select [NETWORK STANDBY] for [STANDBY MODE].
NOTE:
• When[NORMAL]isselectedfor[STANDBYMODE],thefollowingterminalsandfunctionswillnotwork:
MONITOROUTterminal,AUDIOOUTterminal,LANfunctions,MailAlertfunction,DDC/CI(VirtualRemoteTool).Pleaserefertopage
7
3aboutdetails.
• When[NETWORKSTANDBY]hasbeensetfor[STANDBYMODE]andtheLANhasbeeninlink-downconditionfor3minutes,[STANDBY
MODE]willtransitinto[NORMAL]automaticallyforthepurposetosavetheconsumptionpower.
2.
AUTO POWER OFF (Factory preset: 1 hour)
To control the projector from an external device, select [OFF] for [AUTO POWER OFF].
NOTE:
• When[1:00]isselectedfor[AUTOPOWEROFF],youcanenabletheprojectortoautomaticallyturnoffin60minutesifthereisnosignal
receivedbyanyinputorifnooperationisperformed.
v
Table of Contents
Important Information ............................................................................................ i
1. Introduction .......................................................................................................... 1
What’sintheBox? ........................................................................................................ 1
IntroductiontotheProjector ......................................................................................... 2
Featuresyou’llenjoy ............................................................................................... 2
About this user’s manual ......................................................................................... 3
Part Names of the Projector .......................................................................................... 4
Front/Top ................................................................................................................. 4
Rear ......................................................................................................................... 5
Controls/IndicatorPanel .......................................................................................... 6
TerminalPanelFeatures .......................................................................................... 7
PartNamesoftheRemoteControl ............................................................................... 8
BatteryInstallation ................................................................................................... 9
RemoteControlPrecautions ................................................................................... 9
OperatingRangeforWirelessRemoteControl ....................................................... 9
2. Projecting an Image (Basic Operation) .............................................. 10
FlowofProjectinganImage ........................................................................................ 10
ConnectingYourComputer/ConnectingthePowerCord .......................................... 11
TurningontheProjector .............................................................................................. 12
NoteonStartupscreen(MenuLanguageSelectscreen) ...................................... 13
SelectingaSource ...................................................................................................... 14
Selectingthecomputerorvideosource ................................................................ 14
AdjustingthePictureSizeandPosition ...................................................................... 15
Adjustingtheverticalpositionofaprojectedimage(Lensshift) ........................... 16
vi
Focus ..................................................................................................................... 18
Zoom ... ..................................................................................................................19
Digital Zoom........................................................................................................... 20
Adjust the Tilt Foot................................................................................................. 21
Correcting Keystone Distortion [KEYSTONE] .............................................................
22
Optimizing Computer Signal Automatically ................................................................
24
Adjusting the Image Using Auto Adjust .................................................................
24
Turning Up or Down Volume .......................................................................................
24
Turning off the Projector .............................................................................................
25
When Moving the Projector ........................................................................................
25
3. Convenient Features .....................................................................................
26
Turning off the Image and Sound ...............................................................................
26
Freezing a Picture........................................................................................................
26
Magnifying a Picture ...................................................................................................
27
Changing Eco Mode/Checking Energy-Saving Effect ...............................................
28
Using Eco Mode [ECO MODE] ..............................................................................
28
Checking Energy-Saving Effect [CARBON METER] ..............................................
29
Using 4-Point Corner to Correct Keystone Distortion [CORNERSTONE] ..................
30
Cornerstone ...........................................................................................................
30
Pincushion .............................................................................................................
32
Table of Contents
[SOURCE(1)] .......................................................................................................... 77
[SOURCE(2)] .......................................................................................................... 78
[WIREDLAN] .......................................................................................................... 78
[VERSION] .............................................................................................................. 79
[OTHERS] ............................................................................................................... 79
ReturningtoFactoryDefault[RESET] ................................................................... 80
6.
Installation and Connections ................................................................... 81
Tablesofscreensizesanddimensions ................................................................. 81
Exampleofinstallationonadesktop ..................................................................... 83
Lensshiftingrange ................................................................................................ 84
vii
Preventing the Unauthorized Use of the Projector [SECURITY] ..................................... 34
Controlling the Projector by Using an HTTP Browser ................................................ 37
4.
Using the Viewer ............................................................................................. 43
What you can do with the Viewer ............................................................................... 43
Projecting images stored in a USB memory device ................................................... 45
5.
Using On-Screen Menu ................................................................................ 51
HDMI1 and HDMI2 ................................................................................................ 56
COMPUTER ........................................................................................................... 56
VIDEO .................................................................................................................... 56
USB-A.................................................................................................................... 56
LAN ........................................................................................................................ 56
Menu Descriptions & Functions [ADJUST] ................................................................. 57
[PICTURE] .............................................................................................................. 57
[IMAGE OPTIONS] ................................................................................................. 60
[AUDIO] .................................................................................................................. 64
[GENERAL]............................................................................................................. 65
[MENU]................................................................................................................... 68
[INSTALLATION] .................................................................................................... 69
[OPTIONS(1)] ......................................................................................................... 71
[OPTIONS(2)] ......................................................................................................... 73
Setting up the Projector for a Wired LAN Connection [WIRED LAN] .................... 76
[USAGE TIME]........................................................................................................ 77
[CONNECTION] ..................................................................................................... 78
Using the Menus ......................................................................................................... 51
Menu Descriptions & Functions [SOURCE] ................................................................ 56
Menu Descriptions & Functions [SETUP] ................................................................... 65
Menu Descriptions & Functions [INFO.] ...................................................................... 77
Setting Up the Screen and the Projector .................................................................... 81
Menu Descriptions & Functions [RESET] .................................................................... 80
Menu Elements ........................................................................................................... 52
List of Menu Items ...................................................................................................... 53
Table of Contents
7.
8.
Featureofeachindicator ....................................................................................... 96
IndicatorMessage(Statusmessage) .................................................................... 96
IndicatorMessage(Errormessage) ....................................................................... 97
ExplanationonthePOWERindicatorandstandbystate ...................................... 98
CommonProblems&Solutions .......................................................................... 100
Ifthereisnopicture,orthepictureisnotdisplayedcorrectly. ........................... 101
viii
Connecting Your Computer ................................................................................... 86
Specification .............................................................................................................
102
Making Connections ................................................................................................... 86
Connecting an External Monitor . ........................................................................... 88
Connecting Your DVD Player or Other AV Equipment .......................................... 89
Connecting Component Input ............................................................................... 90
Connecting HDMI Input ......................................................................................... 91
Connecting to a Wired LAN ................................................................................... 92
Maintenance ..................................................................................................... 93
Cleaning the Filters ..................................................................................................... 93
Cleaning the Projection Window ................................................................................ 95
Cleaning the Cabinet .................................................................................................. 95
Appendix ............................................................................................................. . 96
Troubleshooting ..........................................................................................................
96
Cabinet Dimensions .................................................................................................. 104
Pin Assignments of D-Sub COMPUTER Input Terminal ...........................................105
Compatible Input Signal List ..................................................................................... 106
PC Control Codes and Cable Connection ................................................................ 107
Using the Computer Cable (VGA) to Operate the Projector (Virtual Remote Tool) ... 108
Troubleshooting Check List ...................................................................................... 109
9
EGISTER YOUR PROJECTOR! (for residents in the United States) .......................... 111
1
Projector
1. Introduction
What’s in the Box?
Makesureyourboxcontainseverythinglisted.Ifanypiecesaremissing,contactyourdealer.
Pleasesavetheoriginalboxandpackingmaterialsifyoueverneedtoshipyourprojector.
Power cord
(7N080236/7N080242)
Computer cable (VGA)
(7N520089)
NEC Projector CD-ROM
User’s manual (PDF)
(7N952943)
Important Infomation (7N8R0231)
Remote control
Batteries (AAA × 2)
(7N901053)
Quick Setup Guide (7N8R0241)
For North America only
Limited warranty
2
1. Introduction
Introduction to the Projector
This section introduces you to your new projector and describes the features and controls.
Features you’ll enjoy:
Quickstart(6seconds*
1
),QuickPowerOff,DirectPowerOff
6 seconds*
1
afterturningonthepower,theprojectorisreadytodisplayPCorvideoimages.
Theprojectorcanbeputawayimmediatelyaftertheprojectorispowereddown.Nocooldownperiodisrequired
after the projector is turned off from the remote control or cabinet control panel.
Theprojectorhasafeaturecalled“DirectPowerOff”.Thisfeatureallowstheprojectortobeturnedoff(even
whenprojectinganimage)byusingtheMainPowerSwitchordisconnectingtheACpowersupply.
ToturnofftheACpowersupplywhentheprojectorispoweredon,useapowerstripequippedwithaswitchand
abreaker.
*
1
Thequickstarttimeisonlywhen[STANDBYMODE]issetto[NETWORKSTANDBY]intheon-screenmes-
sage.
0.26W(100-130VAC)/0.39W(200-240VAC)instandbyconditionwithenergysavingtechnology
Selecting[NORMAL]for[STANDBYMODE] from themenucanputthe projectorinpower-savingmodethat
consumesonly0.26W(100-130VAC)/0.39W(200-240VAC).
Carbon
Meter
Thisfeaturewillshowenergy-savingeffectintermsofCO
2
emissionreduction(kg)whentheprojector’s[ECO
MODE]issetto[AUTOECO],[NORMAL],or[ECO].
TheamountofCO
2
emissionreductionwillbedisplayedin
theconfirmation messageatthetimeofpower-off
andintheINFOoftheon-screenmenu.
Widerangeofinputterminals(HDMI× 2)
Theprojectorisequippedwithavarietyofinputterminals:HDMI(×2),Computer(analog),Video. HDMIinput
terminalonthisproductsupportsHDCP.
Compatible with the MultiPresenter application
This projector is compatible with the NEC MultiPresenter application, so multi-screen projection is possible
via the network (wired LAN).
2 ×10Wbuilt-inspeakerforanintegratedaudiosolution
Two powerful10wattstereospeakersare built in.
Max 130", throw distance: 42.9 cm/17 inches
(The throw distance refers to the distance between the screen and the screen side of the projector)
Ultra short focal lenses provide for a larger image using a shorter throw distance when compared to a typi-
cal projector lens.
Ultra short throw distances
Tilt-free
This projector can be set to any angle within a vertical 360° range.
High color gamut
The projector adopts HLD+LED new solid light source and optical components that can improve color reprodu-
cibility. The reproducible color gamut is greatly expanded compared to traditional lamp projectors (when
[ADJUST] - [PICTURE] - [PRESET] is set to [GRAPHIC] ).
HLD+LED new light source with 20,000 hours long life
With a brightness of 3,800 lumens and an ultra long life of up to 20,000 hours, it maintains brightness of the
display throughout the life.
3
1. Introduction
AUTOPOWERONandAUTOPOWEROFFfeatures
TheDIRECTPOWERON,AUTOPOWERON,AUTOPOWEROFF,andOFFTIMERfeatureseliminatetheneed
toalwaysusethePOWERbuttonontheremotecontrolorprojectorcabinet.
Preventing
unauthorizeduseoftheprojector
Enhancedsmartsecuritysettingsforkeywordprotection,cabinetcontrolpanellock,securityslot,andsecurity
chainopeningtohelppreventunauthorizedaccess,adjustmentsandtheftdeterrence.
HighresolutionuptoWUXGA*
2
Highresolutiondisplay-
uptoWUXGAcompatible,WXGAnativeresolution.
Animagewithhigherorlowerresolutionthantheprojector’snativeresolution(1280×800)willbedisplayed
withAdvancedAccuBlend.
*
2
WhenWXGAMODEissettoON.
About this user’s manual
Thefastestwaytogetstartedistotakeyourtimeanddoeverythingrightthersttime.Takeafewminutesnowto
reviewtheuser’smanual.Thismaysaveyoutimelateron.Atthebeginningofeachsectionofthemanualyou’llnd
anoverview.Ifthesectiondoesn’tapply,youcanskipit.
INTELLIGENTCONNECTION
It enables easily to connect your projector tocomputers orsmartphones, onwhich the application software,
MultiPresenter,hasbeeninstalled,byinputtingPINcode.
Convenientutilitysoftware(UserSupportware)
Thisprojectorsupportsourutilitysoftware(NaViSetAdministrator2,VirtualRemoteTool,etc.)NaViSetAdminis-
trator2helpsyoucontroltheprojectorbyacomputerviawiredLANconnection.VirtualRemoteToolhelpsyou
performoperationsbyavirtualremotecontrolsuchasprojector'spoweronoroffandsignalselectionviawired
LANconnection.Moreover,ithasfunctiontosendanimagetotheprojectorandregisteritasthelogodata.
Pleasevisitourwebsitefordownloadingeachsoftware.
URL:https://www.nec-display.com/dl/en/index.html
ThesuppliedremotecontrolallowsyoutoassignaCONTROLIDtotheprojector
Multipleprojectorscanbeoperatedseparatelyandindependentlywiththesamesingleremotecontrolbyas-
signinganIDnumbertoeachprojector.
4
1. Introduction
Part Names of the Projector
Front/Top
Lens (Projection Window)
Exhaust Vent
Heated air is exhausted from here.
Stereo Speaker (10W )
Security chain opening
Attach an anti-theft device.
The security chain opening accepts
security wires or chains up to 0.18
inch/4.6 mm in diameter.
Remote Sensor
(
page 9)
Indicators
(
page 6)
Controls
(
page 6)
Lens shift cover
(
page 16)
Focus Ring
(
page 18)
Zoom Lever
(
page
19
)
5
1. Introduction
Rear
* This security slot supports the MicroSaver
®
Security System.
Rear Foot (
page 21)
Built-in Security Slot ( )*
AC Input
Connect the supplied power
cord’s three-pin plug here, and
plug the other end into an active
wall outlet.(
page 11)
Terminal Panel
(
page 7)
Intake Vent / Filter Cover
(
page
93
)
6
1. Introduction
Controls/Indicator Panel
7
9
11
10
6
8
1
5
1. (POWER)Button
(
page12,
25)
2.
POWER Indicator
(page11,12,25,96)
3.
STATUSIndicator
(page96)
4.
LIGHTIndicator
(page96)
5. ECOButton
(
page28)
6. SOURCE Button
(page14)
7.
AUTOADJ.Button
(
page24)
8.
MENUButton
(
page51)
9.
▲▼◀▶/VolumeButtons / Keystone Buttons
(page22,24,30,51)
10.
ENTER Button
(page51)
11.EXITButton
(page51)
2
3 4
7
1. Introduction
Terminal Panel Features
1.
COMPUTER IN/ Component Input Terminal
(MiniD-Sub15Pin)
( page86,90)
2.
COMPUTERAUDIOINMiniJack(StereoMini)
( page86,87,90)
3.
HDMI1INTerminal(TypeA)
(page86,87,91)
4.
HDMI2INTerminal(TypeA)
( page86,87,91)
5.
SERVICEPort(USBTypeB)
(forservicepurposeonly)
6.
COMPUTEROUTTerminal(MiniD-Sub15Pin)
(page88)
7.
AUDIOOUTMiniJack(StereoMini)
( page88)
8.
VIDEOINTerminal(RCA)
( page89)
9.
AUDIOINL,R(RCA)
(page89)
10.
LANPort(RJ-45)
( page92)
11.
USBPort(TypeA)
For USB memory
( page45)
12.
PCCONTROLPort(D-Sub9Pin)
(page107)
Use this port toconnect aPC or control system.
Thisenablesyoutocontroltheprojectorusingserial
communicationprotocol.Ifyouarewritingyourown
program,typicalPCcontrolcodesareonpage107.
6
1
3 4
5
11
2 7
8 9
10
12
8
1. Introduction
Part Names of the Remote Control
3
4
6
7
1
2
10
13
17
15
14
9
5
8
16
30
31
32
20
21
26
28
29
25
24
23
22
27
33
19
18
12
11
1.
Infrared Transmitter
(page9)
2.
POWERONButton
(page12)
3.
POWERSTANDBYButton
(page25)
4.
SOURCEButton
(page14)
5.
COMPUTER1Button
(page14)
6.
7.
AUTOADJ.Button
(page24)
8.
HDMI1Button
(page14)
9.
HDMI2Button
(page14)
10.
DisplayPortButton
11.
VIDEOButton(page14)
12.
USB-AButton(page14, 45, 47)
13.
USB-BButton (This button does not work on this
series of projectors)
14.
LANButton(page14)
15. IDSETButton
(page70)
16.
NumericKeypadButton/CLEARButton
(page70)
17.
FREEZEButton
(page26)
18.
AV-MUTEButton
(page26)
19. MENUButton
(page51)
20.
EXITButton(page 51)
21.
Button(page51)
22.
ENTERButton(page51)
23.
D-ZOOM(+)(–)Button
(page27)
24.
MOUSEL-CLICKButton (This button does not
work on this series of projectors)
25.
MOUSER-CLICKButton (This button does not
work on this series of projectors)
26.
PAGE/ Button
(page46)
27.
ECOButton(page28)
28.
KEYSTONEButton
(page22, 30)
29.
PICTUREButton
(page57, 59)
30.
VOL.(+)(–)Button
(page24)
31.
ASPECTButton
(page62)
32.
FOCUS/ZOOMButton
(→ page 20)
33. HELPButton
(page77)
COMPUTER2Button (This button does not
work on this series of projectors)
(Thisbuttondoesnotworkinthisseriesofprojectors)
9
1. Introduction
Battery Installation
1. Press firmly and slide the bat-
tery cover off.
2. Install new batteries (AAA).
Ensure that you have the bat-
teries’ polarity (+/−) aligned
correctly.
3. Slip the cover back over the
batteries until it snaps into
place. Do not mix different
types of batteries or new and
old batteries.
OPEN
OPEN
Remote Control Precautions
Handletheremotecontrolcarefully.
Iftheremotecontrolgetswet,wipeitdryimmediately.
Avoidexcessiveheatandhumidity.
Donotshort,heat,ortakeapartbatteries.
Donotthrowbatteriesintofire
Ifyouwillnotbeusingtheremotecontrolforalongtime,removethebatteries.
Ensurethatyouhavethebatteries’polarity(+/−)alignedcorrectly.
Donotusenewandoldbatteriestogether,orusedifferenttypesofbatteriestogether.
Disposeofusedbatteriesaccordingtoyourlocalregulations.
Operating Range for Wireless Remote Control
Theinfraredsignaloperatesbyline-of-sightuptoadistanceofabout22feet/7mandwithina60-degreeangle
of the remote sensor on the projector cabinet.
Theprojectorwillnotrespondifthereareobjectsbetweentheremotecontrolandthesensor,orifstronglight
fallsonthesensor.Weakbatterieswillalsopreventtheremotecontrolfromproperlyoperatingtheprojector.
30°
30°
30°
30°
Remote sensor on
projector cabinet
22 feet/7 m
Remote control
10
This section describes how to turn on the projector and to project a picture onto the screen.
Flow of Projecting an Image
Step 1
Connectingyourcomputer/Connectingthepowercord( page 11)
Step 2
Turningontheprojector( page 12)
Step 3
Selectingasource( page 14)
Step 4
Adjustingthepicturesizeandposition( page 15)
Correctingkeystonedistortion[KEYSTONE](
page 22)
Step 5
Adjusting a picture and sound
- Optimizing a computer signal automatically (
page
24
)
- Turning up or down volume (
page
24
)
Step 6
Makingapresentation
Step 7
Turningofftheprojector( page 25)
Step 8
WhenMovingtheProjector( page 25)
2. Projecting an Image (Basic Operation)
  • Page 1 1
  • Page 2 2
  • Page 3 3
  • Page 4 4
  • Page 5 5
  • Page 6 6
  • Page 7 7
  • Page 8 8
  • Page 9 9
  • Page 10 10
  • Page 11 11
  • Page 12 12
  • Page 13 13
  • Page 14 14
  • Page 15 15
  • Page 16 16
  • Page 17 17
  • Page 18 18
  • Page 19 19
  • Page 20 20
  • Page 21 21
  • Page 22 22
  • Page 23 23
  • Page 24 24
  • Page 25 25
  • Page 26 26
  • Page 27 27
  • Page 28 28
  • Page 29 29
  • Page 30 30
  • Page 31 31
  • Page 32 32
  • Page 33 33
  • Page 34 34
  • Page 35 35
  • Page 36 36
  • Page 37 37
  • Page 38 38
  • Page 39 39
  • Page 40 40
  • Page 41 41
  • Page 42 42
  • Page 43 43
  • Page 44 44
  • Page 45 45
  • Page 46 46
  • Page 47 47
  • Page 48 48
  • Page 49 49
  • Page 50 50
  • Page 51 51
  • Page 52 52
  • Page 53 53
  • Page 54 54
  • Page 55 55
  • Page 56 56
  • Page 57 57
  • Page 58 58
  • Page 59 59
  • Page 60 60
  • Page 61 61
  • Page 62 62
  • Page 63 63
  • Page 64 64
  • Page 65 65
  • Page 66 66
  • Page 67 67
  • Page 68 68
  • Page 69 69
  • Page 70 70
  • Page 71 71
  • Page 72 72
  • Page 73 73
  • Page 74 74
  • Page 75 75
  • Page 76 76
  • Page 77 77
  • Page 78 78
  • Page 79 79
  • Page 80 80
  • Page 81 81
  • Page 82 82
  • Page 83 83
  • Page 84 84
  • Page 85 85
  • Page 86 86
  • Page 87 87
  • Page 88 88
  • Page 89 89
  • Page 90 90
  • Page 91 91
  • Page 92 92
  • Page 93 93
  • Page 94 94
  • Page 95 95
  • Page 96 96
  • Page 97 97
  • Page 98 98
  • Page 99 99
  • Page 100 100
  • Page 101 101
  • Page 102 102
  • Page 103 103
  • Page 104 104
  • Page 105 105
  • Page 106 106
  • Page 107 107
  • Page 108 108
  • Page 109 109
  • Page 110 110
  • Page 111 111
  • Page 112 112
  • Page 113 113
  • Page 114 114
  • Page 115 115
  • Page 116 116
  • Page 117 117
  • Page 118 118
  • Page 119 119
  • Page 120 120
  • Page 121 121
  • Page 122 122

NEC NEC UM383WL User manual

Category
Data projectors
Type
User manual
This manual is also suitable for

Ask a question and I''ll find the answer in the document

Finding information in a document is now easier with AI