Page is loading ...

Gilian 5000 Basic Manual
This manual covers specifications, warnings and basic operation. For compete information,
including detailed operation, options, and other details see the Operation Manual (PN 360-
0103-01). The warnings, safe operation, installation and maintenance instructions in that
manual should be adhered to at all times.
Cautions:
Pump is intrinsically safe for use in areas designated in the attached specifications listed on
page 4. Do not replace or charge batteries in hazardous area. Charge batteries completely
before each use. No special discharge or battery conditioning required. Use only specified
charger, and charge only within specified temperature range.
Operation Guide
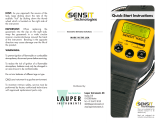
Keypad Operation
Power/Enter: Press momentarily to turn on.
While on, press for five seconds to turn off.
Also used to confirm entries and adjustments.
Set/Cal: Used to select flow rate set (FLO) or
Calibration (CAL)
▲/Clear: Used in set modes to adjust
displayed value upward. Also used to reset
accumulated run data before initiating new
sample when held down for 15 seconds.
▼/Run/Stop: Used in set modes to adjust
displayed value downward. Also used to start
and stop sampling when held down for five
seconds.
Turning Pump power ON and OFF
On: Press Power/Enter key momentarily to
turn power on. Display turns on all
segments and indicators briefly, shows
the software revision, shows the number
of hours since last calibration, then
enters the Ready mode.
Off: While the pump is in Ready mode (not
running), press and hold the
Power/Enter key for several seconds, until the display shows “OFF”. After a few
seconds, the pump will turn power off.
Gas-Detection
Lauper Instruments AG
Irisweg 16B
CH-3280 Murten
Tel. +4126 672 30 50
www.lauper-instruments.ch

Gilian 5000 Air Sampling Pump
360-0104-01 - (Rev F) 2
Setting the Flow Rate:
1 While the pump is in Ready mode, press SET button once. “FLO” is displayed.
2 Press ENTER button to begin setting the flow rate.
3 Press and hold ▲ button to increase flow rate set point or ▼ button to decrease flow
rate set point.
4 When desired flow rate set point is reached press ENTER button. Elapsed Time and
Total Volume will be cleared by this operation.
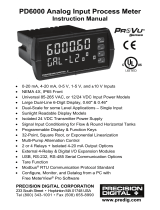
Flow Calibration
Connect the pump to a calibration device such as a Gilibrator as shown in figure below.
1 While the pump is in Ready
mode, press SET/CAL KEY
twice. Display will show “CAL”
2 Press ENTER button to enter
Calibration Mode. “SCAL” is
displayed for 10 seconds,
then, pump motor starts
running. The set flow rate is
displayed.
3 Measure flow rate using
reference meter.
4 Adjust pump display to match
actual flow rate. Press and
hold ▲ button to increase.
Press and hold ▼ button to
decrease.
5 When pump display matches
actual flow rate press SET
button. Pump motor continues
running and adjusts speed to deliver adjusted flow rate. Pump display changes to show
the original flow rate.
6 Continue to measure flow rate. If pump display does not match measured flow rate
within a few cc’s, you may repeat Steps 4 and 5 until display shows the actual flow rate.
When the display matches the actual flow, go to Step 7.
7 Press ENTER button again to complete calibration. The pump stops before returning to
idle
Note on Field Calibration
The above display calibration procedure serves to make internal pump adjustments and
improve the accuracy of the flow display. It does not replace field calibration as described by
OSHA and NIOSH. A flow verification using the Gilibrator and the exact field sampling train
should be conducted before and after each field sample. Procedures for field calibration
may be referenced in the NIOSH Manual of Analytical Methods at www.cdc.gov/niosh or in
the OSHA Technical Manual at www.osha.gov.

Gilian 5000 Air Sampling Pump
3 360-0104-01 - (Rev F)
Starting the Sample Run
NOTE: Total Run Time and Total Volume Sampled are cumulative from one sample run to the next
unless you reset the flow rate, clear the display, or calibrate the display. If you want to clear the
values before starting a sample run, see the section on clearing sample results.
Make sure pump is fully charged, that flow rate has been properly set, and that the pump
has been field calibrated using actual sampling set-up. Make certain all sample tubing and
any sample media have been properly installed.
• Press and hold the “▼/Run/Stop” button until “SCAL” is displayed, then release button.
Pump motor will start 10 seconds later. Note: “SCAL” indicates pump is doing an internal
Self Adjustment. This self adjustment will occur during the course of a sample once per
hour or if the temperature changes by more than 3ºC. The pump is not operating and the
clock does not count the time while the pump is in the SCAL mode.
Stopping the Sample Run
• Press and hold the “▼/Run/Stop” button until pump motor stops.
Clearing Sample Run Data
Press and hold CLEAR button for 8 seconds. The pump will display “CLr”, and the “CLr”
display will flash for a total of 8 seconds.
Maintenance
Battery
The Gilian 5000 pump uses rechargeable Nickel-Metal-Hydride batteries that must be fully
charged and properly maintained for maximum run time. The battery pack has a charge time
under 4 hours. Make certain charger plug is fully inserted into jack on battery pack.
After charging is complete, make certain the rubber jack cover is plugged back into the
charging jack to protect the jack during operation.
Pump Filter
Change internal pump filter when it is dirty or damaged. To access filter, remove two non-
recessed (front and back) panhead screws on filter holder assembly, then lift filter cover.
Inspect o-ring and replace or reuse; ensure it is properly seated when reinstalling.

Gilian 5000 Air Sampling Pump
360-0104-01 - (Rev F) 4
Specifications:
Operating High Flow Range 1000–5000 cc/min
Constant Flow control ................................... < ± 5% of set flow (after calibration);1-5 LPM;
Constant Flow Compensation ....................... 5000cc up to 20” water back pressure (8 hours)
4000cc up to 30” water back pressure (8 hours)
3000cc up to 50” water back pressure (8 hours)
2000cc up to 60” water back pressure (8 hours)
1000cc up to 70” water back pressure (8 hours)
Dimensions ................................................... 3.2” (W) x 5.4” (H) x 2.3” (D)
Weight ........................................................... 19.5 oz.
Battery Pack .................................................. Removable, Sealed, NiMH
Run Time ...................................................... 8 hours at maximum load (4000cc/min @ 30”)
Charge Time ................................................. < 4 hours (Use only Sensidyne PN 298-0013-01)
Intrinsic Safety ..............................................
US/Canada (Hazardous ....................... Class I, Div 1, Groups A, B, C, D
Area Certification) ................................ Class II, Groups E, F, G
Class III, T4
Ta= -20°C to 45°C
FM17US0133
FM17CA0073
Europe .................................................. ATEX II 1 G, Ex ia IIC T4
Ta= -20°C to 45°C
FM 07ATEX0018
IECEx FMG17.0013
EMC EMI/RFI ................................................ EN61326-1:2013
FCC Part B, Class A
IECS-003 Class A
ISO13137:2013 Compliance ......................... Type P
Operating Temperature ................................. 0°C to 45°C (32°F to 113°F)
Storage Temperature .................................... -20°C to 45°C (-4°F to 113°F)
Charging Temperature .................................. 5°C to 40°C (41°F to 104°F)
Operating Humidity ...................................... 0–85 %RH, non-condensing
Storage Humidity ......................................... 0–98 %RH, non-condensing
Service:
Gas-Detection
Lauper Instruments AG
Irisweg 16B
CH-3280 Murten
Tel. +4126 672 30 50
www.lauper-instruments.ch
/