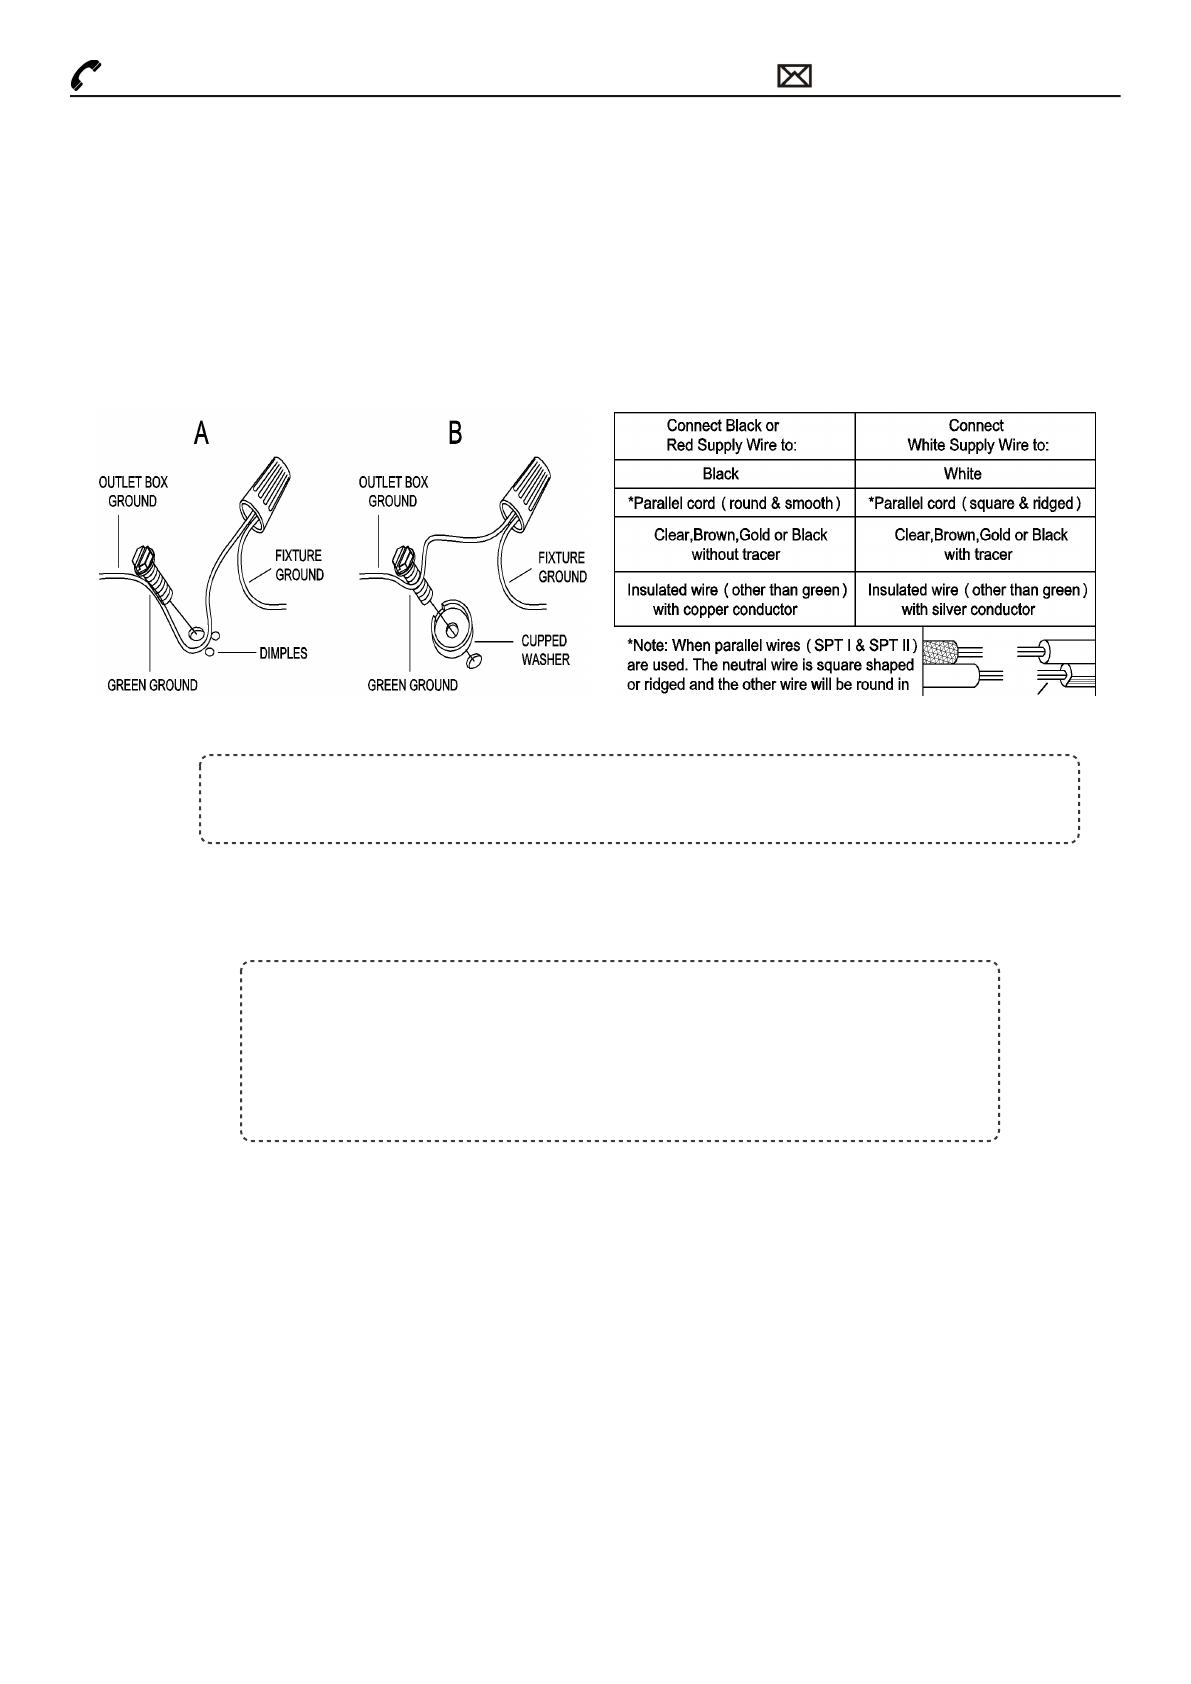
Uolfin A04550 Installation guide

Type
Installation guide

Uolfin A04550 is a stylish and functional light fixture designed to enhance your indoor lighting needs. With its elegant design, this lamp is perfect for adding a touch of sophistication to any room. The A04550 features a glass shade that emits a warm and inviting light, creating a cozy atmosphere in your living space. It is easy to install and comes with all the necessary hardware for a quick and hassle-free setup. The lamp is compatible with a wide range of bulbs, allowing you to customize the brightness and color temperature to suit your preference.

Uolfin A04550 is a stylish and functional light fixture designed to enhance your indoor lighting needs. With its elegant design, this lamp is perfect for adding a touch of sophistication to any room. The A04550 features a glass shade that emits a warm and inviting light, creating a cozy atmosphere in your living space. It is easy to install and comes with all the necessary hardware for a quick and hassle-free setup. The lamp is compatible with a wide range of bulbs, allowing you to customize the brightness and color temperature to suit your preference.

+1 850 296 2377 Working hours : Mon  Fri 9:00 a.m.  16:00 p.m. EST [email protected]
Page:  1  / 3
Item Number: A04550
WARNING (To reduce the risk of fire, electric shock, or personal injury):
1. We suggest installation by a licensed electrician.
2. Please read the instruction carefully and save it as you may need it at a later time.
3. Before you start, NEVER attempt any work without shutting off the electricity until the work is done.
»Go to the main fuse, or circuit breaker, box in your home.
Place the main power switch in the “OFF” position.
»Place the wall switch in the OFF” position.
4. Mounting surface should be clean, dry, flat, strong enough and 1/4” larger than the canopy on all sides.
Any gaps between the mounting surface and canopy exceeding 3/16” should be corrected as required.
5. Make sure that the ceiling or wall can stand the weight of the lamp before installation.
6. Make sure the voltage you are using is 120V. The maximum wattage is 40W per bulb.
7. Keep the lamp away from acidic and alkaline substances in case of damaging the surface of the lamp.
8. When replacing bulbs, you should turn off or unplug the lamp and you must wait until it is cool as bulbs
get hot quickly.
9. The safety instructions appearing in this manual are not meant to cover all possible conditions that may
occur. It must be understood that common sense, caution and care must be used with any electrical
products.
IMAGE FOR FINISHED PRODUCT:
TOOLS REQUIRED (NOT INCLUDED):
Before starting assembly and installation please prepare the needed tools as below picture
Page:  2  / 3
+1 850 296 2377 Working hours : Mon  Fri 9:00 a.m.  16:00 p.m. EST [email protected]
ASSEMBLY & INSTALLATION INSTRUCTIONS:
1. Carefully remove the fixture from the carton and check that all parts and accessories are
included as shown in the above illustration.
2. Turn off power
Before you start the installation, NEVER attempt any work without shutting off the electricity
until the work is done.
PARTS INCLUDING:
(C) Green ground screw (1)
(D) Mounting plate (1)
(E) Back plate (1)
(F) Knob nut (2)
(G) Socket (1)
(H) Glass shade (1)
(I) Socket ring (1)
(J) Tube (1)
ACCESSORIES ENCLOSED:
(A) Mounting screw (2)
(B) Plastic wire connector (3)
3. Make assembly
»Go to the main fuse, or circuit breaker, box in your home.
Place the main power switch in the “OFF” position.
»Place the wall switch in the OFF” position.
Page:  3  / 3
+1 850 296 2377 Working hours : Mon  Fri 9:00 a.m.  16:00 p.m. EST [email protected]
Connect ground wires according to the below chart Connect wires according to the below chart
4. Check everything is installed properly, then you could turn on the light. Enjoy!
Step A1 »
Step A2 »
Step A3 »
Unscrew knob nuts (F) from back plate (E), then set them aside for later installation.
Screw tube (J) onto the bottom of sockets (I).
Carefully pass the supply wires from the outlet box through mounting plate (D).
Secure mounting plate (D) to the outlet box with mounting screws (A).
Make wire connections
Connect wires as below wires connection shown. PLEASE NOTE THAT GROUND WIRE IS
BARE COPPER WIRE, NEVER CONNECT OTHER WIRES TO GROUND WIRES.
Twist wires together with plastic wire connectors until tightly joined, and wrap each
connector with approved electrical tape. Be sure that no wire strands are exposed
and then carefully tuck all wires into the outlet box.
Step A4 » Align the holes in back plate (E) with the preassembled mounting screws, then attach back plate
(E) to mounting plate (D) with the previously removed knob nuts (F). Hand tighten until snug.
NOTE: back plate (E) should be snug against the wall with knob nuts (F).
If not, remove back plate (E), adjust the threaded length of preassembled
mounting screws on mounting plate assembly (D) by unscrewing the pre
assembled hex nuts and then screwing the preassembled mounting
screws in or out of mounting plate (D) until the secure length is achieved.
Tighten the preassembled hex nuts and back to Step A4.
Step A5 » 1) Unscrew socket ring (I) from socket (G).
Carefully place glass shade (H) on socket (G), and secure it with socket ring (I).
2) Install the bulb (Not included) (Please do not exceed the maximum wattage recommended on
the socket.)
ORDERING PARTS
Keep this sheet for future reference in case you need
to order replacement parts. All parts for this fixture can
be ordered from the place of purchase. Be sure to use
exact wording from illustration when ordering parts.
CLEANING
To clean, wipe the fixture with a soft cloth. Clean glass
with a mild cleaner (such as mild and nonabrasive
soap). Do not use abrasive materials such as scouring
pads or powders, steel wool or abrasive paper.
  • Page 1 1
  • Page 2 2
  • Page 3 3

Uolfin A04550 Installation guide

Type
Installation guide

Uolfin A04550 is a stylish and functional light fixture designed to enhance your indoor lighting needs. With its elegant design, this lamp is perfect for adding a touch of sophistication to any room. The A04550 features a glass shade that emits a warm and inviting light, creating a cozy atmosphere in your living space. It is easy to install and comes with all the necessary hardware for a quick and hassle-free setup. The lamp is compatible with a wide range of bulbs, allowing you to customize the brightness and color temperature to suit your preference.

Ask a question and I''ll find the answer in the document

Finding information in a document is now easier with AI