TeachLogic IMA-232 User guide

Type
User guide

TeachLogic IMA-232 is a versatile sound system designed for classrooms, featuring wireless Sapphire™ pendant microphones and handheld microphones for clear audio. It offers multiple input options for connecting external devices like music players, and adjustable volume controls for both microphones and external inputs. The system's ceiling sensor ensures optimal sound quality and reduces feedback. With a battery life of up to 8 hours, the Sapphire™ microphones provide reliable wireless operation.

TeachLogic IMA-232 is a versatile sound system designed for classrooms, featuring wireless Sapphire™ pendant microphones and handheld microphones for clear audio. It offers multiple input options for connecting external devices like music players, and adjustable volume controls for both microphones and external inputs. The system's ceiling sensor ensures optimal sound quality and reduces feedback. With a battery life of up to 8 hours, the Sapphire™ microphones provide reliable wireless operation.

Quick Start Guide 2222
Getting to Know Your Sound System
Make note of the location of the speakers and ceiling sensor in your classroom. Ensure that you have unpacked and charged your battery-powered
microphones. Keep this guide handy for future reference.


1. Power & Status Indicator
Red: OFF
Blue: ON and activated
Amber: STANDBY
2. Mic Channels/Volume Controls
Green light: Microphone on and connected to
channel
No light: Microphone is not on; and/or sensor is not plugged
in; and/or sensor is not receiving mic signal
. Input Volume Controls
Controls volume of connected external
devices
(1)
STEP 2. USING THE SAPPHIRETM PENDANT MICROPHONE
1. Power button and status indicator
Solid Red: OFF
Solid Blue: ON
Solid Purple: External devices quieted
2. Mute microphone: y press power button once (flashing blue).
Unmute microphone: Briefly press power button again (solid blue).
. Aux Input: Connects devices (like music player) to microphone.
. Priority Switch: Changes volume of devices plugged into amp inputs
To increase/decrease volume level: Slide button up or down
To immediately quiet volume level of external device: Push button once
To resume volume level of external device: Push button again
. Gain Switch
There are 3 levels to adjust your microphone volume
You may reduce the volume 
. USB Charge Port (found on the bottom of the mic)
1
2
3
4
. 
 
. 
 
 
 
STEP 1. USING THE 
2
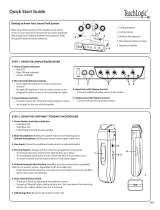
STEP 3. USING THE HANDHELD MICROPHONE
(2)
1. ON/OFF switch
2. Battery Level Indicator
Green: Charged
Red: Low battery
Flashing Red: tteries need replacement
12
STEP 5. CHARGING THE MICROPHONES
Charger Status Indicator
Blue: ON
Red: Battery charging
Green: Charging complete
Ensure your microphone is fully
charged before its initial use.
Charging takes approx 6-8 hrs.
Battery typically lasts 8- hrs.
WHEN REPLACING BATTERIES IN THE
HANDHELD MIC,ALWAYS REPLACE
IN PAIRS. ONLY USE
RECHARGEABLE BATTERIES!
Do not force mics into the cradle. Ensure that both the
charger and Sapphire are aligned in the same direction
facing front as shown.
STEP 4. SETTING UP THE MICROPHONES
Normal -3dB -6dB
3. apphire ic onnect the
lanyard and place
around neck
mic sits your collar
bone. 


4. Turn “ON” the Sapphire
via the front switch; push
and hold 
 econds.
5. On the amp, check to confirm
that the LED next to CH A volume
control is illuminated green,
indicating IR signal is being
received.
1
2
6. 




. While talking, walk around the room to ensure
you have reception without feedback.
. Handheld Mic: Repeat this process using CH B
to set the .
7. Have the other person give you a thumbs up/
down and 

1. amp by p the
power button. The  button 
illuminate blue

2. Set the CH A and CH B volume
controls to the 2 position.
TROUBLESHOOTING
1. System is turned on but there is no LED indicator light
Check if system has been unplugged.
Verify that electrical outlet is generating power.
2. System has power (LED indicator blue) but no sound
Make sure microphone is on.
Ensure the mic signal indicator light is illuminated green.
Ensure ceiling sensor LED is green. If not, the sensor is not receiving
power.
3. Voice is distorted or sound drops
Ensure theres nothing between the mic and ceiling sensor
(mics will not work if placed in pockets, for example).
Battery charge level may be low. Charge and retest.
4.
Hum
is heard w/computer plugged into Comp/Aux input
Locate the COMP ANTI-HUM” switch on the back panel of the amp and
slide to “ON”.
5. Receiver does not “wake up” from standby
Volume of external device too low when played
Microphone not on or not working properly
20220808
  • Page 1 1
  • Page 2 2

TeachLogic IMA-232 User guide

Type
User guide

TeachLogic IMA-232 is a versatile sound system designed for classrooms, featuring wireless Sapphire™ pendant microphones and handheld microphones for clear audio. It offers multiple input options for connecting external devices like music players, and adjustable volume controls for both microphones and external inputs. The system's ceiling sensor ensures optimal sound quality and reduces feedback. With a battery life of up to 8 hours, the Sapphire™ microphones provide reliable wireless operation.

Ask a question and I''ll find the answer in the document

Finding information in a document is now easier with AI