
xTAB-50 GPS
User’s manual

2
TABLE OF CONTENTS
1. Appearance ................................................................................................................. 1
2. Beginning Use ............................................................................................................ 2
2.1 Charge the battery ............................................................................................ 2
2.2 Fix the GPS Navigator with Mounting Kit ...................................................... 2
2.3 Use the storage card ......................................................................................... 2
2.4 Hot plug of storage card ................................................................................... 3
2.5 Memory space .................................................................................................. 3
2.6 Power on/off ..................................................................................................... 3
2.7 Connect to wireless networks .......................................................................... 4
3. Home Screen .............................................................................................................. 5
3.1 Browse Home Screen ....................................................................................... 5
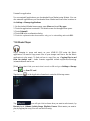
3.2 Launching applictions ...................................................................................... 6
3.3 Status and notifications .................................................................................... 6
3.4 Shortcut Menu .................................................................................................. 8
3.5 Add shortcuts/widgets ...................................................................................... 8
3.6 Finger gestures ................................................................................................. 9
3.7 Coping files to and from the storage card ...................................................... 10
3.8 Searching the device and the web .................................................................. 10
4. Personalizing ............................................................................................................ 12
4.1 Change the Notification ringtone ................................................................... 12
4.2 Change your wallpaper .................................................................................. 12
4.3 Personalize your Home screen with widgets ................................................. 12
4.4 Rearrange or remove widgets and icons on your Home screen ..................... 14
5. Web browsing .......................................................................................................... 15
6 Manage Applications ................................................................................................ 16
7. Applications introduction ......................................................................................... 17
7.1 Calculator ....................................................................................................... 17
7.2 Calendar ......................................................................................................... 17
7.3 Clock .............................................................................................................. 18
7.4 Downloads ..................................................................................................... 19
7.5 File Manager .................................................................................................. 20
7.6 FM Transmitter .............................................................................................. 21
7.7 Gallery............................................................................................................ 22
7.8 Browse & play video ..................................................................................... 24
7.9 Market ............................................................................................................ 26
7.10 Music Player ................................................................................................ 27
7.11 Sound recorder ............................................................................................. 30
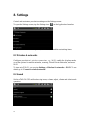
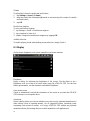
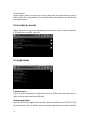
8. Settings ..................................................................................................................... 31
8.1 Wireless & networks ...................................................................................... 31
8.2 Sound ............................................................................................................. 31

3
8.3 Display ........................................................................................................... 32
8.4 Location & security........................................................................................ 33
8.5 Applications ................................................................................................... 33
8.6 Accounts& Sync............................................................................................. 34
8.7 Privacy ........................................................................................................... 35
8.8 Storage ........................................................................................................... 36
8.9 Language & Keyboard setting ....................................................................... 36
8.10 Date & Time ................................................................................................. 37
8.11 About Device ................................................................................................ 37
9. Troubleshooting ....................................................................................................... 38
9.1 Force shutdown .............................................................................................. 38
9.2 Restore default settings .................................................................................. 38
9.3 System updating ............................................................................................. 38
9.4 Reset ............................................................................................................... 38

1
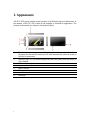
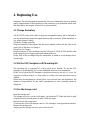
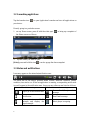
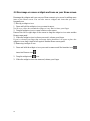
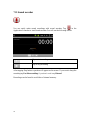
1. Appearance
xTAB-50 GPS series include several products with different physical dimensions. In
this manual, xTAB-50 GPS is taken as the example to illustrate its appearance. The
pictures in the manual are subject to the material object.
1
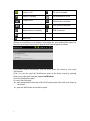
Power button: press to power on/off, wake up from sleep mode or to activate
the status bar (because the status bar will hide automatically when the screen is
left idle for some time)
2
Indicator light: it is red when charging and turns into green when the battery is
fully charged.
3
3.5mm earphone jack
4
T-Flashcard slot
5
Mini USB slot
6
Microphone
7
Speaker
8
Reset key

2
2. Beginning Use
Statement: The software updates sporadically since we continuously devote to product
quality improvements. When operation for the product(s) your purchased differs from
that described in this manual, please follow your product(s).
2.1 Charge the battery
xTAB-50 GPS comes with a built-in polymer rechargeable battery and is designed to
use only manufacture-specified original batteries and accessories. When the battery is
low, please charge it timely.
Charge by Charger (optional)
Plug one terminal of the charger into the power adapter socket, and the other to the
power jack of the device to charge it.
Charge by Car Charger
Plug one terminal of the car charger into the USB port of xTAB-50 GPS and the other
to the charging port to supply power and charge the device.
[Note] Plug in the car charger after the automobile is started to avoid damage due to
current surge.
2.2 Fix the GPS Navigator with Mounting Kit
The mounting kit is composed of a back splint and a bracket. To use the GPS
navigator in an automobile, fix it on the dashboard under the front windshield.
[Note] Do not place the GPS navigator in positions obstructing the driver’s vision. Do
not place it without fixing it, or in the place of air bag or the area after the air bag is
inflated.
When using the mounting kit, please follow local relevant laws and regulations. We
assume no responsibility for any traffic punishments or device damage caused by
illegal use.
2.3 Use the storage card
Insert the storage card
The storage card slot is on the in left panel, just insert the TF Flash card with its gold
contacts facing down and push it in until it licks into place.
Browse files in the storage card
To browser the files in the storage card run “File Manager” from application launcher
Remove the storage card
Simply push the storage card in to eject it from its slot.

3
To avoid data loss or damage, please stop using files/ programs in the storage card
before remove the T-Flash card, and then tap Settings> Storage > Unmount SD card
to remove it safely.
[Note]:
1. Make sure the location and direction of the storage card is correct when
inserting, otherwise it is easy to cause damage/destroy to the storage card.
2. To avoid incompatibility or unrecognized of the storage card, major
brands of storage card are recommended.
2.4 Hot plug of storage card
Please do not hot plug the storage card when using or browsing its files.
For example, when you are running the Music/Video Player/ Gallery, the storage card
may damage if you push out the storage card directly and the running program will
stop automatically to protect the device. As for details of inserting/removing storage
card, see 2.3 Use the storage card.
2.5 Memory space
The device contains 2 memory spaces: local storage & extended storage card. Local
storage appears as “Local” and extended storage card as “SD1”in the device. The
capacity of built-in flash varies from 4GB, 8GB and 16GB because of different model
of the xTAB-50 GPS series. The built-in flash capacity of your device depends on the
model your purchased xTAB-50 GPS series support extended storage card of capacity
maximum 32GB.
2.6 Power on/off
1. Power on: press down the Power Button to turn on the device when the battery is
full enough
2. Power off: press down the Power Button for about 3 seconds and then a menu
with options will popup, select Power Off to turn off the device
3. Stanby: press down the Power Button for about 3 seconds and then a menu with
options will popup, select Stanby and then the device goes to stanby mode. To
turn on from standby mode press Power Button.
4. Screen Lock:press down the Power Button to shutdown the screen to save battery
life. Press down the Power Button again to activate the locked Home Screen. After
unlocking, the device will resume the screen before locking the screen.

4
2.7 Connect to wireless networks
To connect to a wireless network, you should follow:
1. tap Application launcher on the Home screen;
2. tap Settings
3. select Wireless & Networks in the Settings screen;
4. tick in the check box after Wi-Fi to open it;
5. tap Wi-Fi settings to open a screen to set Wi-Fi;
6. the network names and security settings of detected Wi-Fi networks are displayed
in the Wi-Fi networks section;
7. tap a Wi-Fi network to connect. If you selected an open network, you will be
automatically connected to the network. If you selected a network that is secured
enter the key and then tap Connect.
Depending on the network type and its security settings, you may also need to enter
more information or choose a security certificate.
8. after successful connection, the Wi-Fi connected icon will appear on the status
bar.

5
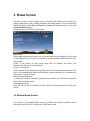
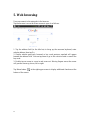
3. Home Screen
The Home screen is your starting point to access all the features on you device. It
displays application icons, widgets, shortcuts, and other features. You can customize
the Home screen with different wallpaper& widgets and display items you want. See
the Personalizing chapter.
When you sign in, the Home screen opens.
Sleep mode
Sleep mode suspends your device to a low power state while the display is off in order
to save battery power. You will still be able to receive messages while the device is in
Sleep mode.
[Note]: If the device in sleep mode more than 30 minutes, the device will
automatically turn off to save electricity.
Switch to sleep mode
Press down the Power Button and tap Sleep Mode in the option menu prompted. The
device will automatically shutdown the display screen when there is no operation on
the screen for a period of time.
Wake up from sleep mode
To wake up your device manually, press the Power Button. You will then see that the
device has locked the screen.
Unlocking the screen
Press the bar on the lock screen and then slide your finger upwards to unlock the
screen.
3.1 Browse Home Screen
You can go to the extended Home screen by sliding your finger horizontally across
the screen to go to the left or right side of the Home screen.

6
3.2 Launching applictions
Tap the launcher icon to open Application Launcher and view all applications on
your device.
Directly going to a particular screen
1. on any Home screen, press & hold the white spot to bring up a snapshot of
the Home screen as follows:
2. tap the screen you want to open
[Note]: press and hold the icon can also popup the above snapshot
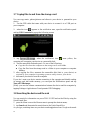
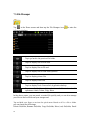
3.3 Status and notifications
Icons may appear on the status bar/notification area:
The status bar (as the above) presents media volume, networks condition, battery
condition, time and so on. When an application is running, corresponding notification
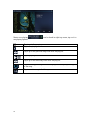
icon will appear in the notification area. Icons you may often see are listed as follows:
Status icons and its meanings
Notification icons its meanings
Tap to go to the Home screen
New Gmail/Google Mail
message
Notification
New Email message
Connected to a Wi-Fi
network and display the
signal strength
Music player is ongoing

7
Battery is full
SD card is mounted
Battery is charging
FM transmitter is in use
Volume down
Silent mode is activated
Volume up
GPS search for satellites
Media scanner is scanning
USB Connected
Back
Menu icon
Open notification panel
When a new notification icon displays in the status bar, press and hold the status bar,
then slide your finger downward to open the Notifications panel as follows:
If you have several notifications, you can scroll down the screen to view more
notifications.
[Tip]: You can also open the Notifications panel on the Home screen by pressing
Menu icon on the panel and then tapping Notifications.
Close the Notifications panel
Do one of the following:
press and hold the bottom bar of the Notifications panel, then slide your finger up
the screen.
press the Back button on the device panel.

8
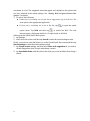
3.4 Shortcut Menu
Press the Menu icon on the Home screen and a shortcut menu will popup as follows.
The shortcut menu includes: Add, Wallpaper, Search, Notification and Settings.
3.5 Add shortcuts/widgets
Shortcuts
To add shortcut(s) to Home screen, you can
1. press the Menu icon to prompt the shortcut menu;
2. tap Add to prompt the Add to Home screen option menu as follows:
3. tap Shortcuts,
4. select a shortcut for an item in an option menu prompted
After the shortcut is added to the Home screen, you can simply tap its icon to run it
quickly.
Widgets
To add widgets to Home screen, you can
1. press the Menu icon to prompt the shortcut menu;
2. tap Add to prompt the Add to Home screen option menu;
3. tap Widgets and the following option menu with addable items will prompt; you
can scroll down the screen to view more addable items

9
4. select one item.
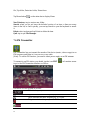
For example, when you select Power Control in the option menu, the widget for it will
appear on the Home screen as follows:
3.6 Finger gestures
Tap: When you want to type using the keyboard, select items onscreen such as
application and settings icons, or press onscreen buttons, simply tap them with your
finger.
Press and hold: To open the available option for an item (e.g. contact or link in a web
page), simply press and hold the item.
Swipe or slide: To swipe or slide means to drag your finger vertically or horizontally
across the screen.
Drag: Press and hold your finger with some pressure before you start to drag. While
dragging, do not release your finger until you have reached the target position.
Rotate: For most screens, you can automatically change the screen orientation from
portrait to landscape by turning xTAB-50 GPS sideways. When entering text, you can
turn xTAB-50 GPS sideways to bring up a bigger keyboard. Refer to Settings chapter
for more details.

10
3.7 Coping files to and from the storage card
You can copy music, photos/pictures and others to your device to personalize your
device.
1. Use the USB cable that came with your device to connect it to a USB port on
your computer.
2. when the icon appears in the notification area, open the notification panel
and tap USB Connected to popup the following screen:
3. tap , when the notification icon turns yellow, the
computer will recognize your device as a removable disk;
4. find the removable disk and open it. Do one of the followings:
Copy the files from the computer to the storage card’s root folder.
Copy the files from the storage card to a folder in your computer or computer
desktop.
5. after copying the files, unmount the removable disk (that is, your device) as
required by your computer’s operating system to safely remove your device.
6. disconnect your device from the computer.
If you don’t want your device remain connecting to the computer and disable reading
its storage card and inside memory, you can open the Notifications panel and tap
Turn off USB storage.
[Note]: you can also release communication between the device and the computer by
tapping Settings> Applications> Development>USB Debugging.
3.8 Searching the device and the web
You can search for information on your xTAB- 50 GPS and on the Web by using the
Quick Search Box.
1. press the Menu icon on the Home screen to prompt the shortcut menu;
2. tap Search and then enter the search item in the Quick Search Box
As you type, matching items on your device and suggestions from Google web search

11
are shown as a list. The suggested items that appear will depend on the options that
you have selected in the search settings. See “Setting Web and Quick Search Box
options” for details.
3. Do one of the following:
If what you’re searching for is in the list of suggestions, tap it in the list. The
item opens in the appropriate application.
If what you’re searching for is not in the list, tap to open the search
option menu. Tap Web and then tap to search the Web. The web
browser opens, displaying results of a Google search on the Web
Setting web and Quick Search Box options
1. tap Settings;
2. scroll down the screen, and then tap Search to enter the search settings screen;
[Note]: you can also press the Menu icon in the Quick Search Box screen and then tap
Search settings to enter the search settings screen.
3. tap Google search settings, and then select Show web suggestions if you want to
include suggestions from Google when doing a search.
4. tap Searchable items, and then select the items you want included when doing a
search.

12
4. Personalizing
4.1 Change the Notification ringtone
Choose from the available selections of notification ringtones on your device. You can
also download or copy notification ringtones or songs to your device' storage card and
choose one to use as your notification ringtone. To find out how you can copy files to
your storage card, see “Coping files to and from the storage card”.
1. In the Home screen, tap Settings > Sound > Notification ringtone.
2. Tap the notification ringtone you want to use. The notification ringtone briefly
plays when selected.
3. Tap OK.
4.2 Change your wallpaper
Personalizing your Home screen wallpaper with your favorite photo is a quick and
easy way to change the feel of your device and give it a fresh look. Browse the
collection of wallpapers included in your device.
To change your Home screen or lock screen wallpaper:
1. on the Home screen press , and then tap Wallpaper.
2. choose source of wallpaper:
You can choose a wallpaper from gallery or wallpaper
3. do one of the following:
Tap Gallery to select a photo/picture that you copied to your storage card.
Crop the photo/picture and then tap Save.
Tap Wallpaper gallery to choose from preset wallpapers and then tap Set
wallpaper.
4.3 Personalize your Home screen with widgets
Widgets put at-a-glance important information and media content up front on your
Home screen. Some widgets are already added to your Home screen for your
convenience. You can add more from the available selections of widgets, or download
more widgets.
① adding a widget to your Home screen
A wide selection of widgets are available for you to choose from, such as Calendar,
Music, Photo Album, and more.
1. go to the part of the Home screen where there’s space to add a new shortcut. To
find out how, see “Browse the Home screen”.

13
2. press and hold on the Home screen to open the Add to Home screen options
menu.
[Note]: You can also press in the Home screen and then tap Add to open the Add
to Home screen options menu.
3. Tap Widgets and then select a widget that you want.
[Note]: To remove a widget, please see Removing a widget or icon for details.
② Adding application icons and other shortcuts on your Home screen
Place application icons on your Home screen to open applications quicker. You can
also add shortcuts to settings and specific information such as a bookmarked webpage,
a music playlist, route directions, and many other items, to your Home screen.
[Note]: the shortcuts available depended on the applications that are installed on your
device.
1. go to the part of the Home screen where there’s space to add a new shortcut. To
find out how, see “Browse the Home screen”.
2. press and hold Home screen to open the Add to Home screen options menu.
[Note]: You can also press in the Home screen and then tap Add to open the Add
to Home screen options menu.
3. to add a shortcut to an applications or Bookmark, tap Shortcuts and then select
the type of information.
[Note]: To add an application icon on the Home screen, you can also press and
then press and hold an application icon. Without lifting your finger, drag the icon to
an empty area on the Home screen, and then release it.
③ Adding folders on your Home screen
Use folders to group related applications and other shortcuts to keep your Home
screen tidy and organized.
1. go to the part of the Home screen where there’s space to add a new shortcut. To
find out how, see “Browse the Home screen”.
2. press and hold Home screen to open the Add to Home screen options menu.
[Note]: You can also press in the Home screen and then tap Add to open the Add
to Home screen options menu.
3. Tap Folder and then tap New folder.
4. Press and hold an application icon or a shortcut that you want to move to the
folder. The device then vibrates. Do not lift your finger.
5. Drag application icon or shortcut and drop it on top of the folder.
Simply tap the folder to open it so you can access the applications and shortcuts inside
the folder.
To rename a folder:
1. Tap the folder to open it.
2. Press and hold the folder window’s title bar.
3. Enter a new folder name and then tap OK.

14
4.4 Rearrange or remove widgets and icons on your Home screen
Rearrange the widgets and icons on your Home screen to give room for adding more
items to the Home screen. You can also remove widgets and icons that you don’t
frequently use.
① Moving a widget or icon
1. Press and hold the widget or icon you want to move.
You’ll see a yellow box around the widget or icon. Don’t release your finger.
2. Drag the widget or icon to a new location on the screen.
Pause at the left or right edge of the screen to drag the widget or icon onto another
Home screen panel.
3. When the widget or icon is where you want it, release your finger.
If you’ve released your finger but a message shows that there’s no space to place the
widget or icon, drag it right or left again to another Home screen panel.
② Removing a widget or icon
1. Press and hold the widget or icon you want to remove until the launcher icon
turns into Remove icon .
2. Drag the widget onto icon.
3. When the widget or icon also turns red, release your finger.

15
5. Web browsing
User can connect to the network via the browser.
Tap the browser icon on the Home screen to open it as follows:
1. Tap the address field (in the title bar) to bring up the onscreen keyboard, enter
website address, then tap Go.
2. Similar website previously browsed or key work previous searched will appear
beneath the address field. You can tap them to go to the web site listed or search the
key word.
3. Double tap on screen to zoom in and zoom out. Moving fingers across the screen
will pan the screen up, down, left or right.
Tap Menu button at the right-upper corner to display additional functions at the
bottom of the screen.

16
6 Manage Applications
You can personalize and enrich your xTAB-50 GPS by installing a wide variety of
free and paid apps ranging from productivity apps, entertainment, to games. When
you find a program you want, you can easily download and install it on your xTAB-50
GPS with just a few steps as follows:
How to install Android third-party programs
1. download the programs you want from web sites and store them into your
storage card or local memory. You can also copy programs downloaded on
your computer into your storage card or local memory;
2. run the application File Manager;
3. find the third-party program you want, and then use functions of File Manager
to install it to your xTAB-50 GPS.
How to uninstall Android third-party programs
To dismount the program, you can do it by tapping Settings > Applications>
Manage applications > Downloaded to uninstall a third-party application.

17
7. Applications introduction
7.1 Calculator
To perform mathematical calculation directly on tablet by tap numbers and symbols.
Tap to show function bar at the bottom of the screen
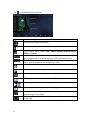
Icon
Action
Clear history of calculation
Show advanced panel
7.2 Calendar
Calendar makes you easy to stay on schedule. You can view your schedule by day,
week, and month.
When using calendar for the first time, there are some steps you shall follow:
1. Tap Calendar icon into Gmail entering interface, then enter your Gmail account and
password and tap Next.
2. Erase “\” icon in front of your Domain\Username.
3. Change the Serve “gmail.com” for “m.google.com”, then tap next step.
Page is loading ...
Page is loading ...
Page is loading ...
Page is loading ...
Page is loading ...
Page is loading ...
Page is loading ...
Page is loading ...
Page is loading ...
Page is loading ...
Page is loading ...
Page is loading ...
Page is loading ...
Page is loading ...
Page is loading ...
Page is loading ...
Page is loading ...
Page is loading ...
Page is loading ...
Page is loading ...
Page is loading ...
-
 1
1
-
 2
2
-
 3
3
-
 4
4
-
 5
5
-
 6
6
-
 7
7
-
 8
8
-
 9
9
-
 10
10
-
 11
11
-
 12
12
-
 13
13
-
 14
14
-
 15
15
-
 16
16
-
 17
17
-
 18
18
-
 19
19
-
 20
20
-
 21
21
-
 22
22
-
 23
23
-
 24
24
-
 25
25
-
 26
26
-
 27
27
-
 28
28
-
 29
29
-
 30
30
-
 31
31
-
 32
32
-
 33
33
-
 34
34
-
 35
35
-
 36
36
-
 37
37
-
 38
38
-
 39
39
-
 40
40
-
 41
41


WayteQ xTAB-50 GPS User manual
- Type
- User manual
- This manual is also suitable for
Ask a question and I''ll find the answer in the document
Finding information in a document is now easier with AI
Related papers
-
WayteQ XTab 7X Owner's manual
-
-
-
-
-
-
-
-
-
Other documents
-
Prestigio PMP-7100D User manual
-
-
-
Prestigio PMP-7280C Duo User manual
-
-
-
-
AOC MW-812 Operating instructions
-
Prestigio MultiPad 2 PRO DUO 8.0 3G User manual
-
Prestigio MultiPad 2 ULTRA DUO 8.0 3G User manual